There are three patterns (so far!) on Moogly that call for you to "braid" loops or chains of crochet, in two different ways. It's a simple technique with a big effect, but it can be hard to describe - after all, "pull a loop through a loop" could be said to be 90% of crochet itself! So here's a video tutorial on making and braiding crochet loops - two ways!
 Disclaimer: This post includes affiliate links.
Braiding Crochet Loops Video Tutorial
As seen in the video (click to purchase your own!)
Furls Fiberarts Hook: US -I, 5.5mm in Cocobolo
Lion Brand Modern Baby in Orange
Purl Soho Worsted Twist in Desert Blue (hat)
Bernat Handicrafter Cotton in Navy and White (bag)
As I showed in the video, there are two ways to work this technique, and two different ways to make the loops that will get braided. I like to use my fingers, but some like to use a hook to help them pull each loop through - you should do whatever works best for you!
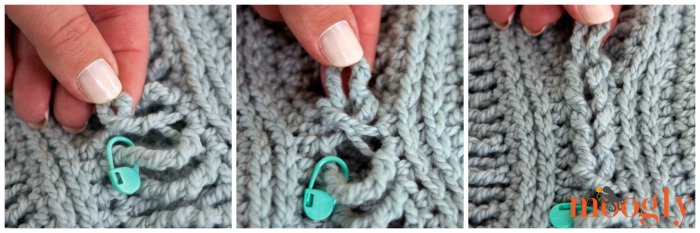
In the Ups and Downs Crochet Slouchy Beanie and matching Fingerless Mitts, the loops that will get braided start life as super tall QuadTr stitches. Then the first loop (which is whatever loop you want it to be!) gets twisted once, and then each following loop is pulled straight through, making a new loop for the loop after that, and then the loop after that, etc until you're done! This tall stitches version is great for creating a horizontal braid!
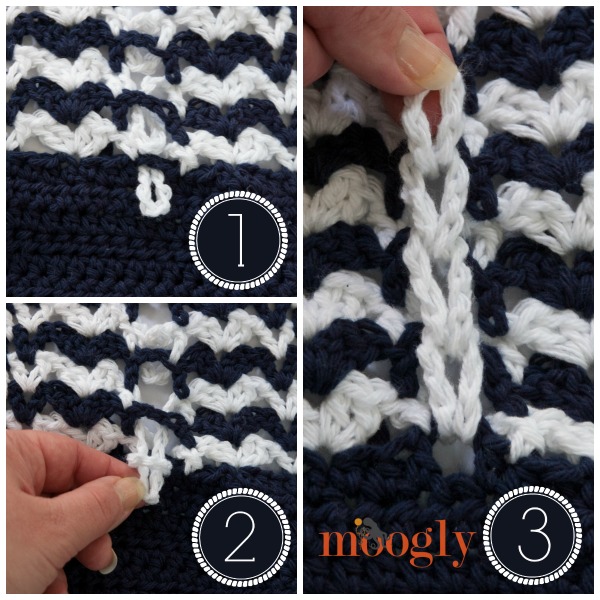
In the Day at the Beach Bag, the loops to be braided start off as lengths of 12 chains, worked between regular stitches. In this pattern, the ch-12 loops are made on odd numbered rows, stacked with ch-2 loops on the even numbered rows. Here, the first ch-12 loop is pulled below the ch-2 loop beneath it, and then each succeeding ch-12 loop is pulled under the ch-2 loop below it, and then pulled through the previous ch-12 loop. This ch st version is great for creating a vertical braid!
Twisting or not twisting gives a slightly different look to the braids - I chose not to twist the loops here (other than the first one in the Ups and Downs set), but other patterns might have you give a little twist to each loop. And some patterns will have you making the braids with loops vertically without the ch-2 rows in between! But generally speaking, this is the idea behind braiding crochet loops. Hopefully this tutorial has demonstrated how to go about braiding crochet stitches in different ways - and why they're all great!

Thanks so much for watching! Be sure to follow Moogly on your favorite social media channels, and sign up for the free weekly newsletter - you'll find links for all of them at the top of the page!

Penny says
I really love the look the braiding adds. Thank you so much for teaching us this technique!
KiDvelociraptor says
I had just realized yesterday how the braided loops look worked; before that, I assumed it would require learning some arduous combination of techniques, so I was surprised (& a little embarrassed) when I suddenly realized how simple it could be! I found this tutorial at just the perfect time; I'm sure I can adapt the idea to knit work, too. Thanks for your serendipitous timing in regards to a crafty stranger!
Tamara Kelly says
😀 Thank you! Yes, it's a lot simpler than it looks lol. That's the fun of it I think!
Marrie says
Thanks Tamara.. It is really fine but my question is "How to conclude it" ??
Tamara Kelly says
That all depends on the pattern! For the hat and fingerless mitts, you slip the last loop over a button. For the bag, you crochet over the last one at the top of the bag. 🙂
Marrie says
Ok! well, can we do this by simply making QUADRUPLES and braid them??
Heidi says
How would you finish it on the ups and downs bootcuffs?
Tamara Kelly says
There's a button that the last loop goes over. 🙂
Annette says
Thx Tamara for sharing the mitts pattern. I made a pair tonight. 😉 would love to show you the colors I used, but I don't see a button for it. Also, I didn't use buttons. I used two pieces of yarn and tied them into a bow to secure the last loops. I think they are really cute.
Tamara Kelly says
Sounds like it Annette - Thank you! Unfortunately I can't host photos in the comments here, but you're welcome to share a photo on the Moogly Facebook page if you are on Facebook! 😀
Marrie says
And, Does braiding affect THE SIZE.. Does it shrinks the project a little??
Tamara Kelly says
It can - on the bag it doesn't, on the hat it definitely does! It just depends on how they're used. 🙂
Shirley says
I know some stitches have more than one name, which can make things confusing sometimes.
Is this what they call Jacob's Ladder now? Or is this something different?
Tamara Kelly says
Hi Shirley! Yes, this is the same technique used in the Jacob's Ladder Afghans. 😀
Karen E. says
Really like the pattern look, but I do not like the buttons. Is there any way to end the loops without using a button?
Tamara Kelly says
Absolutely! 🙂 Just crochet over that last loop at the end, as shown in the bag.
Betty says
I have seen your braiding crochet loop video but I can not find how to end the last row. I am doing it on a blanket so if you could please e mail me back on how to end I would be so thankful. I have looked every where and I can not even find a video showing step by step on how to start and end a blanket but nothing .. Thanks.
Tamara Kelly says
Hi Betty! How you end it depends on the project and pattern. For a blanket, I would crochet a solid row (perhaps the first row of the border?) and crochet the ends of the loops down into it to trap them and finish off the braid. 🙂
Julie Cover says
I saw this technique somewhere on the web. It was a pattern for a cowl and matching hat. I should have bookmarked, but didn't. Now I can't find it again. Can anybody help?
Tamara Kelly says
Hi Julie! I use it for this hat: https://www.mooglyblog.com/ups-and-downs-crochet-slouchy-beanie/
And this cowl: https://www.mooglyblog.com/ups-downs-crochet-cowl/
And these matching mitts: https://www.mooglyblog.com/crochet-fingerless-gloves/
And even boot cuffs: https://www.mooglyblog.com/ups-and-downs-boot-cuffs/