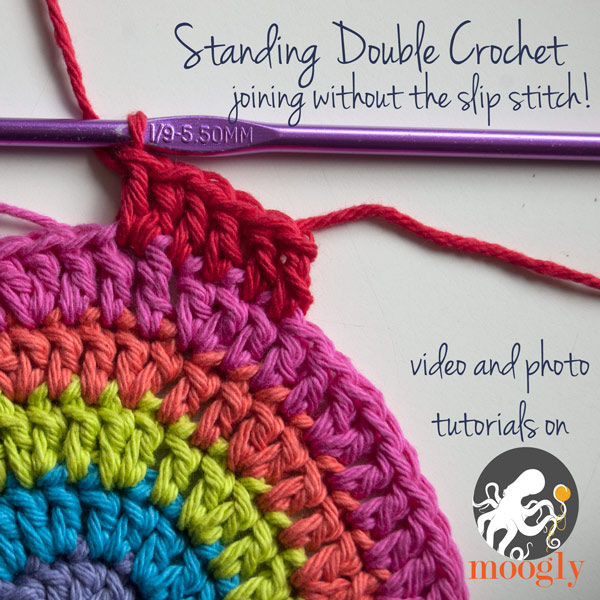
The Standing Double Crochet stitch is one I came to late - and I wish I'd known about it years earlier! It's not a stitch that you'll usually find specified in a pattern, and as such it has no standard abbreviation. What it is, is a technique - one that will allow you to start a new row on a crochet project without having to use the telltale "join with a slip stitch and chain 3" - and I can't wait to share it with you!
Video Tutorial: Standing Double Crochet - Right Handed
Left Handed
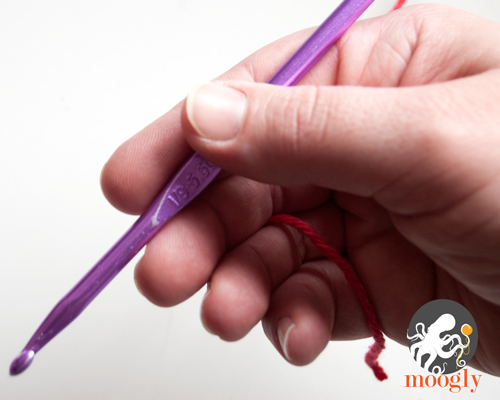
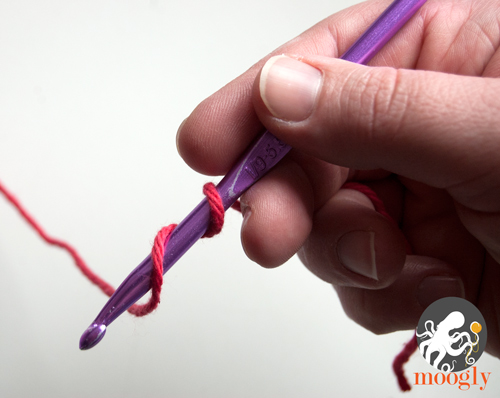
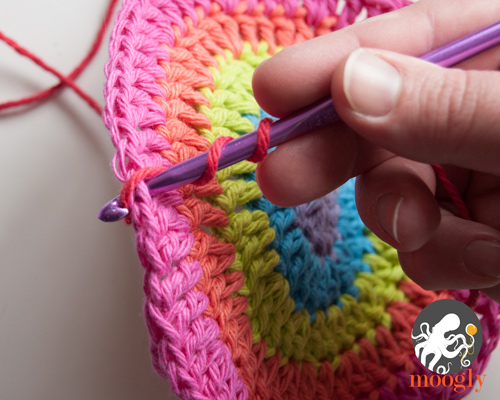
Photo Tutorial for the Standing Double Crochet
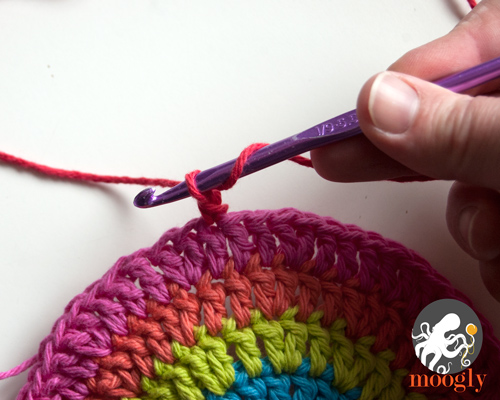
- Step 1: Hold the yarn end with the last two fingers of your hook-holding hand.
- Step 2: Holding the hook in your first two fingers and thumb, wrap the yarn around the hook twice.
- Step 3: Insert the hook into the desired stitch.
- Step 4: Yarn over and pull up a loop.

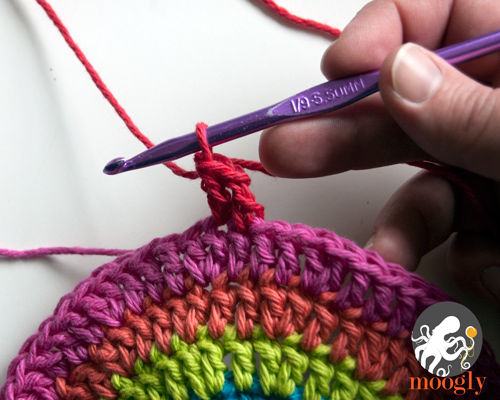
- Step 5: Yarn over and pull through the first two loops on the hook.
- Step 6:Yarn over and pull through the last two loops on the hook (completing as for a normal double crochet).

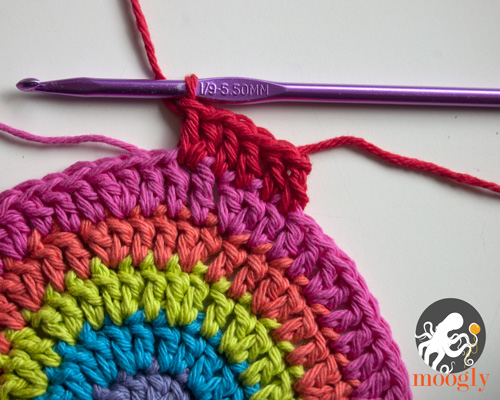
- Step 7: Continuing to hold on to the yarn end, make the next double crochet in the standard manner.
- Step 8: You can let go of the tail, and continue to make stitches according to the pattern. If you used this technique on the previous row, crochet over the tail that was left at the top from that row. The loose end at the top of this row can either be woven in with a needle, or crocheted over in the next row!
So what do you think? Next time you see a pattern that calls for joining with a slip stitch and then chaining to start off a row or round of double crochet stitches, give the Standing Double Crochet a try! You might just never look back!
NOTE: Several different people have now written to me, claiming that they invented this technique. I don't know who did, I didn't invent it myself, and many crocheters have told me they learned it from their grandmothers. Was it lost in time and then rediscovered? I don't know, and again, I don't claim to have invented it, I'm just sharing it, and I hope you like it.
Be sure to check out and like the moogly Facebook page to get the latest updates, links, and sneak peeks. Moogly is also on Pinterest, Twitter, Tumblr, and Google+ – come join the fun! You can contact me via the Facebook page or at TamaraKelly@mooglyblog.com.

Janice Morrow says
Love it...thanks for sharing.
Paddy B says
That was excellent - very clear - very concise and no waffling chatter. Great stuff!
Tamara Kelly says
Thank you Paddy!
Sue Williams says
I agree Paddy! An excellent tutorial!
June says
Absolutely brilliant. Thank you so much for a clear, concise and easy to follow tutorial.Awesome!
Tamara Kelly says
Thank you so much June!
Marcia Purse says
The only comment box I can find on this page says "reply to Paddy B" and is below Comment 6. Confusing - can't I make my own comment? I guess I have to put it here. This is great for starting a new color - but what if you are working in the round in double crochet and don't want to change colors? Is there a way to do a standing dc to begin the next row above with the same yarn? The technique shown here, although great for changing colors, really doesn't work for sticking with the same yarn, unless I'm missing something. Thanks.
Tamara Kelly says
Hi Marcia! I'm so sorry you had trouble finding the comment box. The stitch you are looking for is a Chainless Starting Double Crochet. Here's a tutorial - you can make it in rows or in the round, wherever you're starting a new one. https://www.mooglyblog.com/improved-csdc/
vera says
I like that! Thank for sharing.
LuAnn says
Finally, I have .mastered this and the chainless double crochet thanks to your videos!!
Thank you so much♡♡
Tamara Kelly says
Yay! Thank you so much LuAnn, I'm so glad to hear it!
Penny says
That is awesome! Thank you for sharing it and for making such a wonderful tutorial on it. Much cleaner join for a new color!
Laura Darcy says
thank you for all the valuable tutorials and information! I'm so happy I found your blog and have learned quite a bit already. This tutorial about the ability to join without leaving that seam is wonderful!
carol edwards says
this is such a much cleaner join----thanks for showing
Sarah @ Repeat Crafter Me says
Wonderful tutorial with a very clear video! I never thought of joining the stitch this way. I love learning something new! Thanks Tamara!
Tamara Kelly says
You're welcome! I wish I'd learned it years ago myself!
biz says
Hi there. I think this is a brilliant idea, but I am wondering how you bring your ends together to close off your row? Thanks!
Tamara Kelly says
Hi biz! To end a row I’d just break the yarn and finish off. To end a round, I’d break the yarn and use a seamless join (in the 2nd st, to maintain stitch count). There’s a video tutorial on that technique at https://www.mooglyblog.com/crochet-video-tutorial-seamless-finishing-when-working-in-the-round/
Beth says
Wait, how do you end it if not with a slip stitch?
Tamara Kelly says
Beth, to end a row I'd just break the yarn and finish off. To end a round, I'd break the yarn and use a seamless join (in the 2nd st, to maintain stitch count). There's a video tutorial on that technique at https://www.mooglyblog.com/crochet-video-tutorial-seamless-finishing-when-working-in-the-round/
Sonea Delvon says
Nice tutorial! This technique can be used for any crochet stitch, sc, hdc, dc, tr, dtr, clusters, ... I've been using it for a long time, but I start with a chain instead of a yo. And then I crochet in all ends in every row or rnd and I don't have to weave them in:-)
Diane says
Love learning new tricks! I make a lot of hats so I'll be sure to use this one. Beautifully and clearly done.! Thank you so much, Tamara!
The Dragonfly Dutchess says
GIRL you are a GENIUS!!! GENIUS I SAY!!!
Janie Masterson says
this is so great! thanks so much for sharing with us!
Sarah says
This is great, I have no idea why I haven't been doing this since I started crocheting!
Thanks a lot!
Elizabeth says
How clever! Thanks for sharing.
Natasha says
Thank you so much!! Can't wait to try this!
Nancy says
Awesome! Looks much smoother!
Marnie says
Brilliant! Where has this idea been all my life?? Thanks for sharing. 🙂
Nancy Wisseman says
OMG..that is amazing! I love this and will be using it! Will it work for half double crochet or single crochet too?
BMarie says
Can you do a half double crochet standing chain tutorial if its possible?
Tamara Kelly says
Sure, I think I could do that! 🙂
Wendy J says
Have you done a HDC one? I've searched, and come up with a beautiful afghan pattern, which uses the standing DC, and the standing DC tutorial. I still haven't found the HDC, if you have done one. I've tried, using the one for the DC, and pulling through all the loops, but end up with a big ol' mess!! 🙂
Tamara Kelly says
Hi Wendy! There's an additional step for the hdc version, here's a video: https://www.mooglyblog.com/standing-half-double-crochet/ 😀
Wendy J says
Thanks, Tamara!! I would never have come up with that! I appreciate your response.
Stephanie says
I love love love this!!!
Stephanie says
I wish i would have known bout this years ago!!
Liz says
wow! i love lots of colors but hate joining. i always depend on variagated yarn but it never looks as clean and even as i usually like, now i can use this and not dread joins! thank u!
Tish says
!Genius! I use this for all dc colir changes now.
Crafty Dutchess says
Tell me if I'm wrong but this looks like using a tr to do the work of a dc and therefore as a previous comment says can be used to replace any stitch, just 'go up one'.
Loving the blog btw, despite the coupons being a useless tease to most European followers! ; )
Tamara Kelly says
It starts as a tr (two wraps) but you only pull through two twice - but you can definitely replace anything taller than a sc using this basic idea!
Mindi says
Sweet!! Thank you. I will use this method forever. 🙂
Barbara says
That is fabulous! Thanks!
Colleen Blehm says
Thank you for the tutorial, you made it very clear and understandable. Such a simple stitch. I wish I would have known about this method 45 yrs ago when I started crocheting!! 🙂 Thanks again!!
Cora says
Thanks for sharing...I will never go back to the standard way of joining. Does this also work for half double or triple crochet as well?
Tamara Kelly says
Cora, absolutely! The only one I think I won't work for is sc.
Cheryl says
Did you see the tutorial for standing single crochet at Look What I Made? It's from March of this year.
Tamara Kelly says
I have one here now too: https://www.mooglyblog.com/standing-single-crochet/ 🙂
Cheryl says
Well, I must have missed that in my feed. I'm glad you have it too!
diane says
i can't decide which is more magnificent . . . the foundation stitch or this one!
thank you so much for opening our eyes!
Preeti says
This is a very useful tutorial! I have never done this before . Thanks for sharing!!
Robin says
I just wanted to thank you so much for taking the time to upload a tutorial video. So....thank you 🙂
Tamara Kelly says
You're very welcome! 😀
Sara says
This is awesome, thanks so much!
Kate says
This is wonderful. Thank you so much for this info.
Elizabeth says
Love this tutorial!!!
Deb Pacey says
Brilliant. Thank you.
Diana Priebe says
Awesome*ness I love it. thanks for sharing.
Paula Matos says
Dear Tamara,
this is really great! Found you on Pinterest. May I show this method in German for my readers with my own fotos and words on my BLOG site?
Of course, I will mention your site.
Please let me know.
Greetings from Germany,
Paula
Tamara Kelly says
Hi Paula - please do! It's knowledge everyone should have!
Mel says
this is how I've started a new color all along, I didn't know there was any other way.
Tamara Kelly says
Lucky you! I wish I'd learned it from the start!
Jan says
Can you please tell me what wool was used in the standing stitch tutorial, looks like some sort if cotton yarn? Thanks x
Tamara Kelly says
Hi Jan! It was Sugar'n Cream and Peaches 'n' Cream - I tend to use them interchangeably, they're pretty much the same and each has colors I like. 🙂
Jan says
Ok who makes it? Can I buy it in England ? x
Tamara Kelly says
I don't know if they are available in England in stores or not - they're "kitchen cotton." I did find them on Amazon UK though: http://www.amazon.co.uk/gp/search/ref=as_li_qf_sp_sr_tl?ie=UTF8&camp=1634&creative=6738&index=aps&keywords=sugar%27n%20cream%20yarn&linkCode=ur2&tag=moogly-21
Jan says
Ok thank you. I am making a 6ft x 6ft granny for my daughter and am now half way through. Started using the new stitch last night. So much neater and easier. Love it! x
Marian says
Sugar & Cream is made by Lily. Here is the link to their site: http://www.sugarncream.com/
Marian says
Here is the link for Peaches & Creme: http://www.peachesandcreme.com/
Tamara Kelly says
Ah, direct link to the manufacturers! Didn't even think of it - thank you Marian!
Jan says
Thank you Marian, alas peaches n cream not able to be shipped further than North america
beverly byrd says
I learned something new it will make my work look better. Never to old learn a new stitch 🙂 thanks
Gabriela Méndez says
Many many thanks !!
I aslo tried to get the tutorial: https://www.mooglyblog.com/chainless-starting-double-crochet/
but I cannot find the link to the video or the tutorial, would you be so kind to send me the right link? thank you so much!! the site keeps sending me ads, and I cannot see it.
Bye
Gabriela
Tamara Kelly says
Hi Gabriela! The link to the chainless starting double is https://www.mooglyblog.com/chainless-starting-double-crochet/
Lauren says
This is so cool! Can't wait to try it!
Anna-Lee Howard says
I love this! Is there a way to continue the next round in the same color without using a chain 3? I've been trying to figure it out but can't seem to do it without having to use a brand new piece of yarn.
Tamara Kelly says
Hi Anna! Yes there is! https://www.mooglyblog.com/chainless-starting-double-crochet/ 😀
Anna-Lee says
Thank you so much!
diane says
This is such a wonderful tutorial and video! Thanks so much for sharing.
Cathy - ScrappinCat! says
OMGoodness! This is amazing. My mind is blown. Thank you so much for this and the chainless starting double crochet. Finding your awesomeness is just one more reason I love Pinterest. Thank you, thank you.
Tamara Kelly says
😀 You're so welcome!
Anne says
That is really awesome, and I can't wait to try it. I have always hated leaving that line in the rounds. I also didn't like to re tuck my ends, now I can do it as I go and I know every thing I do will look better. Thanks so much for sharing this..it is very valuable to me!
Tamara Kelly says
You're welcome Anne! 😀
mary says
Nice!! Makes me wanna crochet. Thank you for showng that technique.
Mary
Camaj fiber arts
Edie Eckman says
This is beautiful. And where did you learn it? Inquiring minds want to know... 😉
Tamara Kelly says
Wow, hi Edie! Um, gosh, I picked it up years and years ago, possibly through a link on Ravelry? And then I've seen a few videos of it over the years as well. Was it your invention? I'd believe it, it's an amazing technique!
Edie Eckman says
I didn't invent the technique--it's been around forever. However, I think I named it. In my opinion, it's easier to disseminate information if we can label techniques, and crocheters haven't done a very good job of that.
It does seem like the technique started being talked about more on Rav and other places once it got a name.
Check out my "Beyond the Square Crochet Motifs" for more useful techniques for color changes, and "Connect the Shapes Crochet Motifs" for cool ways to join them.
Beautiful tutorial, btw!
Tamara Kelly says
Thank you so much! And I agree on the naming - so important!
Andria says
That is going to be so handy for the striped hat I'm crocheting! 🙂
Linda says
Thank you so much! I never like the looks of the chain three.
Tamara Kelly says
😀 Glad you liked it!
Diana says
Nice
jessica tingting says
terima kasih sudah berbagi , hasilnya kelihatan lebih rapi,salam dr kami di bumi indonesia
Ruth says
Such clear instructions as always, thank you so much x
Donna Carlen says
I put a link back to your tutorial on my blog. I neither wanted to copy you, or reinvent what you've done so well. A lot of the ladies I have taught to crochet expressed their dislike of the chain 3 in rounds -- and while I've explained to them that is the traditional way, following your tutorial provides an option.
Thanks for the tutorial.
My blog is meant to be an information tank for my students (and anyone who happens to find it). I don't generally post links to tutorials, but this one seemed very useful.
Tamara Kelly says
Thank you Donna!
Marrie says
It's really very colorful,attractive AND..remarkable!..thanks for sharing...good bye!......
Lynette says
Thank you looks so much better.... 🙂
Yanina says
Hola! Me encanto lo que muestra. Me podría decir que numero de aguja usa, el material de la misma y si es lana o hilo. Comencé a realizar crochet hace muy poquito y me encanta. Saludos!!
Tamara Kelly says
Gracias Yanina!
Angela Rueb says
What a wonderful tutorial! Thank you! I understand perfectly after watching you. GREAT!
Tamara Kelly says
😀 So glad to hear it! Thanks for saying so!
Nicky says
Thank you very much Tamara for the wonderful tutorials you have been sharing.
Very helpful and easy to understand. God bless you and your family 🙂
Tamara Kelly says
😀 Thank you so much Nicky!
Chris Rowley says
Thanks ! I will use this from now on !
Tamara Kelly says
You're very welcome! 😀
Elena says
Grazie !! Spiegazione molto chiara e dettagliata!
Angela says
Thank you so much for this, it is such a neater way of doing things.
Barbara says
You are a genius! Thanks so much!
Tamara Kelly says
😀 You're very welcome!
Donna says
I'm having a hard time finding out what an air crochet stitch is and how to make it. I've been told you have a tutorial.
Tamara Kelly says
Air stitch is another name for standing stitches - you're on the right page! 🙂
Donna says
Thanks Tamara, I should have known. I'm so new at this I feel your site is where I live. You have the best teaching site in the whole world.
harriette white says
I looked and couldn't find ant tutorial on a starting cluster, so guess what? I figured it out myself and it looks pretty darn good if i do say so myself! 🙂 thank for the tools.
Tamara Kelly says
😀 That's fantastic Harriette! Well done!
Sarah says
Apologies if I'm asking a silly question, but I feel like I saw the answer somewhere... And now I cannot find it, which is bugging me!
Is it possible to use some form of this stitch when you're not changing colour/starting a new thread? So for example starting a round or row in the same colour and same thread but still getting that look of a double (or treble or etc) stitch instead of the telltale chain which tends to stand out to some degree depending on the stitch or wool.
I hope this question makes sense. I love this idea - I really dislike the odd man out chain (OCD, that's my excuse and I'm sticking to it!) but I'd dearly love to be able to apply it to times when I'm not changing yarn as well as when I am!
Tamara Kelly says
Hi Sarah! Yes, what you're looking for the is the Chainless Starting Double Crochet <- click to go to the tutorial. 🙂
Mika says
Thank you so much for this amazing kind of doing, it's so simple and because of that a great idea! I've never seen this before. I love your blog, you have a lot of such great ideas.
greetings from germany
Tamara Kelly says
Thank you so much Mika!
Jenny Lawson says
I don't understand. The title says there's no need for a slst, but there is. You still need the slst to join at the end.
Tamara Kelly says
Hi Jenny!
The "no sl st" refers to the sl st that is usually used to join the new yarn before you chain to create the "first st" of the round. It doesn't refer to the sl st join at the end of the round. Sorry for the confusion!
Maryam says
That's very lovely and neat! You chose really funky and beautiful colors!
Thank you so much for an ADORABLE Tutorial.. BEST teacher is u! U, Tamara, U ♥♥
Tamara Kelly says
😀 Thank you!
Amber N says
I love learning different ways to eliminate the starting chains in my crochet. Your videos are always clear and easy to follow!
Elsa Reese says
Thank you for this handy tutorial!!
Tamara Kelly says
😀 Thank you Elsa!
Karen Wing says
I love that all of your tutorials are clear and easy to follow! I also love your patterns! Your blog is one of my favorites and my first stop for tutorials! Keep up the great work!!
Rebecca says
I just came across this tutorial and thought it was awesome! I'll have to try it sometime. 🙂
Tamara Kelly says
😀 Thanks Rebecca!
Katie Cottingham says
Thank you so much for this tutorial! I have been using it for a few months now and I love it! Thank you!
Tamara Kelly says
😀 Thank you Katie!
Karen says
Thank you for a great tutorial. Thanks to your video I have finally marred the standing double crochet. Bye bye starting chain, whenever possible!
Tamara Kelly says
😀 So glad you like it Karen!
cathy Marshall says
I feel very strongly that you should get some sort of a prize or reward for this new technique. Maybe a Crochet organization wil pick up on this and you can be recognized! You know, years ago I had been doing somewhat of a new thing myself- a Foundation stitch but I never knew to show anyone. Keep up the great work! Cathy
Tamara Kelly says
Thank you so much Cathy! 😀
susan m jensen says
Tamara I Thank You for this Latest Help. Video's are Great as you make well done/listening is easy and well done.
Thanks
Susan M J
Lana Fink says
Thank you for doing the demonstration for a left hander. I often feel some patterns need to be altered like front end posts when a lefthanded person is trying to follow a right handed pattern.
Tamara Kelly says
Thank you Lana! 🙂
Amanda says
Love this! Really wish I knew about this sooner! Would you mind if I shared a link to this post on my blog?
Tamara Kelly says
Please do! 😀 Thank you Amanda!
Nancy Spoolman says
I am fairly new at crocheting. I have been teaching myself to crochet since I retired in January 2014. I have done quite a few projects. Hobby Horses, Chicago Bulls graphghan (most challenging, I think). I had never heard for the SDC before, but it does make sense. However, I am so used to using the Russian Join or Magic Knot. I think the Russian Join is "cleaner" sometimes. Anyway, if you do use one of these methods, I'm assuming you would just do the Double Crochet for the first stitch.
I love this pattern of the tree skirt. I was wanting to do a Bernat Blanket yarn, but I am terrible about trying to work a pattern with different yarn. If you have any ideas on how to do that, I would appreciate the help. For now, I'll just continue using my favorite yarn, "I Love This Yarn" from Hobby Lobby.
Nancy S.
Tamara Kelly says
Hi Nancy! To substitute yarns, it's best to stick with yarn is the same weight whenever possible. Alternatively, you can hold two or more strands of thinner yarn together as one! You could hold 2 strands of I Love This Yarn together to get the same approximate thickness as Bernat Blanket yarn. 🙂
M.D. says
Thank you for the great tutorials. The pictures are great and the instructions clear and concise. You make it a pleasure to try new stitches.
Tamara Kelly says
Thank you so much M.D.!! 😀
Lydia says
Thank you so much! You just saved my projects from looking tacky to looking fabulous! This is the best tip so far this year! Can't wait to see more from you in the coming year! Again thank you!
Tamara Kelly says
😀 Thank you so much Lydia!
Jen smith says
I've been crocheting for 50years and never seen this my mother taught me and she never did it mum was born in 1897 and taught herself to crochet while in service as a cook . I think it's excellent .i will do this in future thank you for showing it love Jen England
Tamara Kelly says
<3 Thank you so much Jen! What a wonderful memory, thank you for sharing it!
Robyn says
Do you have a tutorial for this mandala?
Tamara Kelly says
Hi Robyn! I think you posted on the wrong page... maybe this is what you're looking for? https://www.mooglyblog.com/mini-magic-mandala-square-tutorial/
Robyn says
Thanks for making such a clear tutorial, and EXTRA thanks for making a left-handed version. I just signed up for your newsletter.
Tamara Kelly says
Thank you so much! 🙂
Rico says
OMG! This is so amazing! Thank you so much for sharing it with the rest of us. Now I can see the world in different colours.
A question; do you count this "standing stitch" as ONE DC stitch? I just wondered because I usually disregard ch3 (that's how we learn in Japan where I grew up), but this standing stitch looks considerably thicker than CH3 that it's hard to ignore it.
Also, would you be able to show us, if possible in photos/a video, how to close the circle if we are to keep crocheting with the same yarn in the next row?
Thank you so much, and good luck with the world domination!
Tamara Kelly says
Thank you so much Rico!
It's so interesting how other countries do things! 🙂 Here, the ch 3 is usually counted as the first dc, so when you make a stdc it would count as the first dc of the row.
I'm not sure what you mean by close the circle. You would work into the top of the stdc in the next row as if it were just another stitch. Going under the loops is a little fiddly, but then when you weave in your ends it's locked down alright. 🙂
Rico says
Thank you, Tamara. 🙂
Kris says
This is brilliant! Your video was so clear and easy to follow, I can't wait to start my next project and put this knowledge to use 😀
Tamara Kelly says
Thank you so much! 😀
Tracey Wild says
Thank you so much. What a lovely tutorial! I am so grateful for skilled people who are willing to share their techniques and skills. I wish my granny was still around so I could show her this...she would have loved it!
Tamara Kelly says
Thank you so much Tracey! ♥
Cindy says
Thank you for this step by step instruction.
I have crocheted for years and have never heard of STANDING DC. until this year when I started SOPHIES UNIVERSE.
I googled to learn what the instructions were talking about.
Thank you for your help.
Tamara Kelly says
I'm so glad you like it Cindy! Thank you! 😀
sgsidekick says
Mind...BLOWN!
Tamara Kelly says
😀 I'm so glad you like it!
Pat Hollan says
I really appreciate this! When you spend your valuable time & money on crocheting you want it to be perfect! So thanks again!!
Tamara Kelly says
😀 I'm so glad you like it Pat! Thank you!
Lyn bown says
Thank you so much for this. I'm just starting a Zookeepers blanket and this will be really helpful. I've always hated how the chain 3 join looked - this is just perfect! x
Tamara Kelly says
I'm so glad you like it Lyn! 🙂
Sue says
Someone recently "invented" that stitch? Yarn work has been around for millennia. I sure that stitch, and others, have been invented thousands of times over. Those who claim to have invented it should be given credit for thinking outside the box (or circle) . Nothing is ever new under the sun.
Ruth says
You show the standing half double crochet at the beginning of a back and forth row and when adding a new color. I need to know how to make one working in the round. Pattern called for this stitch at beginning of each round. Please help me.
Tamara Kelly says
Hi Ruth! It's the exact same in the round, just join to the loops at the top when you slip stitch, or work into them as you usually do if working in a spiral. 🙂
Kathy Cooper says
I have started the standing dc by using a slip knot and yo. But now I will try your way as well. Nope no one taught me that. I am self taught on most. I had to look at instructions to know what stitch I was doing because I didn't know. I was taught how to crochet by making a beer can hat. No one told me how to really start a magic circle. The whole thing is done in dc and slip st.
After many years I can now read patterns.
Thank you again.
Tamara Kelly says
Both ways work, so it's just whatever you like best! 😀
Cheryl says
Thanks for this tutorial, it will make my crochet projects much neater and easier! Your tutorials are always so easy to follow and I use them a lot! Thanks again!
Tamara Kelly says
Thank you so much! ♥
Sharon Forakis says
I wanted to watch this tutorial, right handed. But it barely starts, goes to a advertisement, then starts over, so can't see your tutorial, it's done it over an over. It looks like it has worked before, with all comments on here. But not working for me now, I was doing leaping stripes and blocks hat an came to see tutorial, but not working for me. 12/16/2021 thanks, Sharon
Tamara Kelly says
Hi Sharon! They seem to be working for me, but tech can be a mystery sometimes. Here's the link to the video on YouTube, that may work better: https://youtu.be/VBp-bO2EQRE
Barrie Barrett says
Standing double crochet video…. Fricken brilliant! The only criticism I have is the video starts running and it ask next or stay… if you don’t press a button quick enough it goes to the next video….UGH!!!! With no way back. If I wanted to watch another video I would of clicked on a link for it. 🙁 took me several times of going round and round. Still brilliant
Tamara Kelly says
Oh gosh, that shouldn't be happening - I'll let the tech guy know, thank you!
Beverly says
The video links are not working I need a video it's horrible I am stupidly
Tamara Kelly says
Hi Beverly! I'm so sorry about that, we're fixing them right now!
Bertie says
Thank you! Your tutorials, instructions and videos are the best!
Tamara Kelly says
Thank you so much, Bertie!