
The Wrapped Ombre Tote Bag crochet pattern features a combination of wrapped stitches and V stitches, with some fun stripes that keep this bag moving and fun to make - and green in any color!
Disclaimer: This post includes affiliate links.
Prefer an ad-free PDF? You've got options!


Prefer the free blog version? Keep scrolling!
A New Stitch
I've been wanting to try out wrapped stitches for a while now, and by the time I finished the Wrapped Ombre Tote Bag crochet pattern I was in love!
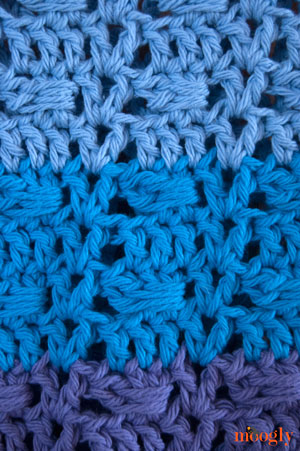
While there are lots of variations of wrapped stitches, I've included a video tutorial for this version, linked below.
Relax with the Wrapped Ombre Tote Bag
And an easily memorized 2 row repeat makes it even better! The Wrapped Ombre Tote Bag is a great stash buster too. I used up some worsted weight cotton I had laying around, but you can use any fiber you like - acrylic, wool, you name it! I used nearly a full skein of the white and dark purple, and less of the other three colors.
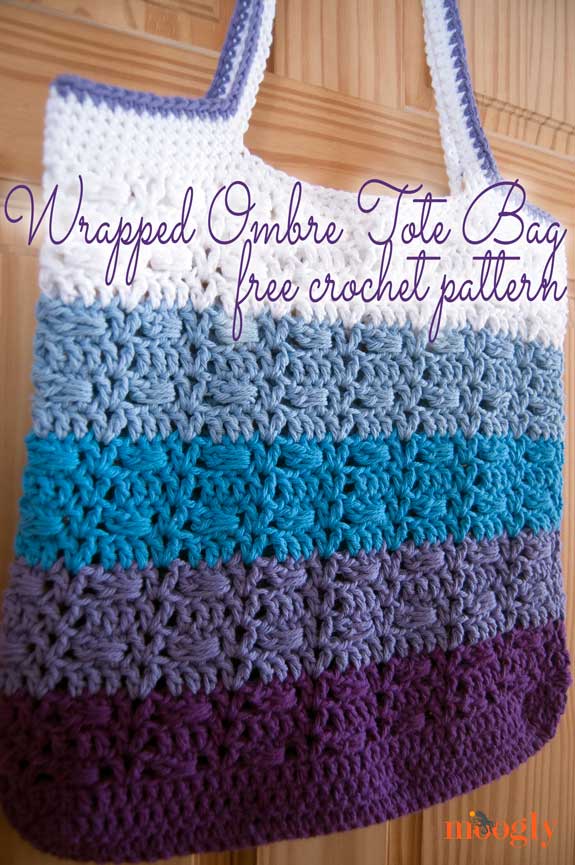
Wrapped Ombre Tote Bag
Add this pattern to your Ravelry Queue and Favorites
US - I, 5.5mm hook - Furls Crochet
380 yds Lily Sugar'n Cream (worsted/"4"/medium; 100% cotton)
Color A: Black Currant
Color B: Cream Hot Purple
Color C: Cream Hot Blue
Color D: Cream Light Blue
Color E: Cream White
Gauge: 12 sts x 7 rows = 4" in dc
Finished size: (not including handles) 15" wide x 14" tall
Stitch Multiple: to change the size, work in multiples of 6 sts
Helpful Links and Tutorials
FDC - Foundation Double Crochet
Chainless Starting Double Crochet
Bag Handles - Getting Them Even
Notes:
The directions are written with standard stitches, but to give this bag a less conspicuous seam, use the Chainless Starting Double Crochet and sl st into the ch sp, instead of using a ch 4 at the beginning of Rounds 7 - 25, and use Standing Double Crochet to join the new colors. See the links above for tutorials.
This pattern begins with rows, and switches to rounds. See the bag bottoms tutorial linked above for more info.
Special Stitch
2 dc cluster wrapped around the last 2 sts - *Yo and placing hook in front of previous 2 sts, yo with working yarn held behind previous 2 sts, pull loop up to left of previous 2 sts, yo and pull through 2 loops on hook. (2 sts remain on hook) Repeat from *, end with 3 loops remaining on hook. Yo and pull through all 3 loops. See linked tutorial above.
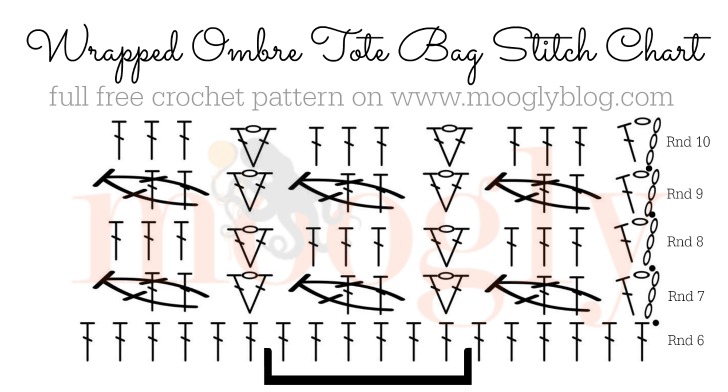
Wrapped Ombre Tote Bag Stitch Chart for Rows 6 - 10
Instructions
Row 1: With Color A, FDC 40, turn. (40 sts)
Row 2 - 4: Ch 2 (does not count as a st), dc in each st across, turn. (40 sts)
Move from Rows to Working in the Round
Round 5: Ch 2, dc in each st across (40 sts), turn work clockwise and dc across end of piece (8 sts), turn clockwise and dc across foundation chain (40 sts), turn clockwise and dc across last end of piece (8 sts). Join with sl st to 1st dc to work in the round. Do not turn. (96 sts)
Round 6: Ch 2, dc in each st around, join with a sl st to 1st dc. (96 sts)
Round 7: Ch 4 (counts as dc and ch 1), dc in the 1st st. *Skip next st, dc in next 2 sts, 2dc cluster wrapped around last 2 sts, skip 2 sts.** [Dc, ch 1, dc] in next st. Repeat from * around, ending last repeat at **. Join with a sl st in ch 4 sp. (96 sts, including chs)
Round 8: Ch 4, dc in ch sp. Skip next st, dc in next 3 sts, skip next st. *[Dc, ch 1, dc] in ch sp, skip next st, dc in next 3 sts, skip next st. Repeat from * to end, join with a sl st in ch 4 sp. (96 sts, including chs)
Round 9: Ch 4 (counts as dc and ch 1), dc in the 1st st. *Skip next st, dc in next 2 sts, 2dc cluster wrapped around last 2 sts, skip 2 sts.** [Dc, ch 1, dc] in next st. Repeat from * around, ending last repeat at **. Join with a sl st in ch 4 sp. Break yarn and finish off. (96 sts, including chs)
Begin the Repeat
Round 10: With Color B, join to the ch 4 sp of the previous round with a sl st. Ch 4, dc in ch sp. Skip next st, dc in next 3 sts, skip next st. *[Dc, ch 1, dc] in ch sp, skip next st, dc in next 3 sts, skip next st. Repeat from * to end, join with a sl st in ch 4 sp. (96 sts, including chs)
Round 11: Ch 4 (counts as dc and ch 1), dc in the 1st st. *Skip next st, dc in next 2 sts, 2dc cluster wrapped around last 2 sts, skip 2 sts.** [Dc, ch 1, dc] in next st. Repeat from * around, ending last repeat at **. Join with a sl st in ch 4 sp. (96 sts, including chs)
Round 12: Ch 4, dc in ch sp. Skip next st, dc in next 3 sts, skip next st. *[Dc, ch 1, dc] in ch sp, skip next st, dc in next 3 sts, skip next st. Repeat from * to end, join with a sl st in ch 4 sp. (96 sts, including chs)
Round 13: Ch 4 (counts as dc and ch 1), dc in the 1st st. *Skip next st, dc in next 2 sts, 2dc cluster wrapped around last 2 sts, skip 2 sts.** [Dc, ch 1, dc] in next st. Repeat from * around, ending last repeat at **. Join with a sl st in ch 4 sp. Break yarn and finish off. (96 sts, including chs)
Round 14 - 17: With Color C, repeat Rounds 10 - 13.
Round 18 - 21: With Color D, repeat Rounds 10-13.
Round 22 - 25: With Color E. repeat Rounds 10 - 13, do not break yarn.
Set Up the Handles
Round 26: Ch 1, sc in each st and ch sp around, join with a sl st to 1st sc. (96 sts)
Round 27: Ch 1, sc in each st around, place markers at st #17, 37, 65, and 85, join with a sl st to 1st sc. (96 sts)
NOTE: Be sure to lay your bag flat and make sure the markers are lined up where you want the handles to be and lined up with each other. Due to differences in tension, yarn, and preference, they may need to be adjusted.
Make the Handles
Round 28: Ch 1, sc in each st to 1st marker, sc in marked st, ch 70, skip 19 sts, sc in 2nd marked st, sc in each st to 3rd marker, sc in 3rd marked st, ch 70, skip 19 sts, sc in 4th marked st, sc in each remaining st around, join with a sl st to 1st sc. (198 sts including chs)
Round 29: Ch 1, sc in each st and ch around, join with a sl st to 1st sc. (198 sts)
Round 30: Ch 1, sc in each st around, join with a sl st to 1st sc. Break yarn and finish off. (198 sts)
Round 31: With Color of choice (D shown), join to 1st st of previous round with a sl st. Ch 1, sc in each st around, join with a sl st to 1st sc. Break yarn and finish off. Weave in ends. (198 sts)
I hope you enjoy this pattern for the Wrapped Ombre Tote Bag! It's a fun crochet pattern to make, perfect for gifts, a fun stashbuster, and easy enough to make while watching your favorite TV show! I can't wait to see your finished totes!
The Fine Print


Swathi says
Oh my! What a lovely bag! I will soon make it. Thank you so much for the pattern 🙂
Tamara Kelly says
Thank you so much Swathi!
Ulrika says
Love the bag and the design. If I may offer a suggestion. I think it would be good to line the bag. This gives it stability and things won't fall through. I have made several bags. What I use to line them is pillowcases that I purchase at the dollar store. I make sure the right side shows on the indside. I fold over the edge, press with an iron and sew in. Easy peasy.
Tamara Kelly says
Oh I like the pillowcase idea! Thanks for sharing Ulrika!
Dawn says
Thank you for the suggestion !!
Kate says
I love this bag! I've never seen this stitch before; I'll have to try it soon! Thanks for the pattern!
Tamara Kelly says
Thank you Kate! 😀
Ashleigh says
Thank you for this awesome pattern! My ravelry queue is starting to look like a Moogly fan club. I love your patterns!
Tamara Kelly says
😀 Thanks so much Ashleigh!
celia says
Tamara,
You are always such a dear when you share. I am struggling with rows 2-4 (it could be because i was trying to do this with no heat and working extra hours this weekend).
Would you be really kind and expand a little more on the first rows and the count. I am just not clear should i have 40 or 41 or 42 "posts" (the first chain three) and the chain on row two, etc. I still struggle with some patterns.
thank you
celia
Tamara Kelly says
Hi Celia! Thank you so much!
Rows 2-4 should each have 40 dc sts, plus the ch 2. The ch 2 doesn't count as a stitch, so that's why it's "(40sts)" at the end of the row - you do not crochet into that ch 2 on the next row. 🙂 I hope that helps!
Jennifer says
I was wondering if this pattern is good for felting. I love this pattern!!!!!
Tamara Kelly says
Hm, I don't know as I haven't tried it - it would be interesting to see though! Thank you!
Debbie says
Am thinking if you used the nylon cording, it would look like one of the Le Sak purses.. Not sure if the gauge would be the same though.
Tamara Kelly says
Probably not, but unless you need a specific size, that's okay! 😀
Yvonne brown says
Tamara,
I enjoyed all the comments and I am anxious to start on this beautiful tote. Thanks much for sharing your pattern.
Tamara Kelly says
Thank you Yvonne! I hope you enjoy it! 😀
Jackie says
Love this pattern. I'm working on it now but am having an issue with the "8" stitches on the edge. Because there are 5 rows I am not sure how to space them. Please help!!
Tamara Kelly says
Hi Jackie! Because Round 5 circles Rows 1-4, you don't crochet into the side of Round 5 - just 1-4. So 2 sts in each row. 🙂 I hope that helps!
Jackie says
I figured it out after thinking about it! Thank you! So much fun to make!
Heather Ross says
Just finished this bag tonight! It's so pretty love it thanks so much for the pattern. I'm going to line it with some pretty blue floral fabric. Thanks again! Happy hooking!
Tamara Kelly says
😀 I'm so glad you like it Heather!
JaCkie says
I made with a removable liner with buttons attached to outside.
heather says
Dear Tamara
i also just finished the bag which i love 🙂 thanks for sharing such lovely and groovy crochet wonders..
the bag looks awesome but the handles are a bit curly...maybe i should block the bag?
thanks again
heather x
heather says
or maybe i did the 70 chain bit too tight..should it be a looser chain? thanks!!
Tamara Kelly says
I'm so glad you like it! A too tight chain could definitely be the culprit - but steam blocking it might help if it's not too terribly bad!
heather says
thanks for your help 🙂
Sylvie Lebeau says
Wish there were a video for this one....
Tamara Kelly says
There is for the wrap stitch! What part is giving you trouble?
Dawn says
In row 9, when we repeat, are we supposed to skip 3 st?? The repeat ends with skipping 2 st and then starts whlith skipping 1.
Dawn says
*with
Tamara Kelly says
Hi Dawn! Only the last repeat ends at **, until you come to the end, you're working the "[Dc, ch 1, dc] in next st" as part of each repeat.
Dawn says
Ok gotcha! Wow, its been a long day apparently 🙂
Tamara Kelly says
😀 Here too!
Ann says
I keep getting stuck at round 7. So after I chain 4 and double crochet in the same stitch I skip the next stitch and do the cluster with the next 2 double crochets. Then skip 2 stitches. Then [Dc, ch 1, dc] in the same stitch. And repeat. When I get to the end I don't end with a cluster before getting to the chain 4 beginning again.
Tamara Kelly says
Hi Ann! Is it that you're running out of stitches to work into? The last few sts of the row are 2 dc with the cluster worked around them, and then you skip the last 2 sts and join to the ch-4 sp. Did you have 96 sts in the previous row?
ann says
Thank you for the response. I counted 96 stitches before the round. In the video turorial you skipped one stitch after the cluster but the 7th round calls for skipping 2 stitches right?
Tamara Kelly says
In Round 7 you skip 2 sts after the cluster, and 1 st after the V stitch. 🙂
AnN says
I got it! thank you!
Anna Borrowman says
For rows 2-4 do you slip stich together? Because It just says rows 2-4 and then round 5. I'm confused.
Tamara Kelly says
Hi Anna! Rows 2-4 are worked back and forth as regular rows. Then Round 5 you work all the way around - this tutorial might help: Bag Bottoms: Rows to Rounds
Anna borrowman says
Oh, Thank you SOO much, that's genius!
Tamara Kelly says
Oh good, glad to hear it! 😀
Char says
Thanks for posting the video in reference to round 5. I was definitely doing it wrong and having the visual was very helpful.
Tamara Kelly says
I'm so glad it helped! Thank you Char!
Sadie says
I just wanted to tell you that the chainless double crochet just changed my life! 🙂 Thank you so much. What a difference!
Tamara Kelly says
😀 You're very welcome Sadie!
Stephanie says
I love this pattern so much. I've made like 3 in a week.lol One thing I did that really helped make the bag sturdy enough to carry groceries is that I crochet the base and first row of the handle with the really stiff redheart yarn since the cotton yarn is so limp.
Thank you for this lovely pattern 🙂
Tamara Kelly says
😀 You're very welcome Stephanie! That's a great idea!
Ali Murray says
Love this so much!! Thank you for the pattern, just finished mine. My only tiny gripe (sorry I really do love love love it!!) is in round 9 at the end you say "Break yarn and finish off" but you don't, you carry on with the same colour until the end of round 11. Not that it mattered, I just sewed an extra end in. Otherwise pattern was very easy to follow, and I learned how to wrap and do a foundation chain too which is great to add to my skillset.
Tamara Kelly says
Thank you Ali! Sorry about that, I'll take another look at the pattern!
Yeon says
Could you make a tutorial video for the tote bag, please?
I have been learning crochet through You Tube and really enjoying it. But I have hard time to read the written pattern.
I really really want to make this.
Thank you.
Tamara Kelly says
Hello Yeon! I don't have a tutorial for the complete tote bag, as I have tutorials for bag bottoms and the wrapped stitch already. Learning to read patterns does take some work, but it's definitely worth it! 🙂
Gloria murphy says
I love this cotton bag. But the first time I washed and dried a cotton item I'd crochet, the colors all muddied together and I had to throw away the item. How should I avoid the colors running together when I wash the cotton? I'm learning a lot from your website!
Tamara Kelly says
Thank you so much Gloria! And I hate when that happens!! There are a couple things you can try: 1 - soak the yarn (particularly reds!) in vinegar water and let dry before using to set the color, or 2 - try Shout Color Catchers in the wash. You can get them on Amazon: http://amzn.to/1TkIN1D I find they can be a real life saver!
Nancy mcquade says
Hello again, Tamara
I am now starting another one of you beautiful patterns. They are always a challenge which makes them interesting! I want to make it smaller so will decrease my stitch count by six but how do I decrease the band width for each of the colours?
Tamara Kelly says
Thank you! You can split the repeats - work 10 and 11 in one color, and 12 and 13 in the next! 🙂
Nancy mcquade says
Me again Tamara,
Row 7 - I did my chain 4 and double crochet in the first stitch and then did the pattern from there, ending with the cluster. I have end up with a stitch count of 83 (I am working with 84 instead of 96 stitches) with 4 double crochets at the end of the round untouched. My stitch count has included the chain 4 as a double crochet (1 stitch) and the chain as a count of 1 stitch also. If I slip stitch to the first double crochet does that count as a stitch to then give me 84? I taken it out and redone it a couple of times with the same result.
Tamara Kelly says
Hello Nancy! I'm sorry, without being there and being able to inspect your fabric it's so hard to say. Did you watch the video at https://www.mooglyblog.com/wrap-around-stitches/? You do not count the sl st as a stitch. The last 2 sts get skipped, so it's only 2 that you are "over." It's so hard to say without being able to see it though, I'd be stabbing in the wind. Each repeat should take up 6 stitches - the 2 dc sts go in the first 2 sts, then you do the wrapped st and skip 2 sts (so we're up to 4 sts covered), and then you make the V stitch (that's the 5th st used), and then skip the next st (that's the 6th st). If you are working the repeats correctly every time, then you shouldn't have those extra 2 sts. I wish I could be more help!
nancy mcquade says
When I start the row, do I double crochet in to the stitch that I did my slip stitch in to or do I go to the next one which would be the 2nd stitch in the round, kind of?
Tamara Kelly says
You crochet into the same stitch that you slip stitched into, but don't crochet into the slip stitch itself. 🙂
nancy mcqude says
My math isn't computing right here! If I start with 84, DC in the 1st stitch, skip one and leave off 2 at the end, that leaves me with 80 stitches to work with. So counting my first double crochet wrap, skip 2, dc,ch1,dc in the same stitch and skipping 1 for a total of 6, and doing 13 repeats of the pattern, I will have used up 78 stitches (13x6) and then skip a stitch and one more of the wraps to count for 3, now I am 81. I know I am missing something here. What do you think? You are very generous with your advice and I know you can't solve all problems but I do appreciate you trying!
Tamara Kelly says
You should have 14 total repeats - the "Ch 4 (counts as dc and ch 1), dc in the 1st st." and the last repeat of "Skip next st, dc in next 2 sts, 2dc cluster wrapped around last 2 sts, skip 2 sts" combine to represent one repeat. It's split at the beginning and end of the round. So you should have 14 V sts, and 14 wrap around stitches, and 14 pairs of plain dc.
So you dc in the first st, skip a stitch (that's 2), then do 13 of the 6 stitch repeats (that brings us to 80), then for the last 4 sts you dc in the next 2, then do a wrap around stitch, and then skip the last 2 sts and join. Does that help?
nancy mcquade says
Me again, Tamara,
I finally got Round 7 done and now I am to the end of Round 8. My last stitches turned out to be the [Dc,ch1,dc] in the ch sp. To me the pattern reads that I should end up with dc in 3 stitches. Please tell me the way I have ended up is correct!
My husband said to the other night after I had used a few expletives that I don't usually use "Are you sure this is the right hobby for you honey?" I assured him that it was but really, it can't be this hard, can it? I read in the comments about some if these lively patterns that someone has completed 3 in a night and I am thinking, How can that be when I am struggling to do one is a month! I need some words of encouragement and advice!
Tamara Kelly says
I'm sorry you're having trouble Nancy! 🙁 Can you read charts? Maybe I could come up with one for this pattern!
nancy mcquade says
Does that mean that I supposed to end up with the 3 double crochets instead of the crochet in to the chain space 🙁 ? I have followed charts from your other patterns so I think so!
Tamara Kelly says
I'll try to get a chart up asap. I'm afraid I don't understand your question.
Tamara Kelly says
The chart is up! 🙂
nancy mcquade says
Dear Tamara,
If there were crochet awards for the most helpful crochet expert it would go to you! The chart has made all the difference and it has answered my question that I didn’t convey clearly to you so no worries there. THANK YOU, THANK YOU, THANK YOU! I can now proceed and there shouldn’t be any more cries for help! I wish that every pattern I use could be one of yours. My last project was a sweater that turned out horribly and the designer wasn’t much help and I am NOT starting over. Not only that I paid about $15.00 Cdn for it! Unfortunately, none of your sweater patterns are what I am looking for but I have found one that looks like it will work for me. Again thank you for all of your help.
Nancy
Tamara Kelly says
Oh I'm so glad!! Whew! 😀 Thank you for letting me know! have a fantastic weekend!
Ezella Dysart says
Hello there I love your tutorials and patterns. For some reason I am having a hard time with the handles. I am counting only 94 stitches instead the 96. My markers are not pinning up and I followed the pattern to a T. I even did it over twice!! Can you please tell me what I am doing wrong? It would be nice if you had a tutorial for this bag. Thank you.
Tamara Kelly says
Personal gauge can greatly affect where the handles end up, hence the note in Round 27. I have a generic handle tutorial HERE. It's hard to say where you lost 2 sts, but if you like the look of it I wouldn't worry about it! I hope that helps!
Lori says
Hello. This pattern is great! I am making this a little bigger so I'm working with 108 stitches instead of 96. When completing round 8 should I be skipping a stitch before joining? I've assumed I do but when I finish there isn't one to skip. I can't find my mistake and have counted multiple times.
Tamara Kelly says
No, you crochet right into the last cluster and then join to the ch 4. 🙂 Watching the video tutorial linked at the beginning of the pattern should help!
Belinda says
Hi Tamara, loved your bag pattern and also tried it. Would love to show you the pic but I do not know how to upload it.
Thank you .
Belinda.
Tamara Kelly says
Thank you Belinda! Unfortunately I can't host photos in comments, but you can email me or post it on the Moogly Facebook page, or share it via your Ravelry notebook if you use that!
Priya says
Thank you for the pattern and clear instructions. First time trying the cluster stitch and first time making a tote bag. Thrilled with how it turned out. Thank you again!!
Tamara Kelly says
😀 Thank you so much Priya, I'm so glad to hear it!
Jen says
Hi! I am making this tote for the first time and I got to my last color (the white part) and my bag is a lot shorter than it should be! With two rows of the last color done I am measuring at about 9.5” top to bottom. I know I did the right amount of rows. Any advice? Thank you!
Tamara Kelly says
Hi Jen! It looks like your bag will be about 2 inches shorter, which makes me think you and I got different gauges. You can add more rows of white to make it taller if you like, or just go with a smaller bag - it's up to you! 🙂
jen says
Do you think it will look silly with so much more white? I'm new to crochet and I went from making coasters, to a beanie, to this tote since I'm most comfortable with double crochets and figured the wrapped cluster stitch would be a new variation for me. I'm realizing that I crochet pretty tightly unknowingly. My stitches look good, they're just smaller. I measured 7 of my rows is 3" as opposed to your 4" gauge. By the time I realized I was already way too far gone and it would have looked silly to change my gauge by then. Any advice on how to retrain my brain to crochet looser to obtain the correct gauge? Thanks for you help!
Tamara Kelly says
Hi Jen! It might not be the look you're going for. You could do a fun striping detail with some of your leftover yarn from the previous colors though!
Everyone's gauge is different, so it's not right or wrong. But to relax your stitches, try to consciously relax your neck, shoulders, and arms before you begin crocheting. You can also try different hook holds, and different hooks! In the end, we're all different though, so your gauge may just be your gauge. In this case, you'd want to go up a hook size or two until your gauge is closer to the one given in the pattern. 🙂
Jessie says
PLEASE HELP how do i count the stitches???????
I just finished row 7 and there is way way more than 96 stitches. I was told every single little v is a stitch but that does not work here. please please help. there are 113 of the little v's 🙁
Tamara Kelly says
Hi Jessie! If you skip the chs it should work! 🙂