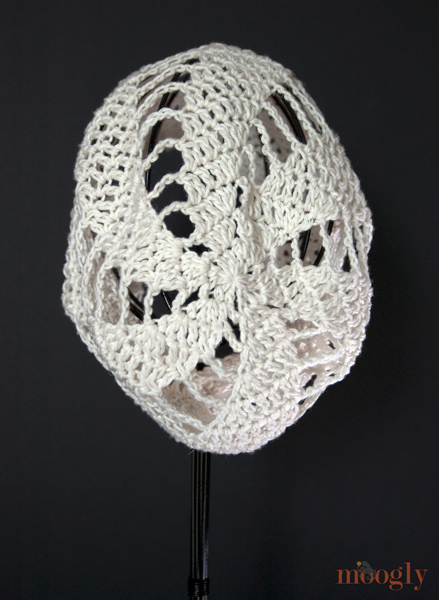
The Spinning Summer Slouchy Beanie will help you wind down the summer in style. The design came to me at the same time as the Tallulah Waterfall Scarf. One stitch theory, two very different results! This beanie is light and airy; perfect for summer, or any time of year. It's all about the fashion - and these spinning stitches are ready for the runway!
 Disclaimer: This post includes affiliate links.

The Spinning Summer Beanie uses just one skein of super breathable KnitPicks CotLin, or the DK/Sport weight yarn of your choice. Baby yarns would work too - anything with the "3" symbol ought to work just fine. It's a got a very loose fit, and is sized for adults. For a tighter fit or smaller size, just drop down to an H hook for the brim!
Spinning Summer Slouchy Beanie
Add this pattern to your Ravelry Queue
- US - I, 5.5mm hook
- 110 yds (43 g; 1.5 oz) DK or Sport weight yarn (KnitPicks CotLin in Swan shown)
- NOTE: To begin each round, if you prefer not to use the Chainless Starting Double Crochet (here abbreviated CSDC), you can substitute a ch 3.
Hat Body Instructions:
Round 1: Starting with the magic circle, make a CSDC, then dc into the ring. *Ch 2, 2 dc into the ring. Repeat from * 4 times, then ch 2 and join to the top of the CSDC with a sl st. (12 dc, 12 ch)
Round 2: CSDC, then work 2 dc in the 1st st, dc in the next st. *Ch 3, skip the 2 ch from the previous row, 3 dc in the next st, dc in the next st. Repeat from * 4 times, then ch 3, skip the 2 ch, and join to the top of the CSDC with a sl st. (24 dc, 18 ch)
Round 3: CSDC, then work 2 dc in the 1st st, dc in the next st, dc2tog over the next 2 sts. *Ch 4, skip the 3 ch from the previous row, 3 dc in the next st, dc in the next st, dc2tog. Repeat from * 4 times, then ch 4, skip the 3 ch, and join to the top of the CSDC with a sl st. (30 dc, 24 ch)
Round 4: CSDC, then work 2 dc in the 1st st, dc in the next 2 sts, dc2tog over the next 2 sts. *Ch 5, skip the 4 ch from the previous row, 3 dc in the next st, dc in the next 2 sts, dc2tog. Repeat from * 4 times, then ch 5, skip the 4 ch, and join to the top of the CSDC with a sl st. (36 dc, 30 ch)
Round 5: CSDC, then work 2 dc in the 1st st, dc in the next 3 sts, dc2tog over the next 2 sts. *Ch 6, skip the 5 ch from the previous row, 3 dc in the next st, dc in the next 3 sts, dc2tog. Repeat from * 4 times, then ch 6, skip the 5 ch, and join to the top of the CSDC with a sl st. (42 dc, 36 ch)
Round 6 - 15: CSDC, then dc in the 1st st, dc in the next 4 sts, dc2tog over the next 2 sts. *Ch 6, skip the 6 ch from the previous row, 2 dc in the next st, dc in the next 4 sts, dc2tog. Repeat from * 4 times, then ch 6, skip the 6 ch, and join to the top of the CSDC with a sl st. (42 dc, 36 ch)
Round 16: Ch 1, sc in each dc and work 4 sc in each ch sp to end. Join to first sc with a sl st. (66 sc) NOTE: This round is referred to as "the set-up row" in the Brim Instructions below.
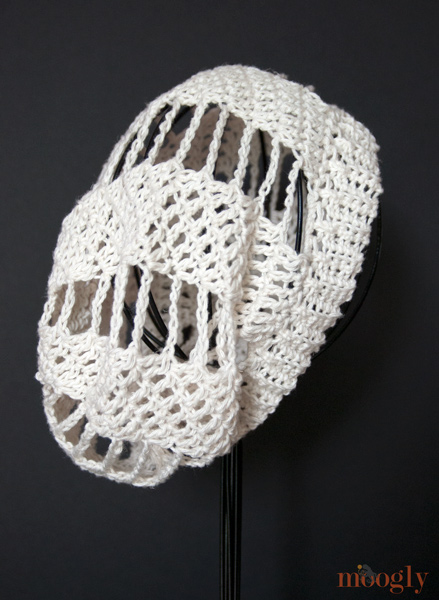
Brim Instructions: (Video tutorial for this brim type HERE)
Row 1: Ch 6. Working in BLO, sc in the 2nd ch from hook and each ch, working back toward the set-up row. Sc2tog in the next 2 set-up row sts. This is the “securing st” that attaches the vertical brim rows to the horizontal setup row. Do NOT ch, turn. (6 sts)
Row 2: Skipping the securing st, sc in the BLO evenly. Turn. (5 sts)
Row 3: Ch 1, sc in BLO evenly. Make securing stitch. Turn. (6 sts)
Row 4 – 66: Repeat Rows 2 – 3.
Sew the brim together using the whip stitch, joining first and last rows. Be sure to sew into the BLO of the last row to maintain the ribbed look.
So what do you think? Fashionable and fun, n'est-ce pas? With all those vents you can wear it even on the hot days - and cover up humidity ravaged locks. Hope the Spinning Summer Slouchy Beanie makes you happy too!
Written pattern copyright Tamara Kelly 2013. Please do not reprint or repost this pattern, but please do link to this page to share this pattern with others. If you wish to make items for sale from this pattern, please visit the About page for details, and use the Print Friendly button to print the pattern for personal use.


Joanne says
Thank you for your talents and gifts of teaching.... However I am at a loss ...the video keeps stalling and when it comes back on ...I have lost some of the directions ....I have tried and tried it...I am not used to knots and that's what I form....But thanks so much....I will keep at it ;/ !!!
Joanne says
so sorry....my previous reply I Was referring to>>>
Miracle circle!!!!!! 🙂
Tamara Kelly says
Sorry the video is hanging up for you - the internet has had a heck of a day! If the magic circle isn't working for you, you can skip the magic circle and start by chaining 4 and working a slip st in the first chain to make a ring - then just work into that ring instead! 🙂
Joanne says
Awe thank you so much. Will get it going soon;)
agnes says
just curious is it rows 4-66 or rows 4-6? on the brim part of the hat.
Tamara Kelly says
For the brim it's 4-66 - it's worked "sideways" to the rest of the hat. The linked tutorial explains it best!
Traci says
"Round 6 – 15: CSDC, then dc in the 1st st, dc in the next 4 sts, dc2tog over the next 2 sts." This section seems to be decreasing and I have run out of stitches. At what point to I do 2dc into a stitch to keep my stitch count the same? This is a beautiful hat btw, well done!
Tamara Kelly says
Hi Traci! The part where is says "CSDC, then dc in the 1st st" - both of those sts are worked in (or in the case of the CSDC "above") that first st. It sounds like maybe you were putting the first dc in the second st of that section?
Traci says
Thanks! You were right and I finished the hat and it looks just like the picture. It is a little small though (it does not slouch). I would need to continue to increase to make it a big bigger in volume. The band fits great though. Also I learned 2 new techniques doing this pattern!! yeah!
Tamara Kelly says
😀 It's only slightly slouchy (on some heads) as written because I wanted to keep it to one skein, but of course you can add more 🙂 So glad it worked out!
LFTwentySeven says
Hi, thanks for this lovely free pattern! I'm currently working on this and it's going well (I'm re-learning everything after having been absent from crocheting for some years).
I had a question though. Do I fasten off after I finish the Hat Body? Sorry for the newbie question. 🙂
Tamara Kelly says
😀 Thank you! Don't fasten off after the hat body, you'll keep going for the brim with the same yarn. Only 2 ends to weave in! 😀
LFTwentySeven says
Hiya Tamara, thanks for helping me out. I did manage to finish the hat! Just need to find time to take the pic of the finished product. Will let you know when I post it on my Pinterest board. 🙂
vicki hicks says
I sam so afraid I will ever learnthis craft. Can't seem to get the confidence. Taking classes, but haven't finished or started anything on my own.
Tamara Kelly says
<3 It can be hard to get started! Small, simple projects to build your confidence would be good - washcloths, simple scarves, things like that!
Sandra Nguyen says
Perfect! I'm having my head shaven for St Baldricks one week from today, and this will be perfect to keep my head protected, but open enough that people can see what I did! I'm on round 13 now, and I'm making it in sapphire blue with silver metallic thread- it's gonna be gorgeous! Thanks for the patterns~ I'm also making Fallen Leaves for my co-shavee!!
Tamara Kelly says
😀 Awesome! Thank you for what you're doing for St Baldricks!
courtney says
i dont understand row sixteen at all. please help!!!
Tamara Kelly says
Hi Courtney! Sorry you're having trouble!
Round 16 reads: Ch 1, sc in each dc and work 4 sc in each ch sp to end. Join to first sc with a sl st. (66 sc)
In other words, you single crochet in each double crochet of the previous round, AND you make 4 single crochet stitches in each chain space. So if you come to a dc st, work a sc into the top if it. When you come to a chain sp, work 4 sc sts into it. At the end of the round, you should have 66 total single crochets. Does that help?
Deborah says
You, my dear, are AWESOME! This will make a perfect gift for my daughter whose birthday is 30 June...SUMMER for real! Did I say already that I think you are AWESOME? Thank you for sharing such a talent as yours!
Tamara Kelly says
😀 Thank you so much Deborah!
Leann says
My crochet group attempted to make your slouchy hat, but were confused by the way it was written and we are wondering if you are British. It's a lovely hat and would make great gifts, but with so many people not able to read the pattern we decided on another hat.
Tamara Kelly says
Hi Leann, I'm sorry you had trouble! I am not British - Midwestern US. Quite a few people have made the hat without trouble, and I used standard pattern writing notation. Do you think a crochet symbol chart would help?
Amber says
Hi! Thank you for all your free patterns. I am working on this hat now but unsure on round 4, I'm not sure where to dc2tog is it in the first chain st after 2dc then dc dc? Thank you for any help!
Amber says
Meant round 3 sorry!!
Tamara Kelly says
🙂 For Round 3, you work 3 dc in the first st (includes the csdc), then dc in the next stitch, then dc2tog in the next two stitches - this is a dc2tog decrease, not a cluster stitch. Does that help?
Amber says
Yes thank you so much!
Jill says
I wanted a hat to keep me warm yet not too hot this cold spring season, and tried this hat in a dk wool. It is prefect, and I learned a new skill - the brim. Thank you so much for your patterns.
Tamara Kelly says
😀 That's fantastic! Thank you Jill, I'm so glad you enjoy them!
Susan says
Working on the brim now , love the pattern very easy to understand. I do better with written patterns and I learned the standing double stitch too. Thank you.
Tamara Kelly says
🙂 Thank you Susan!
katy says
I'm kind of a newbie at crochet, and i work better with a video so i can actually see what you are doing. I was wondering if you can make a video crocheting this hat. It's super cute and I love and adore it!!!
Tamara Kelly says
Thank you katy! I'll add it to the list!
katy says
It turns out I didn't need the video. Im almost done. im on the brim right now. I started to understand after i looked up how to do some things. Im so happy im almost done. well just wanted to let u know.
Tamara Kelly says
I'm so glad you were able to figure it out! 😀
kristine says
In round 1, its written ," into the ring" . What does that mean? do i actually work into the middle of the magic circle?
Tamara Kelly says
Yes, you crochet into the center of the magic circle. 🙂
Rachel says
I am absolutely in love with this hat and so are the girls I babysit. They asked me to make them some but the size in the pattern is too big, I figured for a smaller size you would just stop increasing earlier and wanted to know if you had a rough idea of where to stop increasing to make it the right size for a 10 year old.
Tamara Kelly says
Thank you Rachel! I'd stop when it reaches between 5.50-6.25" 🙂
Michelle says
I'm always keen on making crochet goodies but I'm not that clued up as of yet still in the learning stage but I love a challenge if it's worth it and I decided to take on this pattern thinking it looks a slight bit tricky but with your added notes to help us along during the progress it's made making this pattern so easy and so much fun thank you I will most definitely fellow your patterns.
Katelynn says
Its so cute, if I was a masochist I'd change colors so the swirl parts change colors because it would look amazing...but that's a lot of color changes lol...
Tamara Kelly says
Yes! And yes, ouch, lol! 😀
Tara says
Hey I'm a newbie to crochet and I really want to make this, but I'm really confused on how to. Could you please post a tutorial because it would really help me!
Tamara Kelly says
I'll add it to my list! Thank you Tara! And congrats on learning to crochet! 😀
Tara says
Thank you so much, it really is a help!
Tamara Kelly says
I'm very glad! 🙂
nya hootselle says
hi! i've tried making this hat but it seems to stop 'spinning' after the 5th round. i'm not really sure after i chain six rather i make the two double crochet in the stitch before or after the first dc beneath it.
Tamara Kelly says
I will be making a video tutorial in the next few months. Make the 2 dc in the 1st st of each set, and be sure to decrease in the last 2 sts of each set, and that should keep the spin going.
Debra says
I am just starting and am confused on how to get 12dc and 12ch if I onky repeat the pattern 4 times
Tamara Kelly says
You do it the initial time, and then 4 times more. And don't forget to count the sts before the repeat too. 🙂
Michelle says
Hi Tamara,
I absolutely love this hat design. However, for me I would rather a beanie rather than a slouchy... I would love to wear this for my step-daughter's wedding next week. Do you have the same design in that style, or is there a quick way I could convert this? I understand the concept of making a beanie, just not using this design lol. I'm so very sorry if this is a dumb question.
Regardless of silly question or not, I would love to Thank You so much for all you do for us " crochet hookers" out in webland.
Thank you in advance for any and al help.
Happy Crochet!
Michelle
Tamara Kelly says
Thank you Michelle! I would recommend eliminating a couple of the rounds between 6 and 15 - those are the rounds that give the hat most of it's height. 🙂
Michelle says
Thank you dear, I guess I was right ? I was thinking on this last night while doing the cooking, and thought, "I wonder, if I just not do so many rounds..." Lol
Thank you heaps for your help.
Have a great day and enjoy what's left of summer ?
Tamara Kelly says
🙂 Thank you so much Michelle, you too!
norma gooodrich says
I read all the comments and your reply...after many times to do and undo...FINALLY i done the hat,, it is very pretty.... so beautiful......thank you for post free this beautiful beanie...
Tamara Kelly says
🙂 I'm glad it worked out! Thank you!
Ria Thompson says
Can I buy this hat, if you have some made? Thanks! 🙂
Tamara Kelly says
I'm so glad you like it Ria! I don't sell finished items myself, but be sure to check out the Moogly Makers page for those that do! 😀
Lavinia betancourt says
Thanks for this beautiful beanie pattern, made it and giving as gifts. everyone loves it.. I love your patterns easy to follow.
Tamara Kelly says
Thank you so much Lavinia!
Nancy McQuade says
Just about to start this project but I don’t see a gauge. What do you think?
Nicole says
I made this with #4 weight cotton and an I hook. I would like to try to make it with some super fine weight cotton that I have but I am not positive what the hook substitution would be... is there any chance that you may have an idea? I know it will be significantly smaller so I'm thinking the child size or even baby size.
Tamara Kelly says
I would recommend starting with the hook size recommended on the yarn. 🙂