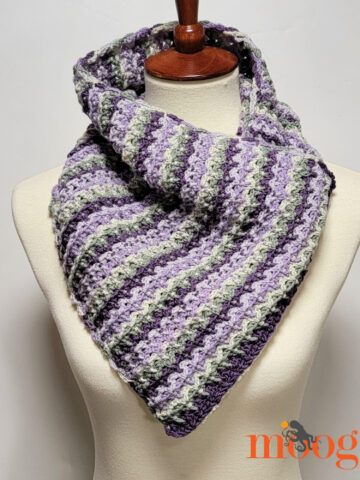
When I designed the Tallulah Waterfall Scarf I was playing with a swirling, twisting stitch pattern. I used it to make two different accessories, and got two very different effects! The scarf is the first one I've chosen to share - and I can't resist it's subtle ruffles!


The name Tallulah means leaping water, and the Tallulah Waterfall Scarf seems to float, meander, jump, and twirl just like a waterfall! The scarf is fun, flirty, and light enough to wear as a year round accessory, and an optional button dresses it up and keeps it in place. Best of all, it only takes one skein, and 3 rows to crochet - love quick accessory crochet patterns! Make one for yourself, another a gift, and a bunch for the craft fair!

Tallulah Waterfall Scarf
Add this pattern to your Ravelry Queue and Favorites
- US - I, 5.5mm hook and Optional: US - H, 5.0mm hook
- 123 yds (50 grams) DK or Sport weight yarn (KnitPicks CotLin in Swan shown)
- Optional: button with shank and clear plastic button with holes, both at least ⅞" wide
- Yarn needle
NOTE: To start each row, you have a few options. You can use the chainless starting dc st (and the chainless starting dc2tog also shown in the video), which is what I did, and how I wrote the pattern - the first dc or dc2tog of each row is worked in this way. If you're uncomfortable with that technique, you can ch 2 to start (and add 2 to the starting ch), and then work the sts as directed. Alternately, if you're using this pattern as a stash buster and want to change colors every row, you can use the standing dc st to begin!
Scarf Instructions: (using I, 5.5mm hook)
Row 1: Ch 212. Work 2dc in the 1st ch, ch 2, skip 2 ch. *Work 2 dc in the next ch, ch 2, skip 2 ch. Repeat from * until 2 ch remain. Work 2 dc in the next ch, then dc in the last ch. Turn. (283 sts and ch)
Row 2: Dc2tog in the 1st 2 sts. Work 3 dc in the next st. *Ch 3, skip the 2ch. Dc in the next st, 3 dc in the next st. Repeat from * to end. Turn. (494 sts and ch)
Row 3: Work 3 dc in the 1st st, dc in the next st, dc2tog in the next 2 sts. *Ch 4, skip the 3ch. Work 3 dc in the next st, dc in the next st, dc2tog in the next 2 sts. Repeat from * to end. Break yarn and weave in ends. (636 sts and ch) There should be just a few yards left to make the button!
Flower Button Instructions: (using H, 5.0mm hook)
Row 1: Starting with a magic circle, work 5 sc into the ring and join with a sl st to work in the round. Pull the center closed with the end, but not too tightly - we're going to poke the button shank through the hole later!
Row 2: Ch 1, work 3 dc in the 1st st, ch 1, sl st in 1st st. *Sl st in the next st. Ch 1, 3 dc in the same st, ch 1, sl st in the same st. Repeat from * 3 more times, until 5 petals made. Break yarn if needed, leaving a 12 inch tail for sewing.

Assembly: Insert the shank of the button through the hole in the center of the flower, from the right side. Tighten up the hole using the short beginning tail. Using the long tail and a yarn needle, sew through the shank and a few strands of the flower on the other side to secure. Then sew through the holes of the clear button, somewhat loosely, to attach it to the end of the shank. Weave in all ends. See photos above for reference.
 And now it's time to wear your new scarf! The Tallulah Waterfall Scarf can be worn in all sorts of ways - long and loose, wound up tight, tied in a bow... you name it! Lay it carefully for a ruffled effect or let it twist wild and free as a waterfall! The button fits right into the chain spaces to help keep it secure the way you want - and it adds a sweet little touch too! And of course it isn't limited to the scarf - put it on your crochet hat to change it up! I can't wait to see what you all do with this pattern!
Written pattern copyright Tamara Kelly 2013. Please do not reprint or repost this pattern, but please do link to this page to share this pattern with others. If you wish to make items for sale from this pattern, please visit the About page for details.You can contact me via Facebook messages or at TamaraKelly@mooglyblog.com.


Elena Hunt says
Very pretty and feminine!
Tamara Kelly says
Thanks Elena!
Sue says
This is so cute, and I love the name! 🙂
Tamara Kelly says
Thanks so much Sue! 😀
Tori says
Very pretty scarf! I made one for myself and may need to make some for some Christmas presents!
Tamara Kelly says
Thank you Tori! I'm so glad you like it!
Ericka says
Very very pretty and unique - love it!
Lee Ann says
Pretty!!! Thank you!
Amy Renton says
Hi. This is a lovely scarf and I have tried to crochet it, but I have not been successful, it doesn't seem to be long enough and I can get the stitches to look neat and I am getting loads of holes were I have increased and decreased. Please can you let me know what I am doing wrong, so I can get a lovely scarf. Many thanks x
Tamara Kelly says
Well, it's definitely a "holey" scarf, very lightweight. It sounds like maybe your tension is looser and that's why the stitches are more open? It's so hard to say for sure without seeing it. If it's not long enough you can certainly increase the length as desired, in multiples of 3.
Michelle says
Where should I attach the flower button?
Tamara Kelly says
Wherever you like - right through the stitches! 🙂