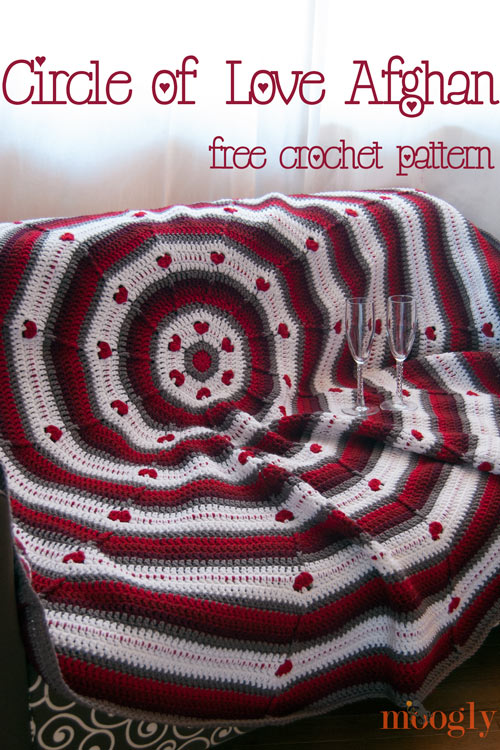
 The Circle of Love Afghan tells a love story in the stitches. Moments of clarity, bursts of brightness, a deep ombre of feeling, and an oversized ruffle to share. And it always comes around again, if you stick with it. Perfect for Valentine's Day - or any day!
Disclaimer: This post includes affiliate links.
Prefer an ad-free PDF? You've got options!


Prefer the blog version? Keep scrolling!
A Swirl of Crocheted Love
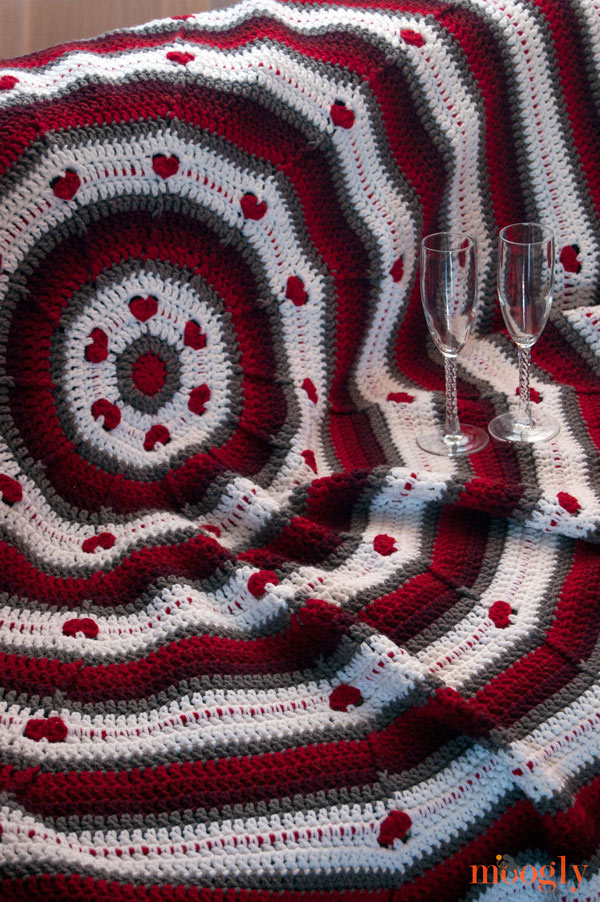
The Circle of Love Afghan is solid, cozy, warm, and fun to make. This blanket doesn't lie down, calm and flat - it's slightly hyperbolic... or you might say it's exuberant and generous!
The posts stitches point the way, with a gentle curve that always comes back to the heart. The red peeks of color between the hearts create a dashed line that ties it the love together, and while there might be some cloudy gray, it just makes the love all the sweeter!
Circle of Love Afghan
Add this pattern to your Ravelry Queue and Favorites
US - K, 6.5 mm hook - Furls Fiberarts
2600 yards total Red Heart With Love (4-Medium; 100% acrylic; 223 yds)
A: White - 3 skeins
B: Pewter - 2 skeins
C: Holly Berry - 2 skeins
D: Berry Red - 1 skein
E: Merlot - 1 skein
Gauge: 3 rounds = 4" across
Finished Size: 65" across
Helpful Links and Tutorials
Standing Double Crochet (optional)
Chainless Starting Double Crochet (optional)
Fpdc - front post double crochet
Notes on Stitches and Sizing:
- On rounds where you break the yarn and finish off, you can do so using your preferred method, or the Seamless Join (linked above). If you use the Seamless Join, be sure to join to the 2nd st of the round, not the first, to maintain stitch counts.
- You can join the new color for a new round using a sl st and ch 2 (which does not count as a stitch), and then dc (as written), or you can use the Standing Double Crochet (linked above).
- When starting a new round with the same color as the previous round (or as in Round 5), you can ch 2 and crochet as written, or you can use the Chainless Starting Double Crochet (linked above) to replace the first dc of the round.
- No turns! This blanket is worked with a definite right side and wrong side. But don't worry, the wrong side looks pretty good too.
- If you wish to make a baby sized blanket, stop after Round 29 and add your border. If you wish to make a lap sized blanket, stop after Round 38 or 47, as you prefer.
Circle of Love Afghan Instructions:
Round 1: With Color C make a magic circle, ch 2 (does not count as a st), dc 12 in the ring. Join with sl st to 1st st and fasten off. (12 sts)
Round 2: With Color B, join to any st, ch 2. 2 dc in each st around. Join with sl st to 1st st and fasten off. (24 sts, or 12 Vs)
Round 3: With Color A, join to left st of any V of previous round, ch 2. *2 dc in next st, hdc in next st, 2 dc in next st, dc in next st. Repeat from * around. Join with sl st to 1st st and do not break yarn. Remove hook and place marker (pm) in active loop. (36 sts)
Round 4: With Color C, join to any hdc st of previous round, ch 2. *[2 dc, hdc 2 dc] in next st, ch 3, skip 5 sts. Repeat from * around. Join with sl st to 1st st and fasten off. (48 sts)
Round 5: Pull active loop of Color A to the front of the work, and replace hook in loop. Ch 2, dc in 1st st of Round 3, enclosing ch from Round 4. Dc in next st of Round 3. *Ch 2, skip 2 sts, sc in next st (the hdc of Round 4), ch 2, skip 2 sts, dc in next 5 sts of Round 3, enclosing ch from Round 4. Repeat from * around, finishing last repeat with dc in last 3 sts. Join with sl st to 1st st and do not break yarn. (60 sts)
Round 6: Ch 2, dc in each st around. Join with sl st to 1st st and fasten off. (60 sts)
Round 7: With Color B, join to 1 st to the right of the st above a sc from Round 5, ch 2. *Dc in next 4 sts, 2 dc in next st. Repeat from * around. Join with sl st to 1st st and fasten off. (72 sts)
Round 8: With Color C, join to 1st st of previous round, ch2. *Dc in next st, fpdc in next st, 2 dc in next st, dc in next 3 sts. Repeat from * around. Join with sl st to 1st st and fasten off. (84 sts)
Round 9: With Color D, join to 1st st of previous round, ch2. *Dc in next st, fpdc in next st, 2 dc in next st, dc in next 4 sts. Repeat from * around. Join with sl st to 1st st and fasten off. (96 sts)
Round 10: With Color E, join to 1st st of previous round, ch2. *Dc in next st, fpdc in next st, 2 dc in next st, dc in next 5 sts. Repeat from * around. Join with sl st to 1st st and fasten off. (108 sts)
Round 11: With Color B, join to 1st st of previous round, ch2. *Dc in next st, fpdc in next st, 2 dc in next st, dc in next 6 sts. Repeat from * around. Join with sl st to 1st st and fasten off. (120 sts)
Round 12: With Color A, join to 1 st before a post st, ch 2. *2 dc in next st, hdc in next st, dc in next 8 sts. Repeat from * around. Join with sl st to 1st st and do not break yarn. Remove hook and pm in active loop. (132 sts)
Round 13: With Color C, join to any hdc st of previous round, ch 2. *[2 dc, hdc 2 dc] in next st, ch 8, skip 10 sts. Repeat from * around. Join with sl st to 1st st and fasten off. (156 sts)
Round 14: Pull active loop of Color A to the front of the work, and replace hook in loop, ch2. *Dc2tog in Round 12, ch 2, skip 2 sts, sc in next st, ch 2, skip 2 sts, dc2tog in Round 12, dc in next 6 sts of Round 12. Repeat from * around. Join with sl st to 1st st and do not break yarn. (156 sts)
Round 15: Ch 2, *dc in next 12 sts, 2 dc in the next st. Repeat from * around. Join with sl st to 1st st and fasten off. (168 sts)
Round 16: With Color B, join to st above a sc st in Round 14, ch 2. *Dc in next 13 sts, 2 dc in next st. Repeat from * around. Repeat from * around. Join with sl st to 1st st and fasten off. (180 sts)
Round 17: With Color C, join to the right st of a V from previous round, ch2. *Dc in next 2 sts, fpdc in next st, 2 dc in next st, dc in next 11 sts. Repeat from * around. Join with sl st to 1st st and fasten off. (192 sts)
Round 18: With Color D, join to 1st st of previous round, ch2. *Dc in next 2 sts, fpdc in next st, 2 dc in next st, dc in next 12 sts. Repeat from * around. Join with sl st to 1st st and fasten off. (204 sts)
Round 19: With Color E, join to 1st st of previous round, ch2. *Dc in next 2 sts, fpdc in next st, 2 dc in next st, dc in next 13 sts. Repeat from * around. Join with sl st to 1st st and fasten off. (216 sts)
Round 20: With Color B, join to 1st st of previous round, ch2. *Dc in next 2 sts, fpdc in next st, 2 dc in next st, dc in next 14 sts. Repeat from * around. Join with sl st to 1st st and fasten off. (228 sts)
Round 21: With Color A, join to 1 st before a post st, ch 2. *2 dc in next st, hdc in next st, dc in next 17 sts. Repeat from * around. Join with sl st to 1st st and do not break yarn. Remove hook and pm in active loop. (240 sts)
Round 22: With Color C, join to any hdc st of previous round, ch 2. *[2 dc, hdc 2 dc] in next st, ch 17, skip 19 sts. Repeat from * around. Join with sl st to 1st st and fasten off. (264 sts)
Round 23: Pull active loop of Color A to the front of the work, and replace hook in loop, ch2. *Dc2tog in Round 21, ch 2, skip 2 sts, sc in next st, ch 2, skip 2 sts, dc2tog in Round 21, dc in next 15 sts of Round 21. Repeat from * around. Join with sl st to 1st st and do not break yarn. (264 sts)
Round 24: Ch 2, dc in each st around. Join with sl st to 1st st and fasten off. (264 sts)
Round 25: With Color B, join to st above a sc st in Round 23, ch 2. *2 dc in next st, dc in next 21 sts. Repeat from * around. Join with sl st to 1st st and fasten off. (276 sts)
Round 26: With Color C, join to 1st st of previous round, ch2. *Dc in next st, fpdc in next st, 2 dc in next st, dc in next 20 sts. Repeat from * around. Join with sl st to 1st st and fasten off. (288 sts)
Round 27: With Color D, join to 1st st of previous round, ch2. *Dc in next st, fpdc in next st, 2 dc in next st, dc in next 21 sts. Repeat from * around. Join with sl st to 1st st and fasten off. (300 sts)
Round 28: With Color E, join to 1st st of previous round, ch2. *Dc in next st, fpdc in next st, 2 dc in next st, dc in next 22 sts. Repeat from * around. Join with sl st to 1st st and fasten off. (312 sts)
Round 29: With Color B, join to 1st st of previous round, ch2. *Dc in next st, fpdc in next st, dc in next 24 sts. Repeat from * around. Join with sl st to 1st st and fasten off. (312 sts)
Round 30: With Color A, join to 2 sts before a post st, ch 2. *Dc in next 2 sts, hdc in next st, dc in next 23 sts. Repeat from * around. Join with sl st to 1st st and do not break yarn. Remove hook and pm in active loop. (312 sts)
Round 31: With Color C, join to any hdc st of previous round, ch 2. *[2 dc, hdc 2 dc] in next st, ch 23, skip 25 sts. Repeat from * around. Join with sl st to 1st st and fasten off. (336 sts)
Round 32: Pull active loop of Color A to the front of the work, and replace hook in loop, ch2. *Dc2tog in Round 30, ch 2, skip 2 sts, sc in next st, ch 2, skip 2 sts, dc2tog in Round 30, dc in next 21 sts of Round 30. Repeat from * around. Join with sl st to 1st st and do not break yarn. (336 sts)
Round 33: Ch 2, dc in each st around. Join with sl st to 1st st and fasten off. (336 sts)
Round 34: With Color B, join to st above a sc st in Round 32, ch 2. *2 dc in next st, dc in next 27 sts. Repeat from * around. Join with sl st to 1st st and fasten off. (348 sts)
Round 35: With Color C, join to 1st st of previous round, ch2. *Dc in next st, fpdc in next st, 2 dc in next st, dc in next 26 sts. Repeat from * around. Join with sl st to 1st st and fasten off. (360 sts)
Round 36: With Color D, join to 1st st of previous round, ch2. *Dc in next st, fpdc in next st, 2 dc in next st, dc in next 27 sts. Repeat from * around. Join with sl st to 1st st and fasten off. (372 sts)
Round 37: With Color E, join to 1st st of previous round, ch2. *Dc in next st, fpdc in next st, 2 dc in next st, dc in next 28 sts. Repeat from * around. Join with sl st to 1st st and fasten off. (384 sts)
Round 38: With Color B, join to 1st st of previous round, ch2. *Dc in next st, fpdc in next st, 2 dc in next st, dc in next 29 sts. Repeat from * around. Join with sl st to 1st st and fasten off. (396 sts)
Round 39: With Color A, join to 2 sts before a post st, ch 2. *Dc in next 2 sts, hdc in next st, dc in next 30 sts. Repeat from * around. Join with sl st to 1st st and do not break yarn. Remove hook and pm in active loop. (396 sts)
Round 40: With Color C, join to any hdc st of previous round, ch 2. *[2 dc, hdc 2 dc] in next st, ch 30, skip 32 sts. Repeat from * around. Join with sl st to 1st st and fasten off. (420 sts)
Round 41: Pull active loop of Color A to the front of the work, and replace hook in loop, ch2. *Dc2tog in Round 39, ch 2, skip 2 sts, sc in next st, ch 2, skip 2 sts, dc2tog in Round 39, dc in next 28 sts of Round 39. Repeat from * around. Join with sl st to 1st st and do not break yarn. (420 sts)
Round 42: Ch 2, *2 dc in next st, dc in next 34 sts. Repeat from * around. Join with sl st to 1st st and fasten off. (432 sts)
Round 43: With Color B, join to st above a sc st in Round 41, ch 2. *2 dc in next st, dc in next 35 sts. Repeat from * around. Join with sl st to 1st st and fasten off. (444 sts)
Round 44: With Color C, join to 1st st of previous round, ch2. *Dc in next st, fpdc in next st, 2 dc in next st, dc in next 34 sts. Repeat from * around. Join with sl st to 1st st and fasten off. (456 sts)
Round 45: With Color D, join to 1st st of previous round, ch2. *Dc in next st, fpdc in next st, 2 dc in next st, dc in next 35 sts. Repeat from * around. Join with sl st to 1st st and fasten off. (468 sts)
Round 46: With Color E, join to 1st st of previous round, ch2. *Dc in next st, fpdc in next st, 2 dc in next st, dc in next 36 sts. Repeat from * around. Join with sl st to 1st st and fasten off. (480 sts)
Round 47: With Color B, join to 1st st of previous round, ch2. *Dc in next st, fpdc in next st, 2 dc in next st, dc in next 37 sts. Repeat from * around. Join with sl st to 1st st and fasten off. (492 sts)
Round 48: With Color A, join to 2 sts before a post st, ch 2. *Dc in next 2 sts, hdc in next st, dc in next 38 sts. Repeat from * around. Join with sl st to 1st st and do not break yarn. Remove hook and pm in active loop. (492 sts)
Round 49: With Color C, join to any hdc st of previous round, ch 2. *[2 dc, hdc 2 dc] in next st, ch 38, skip 40 sts. Repeat from * around. Join with sl st to 1st st and fasten off. (516 sts)
Round 50: Pull active loop of Color A to the front of the work, and replace hook in loop, ch2. *Dc2tog in Round 48, ch 2, skip 2 sts, sc in next st, ch 2, skip 2 sts, dc2tog in Round 48, dc in next 36 sts of Round 48. Repeat from * around. Join with sl st to 1st st and do not break yarn. (516 sts)
Round 51: Ch 2, dc in each st around. Join with sl st to 1st st and fasten off. (516 sts)
Round 52: With Color B, join to st above a sc st in Round 50, ch 2. *2 dc in next st, dc in next 42 sts. Repeat from * around. Join with sl st to 1st st and fasten off. (528 sts)
Round 53: With Color C, join to 1st st of previous round, ch2. *Dc in next st, fpdc in next st, 2 dc in next st, dc in next 41 sts. Repeat from * around. Join with sl st to 1st st and fasten off. (540 sts)
Round 54: With Color D, join to 1st st of previous round, ch2. *Dc in next st, fpdc in next st, 2 dc in next st, dc in next 42 sts. Repeat from * around. Join with sl st to 1st st and fasten off. (552 sts)
Round 55: With Color E, join to 1st st of previous round, ch2. *Dc in next st, fpdc in next st, 2 dc in next st, dc in next 43 sts. Repeat from * around. Join with sl st to 1st st and fasten off. (564 sts)
Round 56: With Color B, join to 1st st of previous round, ch2. *Dc in next st, fpdc in next st, dc in next 22 sts, 2 dc in next st, dc in next 22 sts. Repeat from * around. Join with sl st to 1st st and do not break yarn. (576 sts)
Border/Round 57: Ch 1, sc in each st around. Join with sl st to 1st st and fasten off. (576 sts) Weave in ends.
Now cuddle up with someone or something you love!
The Fine Print


Penny Adams says
That is just beautiful. Thank you for the pattern!
Tamara Kelly says
Thank you Penny!
Angela says
This is soooo going in my ravelry queue 🙂 Thanks so much for sharing, it's absolutely GORGEOUS! Love the Ombre look with the different shades of red. LOVE!
Tamara Kelly says
😀 Thank you so much Angela!
Karen says
This is beautiful, thank you for sharing this 🙂
Nancy says
This afghan is sooo beautiful, but much more than I would want to try at this stage of my life. But as I said, it is beautiful.
Andria says
Just beautiful! How do you keep coming up with such creative designs?!
Tamara Kelly says
Thank you! 😀 Crochet is my passion!
Helen Charbonneau says
I have a big purple and pink afghan started almost done for my 14 year old granddaughter; it takes forever to go all the way around. I am going to finish it with this heart pattern. It will be 3 patterns in one. It now has the ring toss center crochet world, the circular with popcorns and puffs and now I will finish it with hearts. Thank you very much...
Tamara Kelly says
Sounds wonderful Helen!
Sharon Forakis says
I would like to see it when you get it finished. What colors did you use?
Sharon Forakis says
Opp just went back and seen purple and pink, sorry.
Beverly Graham says
Gorgeous. Saving this one to do later.
Grace says
oooo this is so pretty!! I'm going to have to add this to my to-do list for sure!
Kellie says
I couldn't wait to start this but I have a question...on round 7 where it's supposed to end with 72 stitches, it ends up being 80. I've checked and rechecked round 6. I have 60 stitches there. Can you help me to see what I'm missing? I've done the 2 dc in one stitch then dc in next 2 and still come up with 80. Thank you!
Tamara Kelly says
Oh shoot, that was a typo! I've corrected it now - that should've read dc 4, 2 dc instead. Thanks for letting me know!
Kellie says
Ok thank you so much! 🙂
Janet says
Thank you. I was having the same problem trying to get to 72.
Joyce says
love this very much - you are very inspiring, thanks for sharing
Jamie says
This is beautiful! Trying to talk my husband into an afghan for our bed (he'd prefer a quilt). Seeing this makes me think I need to be more persuasive! 🙂 Thanks for your great patterns! I follow you on facebook and look forward to seeing your posts everyday!
Tamara Kelly says
😀 Thanks so much Jamie!
Cheryl Moore says
Tamara, This is a beautiful afghan! Thank you so much for sharing! 🙂
Tamara Kelly says
Thank you Cheryl!
diana says
Hi Tamara,
sure 🙂 I'd be flattered if you feature my pop heart pattern on your blog 🙂
btw very awesome afghan!
crochet hugs, Diana
Tamara Kelly says
Thanks so much Diana! 🙂
Sandy says
This is lovely! I have to make this for my granddaughter. Thank you for sharing it with us!
Laurie says
I'm having trouble with Row 15 - where is the increase to get to 168 stitches? Love the pattern - thanks for your help in advance 🙂
Tamara Kelly says
I apologize Laurie, there was a typo on that line. I've corrected it now - it should read dc 12, 2 dc in the next.
Kara says
I am in LOVE with this Tamara!!!
Tamara Kelly says
😀 Thanks so much Kara!
Susan says
I am confused on row 4. It says to change to color C, which is holly berry but the picture shows you used 3 rows of white? Is there a correction I am not aware of? If you are not suppose to change colors how do you continue on with the same color?
Tamara Kelly says
Hi Susan! Round 4 is where you make the hearts within the white. You leave the active loop of Round 3 on a stitch marker, and work Round 4 with the red. Then come back to the white from Round 3, replace the loop on the hook, and continue on with the second white row. I hope that helps!
Sharon Forakis says
♡Love this pattern, thanks!
T'onna says
So beautiful!
tEresa white says
On row 15, does it matter where your increase lands? What I mean is are you intending for it to be increased on the sc stitch?
Tamara Kelly says
Hi Teresa! It does matter a bit, because on Round 16 you use that point to know where to begin, and that's used to line up Round 17. If you want to put the increase in a different place you can, but you'll need to keep track of where it would've been in the pattern, and it might throw off the post stitch swirl.
Teresa white says
Thank you so much! I did as the pattern said and it worked out beautifully. I'm very new to reading patterns so sometimes for me it's reading it a few times even trying to work it a few times till I get it right. Thanks for the response and the pattern, it's absolutely beautiful and I think after I finish mine (yay a me project) I'm gonna do one in blues with red hearts for my soon to be here grandson!
Tamara Kelly says
😀 That's fantastic to read Teresa! Thank you! I'm so glad.
Lisa V says
My bad, Tamara! I was miscounting on row 29. But I am still curious as to why this row was not an increase row.
Thanks again for a beautiful pattern!
Tamara Kelly says
Thank you! Some of the rows are not increase rows to help tame the hyperbolic nature of the finished piece! It has a built in ruffle, and it simply doesn't need to increase every row to keep growing. 🙂
Brigitta says
Hi Tamara (and co.!!)! I just want to tell you how much I LOVELOVELOVE your patterns and tutorials, particularly the Circle of Love! I've been able to crochet for 30-odd years, but never learnt how to follow a pattern! Your videos are priceless, IMO! I might be nuts, but I think I'm going to try this one (if I can calculate the yarn quantities in terms of balls, rather than skeins!
Tamara Kelly says
😀 Thank you Brigitta! Let me know if you need any help!
Brittany Yenser says
I love this pattern! I have already made a smaller version using greens and I'm working on my second green one now. I'm not sure if I missed it the first time or if my brain just "fixed" it, but in row 7 is says to join to the right of the sc from round 5 then do the repeated section. When I did that I came up with only 71 stitches and had to add a stitch in the same as the starting stitch to keep the pattern as well as the stitch count correct. Is that the way we are suppose to do it or am I over looking something? (Which very well could be the case!!) 🙂
Tamara Kelly says
Hi Brittany! The first stitch of that round is worked in the same stitch that you join to - maybe that's the confusion?
Angela McKean says
love this pattern, but the hearts aren't always lining up with the fpdc... i'm well into the pattern - probably about half way now. i figure as the first time i'm trying the pattern there are to be a few errors. i think i get confused about the ch 2 at each beginning row, do you count that as a stitch or is it ok to crochet the first stitch into the same stitch as the join/ch 2?
by the way - i think red heart with love is a new favorite yarn! it's soo soft and my bf hands don't snag the fibers like they would on other materials. in addition to these colors being incredibly similar to washington state university's colors, even the bf loves it!
Tamara Kelly says
I'm glad you like it! The ch 2 does not count as a stitch, the first stitch is still worked into that stitch - this prevents visual gaps as opposed to a ch 3. Sorry you're having trouble getting things to line up though! :/
Angela McKean says
no worries, although, this bit of information does help for the next one i'm doing in Seahawks colors!!! I always figure that when i work a new pattern, there will be errors - a small sacrifice to my yarn muse!
Brigitta says
Hi there! I'm having, probably, the same issues?! The fpdc lines are sort of diagonal, but then they all are, so that's ok! A variant of Tamara's one lol! I'm on row 49 and am having issues withe the chains being too tight when I do row 50...
Harriet says
I made this and I really enjoyed the pattern, Is there a way to send you a picture of my completed afghan. I used a different color combination than you suggested because it is what I had available.
Tamara Kelly says
I'm glad you liked it Harriet! You are welcome to post photos on the Moogly Facebook page or email them to me at TamaraKelly at Mooglyblog dot com. 😀
Sam says
Hey, I really want to make this but I'm in the UK and can't get red heart love yarn, can you recommend a substitute yarn I could use? And the hook size, it just says mm. Thank you 🙂
Angela McKean says
i finally finished the afghan this weekend!!! LOVE it! few things i noticed with the pattern... i think. i'll let you know if it's just my brain or if it could benefit other folks as well. 🙂 it's a gorgeous pattern! Thank you!!!
Cintia Betancourt says
Hermoso, me encanta el diseño. Voy a tratar de hacerlo.
Renee Melton says
I have loved this from the moment you posted it and finally have someone to make it for! My cousin is getting married and I want to make it for a wedding gift. After looking at the With Love color choices I am thinking Lettuce, Clover, and Evergreen should work for the ombre effect in place of the red....would you agree? I really want it to look as beautiful as yours, but his favorite color is green, so I want to "personalize" it for him by making it with his favorite color - your opinion would be much appreciated 🙂 I can't wait to see the finished project! Thanks so much for the beautiful free pattern!!
Tamara Kelly says
I think those would be perfect! 😀 Thank you so much Renee!
Amber says
Beautiful ,I would love to make this afghan 🙂
Tamara Kelly says
😀 Thank you Amber!
Yvonne says
Thanks for your beautiful pattern. I made it for my sister's 5th Wedding anniversary so I made it with only 5 heart rings. Worked up nicely. Thanks again!
Tamara Kelly says
Oh what a great gift idea! 😀 Thank you so much Yvonne!
Sheryl says
Hi 🙂 I was wondering if this could be done in just two colors? I have a lovely dark grey and a lavender color I would like to try it in, but unsure of how I would do it.
Angela McKean says
just my thought: i'd decide the main color and use that for the up to the first row of hearts where i'd introduce the 2nd color. then after finishing the 3rd row of "white" (back ground color/1st color) then switch to the 2nd color as the main, using the first color for the hearts. easier to picture in my head! try using some lined or quad paper to set the idea in your mind, each line can represent a row...
Sunny says
I am making the Circle of Love Afghan but I ran into a problem at round 15. Round 14 has 156 stitches. Round 15 instructs to doc in each around resulting in 168 stitches. If I'm making one stitch in each of 156 stitches, I end up with 156 stitches. Help! Thank you.
Tamara Kelly says
In round 15 you increase by 3 sts: dc in next 12 sts, 2 dc in the next st 🙂
christina says
I am finishing this now for my room. Changed colors a tad. Was wondering if wanted to do bigger one I should just continue to increase by 2 sts till size need? My daughter wants one to cover her king size bed.
Tamara Kelly says
It will take a little bit of experimentation - figuring out the increases to get as far as a throw took much trial and error! 🙂
Pamela says
SO PRETTY!!! I can't wait to make this! I've been looking for a pattern for my nephew's Christmas present, and I think I found it! Made without the hearts, because, hello, nephew lol. But he will love the circle pattern! Thank you so much!!!
Tamara Kelly says
😀 Thank you so much Pamela!
nila says
I'm having a time with row 4. I can't figure out how to surround the heart row with the white. Do you have a video to show how it's done?
Tamara Kelly says
I'm afraid I don't, what part is tripping you up?
Megan says
I love this blanket! I want to make it but I'm afraid it is above my skill level. I couldn't seem to find the skill level anywhere, am I missing it? I would love some feedback. Thank you!
Megan
Tamara Kelly says
I don't usually rate by skill level unless it's a particularly complicated pattern. If you are familiar with working in the round then I think you can do it! 😀
Sheila says
Hi! I love the pattern and just finished the afghan. I had to use regular Red heart instead of 'with love' and I chose red, rose pink, soft white baby pink and black. its for valentines day birthday gift for my sister and she loves the black with the red hearts. I think its turned out great and ripples well. On most of the CH 2 stitches at the begining of each row I omitted and started with a double crochet when needed and my count came out fine. this also helped when making the hearts because the first heart of the round (with the CH 2) always looked noticeably bigger to me. Anyway love it so much! thx! How do I post a pic of my afghan?
Sheila says
sry the pinks I used were perfect pink and petal pink.
Tamara Kelly says
I'm so glad you like it Sheila! You can share a photo on the Moogly Facebook page, or you can email it to me at tamarakelly@mooglyblog.com 😀
susan says
Hello im trying this blanket but i cant get it right on row 5 please help x x
Tamara Kelly says
Hi Susan! I have a tutorial that might help you see how Round 5 works: click here. 🙂
Paulette says
I had some trouble with getting the hearts to sort of line up with the fpdc in rows 3 through 5 but finally conquered it. Now I'm having problems with rows 12 through 14. The hearts do not line at all with the fpdc line. I can make them match, but then row 14 doesn't work. Please help cause I'm going crazy & I'm not a novice crocheter. I have done your stitches to start & stop each round so I am skipping over to the next stitch as well.
Tamara Kelly says
I can't really say what the problem is without being there I don't think. Can you be more specific?
Paulette says
When I start row 12 it states to start 1 st before a post at. Since I'm starting with a Chainless Staring Double Crochet, So as per your instructions, I start in the next stitch to do my first 2 DC. That means I am starting right on the FPDC line. That row seems ok until I do row 13. I start row 13 in the stitch following the hdc since again I am starting with the Chainless Starting Double crochet stitch. That is when the hearts do not line up with the fpdc lines. Can you help me now? Paulette
Paulette says
As I'm looking at my piece,I am noticing that my Fpdc rows start slanting to the right from the first row I do. I am also noticing if these fpdc didn't slant to the right, the rows would line up in the next section. So can you tell me where I went wrong from the first fpdc??? Paulette
Tamara Kelly says
It shoulds like perhaps your fpdc is a stitch too soon?
Tamara Kelly says
The first 2 sts, including the csdc, would be made in the stitch before the post stitch, as the ch 2 does not count as a stitch.
Debbie chandler says
Love this pattern, but I am having a hard time with it. It is easy I am just dumb lol can you send me a email I have some questions. Thank u so much
Tamara Kelly says
Feel free to email me at tkelly75 at gmail.com 🙂
karen says
Do I have to leave yarn attached or can I cut and reattach as needed? I'd rather feed in ends than to end up with a tangled mess, and that would be exactly what i'd have. lol
Tamara Kelly says
You can absolutely cut it if you prefer! 😀 Whatever works best for you!
Tamara Kelly says
I'm afraid there is not a Dutch translation for this at this time. Perhaps this video will help though: click here
Kristy says
I'm totally confused on round 5 - not sure how to even start it ;(
Kristy F says
Never mind 😉
I re-did rd 3 and watched your video for the ear warmer 😉
Tamara Kelly says
So glad it helped! 🙂
Kristy F says
Do you happen to have a chart?? I'm a lefty and I'm thinking like a right handed person but crocheting it left handed ?
Tamara Kelly says
I'm afraid not for this one - is there a particular part that's tripping you up that I can help with?
Cheryl says
Love love love this afghan!!! Another awesome pattern from my favorite crochet blogger! I can't wait to make it. Thanks Tamara!!!❤
Tamara Kelly says
😀 Thank you so much Cheryl!! I'm honored!
Caz says
Another gorgeous project added to my long, long list! I also love your descriptive story to this circle of love piece! Love your work and the passion you give it, Tamara!
Tamara Kelly says
😀 Thank you so much Caz!
Patty says
Hi!! I'm almost done with this afghan. I think I have about 13 rounds left for the full size. I was reading the past posts and see that I wasn't the only one having problems with the fpdc stitches lining up properly. Now, I am a beginner crocheter... And this is my first huge project! I think I'm doing fairly well. I have one section where I somehow have two less stitches than the rest. Starting at row 41 or so, I have lost a stitch in each section between hearts, according to your instructions. However, I am managing to make it work. I think it's because I'm channeling my mom, who LOVED to crochet, and she needed only to look at something and could replicate it with no instructions!
I'm really loving this piece though and would love to send you a pic of my completed product to hear how you think I did!
Tamara Kelly says
I'd love to see it Patty! You can email it to me at tamarakelly@mooglyblog.com or share it on the Moogly Facebook page! 😀
michele says
I have started this blanket with just three colors. Wish I
could post a picture, but don't know how.
Tamara Kelly says
Hi Michele! Unfortunately I cannot host photos in comments, but you are welcome to share them on the Moogly Facebook page, or tag me @mooglyblog on Instagram! 🙂 Or shoot me a Ravelry message if you upload photos there! 🙂 I hope you're enjoying it!
Mary says
Is there a way to download this file so that I can work from a printed copy?
Tamara Kelly says
Hi Mary! Please use the green Print Friendly button at the bottom of the page. If needed, here is a tutorial: https://www.mooglyblog.com/print-pattern-use-print-friendly-button-moogly/
Briana says
Hello I need help im on row six how do I dc in every stitch when there's chains from row 5 thanks
Tamara Kelly says
Hi Briana! You can either dc in the chains or just work 2 dc in each ch-2 sp. 🙂
Briana says
Thank you I'm on row 12 now and it's kinda bushing up a little not laying flat does it start to lay flat??? I've counted my stitches and I'm using a i9 hook 5.5 I crochet tighter doesn't look flat like yours thanks
Briana says
Oh and worsted weight yarn (4) forgot to put that in there.😆
Kelly says
I’m a newbie to crocheting but I’m really enjoying working this pattern. My question relates to the hearts. I’m just about ready to start my 3rd round of hearts but I’m noticing the hearts aren’t really taking form. Could it be because I’m making the stitches too tight, too loose, or something else?
Tamara Kelly says
Hi Kelly! The best advice I have here is to make sure your hdc sts in the middle are nice and tight, while the dc sts are taller and more relaxed. 🙂
Kelly says
Exactly the advice I needed. My hearts look like hearts now. Thank you 😊
Tamara Kelly says
Oh I'm so glad! 😀 ♥
TRacy king says
I don’t know how I missed this until now but I love it! Will have to add to the convince the kids they need this list!
Tamara Kelly says
😀 Thank you!
Lynda M Otvos says
The hook size is listed as "J, mm" Quick question, how many mms are in a J hook? Is there a number that should be in that description ?~!
Love the way the red peeks out from the crafted heart shapes--well done, my lady
Tamara Kelly says
Sorry about that Lynda, I don't know why or when the mm# got dropped from this pattern! It calls for a 6.5 mm (K). 🙂
Deanna says
Hi I am having trouble with Round 5 instructions is there a video of how to do that part? Thanks
Deanna
Tamara Kelly says
Hi Deanna! I don't have a video for this pattern, but this one uses the same stitches and might help: https://www.mooglyblog.com/ear-warmer-full-tutorial/
Mary A Klein says
This so beautiful I want to make for a wedding gift for 2 people. However, I keep getting stuck on row 14 with pulling up the white yarn. I can only get 4 dc not 6 dc before the Dc2tog. Please help. Am I doing something wrong? I'm not sure what happened that I am not getting this. I checked thated my count and it is correct. I even went to the video for your ear warmer not sure what I am doing wrong. Ugh
Tamara Kelly says
Thank you, I'm so sorry you're having trouble!
In Rnd 13 you made 8 chains (that we're going to work over). When you made those 8 chains, you should have skipped 10 stitches in Row 12.
You work a dc2tog in the first 2 stitches. Then dc in the next 6 dc stitches. Then there should be 2 left for the last dc2tog.
Be sure that you have 11 sts in between each hdc stitch in Rnd 12, and that you've skipped 10 in Rnd 13 whenever you ch 8. I hope that helps!
Mary A Klein says
Thank you so much!!! Not sure what is did wrong but now that came out.
Tamara Kelly says
Whew! So glad to hear it, thank you!