I love using my Cricut for all sorts of paper and craft projects. And now with the Cricut Maker and it's ability to cut fabric, I can use it to create custom no-sew bag linings for my crochet purses and pouches in record time - it's so easy!
 Disclaimer: This is a sponsored conversation written by me on behalf of Cricut.
The opinions and text are all mine. This post includes affiliate links.
To make my first lining, I used my Cricut Maker with the Rotary blade installed (included with the Maker), Cricut Fabric - On Trend Navy Hexie Dot, and Thermoweb Heat'N Bond Hem Iron-On Adhesive.

Additionally, I needed a 12" x 24" Cricut Fabric Cutting Mat, needle and thread, and rather than using an iron, I used the Cricut EasyPress!

So to prep, I ironed the fabric using the EasyPress, and laid it face down on the pink Fabric Cutting Mat. While you can use any fabric at all with the Cricut Maker (and about 300 other materials!), the Cricut Fabric is conveniently pre-cut to fit the mat. So if you use another fabric, you'll need to cut it down to size - 12" x 24" fits the largest mat.

Then, I measured the pouch I wanted to make a lining for. The inside of the pouch measured about 5.25" across, and 4" high. Since I knew I wasn't putting anything too terribly heavy in this pouch, I planned for the fold in the fabric to be along one side. If it were a tote bag or purse, I would've planned on putting the fold at the base of the bag for extra strength.

In Cricut Design Space™, I used the Shapes tool (along the left side) to get a simple square on the screen. Then, by clicking on the little padlock in the bottom left corner of the square it unlocked, and I was able to stretch and move the sides of my rectangle close to the size I wanted to cut, using the super convenient grid lines right on the Canvas.

And then, because I wanted the measurements to be just totally exact, I used the Size Tool right here at the top of the Canvas to put in my exact measurements! (Why didn't I just start there? Because I'm still learning too!) I set it to cut 5" wide and 12" long - big enough to fit my pouch with some extra for the adhesive.

Setting up the cut in Design Space took less than a minute, and I was ready to click Make it!

The cut itself was over in just another minute or two.... almost anticlimactic, it's so fast and easy!

Peeling it off is SO satisfying.

At this point, the Cricut Maker had done its job, but it was time to set the EasyPress heat to the temp recommended for my fabric (cotton) and the adhesive.

The Heat'N Bond works fast, so I set the timer for only 3 seconds!

Then, I cut strips of Heat'N Bond to fit my pouch - one strip along the bottom, and one along the side. If I'd put the fold at the bottom of the pouch, I would be putting one strip along each side. Be sure to keep the Right Sides of the fabric together here! You want the pretty part to show inside the bag, so it's ugly side out as you work.

Time to get hot! Using the EasyPress, it was bonded quick as can be. Totally and permanently! I pressed both sides, then folded over the adhesive strip sections over and pressed/bonded those down as well. Then, I folded over the top of the pouch, folding toward the outside, and with two more pieces of Heat'N Bond, that was secured as well.

Ta-da! The ironing took maybe another minute or two - a bag lining ready to install in under 5 minutes!

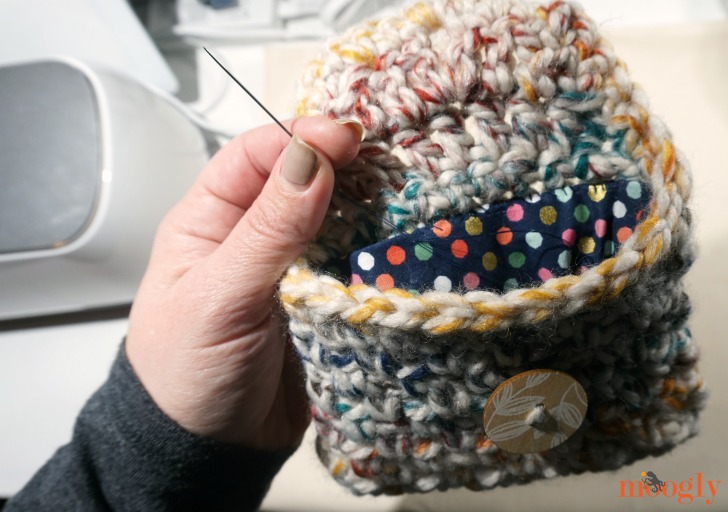
This is where, alas, you do still need to pull out the needle and thread - to sew the pouch into the bag itself. Ironing crochet isn't *generally* recommended - if there is any acrylic in there it can melt! Cotton and wool can be ironed, but it can crush the fabric, and I would recommend ironing a swatch before ironing a finishing project if you do want to experiment.

Sewing in the lining using the whipstitch was pretty quick too - it took less time to sew it in than it did to crochet the pouch itself. But with the Cricut Maker, EasyPress, and Heat'N Bond, it's far and away the fastest bag lining I've ever made.
And it's one of the prettiest too - even though all the cut edges are hidden now inside the pouch, it was just that much simpler to assemble and put together with perfectly cut edges. There was no need to make a template or try to trace on fabric, then hand-cut (poorly) and "make it work"... nope! I've made these no-sew bag linings without the Cricut Maker, but this so much easier.

I think my favorite part is how easy it is to get just the size you need with Cricut Design Space™ - between the grids, sizing tools, and shapes available, I know that I can make quick custom linings for all sorts of bags, in a variety of sizes and shapes. If you'd like to save this idea for later, I've created this Pin:

I hope you've enjoyed this tutorial on how to make no sew linings for crochet and knit bags - and that it makes crocheting and knitting them even more fun, knowing how much easier it is to finish them off!

Follow Moogly on Facebook, Twitter, G+, Pinterest, Instagram, and Tumblr!
This is a sponsored conversation written by me on behalf of Cricut. The opinions and text are all mine.


Leave a Reply