Ella the Elephant Lovey is cute, cuddly, and loves spinning in circles! The perfect gift for any baby, they'll never forget how cute this free crochet pattern is!

Disclaimer: This post includes affiliate links.

Ella the Elephant Lovey
Add this pattern to your Ravelry Queue and Favorites
US - I, 5.5mm hook (Furls Fiberarts recommended)
385 yds Martha Stewart Extra Soft Wool Blend (Aran/10 ply; 165 yds/151 m; 3.53 oz)
Color A: Gray Pearl - 1 ball; 165 yds
Color B: Bakery Box White - 1 ball; 110 yds
Color C: Lemon Chiffon - 1 ball; 110 yds
This yarn has been discontinued. Suggested substitutions: Bernat Fabwoolus, Red Heart Hygge Charm
Stitch Markers (Clover Lock Ring Markers recommended)
Yarn/Tapestry needles
Fiberfill/Toy Stuffing (small amount)
Gauge: 8 rows in blanket = 4"
Finished Size: 21" diameter blanket
Helpful Video Tutorials: Magic Circle, Working in a Spiral, Invisible Decreases; Surface Crochet; Shallow Post Stitches
NOTES:
- Make the pieces in the order listed for easiest assembly.
- Some pieces are made in a spiral, without joining, while others are made in joined rounds - this will be noted at the beginning of that section's instructions. Using a stitch marker in the first st of each round will help you keep your place
INSTRUCTIONS
EARS INSTRUCTIONS: Use Color A, make 2.
Row 1: Ch 3, skip the ch closest to the hook, sc in each remaining ch; turn. (2 sts)
Row 2: Ch 1, 2 sc in the 1st st, sc in the last st; turn. (3 sts)
Row 3: Ch 1, sc in the 1st 2 sts, 2 sc in the last st; turn. (4 sts)
Row 4: Ch 1, 2 sc in the 1st st, sc in each st to end; turn. (5 sts)
Row 5: Ch 1, sc in each st to last st, 2 sc in the last st; turn. (6 sts)
Row 6 - 11: Repeat Rows 4 - 5 until there are 12 sts in the row; break yarn leaving a long tail for sewing.
TRUNK INSTRUCTIONS: Use Color A, make 1, work in a spiral (no joining).
Round 1: Make a magic circle, hdc 9 in the ring. (9 sts)
Round 2 - 7: Sc in each st around. (9 sts) After Round 7, break yarn leaving a long tail for sewing.
HEAD INSTRUCTIONS: Use Color A, make 1, work in a spiral (no joining), use invisible decreases.
Round 1: Make a magic circle, sc 5 in the ring. (5 sts)
Round 2: 2 sc in each st to last st, 3 sc in the last st. (11 sts)
Round 3: 2 sc in the 1st st, sc in the next 2 sts, *2 sc in the next st, sc in the next st; repeat from * to end. (16 sts)
Round 4: Sc in the 1st 2 sts, 2 sc in the next st, sc in the next 3 sts, 2 sc in the next st, *sc in the next 2 sts, 2 sc in the next st; repeat from * to end. (21 sts)
Round 5: Sc in the 1st 4 sts, 2 sc in the next st, sc in the next 5 sts, 2 sc, *sc in the next 4 sts, 2 sc in the next st; repeat from * to end. (25 sts)
Round 6: Sc in the 1st st, 2 sc in the next st, sc in the next 5 sts, 2 sc in the next st, sc in the next 6 sts, 2 sc in the next st, sc in the next 5 sts, 2 sc in the next st, sc in the last 4 sts. (29 sts)
Round 7: Sc in the 1st 3 sts, 2 sc in the next st, sc in the next 8 sts, 2 sc in the next st, sc in the next 9 sts, 2 sc in the next st, sc in the last 6 sts. (32 sts)
Round 8: Sc in the 1st 4 sts, 2 sc in the next st, sc in the next 15 sts, 2 sc in the next st, sc in the last 11 sts. (34 sts)
Round 9: Sc in the 1st 12 sts, 2 sc in the next st, sc in the next 16 sts, 2 sc in the next st, sc in the last 4 sts. (36 sts)
Round 10 - 11: Sc in each st around. (36 sts)
Round 12: Sc in the 1st 3 sts, sc2tog, sc in the next 16 sts, sc2tog, sc in the last 13 sts. (34 sts)
Round 13: Sc in the 1st 11 sts, sc2tog, sc in the next 15 sts, sc2tog, sc in the last 4 sts. (32 sts)
Round 14: Sc in the 1st 7 sts, sc2tog, sc in the next 8 sts, sc2tog, sc in the next 9 sts, sc2tog, sc in the last 2 sts. (29 sts)
Round 15: Sc in the 1st st, *sc2tog, sc in the next 5 sts; repeat from * to end. (25 sts)
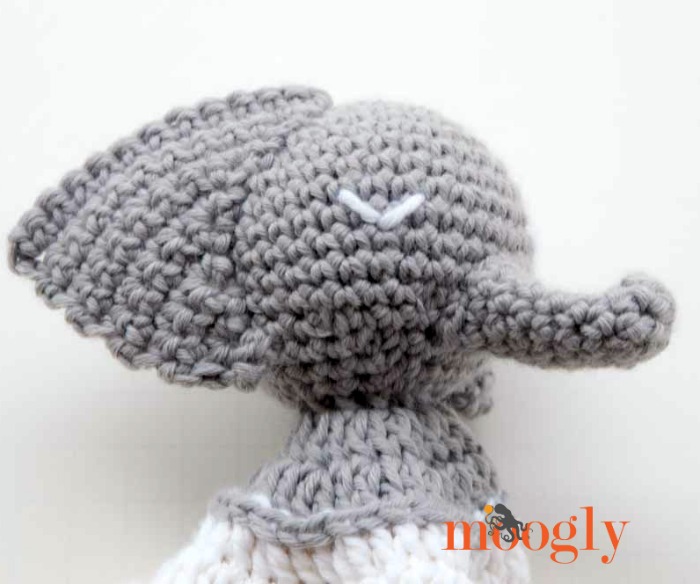
PAUSE FOR ASSEMBLY:
- Place a st marker in active loop, remove hook and set aside.
- Sew ears and trunk to head as shown in photos, using the long tails.
- Using Color B embroider on eyes, or use safety eyes if preferred.
- Replace hook in active loop and remove stitch marker to resume crocheting.
Round 16: Sc in the 1st st, sc2tog, sc in the next 5 sts, sc2tog, (sc in the next 4 sts, sc2tog) twice, sc in the last 3 sts. (21 sts)
Round 17: Sc in the 1st 2 sts, sc2tog, sc in the next 3 sts, sc2tog, *sc in the next 2 sts, sc2tog; repeat from * to end. (16 sts)
Round 18: (Sc2tog, sc in the next st) twice, sc2tog, sc in the next 2 sts, (sc2tog, sc in the next st) twice. (11 sts) Stuff head with small amount of fiberfill, until head is desired firmness.
Round 19: Sc2tog 4 times, sc3tog; break yarn leaving a long tail. Add more fiberfill if needed. Use tail to cinch last round closed.
BLANKET INSTRUCTIONS: Use Colors as indicated below, make 1, work in joined rounds (not a spiral).
Round 1: With Color A, surface crochet 12 sc sts in a circle at the base of the head; join with a sl st. (12 sts)
Round 2: Ch 2 (does not count as a st here and throughout), 2 dc in each st around; join. (24 sts)
Round 3: Ch 2, *dc in the next st, 2 dc in the next st; repeat from * around, join and break yarn. (36 sts)
Round 4: With Color B, join to any st and ch 2, *shallow bpdc in the next 2 sts, 2 shallow bpdc in the next st; repeat from * around, join. (48 sts)
Round 5: Ch 2, *2 dc in the next st, dc in the next 3 sts; repeat from * around; join and break yarn. (60 sts)
Round 6: With Color C, join to any st and ch 2, *shallow bpdc in the next 4 sts, 2 shallow bpdc in the next st; repeat from * around, join. (72 sts)
Round 7: Ch 2, *2 dc in the next st, dc in the next 5 sts; repeat from * around; join and break yarn. (84 sts)
Round 8: With Color A, join to any st and ch 2, *shallow bpdc in the next 6 sts, 2 shallow bpdc in the next st; repeat from * around, join. (96 sts)
Round 9: Ch 2, *2 dc in the next st, dc in the next 7 sts; repeat from * around; join and break yarn. (108 sts)
Round 10: With Color B, join to any st and ch 2, *shallow bpdc in the next 8 sts, 2 shallow bpdc in the next st; repeat from * around, join. (120 sts)
Round 11: Ch 2, *2 dc in the next st, dc in the next 9 sts; repeat from * around; join and break yarn. (132 sts)
Round 12: With Color C, join to any st and ch 2, *shallow bpdc in the next 10 sts, 2 shallow bpdc in the next st; repeat from * around, join. (144 sts)
Round 13: Ch 2, *2 dc in the next st, dc in the next 11 sts; repeat from * around; join and break yarn. (156 sts)
Round 14: With Color A, join to any st and ch 2, *shallow bpdc in the next 12 sts, 2 shallow bpdc in the next st; repeat from * around, join. (168 sts)
Round 15: Ch 2, *2 dc in the next st, dc in the next 13 sts; repeat from * around; join and break yarn. (180 sts)
Round 16: With Color B, join to any st and ch 2, *shallow bpdc in the next 14 sts, 2 shallow bpdc in the next st; repeat from * around, join. (192 sts)
Round 17: Ch 2, *2 dc in the next st, dc in the next 15 sts; repeat from * around; join and break yarn. (204 sts)
Round 18: With Color C, join to any st and ch 2, *shallow bpdc in the next 16 sts, 2 shallow bpdc in the next st; repeat from * around, join. (216 sts)
Round 19: Ch 2, *2 dc in the next st, dc in the next 17 sts; repeat from * around; join and break yarn. (228 sts)
Round 20: With Color A, join to any st and ch 2, *shallow bpdc in the next 18 sts, 2 shallow bpdc in the next st; repeat from * around, join. (240 sts)
Round 21: Ch 1, sc in each st around; join and break yarn. (240 sts)

Weave in all your ends, and you're all set! This sleepy little elephant blanket is ready for cuddles. I hope you enjoy making Ella the Elephant Lovey!
The Fine Print
Written pattern copyright Tamara Kelly 2015, all rights reserved. Please do not reprint or repost this pattern, but please do link to this page to share this pattern with others. If you wish to make items for sale from this pattern, or translate it to another language, please visit the About page for details. Thank you to Lion Brand Yarn for providing the yarn for this pattern!


Cintia - Sol de Noche {deco crochet} says
Lovely colors! Such a great idea for little kids Thanks for the pattern!
Tamara Kelly says
Thank you so much! 😀
Julie says
OH MY GOSH IT IS SO CUTE!! If I ever need a gift for a baby, I"m definitely going to make this.
Tamara Kelly says
😀 Thank you so much Julie!
Margaret says
This cuddly elephant is adorable. Thansk for sharing the pattern.
Tamara Kelly says
Thank you! 😀
CHERIE says
Thank you so much! Adorable! ?
Tamara Kelly says
🙂 Thank you Cherie!
Katie Finnell says
Wonderful pattern! Thank you so much for sharing it. I have been looking for a round lovey with elephant head for my niece for Christmas! This will be ideal.
Tamara Kelly says
Thank you so much Katie!
Katie Finnell says
I used this pattern to make a gray and pink lovey for my niece for Christmas. She loves elephants and the color pink. It was easy, quick (i managed to finish it in 3 days), and turned out great! Thanks so much for making this pattern available for everyone!
Tamara Kelly says
😀 Thank you Katie! I'm so glad to hear it!
Happy says
Great pattern! I made one in a dusky rose & added a crochet heart. It turned out beautifully! Thank you for such a great pattern.
Tamara Kelly says
Thank you Happy! 😀
Charlotte smith says
Why do the Ads cover the pattern printout when I want to print a pattern? I can't figure out how to print without the ads covering the instructions.?
Tamara Kelly says
Hi Charlotte! Please use the green Print Friendly button - it removes the ads.
Kathryn Brady says
how do I print pattern
Tamara Kelly says
Hi Kathryn! You can use the green Print Friendly button above if you'd like!
Charlotte Smith says
Thanks so much for helping me out, it worked!!!!
Tamara Kelly says
Yay!!
Katie Z says
I am struggling with starting the blanket part of the pattern. I watched your video on surface crocheting, but I am still having trouble. The video shows how to crochet into a flat surface, but how do I crochet into a 3D surface? Also do I slip stitch the line first and then go back to single crochet them or is there a way to surface crochet a single crochet line?
Tamara Kelly says
Hi Katie! It's the same technique, just make a sc instead of a slip stitch - when you've got the two loops on the hook, don't pull the second one through, yarn over and then pull through. To crochet into the 3D surface you work around the stitches like front post stitches.
Dominique says
I'm struggling to assembly the parts together. Do you have a video showing how to do it?
thank you very much, lovely patterns you have 🙂
Dominique.
Tamara Kelly says
I would recommend taking a look at this tutorial: click here
CinDy pourkaldani says
Thank you for this pattern. I enjoyed making it. My friend is having twin girls. So I did two.
Tamara Kelly says
🙂 I'm so glad you liked it!
fLORENTINA gHEORGHE says
THE IDEEA IS VERY LOVELY! I AM VERY HAPPY TO DISCOVER SUCH A MODEL !
MULTUMESC! ( IS IN ROMANINA LANGUAGE FOR "THANK YOU)
Tamara Kelly says
😀 Multulmesc to you too!
Bess says
Question about the body part of the pattern. Round 2: you say: 2st in each st to the last and 3st in the last (11 st). But if you multiply 5(st from the previous row)*2 (increase) =10, then add 3 sc to the last stitch comes out to 13 instead of 11. Do I need 11 or 13? Thank you so much for the help!! Kindly!!
Tamara Kelly says
Hi Bess! I'm sorry for the confusion - the last stitch gets 3 stitches in it total, not 3 additional (5 total). 🙂
Bess says
I figured it out right after I posted...my apologies...too tired to be able to count! I was suffering from the "one-more-row" syndrome! Thanks for your reply Tamara!!
Kay Bee says
Am making Ella the Elephant Lovey and did not like that each time I added a new color, it showed as a break in the sbbp pattern. I experimented and found I could start the next round by wrapping yarn around hook rather than with a slip knot and then doing a sbp then chain two.. How did you add each color? I am learning as I go and love your blogspot because you offer the videos so I can see how you do things.
Tamara Kelly says
Thank you Kay Bee! 🙂
A great way to avoid the break is to replace the (join with a new color, ch 2, and first shallow bpdc) with a standing stitch. I would use the standing double crochet (tutorial HERE) to work the first shallow bpdc directly into the previous row. Does that make sense?
KaTHRYN pLESS says
How cute! I'm going to make one for my grandson and granddaughter The will love them. Thanks so much for sharing the free pattern!
Tamara Kelly says
😀 Thank you!
Joanne Crook says
As I'm trying to use up yarn could I replace the yarn you used with Cotton instead?
As I don't have anything like the yarn that's suggested.
Tamara Kelly says
I think cotton would be a great choice - I love using cotton for baby items. 🙂
Joanne Crook says
Thanks for replying.
I too love using Cotton for my baby project.
Can't wait to start this one now.
Lisa says
Hello Tamara, could you please explain Round 4 of the body. I don’t understand where you say, ‘2 shallow bpdc in the next st’...... this doesn’t make sense to me. Please advise. Thank you.
Round 4:: With Color B, join to any st and ch 2, *shallow bpdc in the next 2 sts, 2 shallow bpdc in the next st; repeat from * around, join. (48 sts)
Tamara Kelly says
Hi Lisa! You work 2 back post double crochet stitches around the post of the next stitch, going right under the top two loops of the stitches rather than down around the post as you usually would. The second stitch is just worked slightly below the first. Does that help?
Patti says
I love your blanket, hat, booties and Ella pattern! I have made them for all six of my grandchildren (so far). They have asked for larger hats as the children are getting older and two of them have asked for extra Ella lovies. Your videos are so helpful and the pattern is very easy to follow.
Tamara Kelly says
Thank you so much, Patti!