
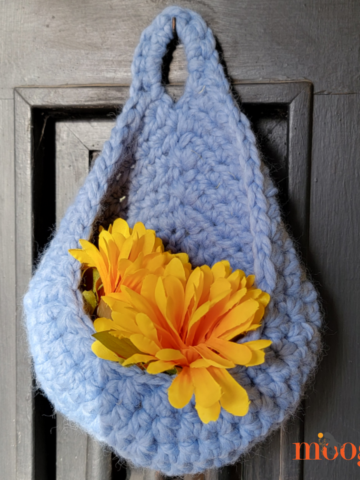
The Button Up Basket is a fun one skein crochet pattern that's unique and modern, and free on Moogly!
Disclaimer: This post includes affiliate links; materials provided by Red Heart and Clover USA.
Prefer an ad-free PDF? You've got options!


Prefer the free blog version? Keep scrolling!
Inspiration and Experimentation
I was inspired by a basket I saw in my favorite Swedish home goods store. Though it was made of felt and used snaps to assemble, I wanted to see if it could be done in crochet - with buttons!
It took a bit of experimentation for sure... But eventually, it was a success!

The Yarn
I used Red Heart Sweet Home to make the Button Up Basket. It made this fast project even speedier, while also adding a ton of texture and visual appeal. And... it's discontinued. But this basket works up just the same in Bernat Blanket!
As for the buttons, you might notice they are printed on the side that's facing "in." I bought these a while back, but never found just the right project for them - and now prefer the wood look of the "wrong" side. Waste not, want not!

Button Up Basket
Add this pattern to your Ravelry Queue and Favorites
US - L, 8.0mm - Clover Amour
75 yds Bernat Blanket (6 – Super Bulky/ UK: 14-16 ply; 300g/10.5 oz, 201 m/220 yds)
Colorway Shown: Steel (less than 1 ball used)
4 Buttons - 1 ¾" (44mm)
Stitch Markers - Clover Quick Locking
Gauge: 10 sts x 8 rows = 4"/ 10cm in hdc
Size: 4" high x 7" wide x 7" long at top
Helpful Links & Tutorials:
CSDC - Chainless Starting Double Crochet
Twisted sc - Twisted Single Crochet
Join with dc - Standing Double Crochet
NOTE:
This pattern is written primarily in Rows, with one Round worked (Round 10).
If preferred, substitute a ch 3 for the CSDC that begins each Side row.
INSTRUCTIONS
BASE OF BASKET
Row 1: Ch 12, skip the ch closest to the hook, sc in each rem ch across; turn. (11 sts)
Row 2 - 9: Ch 1, sc in each st across; turn. (11 sts)
Rnd 10: Ch 1, sc in each st across, turn 90 degrees and sc 9 evenly along side of piece, turn 90 degrees and sc in each foundation ch, turn 90 degrees and sc 9 evenly along final side of piece; join with sl st in first sc made, place stitch markers in 11th, 21st and 31st stitches. (40 sts)
Do not break yarn, continue with Side #1.
SIDE #1
Row 1: (CSDC, hdc) in first st, sc in next 7 sts, (sc, hdc) in next st, (hdc, dc) in next st; turn leaving rem sts unworked. (13 sts)
Row 2: (CSDC, hdc) in first st, (hdc, sc) in next st, sc in next 10 sts, (hdc, dc) in last st; turn. (16 sts)
Row 3: (CSDC, hdc) in first st, sc in next 13 sts, (sc, hdc) in next st, (hdc, dc) in last st; turn. (19 sts)
Row 4: (CSDC, hdc) in first st, (hdc, sc) in next st, sc in next 16 sts, (hdc, dc) in last st; turn. (22 sts)
Row 5: (CSDC, hdc) in first st, sc in next 19 sts, (sc, hdc) in next st, (hdc, dc) in last st; turn. (25 sts)
Row 6: CSDC in first st, ch 3, skip next st, sc in next 9 sts, ch 3, skip 3 sts, sc in next 10 sts, (hdc, dc) in last st; turn. (28 sts inc chs)
Row 7: Ch 1, twisted sc in each st and ch across, turn 90 degrees and sc 12 evenly along side of Rows 7-1; break yarn.
SIDE #2
Row 1: Join with dc in first marked st, hdc in same st, sc in next 7 sts, (sc, hdc) in next st, (hdc, dc) in next st; turn leaving rem sts unworked. (13 sts)
Row 2 - 7: Rep Side #1 Rows 2 - 7.
SIDE #3
Row 1: Join with dc in second marked st, hdc in same st, sc in next 7 sts, (sc, hdc) in next st, (hdc, dc) in next st; turn leaving rem sts unworked. (13 sts)
Row 2 - 7: Rep Side #1 Rows 2 - 7.
SIDE #4
Row 1: Join with dc in third marked st, hdc in same st, sc in next 7 sts, (sc, hdc) in next st, (hdc, dc) in next st; turn leaving rem sts unworked. (13 sts)
Row 2 - 7: Rep Side #1 Rows 2 - 7.
SEW ON BUTTONS
Step 1: Lay the piece so that Row 7 of each side is facing up. If crocheted right-handed there will be a buttonhole on the left of the side furthest from you. If crocheted left-handed, there will be a buttonhole on the right of the side furthest from you.
Step 2: Sew a button to the opposite end of each side - the side without a buttonhole - at the corner. See photo below for right-handed. Left-handed versions will have the button on the opposite end of each Side.
Step 3: Button up your new basket!

And that's all there is to making your own Button Up Basket! It was a fun crochet experiment for me to design, and I think it's a lot of fun to make and use too - I hope you agree!
Looking for a basket to match and make a set? Try the Simple Home Basket!

If this pattern does inspire you to make your own project, and you post a photo on social media, be sure to tag me @mooglyblog or #mooglyblog so I can check it out too! I love seeing what you make!
THE FINE PRINT:
Follow Moogly on Facebook, Twitter, Pinterest, Instagram, and TikTok! Thank you to Red Heart Yarns and Clover USA for providing the materials shown in this post. Written pattern copyright Tamara Kelly 2019, all rights reserved. Please do not reprint or repost this pattern, but please do link to this page to share this pattern with others.
If you wish to make items for sale from this pattern or translate it to another language, please visit the About page for details.


Kimberly Murphy says
I've tried and tried to make this, I just can't get the stitch count to come out right. Any possibility you'll be doing a video? I love the idea of this and really want to make some.
Thanks so much
Tamara Kelly says
Yes, it will be up on Wednesday of this week, barring technical difficulties! 🙂
Carolyn says
What did you see on the buttons with ...one strand of yarn??
Tamara Kelly says
Yes! 🙂 I have a tutorial on how to get yarn through buttons here: https://www.mooglyblog.com/thread-buttons-with-yarn-trick/
Carolyn says
Thanks! I got it. I just untwisted the strands and got what I needed. Love this. Thanks for sharing!
Renee says
I've made this basket 2 times it doesn't look as good as yours. 1st one was really bad just fitted the buttons were I could the 2nd one is a lot better but still not as good as yours. 3 sides fitted right for the buttons one side just had to make it work.if there is a way to send you the pics of them. maybe next time do one with the short side for some of us thst need more help. Thank you for oistung thing though. Renee
Tamara Kelly says
Hi Renee! I'd love to try to help if I can! You can email me at tamarakelly@mooglyblog.com 🙂