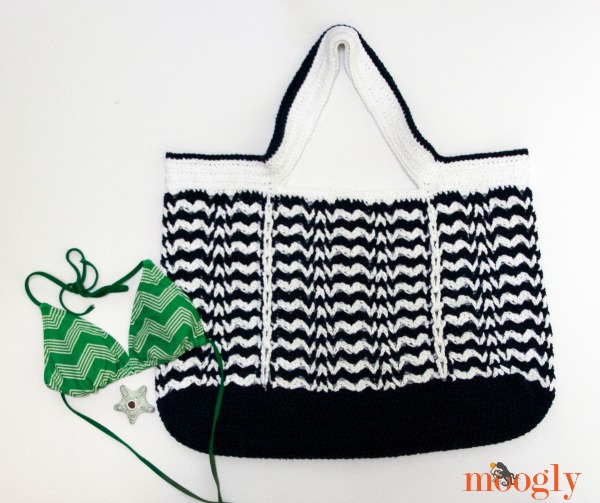
Whether it's the beach, the pool, the waterpark, or the local park, the Day at the Beach Bag is ready! With its generous size and wide straps, it's super practical, and the nautical striping and details make it a great way to show off your style - and crochet skills!
Disclaimer: This post includes affiliate links.
Prefer an ad-free PDF? You've got options!


Prefer the free blog version? Keep scrolling!
Inspired by a "Vintage" stitch pattern
The Day at the Beach Bag was weeks in the designing - but it'll be a lot quicker to crochet! And I think it was totally worth it. I love all the little details, from the four"ropes" that run up to the handles, to the surface crochet on the handles themselves, to the stripe stitch pattern - borrowed from the Vintage Wobble Afghan! Every way you look at it, this bag is full of interest - for both the crocheter and the user!

Day at the Beach Bag
Click here to add this pattern to your Ravelry Queue and Favorites!
US - I, 5.5mm hook
800 yds Bernat Handicrafter (Worsted "4"'; 100% cotton)
Color A: Classic Navy (420 yds used), Color B: Sail White (380 yds used)
Gauge: 12 sts x 10 rows = 4" in hdc
Size: 23" wide x 17.5" tall (not including handles)
Helpful Links and Tutorials
NOTES:
- This is an intermediate difficulty pattern - please be sure to read all the notes and watch the linked tutorials as needed!
- I prefer to start a row of hdc with a ch 1 and an hdc in the first st. If you prefer to ch 2 then feel free to substitute.
- If you prefer not to break the yarn after each stripe, you can carry them along inside the bag - however this may result in some color showing through.
- The first 15 rows are worked in rows, then starting with Round 16 you'll be working in rounds - see the Bag Bottom Tutorial linked above.
- This pattern, beginning in Rnd 16, is worked in turned Rounds, or joined Rows. Use a stitch marker in the first and last stitch of each rnd to help you find your stitches.
INSTRUCTIONS:
Row 1: With Color A, Ch 62, hdc 61; turn. (61 sts)
Row 2 - 15: Ch 1, hdc across; turn. (61 sts)
Round 16: Ch 1, hdc 61 across, spin work clockwise to hdc 15 along side, spin work clockwise to hdc 61 across bottom of starting ch, spin work clockwise to hdc 15 along last side; join with a sl st in first hdc, turn. (152 sts)
Round 17: Ch 1, hdc in each st around; join with a sl st in first hdc, turn. (152 sts)
Round 18: (RS) Ch 1, hdc in the first 14 sts, ch 2, skip 1 st, hdc 31, ch 2, skip 1 st, hdc 43, ch 2, skip 1 st, hdc 31, ch 2, skip 1 st, hdc 29; join with a sl st in first hdc, break yarn. (148 hdc, 8 ch)

Round 19: With Color B, join with a sl st to the st left of a ch-2 sp that is on the left, as you look at the RS of the bag (see diagram above). Ch 3 (as dc), *skip 2 sts, [(2 dc, ch 1, 2 dc) in next st, skip 3 sts, (dc, ch 1, dc) in next st, dc2tog over 3 sts (skipping center st), (dc, ch 1, dc) in next st, skip 3 sts] 3 times, (2 dc, ch 1, 2 dc) in the next st, skip 2 sts, dc in the next st, ch 12, skip ch-2 sp, dc in the next st, skip 2 sts, [(2 dc, ch 1, 2 dc) in next st, skip 3 sts, (dc, ch 1, dc) in next st, dc2tog over 3 sts (skipping center st), (dc, ch 1, dc) in next st, skip 3 sts] twice, (2 dc, ch 1, 2 dc) in the next st, skip 2 sts, dc in the next st, ch 12, skip ch-2 sp, dc in the next st; repeat from *, omitting last dc; join with a sl st in top of ch 3, break yarn.
Round 20: Turn bag to work from WS, in opposite direction of last row. With Color A, join to top of ch-3 that began previous round with a sl st, ch 5 (as dc and ch 2), skip ch-12 sp, *dc in the next st, skip 2 sts, [(2 dc, ch 1, 2 dc) in next st, skip 3 sts, (dc, ch 1, dc) in next st, dc2tog in between the posts on either side of the dc2tog of the previous round, (dc, ch 1, dc) in next st, skip 3 sts] twice, (2 dc, ch 1, 2 dc) in the next st, skip 2 sts, dc in the next st, ch 2, skip ch-12 sp, dc in the next st, skip 2 sts, [(2 dc, ch 1, 2 dc) in next st, skip 3 sts, (dc, ch 1, dc) in next st, dc2tog in between the posts on either side of the dc2tog of the previous round, (dc, ch 1, dc) in next st, skip 3 sts] 3 times, (2 dc, ch 1, 2 dc) in the next st, skip 2 sts,** dc in the next st, ch 2, skip ch-12 sp; repeat from * to **; join with a sl st in 3rd ch of ch 5, break yarn.
Round 21: Turn bag to work from RS again. With Color B, join with a sl st to the top of the ch-3 that began previous round, as you look at the RS of the bag (see diagram above). Ch 3 (as dc), *skip 2 sts, [(2 dc, ch 1, 2 dc) in next st, skip 3 sts, (dc, ch 1, dc) in next st, dc2tog in between the posts on either side of the dc2tog of the previous round, (dc, ch 1, dc) in next st, skip 3 sts] 3 times, (2 dc, ch 1, 2 dc) in the next st, skip 2 sts, dc in the next st, ch 12, skip ch-2 sp, dc in the next st, skip 2 sts, [(2 dc, ch 1, 2 dc) in next st, skip 3 sts, (dc, ch 1, dc) in next st, dc2tog in between the posts on either side of the dc2tog of the previous round, (dc, ch 1, dc) in next st, skip 3 sts] twice, (2 dc, ch 1, 2 dc) in the next st, skip 2 sts, dc in the next st, ch 12, skip ch-2 sp, dc in the next st; repeat from *, omitting last dc; join with a sl st in top of ch 3, break yarn.
Round 22 - 38: Repeat Rounds 20 - 21, ending with a Round 20 row.
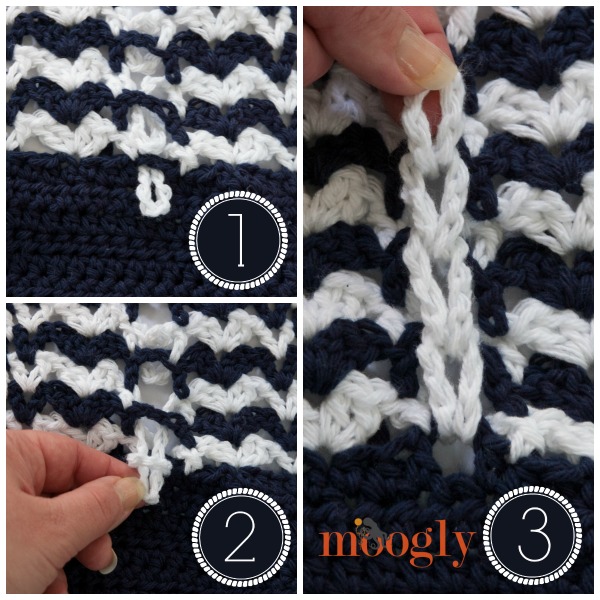
ROPE ASSEMBLY TIME!
Lace up the ch-12 loops as shown above. In words: Pull each ch-12 loop underneath the ch-2 loop below it, pulling toward the RS (outside) of the bag. Pull each ch -12 loop through the ch-12 loop below it, moving on up the bag. At the top of each loopy section, use a stitch marker or scrap yarn to hold the last ch-12 loop up with the last ch-2 loop. When all 4 loop sections are complete, move to Round 39.

Round 39: With Color B, join to the ch-1 sp in the center of a (2 dc, ch 1, 2 dc) between 2 of the rope sections, on one side of the bag (see photo above). Ch 1, sc in the ch-1 sp, sc in next 2 sts, 3 hdc in the next ch-1 sp, hdc in the next st, 3 hdc in the next ch-1 sp, *sc in the next 2 sts, sc in the ch-1 sp, sc in the next 2 sts, hdc in the next st, dc in the ch-2 sp enclosing the ch-12 loop, dc in the next st, [sc in the next 2 sts, sc in the ch-1 sp, sc in the next 2 sts, 3 hdc in the next ch-1 sp, hdc in the next st, 3 hdc in the next ch-1 sp] 3 times; rep from * with bracket section worked twice; then rep from * with bracket section worked 3 times; then rep from * with bracket section worked once; sc in the last 2 sts; join with a sl st in 1st sc, break yarn. (152 sts)

Round 40: With Color B, join to a st 2 sts before a dc that is on the right side of the bag (see photo above). Ch 1, hdc in same st as join, hdc in next 2 sts, ch 75 (or desired handle length), skip 31 sts, hdc in the next 45 sts, ch 75, skip 31 sts, hdc in the last 42 sts; join to first hdc with a sl st, do NOT turn. (90 hdc, 150 ch)
Round 41: Ch 1, hdc 3, dc in next 75 ch, hdc 45, dc in next 75 ch, hdc in last 42 sts; join to first hdc with a sl st, do NOT turn. (240 sts)
Round 42: Ch 1, hdc 3, dc 75, hdc 45, dc 75, hdc 42; break yarn join to first hdc with a seamless join, do NOT turn. (240 sts)
Round 43: With Color B, (join anywhere) ch 1, sc around inside of handle opening, using seamless join to finish off.
Round 44: With Color A, (join anywhere) ch 1, sc around outside/top of handles and bag opening; join with a sl st in 1st sc, do NOT turn.
Round 45: Sl st in each st around; break yarn and use seamless join to finish off.

OPTIONAL: Add rows of surface crochet to the handles and top, as shown in the photo above. I used Color B, but Color A would make great stripes if you prefer!
Time to Go!
Whew! That might look intimidating (and it was a bear to write it out!) but making it was so fun, I had to share it! Watching the tutorials will help you get an overview of how this bag comes together - and take the long lines of instruction one row at a time.
I'd bet that once you get started with each round, and see how they go, you'll be flying along in no time! I hope you enjoy making it as much as I did - and get a chance to take it somewhere fun soon!
Written pattern and photos copyright Tamara Kelly 2014. You are welcome to make finished items from this pattern to sell - see the About page for details.


Mindi says
This looks so cool! I'm totally making it. My goal is to make every one of your patterns, but I think I've only made six so far. 🙂
Tamara Kelly says
😀 Thank you so much Mindi!
Carrie says
You have OUTDONE yourself this time, Tamara!!! I love this soooooooooooooooo much! I wish I had the time to make it right now! Maybe in a month. . . LOL
Tamara Kelly says
😀 Thank you so much Carrie!
Dianne says
So hey - do you think this would work up nicely in acrylic. or do you think it's just better with cotton, esp. considering the beach implications? I am just thinking about the yard I would buy. I did buy some on the craftsy sale, but hmmmm I don't think I bought enough. DARN I will have to go to the yarn store again! 😀
Tamara Kelly says
😀 I think it would work with any yarn! I like cotton for totes, but that's just personal preference. No reason acrylic wouldn't be fine!
Timi Higdon says
Day at the Beach Bag! Heck I'm going to make it carry my crochet projects, btw I live in Colorado! Beautifully written patterns!
Tamara Kelly says
😀 Thank you so much Timi! (Just make sure to use a pouch for your hooks!!)
Denise Cottee says
Can you please advise how to print this pattern , I cannot work out how to print
regards
Denise
Tamara Kelly says
Hi Denise! Please use the green Print Friendly button - there a tutorial on how to do so HERE. 🙂
Angela says
I love this!!! I cannot wait to wake up in the morning and start working on it! I recently finished the wrapped stitch bag and I used it at our local Farmers market, I cannot believe how many complements I received!!!! Do you like to see pics of finished projects made with your patterns?? I would love to show you!!!! I am thinking of making this beach one in red and white!!!! Perfect for the 4th of July!!!! Thanks for your wonderful patterns!!!! Hugs--Angela
Tamara Kelly says
😀 Thank you so much Angela! I love to see photos! You can post them on the Moogly Facebook page, or if you'd like to email them to me at TamaraKelly@mooglyblog.com, I might just feature them in a future Moogly email newsletter! 😀
Dee says
When you showed the wobbly stitch a few months age I was really intimidated, but when I saw this bag I knew I had to overcome! With the help of your tutorials I came, I saw, I croched! Thanks so much!
Tamara Kelly says
Hooray!! 😀
Christina white says
Hi there! I am so excited to be making this bag! I have started, but I am stuck at Round 20 - I am hoping you can help. I am confused about starting Round 20, as I ended Round 19 with the ch12, sk ch2 space, slip stitch to join and Round 20 is supposed to be working in the opposite direction of Round 19. I'm not sure if I have misunderstood something but in Round 20 I will run into the ch12 almost immediately, so I'm not sure what to do since the directions don't say to skip that ch12 until further into the round. I must be doing something wrong but can't figure it out, hope this makes sense! I appreciate any help you can offer!
Christina
Tamara Kelly says
Hi Christina! I'm sorry for the confusion, I see what you mean. Yes, you ch 5 (as a dc and ch 2) and skip over the ch-12 loop, putting the first "real" dc in the dc on the opposite side of it there. I've edited the pattern to reflect that. You were right! 🙂 Thanks for letting me know!
Christina white says
Thank you so very much for your help, can't wait to finish it now!
Jennifer Moss says
This bag looks awesome...however, I am stuck on row 19, when I get to the part that says ch 12 and skip ch 2 spot, I am nowhere near the ch 2 spot, is it supposed to be like that?
Tamara Kelly says
Hi Jennifer, and thanks! 😀 It sounds like you missed some stitches somewhere - when you ch 12 you should have just crocheted into the stitch right before the ch-2 of the previous round. Did you repeat the part in the brackets 3 times?
Jennifer says
Thank you, thank you...I tried to avoid printing out the pattern but I think I am going to have to 🙂
Amy c. says
Hi Tamara, I just finished crocheting this bag and it's lovely however I know it needs blocking of some sort because the handles are a bit wonky. Could you share how you blocked your bag. Thanks so much for the pattern, I'm looking forward to using it on our beach trip in a couple of weeks. ?
Tamara Kelly says
Thank you Amy!
For blocking, it depends on what fiber they are made out of. If cotton/wool/natural fibers, I would hang the bag over the end of an ironing board or something similar, and then spray them with water, and then let them dry. If it's acrylic, then water might help if they are just a little wonky, but you'll want to use light steam if they need more help - just be sure not to melt them. If it's stretching out that's causing trouble, then lining them with a bit of woven ribbon should help. 🙂
Janice Chrostoski says
I was getting your emails but I don't anymore. I would like to be back on your emails list.
Tamara Kelly says
Hi Janice! I'll make sure your email address gets back on the list!