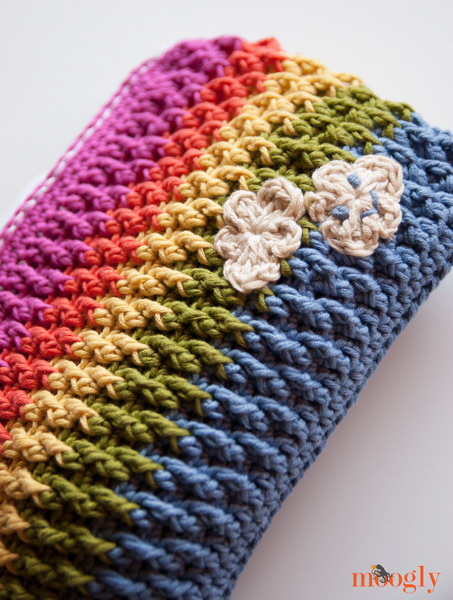
Gray skies and cold wind got you down? Crochet some sunshine! The Rainbow Happy Fun Pouch will come to your rescue!
Disclaimer: This post includes affiliate links. Yarn provided by Lion Brand.
Prefer the ad-free PDF? You've got options!

 Prefer the free blog version? Keep scrolling!
Cheer Up with Crochet!
The Rainbow Happy Fun Pouch is insanely cheerful. But in a good way! It's a great stash buster, and it works up fast. I wanted a simple pattern with which to try out the Sharp Hook but that could be done without the Sharp Hook too. I utilized a stitch pattern I used before, so there's already a video tutorial for the stitches if you need help there.
Stashbuster Time!
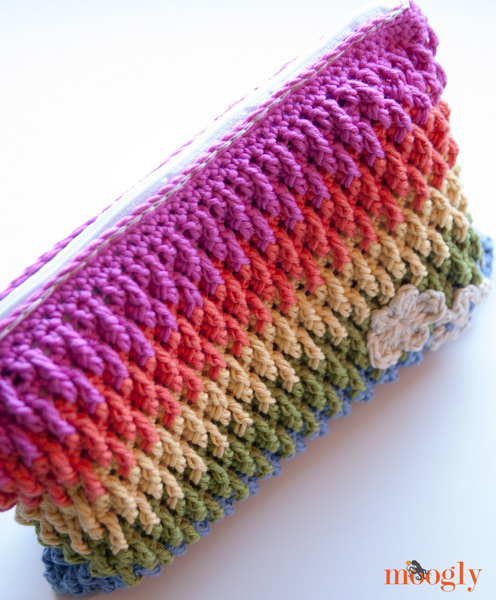
I also managed to use some leftover yarn from the Moroccan Market Tote - stashbuster! You can use any weight yarn you have, just use a hook one size smaller than that recommended on the label. As written, the pouch is 6.5" tall and 9.5" wide, but the great thing about pouches is they're useful at any size!
A little Cloudy...
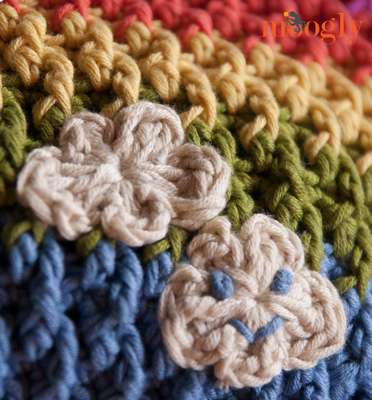
For the appliques I used a free pattern from Fiber Flux: One Round Cloud. They took hardly any yarn at all! And I gave one a little smiley face with some scrap yarn. As you do when making a Rainbow Happy Fun Pouch.
Rainbow Happy Fun Pouch
Add this pattern to your Ravelry Queue and Favorites
- US - G, 4.00mm hook, or hook one size smaller than recommended on label
- 190 yds Lion Brand LB Collection Cotton Bamboo (DK/Sport weight)
- Zipper
- Sharp Hook or sewing needle
- Thread to match zipper
- Crochet thread, mercerized (if using Sharp Hook)
- Video Tutorial for the Stitch Pattern HERE
Instructions
Row 1: With Color A, ch 40. Hdc in 2nd ch from hook and each ch to end. Turn. (39 sts)
Row/Round 2: Ch 1, hdc in each st to end of row. Turning to work in the side, hdc in the side of the first st of Row 1. Turning again, hdc in the each ch of the starting ch, opposite the first row of hdc sts. With one more clockwise turn, hdc in the side of the last st of Row 1 and join to the first st of Row 2 with a sl st, to begin working in the round. Do not turn. (80 sts)
Round 3: Ch 2 (does not count as first st), dc in each st around. Join with a sl st to first dc. (80 sts)
Round 4: Ch 1, sc in each st around. Join with sl st to first sc. (80 sts)
Round 5: Ch 2, fptrc around dc below the first st. Dc into the next st. *Fptrc around the st below the next st, dc in the next st. Repeat from * to end. Join with a sl st to first fptrc. (80 sts)
Round 6: Ch 1, sc in each st around. Join with sl st to first sc. (80 sts)
Round 7: Ch 2, dc in the 1st st, fptrc around st below next st. *Dc in the next st, fptrc around the st below the next st. Repeat from * to end. Join with a sl st to first dc. (80 sts)
Round 8: Ch 1, sc in each st around. Join with sl st to first sc, using the Next Color. (80 sts)
Round 9-12: With Color B, repeat Rounds 5-8.
Round 13-16: With Color C, repeat Rounds 5-8.
Round 17-20: With Color D, repeat Rounds 5-8.
Round 21-24: With Color E, repeat Rounds 5-8. Add more stripes in pattern for a taller bag if desired.
Round 25: Ch 1, sc in each st around. Join to first sc with sl st. (80 sts)
Round 26: Sl st in each st around. Break yarn and seamless join.
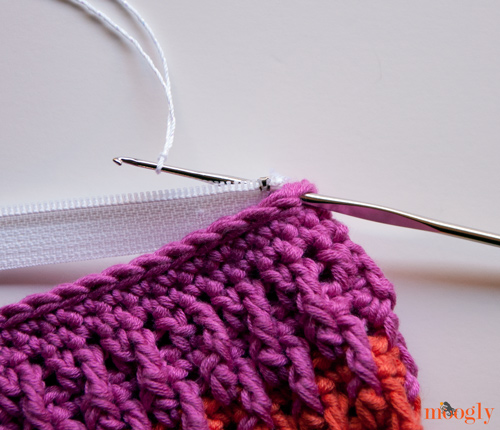
Add Zipper:
Measure the length of zipper needed. If the zipper is too long, sew a new stopper with matching thread, by sewing around the zipper repeatedly so it cannot open.
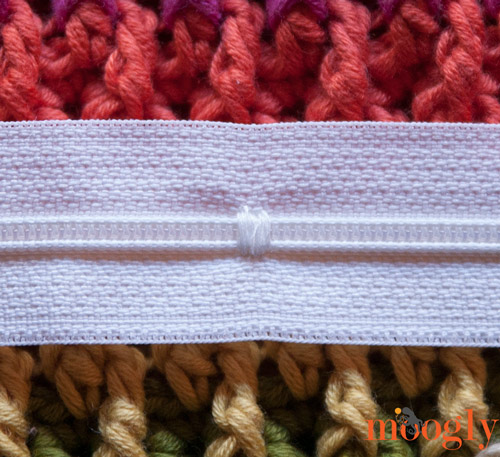
Working into Round 26, attach the zipper. If you're using a needle and thread, sew it on with the back stitch (tutorial HERE). If you are using the Sharp Hook and crochet thread, use the Surface Crochet method (tutorial HERE).
The Fine Print
And that's all there is to it! The Rainbow Happy Fun Pouch is a quick and easy pattern that's great for using up odd balls of yarn. Make it in one color or as many as you like - and then fill it with something fun!
Written pattern copyright Tamara Kelly 2013 – share this pattern via links only please! Get Moogly on your favorite social media sites: Facebook, Twitter, Pinterest and Tumblr, and sign up for the Newsletter at the top of the page so you don’t miss a thing!


stitches'n'scraps says
I think you just solved one of my "what on earth can I make for HER?" dilemmas for this year! thank you! 🙂
Tamara Kelly says
😀 You're very welcome!
namis says
Thanks
Daisy says
Thanks for this free Pattern,I love it ,its soo beautiful.I will make this to my Granddaughters !!!! <3
Jackie says
Did you line the pouch or just add the zipper?
Tamara Kelly says
I just added the zipper, but I know others lined it. 🙂
Jackie says
If I line it. Do you recommend any special fabric?
Tamara Kelly says
Any fabric should work! Fleece is nice because you don't have to worry about raveling. But other than that, it's up to you!
Jackie says
Thank you. Will try the fleece. Also, can you attach material plus zipper onto bag at same time?
Tamara Kelly says
For that many layers I'd recommend sewing a quick edge around the fleece, and crocheting into that rather than the fleece itself - unless you an punch holes in the fleece!
Martha Thatcher says
I love this stitch pattern I am using it to make a sleeping bag for my grandkids dolls. Can't wait to use it for making a blanket. Thank you so much for sharing it.
Tamara Kelly says
😀 Thank you Martha!
Tasha says
Too cute!
Tamara Kelly says
Thank you Tasha!
Des Maunz says
I love this! Actually I love pouches of all kinds and this looks fantastic and fun!!! Thank you so much for the wonderful pattern. ♥
Tamara Kelly says
Thank you Des!
Maria Halberstadt says
To this date, I have never heard of a "sharp hook", and thought this might be an opportunity to at least find out more about it and possible enter to win said hook. For whatever reason, the link fore this contest and any reference to it is not loading. The clutch-like pouch does seem interesting enough and will help reduce the "clutter" of left-over yarn that keeps building up. Thank you for the pattern.
Tamara Kelly says
Oh dear the link was broken! Sorry about that Maria, thank you for bringing it to my attention! All fixed now. Here's the link: https://www.mooglyblog.com/sharp-crochet-hook-review-giveaway/
Joyce says
Thanks Tamara - i'm going to make this, haven't tried this stitch yet, so will be fun to give it a go!!!
Jacki says
This looks gorgeous - and I have quite a few ends of balls to use up. Wouldn't mind winning one of the Sharp crochet hooks either!
Tamara Kelly says
😀 Thank you Jacki!
Pauline Brechlin says
Thank you for this fun rainbow of the day! Love this and shared it like crazy! 🙂 But then again I love Moogly!
Tamara Kelly says
😀 Thank you so much Pauline!!
Shawna says
So adorable. I have never thought about about combining these techniques! You sure are amazing! ♥
Tamara Kelly says
😀 Thank you Shawna!
Rasangika says
Thank u very much
Gudrun Schindler says
amazing!!!!...amazing!!!!...amazing!!!!...amazing!!!!...amazing!!!!...amazing!!!!...amazing!!!!...amazing!!!!...amazing!!!!...amazing!!!!...amazing!!!!...amazing!!!!...amazing!!!!...amazing!!!!...amazing!!!!...
Marrie says
AGREED!!!!!!!!!.:P
sorry for the interference!..but its my RED SIGNAL..LOL!!!
fiorella says
bellissimo
Sara says
Super fun Tamara! Linking up tomorrow at Tangled Happy. 🙂
Tamara Kelly says
😀 Thank you so much Sara!<3
Marrie says
I hope this is one of the most beautiful thing I've seen in the history of moogly!..actually history of crochet..no,no,no..history of my LIFE!..: )
Tamara Kelly says
😀 Thank you Marrie!
Marrie says
Welcome!..<3
Heather says
Hi Tamara! I'm in love with this pattern and working on one now! Is it possible to get the final measurements on the one you made? Mine looks big to me!
Tamara Kelly says
As written, the pouch is 6.5″ tall and 9.5″ wide. 🙂
Heather says
Hmm I'm doing the stitch wrong. Mine is that big and I'm only on the second color. I knew it looked wrong!
Heather says
I apologize.I just saw the dimensions listed up there. That's what I get for skipping the intro paragraph and diving right into the pattern! Lol
Tamara Kelly says
😀 No worries! It was easy to miss!
eileen says
I would like to make this pattern, but what is a fptrc stitch. Never saw this abbreviation before.
Thanks,E
Tamara Kelly says
Hi Eileen! Fptrc is front post treble crochet. 🙂 There's a video tutorial for the stitch pattern linked in the bullet points with the hooks and yarn.
BrendaL says
Tamara, your genius is showing! Every time I come to Moogly I learn something new, creative and usable. It will be awhile before I can start the clutch, but I will FOR SURE use your Surface Crochet method many times over. (I used your link to the tutorial.) Thank you so much for your generosity in sharing your designs and your genius.
Tamara Kelly says
😀 Thank you so much Brenda!
Doris says
I am trying to print out then pattern and when I do there are advertisements printed over the instructions, What am I doing wrong, I love this little purse, trying to make them for a cruise.
Tamara Kelly says
Are you using the green Print Friendly button? If so, you can click on the parts you don't want to print and they'll be "deleted" from the print copy. The ads shouldn't be overlapping, but even so I'm sure you don't want to print them. 🙂
kreshel says
It's very nice I think I want to make one.
Tamara Kelly says
Thank you kreshel!
Rosalee Anderson says
Do you show how to do row 2.. I'm kind of stuck when you say to crochet in the side stitch.
Rosalee
Tamara Kelly says
Hi Rosalee - it's not crochet in the side stitch, but crochet in the side of the stitch. If you look at the row, there's the tops of the stitches, the bottoms of the stitches, and the sides on the left and right. So you crochet across the top, and then you spin the work clockwise and crochet into the side of the stitch you last worked into, then spin again and work across the bottoms, then spin one more time and work in the side of the first stitch you worked into. Does that help?
colleen says
Would love to see step 2 in a video.. hint hint 🙂
I'm a bit confused here myself.
This looks beautiful though!
Tamara Kelly says
Hi Colleen! It's essentially the same as if you were making a border around a (tiny!) blanket - you turn and work all the way around. Does that help? I can add a video to the list too, but I hope maybe the blanket description helps?
Rosalee Anderson says
Please do a video
Joan says
I have questions about joining. In round three when you say the ch 2 doesn't count as a stitch, do you put your first stitch in the same stitch as the join? Some patterns are different. So joining always gives me a problem. I understand that the chain 1 or 2 is to maintain the height of the stitch. I just get confused about where to put the first and last stitch for the row following a join, and sometimes end up with too many stitches (or too few.)
Joan says
In row three, do you make the first stitch in the same stitch as the chain 2? Some patterns vary o this. Also the chains do not count as stitches throughout the pattern, right?
Tamara Kelly says
Hi Joan! Yes, in Row 3 the first stitch is made in the same stitch as the ch 2. The chs at the beginning of a round in this pattern never counts as a stitch. 🙂
Janet says
Hi I made this in thread crochet and would like to line it. Any duggestions
Janet says
Suggestions sorry
Tamara Kelly says
Hi Janet! Futurgirl has a great lining tutorial that I'd recommend!
farzan says
what are meaning "st" "ch" "hdc" " and other abbreviations used in text ??
Thank you for nice assistance
Tamara Kelly says
Hi farzan! Here's a list of standard crochet abbreviations: http://www.craftyarncouncil.com/crochet.html
Robin says
I made the morroccan market tote from your pattern and love it! I also love the bamboo cotton yarn! I saw this and just had to try it. I'm not quite finished yet but I absolutely love the pattern and texture of this little bag. I'm toying with the idea of creating a little flap closure instead of a zipper. I've also added some daisy motifs for my daughter.
Lyssie says
I love clutch purses, but I didn't like the size of the pouch, so I cut the starting chain and number of pattern repeats in half to make a beautiful clutch with a cloud in the bottom left corner.
shakila says
Love this pouch. Thanks very much for the pattern. Made two. both were appreciated very much. Credit goes to you . thanks again.
Bj says
When I saw this picture I thought it was a headband and wanted to make it for my granddaughters. It's such a beautiful stitch. Any idea how long you would make it for a headband? Such a cute pouch!
Tamara Kelly says
Since everyone's gauge (and heads!) are different, I'd make a small swatch with your chosen yarn and see how big it is, and go from there! The pattern has a lot of stretch to it though, so be sure to make it an inch or two smaller than the head measurement. 🙂
Chhavi says
Hi Tamara,
I absolutely loved this textured pattern. It is so unique! I want to make a hat for my daughter ( regular adult size) with this pattern. Can you please tell me how to do the increase using this pattern. First I thought I'll do simple double crochet increase on top for first 5-6 rows, and then use this pattern. But I'll really appreciate if you can suggest me a way to use this stitch through out.
Thank you so much! Chhavi
Tamara Kelly says
Hi Chhavi! That would basically be a whole new design - there's not really a "standard" way, it would be designing a hat from scratch. I'll see if I can come up with something for fall though! 🙂
Karla says
Thank you for posting the free pattern! It is lovely:) I have included it on my blog Karla's Making It (linking to your pattern, of course)! You can view it here http://www.karlasmakingit.com/free-crochet-patterns/free-crochet-purse-and-bag-patterns/
Tamara Kelly says
😀 Thank you so much Karla!
Mandy says
I have searched for days for an etrepreneurs day project for my daughter, nothing i found suited her. She had to make 30 products to sell made out of recycling. My left over wool we see as recycling and she absolutely loved your pencil case. Thank you.
Tamara Kelly says
😀 I'm so glad to hear it! You're very welcome!
wala says
hi
thank you for this beautiful lovely pattern.
i am medical student and i love to crochat i use it as stress reliever. and small projects are my favorite because usually i am kind of busy.
thank you and i wish if i can show you my final result for this bag.
Tamara Kelly says
Thank you Wala! 🙂 I would love to see a photo! You can email it to me at tamarakelly at mooglyblog.com, or post it to the Moogly Facebook page!
Allison says
For round 8, when you say "using the Next Color" does that mean that you change colors after round 7 and round 8 is a row of sc in the new color, or does that happen at the end of round 8? Thank you!
Tamara Kelly says
Round 8 is in the first color, you just do the slip stitch at the end with the next color, which sets you up to use that color in the next round without any color bleed. 🙂
allison says
Got it--thank you!
vidya says
amazing rainbow happy fun clutch. I want to do it for my daughter. Thank you very much for sharing this amazing pattern n also for video tutorial
Tamara Kelly says
Thank you so much! 🙂
Belinda Osborne says
Greetings! I Love the Stitches for the colorful rainbow pouch and would Love to make a rectangle scarf! How would I do that without working it in the round?
Tamara Kelly says
Hi Belinda! That info is in the video tutorial for the stitch pattern: https://www.mooglyblog.com/overlapping-post-stitch-pattern/ 🙂
neena says
amazing rainbow i love this pouch. Thanks very much for the pattern
Tamara Kelly says
😀 Thank you!
Julia Ong says
this is beautiful. Would like to ask how u line the bag? I can knot, crochet...but very bad at sewing...😅
Tamara Kelly says
Hi Julia! Here's my favorite method: https://www.mooglyblog.com/nearly-no-sew-bag-lining-tutorial/ Thank you!
Elese says
Do you have. Avideo to show what you mean to start row two or the name of this stitch?
Tamara Kelly says
Hi Elese! Yes, here you go: https://www.mooglyblog.com/bag-bottoms-crochet-tutorial/ 🙂
Debi Schuhow says
What are the stitch multiples? I want to make several “stacking” pouches for Christmas Gifts.
Thanks!
Tamara Kelly says
For the overlapping post stitch worked in the round, it's just a multiple of 2 - so if you look at how Row/Rnd 2 is made, you can actually start with any number of stitches for Row 1, as it will always end up being an even number after Row/Rnd 2. 🙂
Debi Schuhow says
THANk you so much Tamara! I
AgnesCreates says
Hello Tamara, I really enjoyed making this pouch using your free pattern. Also, I had some yarn leftover and figure out how to crochet that particular stitch in rounds. I am guessing the stitch is called alpine crochet stitch. You can view my crochet circle clutch purse at https://thesewingpixies.com/round-wristlet-purse-crochet-pattern/
Tamara Kelly says
Hi Agnes! ♥ Thank you so much! It's not quite the alpine crochet stitch - this one is a bit different. I've used it for several patterns, including in the round! Sorry you had to take the time to figure it out!
Skye says
Lol, I clicked on this and read some of the top (before the pattern) and it said, "Grey skies and cold wind got you down?" I looked outside, and the sky is grey and it's windy outside... Are you secretly spying on me, Tamara? Lol, just kidding.
Awesome pattern by the way! I even made it.
Tamara Kelly says
♥ Too funny! Thank you so much!