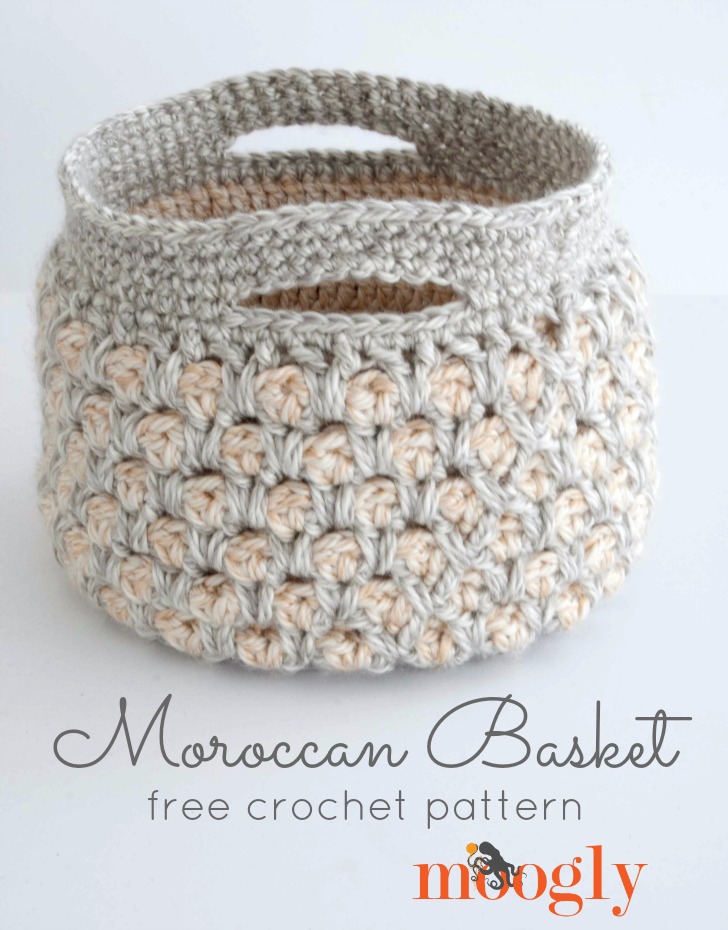
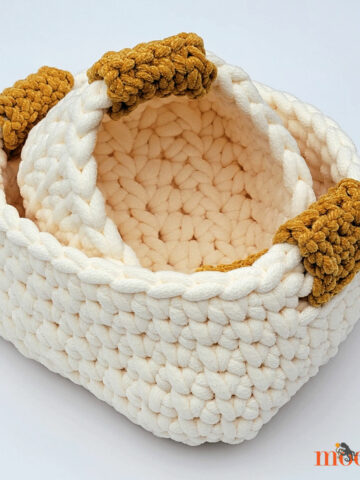
I knew I wanted to make a basket, and I knew I wanted to use Lion Brand Heartland Thick & Quick... and when I started crocheting, the Moroccan Basket just flew off my hook!
 Disclaimer: This post includes affiliate links.
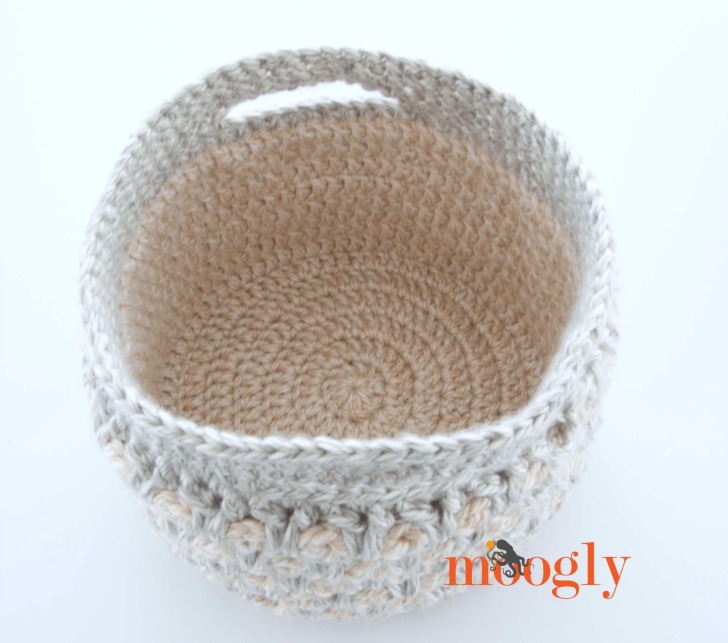
The Moroccan Basket brings back one of my favorites - the Moroccan Tile Stitch - and pairs it with chunky yarn in a handy and attractive basket that works up fast! The basket is lined with another layer of crochet, making it even more useful and sturdy. And I think it looks better for it too!
Moroccan Basket
Add this pattern to your Ravelry Queue and Favorites
- US - K, 6.5mm hook (Furls Heirloom Wooden Hook recommended)
- 350 yds Lion Brand Heartland Thick & Quick (100% acrylic, Super Bulky (6); 125 yds/114 m; 5.01 oz)
Color A: Katmai - 2 balls
Color B: Acadia - 2 balls - Stitch Markers (see Moroccan Tile Stitch tutorial linked below for how to use these in this pattern)
- Gauge: 3 rnds = 4" across
- Finished Size: 8" diameter x 7" tall
- Helpful Tutorials: Magic Circle; Dc2tog; Round 7 Tutorial; Moroccan Tile Stitch in the Round; Handles. Please see the Crochet Abbreviations Page if needed.
Liner: (make this portion first, with Color B)
Round 1: Make a magic circle, ch 2 (does not count as a st), dc 12 in the ring; join to work in the round. (12 sts)
Round 2: Ch 2, 2dc in each st around; join. (24 sts)
Round 3: Ch 2, dc in the first st, 2 dc in the next st, *dc in the next st, 2 dc in the next st; repeat from *, join. (36 sts)
Round 4: Ch 2, 2 dc in the first st, dc in the next 2 sts, *2 dc in the next st, dc in the next 2 sts; repeat from *, join. (48 sts)
Round 5: Ch 2. dc in the next 3 sts, 2 dc in the next st, *dc in the next 3 sts, 2 dc in the next st; repeat from *, join. (60 sts)
Round 6: Ch 2, 2 dc in the first st, dc in the next 4 sts, *2 dc in the next st, dc in the next 4 sts; repeat from *, join. (72 sts)
Round 7 - 14: Ch 2, dc in each st around, join. (72 sts) After Round 14, break yarn and finish off. Turn this bowl Wrong Side out, so that the Right Side will face up when inserted in the Outer.
Outer: (make this portion second, then add the liner when instructed)
Round 1: With Color A, make a magic circle, ch 2 (does not count as a st), dc 12 in the ring; join to work in the round. (12 sts)
Round 2: Ch 2, 2dc in each st around; join. (24 sts)
Round 3: Ch 2, dc in the first st, 2 dc in the next st, *dc in the next st, 2 dc in the next st; repeat from *, join. (36 sts)
Round 4: Ch 2, 2 dc in the first st, dc in the next 2 sts, *2 dc in the next st, dc in the next 2 sts; repeat from *, join. (48 sts)
Round 5: Ch 2. dc in the next 3 sts, 2 dc in the next st, *dc in the next 3 sts, 2 dc in the next st; repeat from *, join. (60 sts)
Round 6: Ch 2, 2 dc in the first st, dc in the next 4 sts, *2 dc in the next st, dc in the next 4 sts; repeat from *, join. (72 sts)
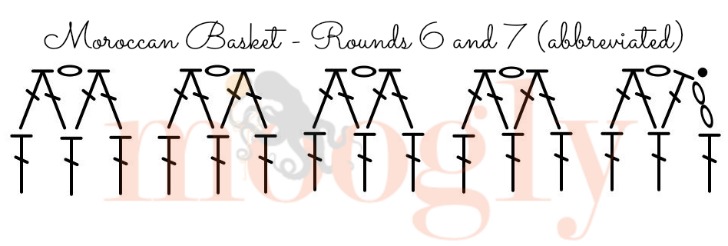
Round 7: (CLICK HERE for a video tutorial for this round) Ch 2, dc in next st (counts as dc2tog), ch 1, dc2tog in same st as 2nd half of previous st and next st, *dc2tog in next 2 sts, ch 1, dc2tog in same st as 2nd half of previous st and next st; repeat from *, join to top of 1st dc2tog, pull up loop and remove hook. (24 ch-1 sps)
Round 8: With Color B, join with sl st and ch 4 in 1st ch-1 sp of previous round, dc in the same ch sp (V st made), *(dc, ch 1, dc) in next ch-1 sp; repeat from * to end, pull active loop and working yarn of Color A to front of fabric, then join to top of ch 3, remove hook from loop, pull up loop and remove hook. (24 ch-1 sps)
Round 9: Replace hook in active loop of Color A, ch 4, dc between first and last V of the row before the previous round (NOT in the ch sp, but between the dc2tog sts), *(dc, ch 1, dc) in the next sp between dc2tog sts of round before the previous round, enclosing previous round; repeat from *, leave working yarn and active loop of Color B behind fabric, join to top of ch 3, remove hook from loop, pull up loop and remove hook. (24 ch-1 sps)
Round 10: Insert hook in the ch sp of the first V st of the previous round, replace hook in active loop of Color B and pull it through the V to the front, leaving working yarn behind, ch 4, dc in the ch sp of that first V, *(dc, ch 1, dc) in next ch-1 sp; repeat from *, pull active loop and working yarn of Color A to front of fabric, then join to top of ch 3, remove hook from loop, pull up loop and remove hook. (24 ch-1 sps)
Round 11: Replace hook in active loop of Color A, ch 4, dc between first and last V of the row before the previous round (NOT in the ch sp, but between the Vs), *(dc, ch 1, dc) in the next sp between V sts of round before the previous round, enclosing previous round; repeat from *, leave working yarn and active loop of Color B behind fabric, join to top of ch 3, remove hook from loop, pull up loop and remove hook. (24 ch-1 sps)
Round 12: Repeat Round 10.
Round 13 - 18: Repeat Rounds 11 - 12. Break Color B after Round 18.
Round 19: Repeat Round 11.
Round 20: Insert Liner into basket, Wrong Sides together. Continuing with Color A and working through both Outer and Liner in each st, ch 1, *sc in next dc (and next st of liner), sc in ch-1 sp (and next st of liner), sc in next dc (and next st of liner); repeat from *, join. (72 sts)
Round 21: Ch 1, sc in next 5 sts, ch 10, skip 10 sts, sc in next 26 sts, ch 10, skip 10 sts, sc in last 21 sts; join. (52 sc, 20 ch)
Round 22: Ch 1, sc in each st and ch around; join. (72 sts)
Round 23 - 24: Ch 1, sc in each st around; join. After Round 24, break yarn and finish off. (72 sts)
And that's it! The liner adds a solid interior so the basket isn't see through at all, as well as making it sit up pretty. And the handles are just the right side for carrying it wherever you need it to be! I hope you enjoy this free crochet basket pattern!

Written pattern copyright Tamara Kelly 2016, all rights reserved. Please do not reprint or repost this pattern, but please do link to this page to share this pattern with others. To print this pattern for personal use, please use the green Print Friendly button at the bottom of the pattern. If you wish to make items for sale from this pattern, or translate it to another language, please visit the About page for details. Thank you to Lion Brand Yarn for providing the yarn for this pattern!


Jen S
Oh!!! I love this! I have no reason to make it ... Quick! Give me a reason to make this!!! I need to have this.
Kashi
To be happier!!! ?
Tamara Kelly
😀
Joanne Green
You could use it for a hat, put clips on the handles and use them to carry your grocery bags. lol Forgive me for my sick humor. But I would make it anyways, then later on if you forget someones birthday gift, tada, you will already have it made.
Tamara Kelly
Thank you! To show off! 😉
Leslie
You need something to carry your books back to the library in.
Tamara Kelly
😀 Love it!
Angela (Colour and Cotton)
I'm going to make one of these for my bathroom to store my little crochet facial scrubbies, or small rolled up towels.
But, do you ever need a better reason than just to crochet something? 🙂
Tamara Kelly
😀 Great idea Angela, thank you!
Diana
To keep sweet kittens warm while they are sleeping beside your keyboard. 😀
Robin
Great idea, but my kitten would rather be on me than beside me!
Crw
Be a great gift for anyone!
Penny
Wow. That is gorgeous!
Carolina peralta
This is a nice basket. I'm a new learner and wanted to make things like this. I would like to know if there is a video tutorial available.
Tamara Kelly
Thank you! There is a video tutorial for the stitch pattern linked in the supplies list above. 🙂
pat brewster
Just love the basket!
Tamara Kelly
Thank you so much! 😀
bee Bee
Hi Tamara,
I would like to ask if the inner piece is done completely (until row 14) before we start with the outer piece? Or I shd crochet both from row 8 onwards?
I have completed the outer pierce but I don't understand how to start from row 8 of the inner piece now
Looking forward to your reply. I'm doing the basket for a Christmas present.
Thanks
Thanks
Tamara Kelly
Hi Bee Bee! 😀 You make the inner piece all the way through Round 14, and finish it off, and set it aside. Rnds 8–14 are all the same as Rnd 7 - just dc evenly around.
Then, you make the outer through Round 19. Then in Round 20, you insert the liner and crochet through both layers.
Does that answer your question?
Teri
Thank you. I am looking forward to getting this started.
Tamara Kelly
Thank you Teri!
Chickie
Hi Tamara, love the basket and in the process of making it now. Question on Round 9 ... since round 7 of the Outer was a dc2tog rather than traditional v-stitches, and there was only a ch1 every 2nd dc2tog, shouldn't we be working our new colour over the dc2tog 'join' stitch? The ch1 space was already worked into from round 7 when we did round 8 and created the first true v-stitches. I hope I'm making sense... there are no more ch1 spaces left to work into by the time we get to row 9
Chickie
Sorry, I mean there is no 'between the v-stitches' in row 7 to work our row 9 into...
Tamara Kelly
I'm sorry, that was unclear. You work between the dc2tog sts.
Maron
Hi sorry I'm already confused about row 7. If I follow the instructions, I seem to make the row too long and bulky. I need a video for row 7,8,9. Or at least a picture for each row. Thank you!
Tamara Kelly
Ok, I'm adding it to the list! 🙂
stephanie
Thank you for your request. I am having the same problem..
Kay
Help, my outer basket came out much smaller than my liner. My stitch count for inner is correct and I think the outside is correct.
Tamara Kelly
Hi Kay! If it's just too short, you can add a row or two (or three) to get to the same height! If it's narrower around, then there's another issue, as they should have the same stitch count.
Johnnie J Mazzocco
I also had this problem.My insert folds over on itself (vertically) a couple of times to fit, and I've recounted everything. I'm making the basket for my daughter, and I really want it to look like the photo. So... I'm going to tear out most of the insert and see how much I need to reduce to make it fit.
Debbie
I had the same issue. I counted and re-counted. My stitch count is correct, but the circumference of my liner was larger than my inner. I used the same exact yarn and hook. I ended up "joining" two stiches of the liner to one of the outer in 4 places spaced throughout, when I connected the liner to the outer. There are a few "bulges" on the liner, that could probably be stretched out, but I've decided that, since I made it for myself, I'll leave it. I plan to make another basket for my aunt, and I think I'm going to reduce the stitch count around the liner by 3.
Tamara Kelly
Hi Debbie! Sorry for the trouble - I'm not sure how that happened, but it sounds like you've found a good solution! 🙂
Carly
Wow! Love it!
Tamara Kelly
Thank you! 😀
Evelyn Byrne
My daughter will love this,I'm going to make it for her
Tamara Kelly
Thank you Evelyn!
Tammy
Can you do a tutorial of photos or a short video? I got to Round 8 of the outer portion and have no idea what I am supposed to do. I also read round 9 and this left me equally as confused! So now I am stuck and would really like to do this basket! Thank you!!
Tamara Kelly
Hi Tammy! There is a tutorial for this stitch pattern linked in the notes, below the hook and yarn. 🙂
Marie
I also am stuck on rows 8 and 9. I did row 8 wrong and had half the height of row i\8 folded into the inside of the basket, went onto row 9, then when row 10 came up, I realized I did row 8 incorrectly and was lacking a row. We really need a closer look at how to do the dc in the previous row -- and do you incorporate rows 8 and 9 together??? I am determined to get this done. I have already ripped out at least 4 rows. Marie Colette
Tamara Kelly
The video tutorials linked above show all the stitches, I'm afraid I cannot make new ones for this pattern as I'm not currently working with this yarn company.
Patricia Davidson-Peters
I love your designs, and am always looking forward to what's new! Definitely want to try this one. Thanks so much for sharing your talents.
Tamara Kelly
Thank you so much Patricia! 🙂
Nancy Craig
Thanks for the great looking pattern....love that it is lined and your color choice is really great. Going to make and then decide on use - maybe a gift (for ME!)
Thanks for all you share with us! 🙂
Tamara Kelly
Thank you so much Nancy!
Rebecca L
LOVE it! I'm really into baskets lately, and this is awesome, as always!
Thanks so much for sharing!!!!
Rebecca L
Tamara Kelly
Thank you so much Rebecca! 😀
cynthia
I am quite new to crocheting, but I do love. If i TRY this....is it stiff enough to stand up well, or does it need stiffening? I made a little set of 3 baskets with lids as my first project as a Christmas gift, not knowing about stiffening at the time, and it was necessary for me to cut that plastic canvas stuff to line them. That did the trick, but....can you even stiffen something large like this?
Tamara Kelly
Hi Cynthia! The liner on this one helps make it stiff - that and the small hook combined with chunky yarn. But of course it is yarn, and will fold and bend without *too* much effort. You could use plastic canvas around the body if you like!
december
Hi, Tamara!
I've been reading your blog for a while now, but somehow never write a comment. You are a great crocheter and writer, it is always a pleasure to read your posts 🙂
This basket is amazing - I like how the colour pops through the otside layer! I am definitely adding it to my bookmarks, so I can crochet one like this in the future 🙂
Thank you for your hard work!
Tamara Kelly
Thank you so much December! I really appreciate it! 😀
Deborah
OOOH! Love this basket. Do you think it would work to double in size? Thanks for sharing with us!
Tamara Kelly
Thank you Deborah! I think so, though the taller the sides get, the floppier they will become. 🙂
Nancy McQuade
Wondering if you increased the size and how it worked out.
Diana
"dc2tog in next 2 sts, ch 1, dc2tog in same st as 2nd half of previous st and next st"
Does this mean that I would dc2tog over two stitches chain one and go back into the same stitch for the first part of the stitch and in the next empty stitch to complete it? then use the next two empty stitches for the next dc2tog? Do you have a video or ? something so I can see where to put the stitches?
Tamara Kelly
You've got it! 🙂 No video yet, but it sounds like I may need to make one. You have it correct though! 🙂
Shinobu
Hi, thanks for the great idea. I'm really confused about Outer Row 7, if I follow the instruction as is, there seem to be too many stitches. And the row gets stretched, won't hold up. Do you have either video or photo instruction for Row 7, 8 and 9? If I can see the photo of Row 7, I'd get much better idea. Thanks!
Tamara Kelly
In Row 7, there should be 24 ch-1 sps, with a dc2tog on each side of the ch-1. It won't stand on it's own - the liner and following rows help it. I don't have a video for Row 7, but the video for Rows 8-9 are included in the video links in the pattern, after the yarn/hook/etc. I may do a video for Row 7 in the future.
Shinobu
Tamara, Thank you very much. Actually V-shape part (Row 8, 9..) wasn't bad at all. If there is a picture of Row 7, that'll already help a great deal. I sort of get the idea, instead of empty V shape, you fill up that space with DC2tog. I'll try again. The pattern is beautiful, I may try to apply in different things.
Tamara Kelly
Sounds like you've got the idea! 🙂 Yes, it's just to make it a little more solid there at the bottom.
Shinobu
Tamara, it worked! I unwound "regular" Moroccan stitches with empty V's and re-started. It's genius, as you said, the basket started to "stand up"! I was right at the first time, but your confirmation really helped, so on Row 7 you have tiny empty V and sort of two reverse V filled up, and Row 8 picks up the small V. This is far better than "regular" Moroccan stitches at the bottom. Thank you very much.
Tamara Kelly
Oh yay! 🙂 I'm so glad to hear it!
Gloria Sterrett
I finished it with a few probs couldn t find the tut. at first. Still had some probs and thee are some mistakes.
But I love it and think it turned out great!!!you very much for the pattern and your hard and talented work!!
Tamara Kelly
Thank you so much Gloria! 😀
Gloria Sterrett
I posted pics of it.
Thanks again.
Tamara Kelly
😀 I'll keep an eye out, thank you!
Karen Schulz
Hi Tamara- Is there a print friendly button for the Moroccan tile basket?
I am picking up yarn tomorrow to get started 🙂
Tamara Kelly
Yes, it should be at the bottom of the pattern. 🙂
Jan P.
Hi Karen,
It's kind of hidden there at the bottom, I also had a hard time finding it. It's below Tamara's copyright info and just below the row of icons for sharing with all the different sites like facebook, twitter etc. and right above the RELATED POSTS heading on the bottom left. Hope that helps 🙂
Tamara Kelly
Thank you Jan!
LISE
I NEED HELP WITH THIS PATTERN. I'M LOST ON THE OUTER SHELL HOW CAN 72 STICHES GO DOWN TO 24 OR AM I READING THIS WRONG?
Tamara Kelly
It doesn't go down to 24 stitches, it's 24 repeats - if you just count the ch-1 sps, as directed in the count, then there will be 24 of them. 🙂
Dee
Just a quick compliment... I love the way you write a pattern, clean and simple.....Thank You...
Tamara Kelly
Thank you so much Dee! 😀
Marjon
It was nice to make this basket. A have to translate it in Dutch but with help of the tutorial i have complet it.
Happy with the basket. Maybe i make another one too.
Marjon
Tamara Kelly
🙂 I'm so glad you enjoyed it Marjon!
Traci
Completed the basket this week....proud of my new learning! Thank you for such a wonderful project pattern and I love the colour choice! The video links were quitter helpful as well.
Tamara Kelly
🙂 I'm so glad to hear it! Thank you Traci!
Linda
Love this pattern. I've just made 2 in super quick time and I can see me making more. In fact I use use a lot of your patterns as my favourite 'go to' for gifts. Always a pleasure to find a new Moogly design. Thanks Tamara, keep up the good work.
Linda (in UK)
Tamara Kelly
Thank you so much Linda!! I really appreciate it! 😀
Anne-Marie Gagiano
The green print button does not work for me? And I must have this pattern. It is beautiful!!!
Anne-Marie Gagiano
Got it thank
Tamara Kelly
Ah, glad it worked for you! Sometimes it just doesn't want to load up the first time. 🙂
Sonia
Help! I'm having a hard time understanding round 7. Please explain what, "dc2tog in next 2 sts, ch1, dc2tog in same at as 2nd half of previous st and next st" mean. I'm just not getting it, and I've crocheted over 35yrs. Please help me.....
Tamara Kelly
Hi Sonia! I'm sorry for the confusion - I'll be making a video tutorial for this next, hopefully releasing it this week!
Nancy Peck
I'm working on liner. When get to beginning of a round and chain two before making double crochets (rounds 3 +) get a hole.
What would happen to pattern if I leave out the chain two's and go directly from last round to double crochets of next round?
Tamara Kelly
I find that that leaves a bit of a hole too. I think a better option would be a chainless starting double crochet: tutorial here. 🙂
Carolyn Roberts
Ctncel I found it and have printed it T hanks
Tamara Kelly
🙂 Glad you found it, thank you Carolyn!
Vicki L
Just fished making the basket,, had to watch the video re: row 7, but overall a really easy project. I made this for my daughter's birthday but am sorely tempted to keep it for myself☺ Guess I'll have to make one for myself!
Tamara Kelly
😀 Yay! Thank you so much Vicki!
Gail
Dear Tamera: I cannot find the green print button. I want to make your Moroccan basket for personal use only. Please help! Thanks.
Tamara Kelly
Hi Gail! If you are on mobile, I'm afraid it won't show up - this is a recently discovered problem and we're still trying to find something that will work on mobile without breaking the site. So for now, I have to recommend that you go to PrintFriendly.com and enter the URL of the pattern there to create the printable copy. It's one more step, but it works!
If you aren't on mobile and just aren't spotting it, it should be right below the social media share buttons, and right above the related posts. 🙂
Diane
I can't get it to print for me.
Tamara Kelly
If Print Friendly isn't working for you, you might have better luck with CleanPrint https://chrome.google.com/webstore/detail/print-or-pdf-with-cleanpr/fklmmmdcofimkjmfjdnobmmgmefbapkf?hl=en-US
Liz
I made one basket and it is beautiful. However, the liner was a bit bigger than the outer basket. I am not very good with following instructions. For the liner, I'm wondering if the ch 2 at the beginning of each round substitutes for the first dc. I did ch2 AND a dc in first stitch.
Tamara Kelly
The ch 2 does not count as a st, so you don't crochet into it, and do crochet into the first st.
Sandra
What is the diameter measurement of the finished liner? Mine seems too large and I've used lots of yarn. I checked gauge before beginning. Thank you.
Tamara Kelly
It should be the same as the base of the outer portion, approximately 8".
Sandra
Does this include the sides of the liner?
Liz
This is a 'must make', there will allways be a place for it. thanks a million.
Tamara Kelly
🙂 Thank you Liz!
prashanthy
I have problem with the pattern, i made 13 stitches, since you said that ch2 should not be counted a stitch, when i follow the pattern for round -1 , am getting correct 24 stitches in the next round. but my Round - 3 doesn't have 36 stitches. Please help me with this. I really want to make this basket for my daughter.
IF you cud share the video to make this magic circle it will be a great help to me.
Tamara Kelly
Hello Prashanthy! The video tutorial for the magic circle is linked above in the notes. When making Round 3, you alternate - 1 st in a st, then 2 sts in the next st, then 1 st in the next st, then 2 sts in the next st, etc. This means you will work 1 st in 12 sts, and 2 sts in 12 sts, so that you'll have 36 sts at the end of Round 3. Does that help?
Prashanthy
I will try as per this. But please let me know how many stiches are there in Round -1 if we count ch2 together. Is it 13.
Tamara Kelly
If you were to count the ch2, it would make 13. But you never crochet into the ch 2, so it should not be counted as a stitch.
Donna
Is this scalable? I'd like to make this in three sizes. Also I have none of that yarn in my stash and would like to substitute double strand of worsted. Would that work?
Thanks
Tamara Kelly
Hello Donna! Great question! Since you want to use worsted, the easiest way to make 3 sizes would be to make one using 1 strand of yarn, one using 2 strands, and one using 3 strands! Changing the hook size to fit each of course. 🙂
Cherri Megasko
I just stumbled across this on Pinterest ... I have to make one! (Who am I kidding, I'll probably make at least half a dozen!)
Tamara Kelly
i'm so glad you like it, thank you!
Ashley W
Okay I get how to do round 7 and 8 of the basket but I cannot understand round 9 I've watched the Moroccan tile stitch video and still don't get it is there anyway you could please make a tutorial of the actual round 7-9 of the outer basket part?
Tamara Kelly
Hello Ashley! There is already a tutorial for that linked in the pattern: https://www.mooglyblog.com/moroccan-tile-stitch-round/ 🙂
Tracey Petrass
Thanks Tamara, I love this pattern, and so many others of yours! I'm new to crocheting, and your patterns and tutorials make it so easy to get a great result.
I'd like to post a pic but I'm not sure how to....
Tamara Kelly
Thank you so much Tracey! Unfortunately, I don't have the ability to host photos in the comments, but you are welcome to share on the Moogly Facebook page! 😀
Bee Bee Chong
I figure it out. Thanks 🙂
Rita Miller
Why does round 19 say to repeat round 9 instead of round 11? There aren't any dc2tog on the previous round 18. I've just been repeating round 11 and it's coming out perfectly. (I'm making a bunch of these for Christmas gifts but smaller, only going up to 48 sts.)
Tamara Kelly
It was an oversight, I'll correct it now. 🙂
Rita Miller
Thanks, Tamara!
Dian Irvin
My inner liner is larger than the outer basket. I don't understand why the liner isn't made with fewer stitches. You can't expect things made exactly the same to fit inside one another. The liner is too bunched up at the top. If you have no solution by now I will have to take the liner back to the bottom and redo it to fit better inside the outer basket. I do love the design, Thank You!
Tamara Kelly
Hi Dian! Mine and the others people have made lined up as written, with the liner pushing on the outer to create a stiff outer wall. It sounds like it didn't work as well for you though. You can take out one increase round on the liner, but you'll have to double up stitches a bit when connecting the two pieces.
Dian Irvin
Thanks much for your quick response and help!
Rita Miller
I wonder if you just went down a hook size for the liner if that might help. That way your stitches will still iine up when joining, but the liner should be a bit smaller.
Nancy C
Tamara:
Thank you so much for this pattern. It's become a great hit as gift-givers. Is there a place to leave you a picture of my versions of your pattern? - and if you've already addressed this above, my apologies!
Nancy C
Tamara Kelly
Thank you Nancy, I'm so glad to hear it! Unfortunately, I don't have a way for comments to include photos here on the blog, but there's the Moogly Facebook page, and you can always email me at tamarakelly@mooglyblog.com! 🙂
Amanda
So excited to make this, but having a little trouble getting started as I'm still pretty new to crocheting. For round 1 of the liner, do I make a magic circle, then ch 2 and then begin my dcs in the first stitch of the magic circle? The ch 2 leaves a gap, so I wasn't sure. Thanks!
Tamara Kelly
When you pull the tail end of the magic circle closed, that gap should close up! 🙂 Just be sure you join to the first dc, not the ch 2.
Amanda
Oh, okay! I was chaining 2 and then joining into the next round which was leaving quite a gap. I"ll give it a try...thanks!
fithry
Hi...im beginner here...
can you show me how to do a ROUND 8-till the end of OUTER moroccan basket? I dont understand the pattern, im really confuse if i dont see the video...please can you help me Tamara Kelly???
Tamara Kelly
Hello Fithry! Did you check out the Moroccan Tile Stitch in the Round video linked above? That demonstrates the rest of that section's stitch pattern. 🙂
Suzanne
Hello
I'm a little bite confused with the quantity of balls required to do the basket :
350 yds Lion Brand Heartland Thick & Quick (100% acrylic, Super Bulky (6); 125 yds/114 m; 5.01 oz)
Color A: Katmai – 2 balls
Color B: Acadia – 2 balls
is it a total of 5 balls 2 of 125 yards and one of 350 yards? or. Tks for your help
Tamara Kelly
Hi Suzanne! It would be 4 balls total, 2 each of each color. 350 yds total were used for the pattern, and each ball has 125 yds in it. 🙂
Michael Behrens
Started and finished in two days. Super easy and strong. Thank you very much. It is beautiful. If you want to see a picture I would be more than happy to send one.
Tamara Kelly
😀 Thank you so much Michael! If you'd like to share a photo, I'd love to see it! You can email photos to me at tamarakelly@mooglyblog.com, or you are welcome to share them to the Moogly Facebook page at https://www.facebook.com/mooglystore/ 😀
Francis
Hi, thanks for sharing this pattern. It is lovely. I wonder if there would be any problems if I were to increase the size? make it taller that is. Any thoughts?
Tamara Kelly
Thank you! I don't think there would be any issues other than it might not want to stand up as well on it's own - keeping it filled with items should help that though!
ANGIE SMITH
I MADE 3, ONE FOR MYSELF, ONE FOR MY HUBBY TO USE IN HIS MUSIC ROOM AND ONE FOR MY SON.
Tamara Kelly
🙂 Wow, I'm so glad you like the pattern Angie! Thank you!
Sandy
Help I'm having so much trouble with round 7. I've watched the video many times and I'm lost. After completing round 7 (many times) I have 120 stitches and it's all wavy like a doily I can't figure out what is wrong. The lining came out perfect and I looking forward to completing the basket. Thanks for your help
Tamara Kelly
Hi Sandy! Have you checkout the chart? I just added it a week or so ago, so if you are working off a version you printed previously it might help! It sounds like you aren't working the parts of the dc2tog sts in the correct locations, so I hope the chart shows you what is supposed to be happening there...
Sandy
I finally figured out row 7 on the outer shell. Following the directions there is no way that you go from 72 stitches down to 24 ch 1 spaces. I found that if you do the chain 1 after 3 patterns of dc2tog I had the 24 ch 1 spaces. After I solved that problem the rest came together very easy. Thank you for this beautiful pattern. I finished the basket and it looks great
Tamara Kelly
Hi Sandy! I'm glad you found a way to make it work for you. 🙂
Jo Miller
Gosh, could've sworn I sent you an email via a Reply here or on the Contact page......but want to send you a picture of MY finished basket, of course, using your design, but don't see a way to upload a pic. Can you help with this point?
Also, my only issue with MY basket is that it doesn't stand as straight and firm as yours. I used similar yarn and followed precisely the pattern. Did you do something to get yours to look so firm????? Please advise. Would like to give as present, but not real happy with how floppy it looks.
Thanks and looking forward to your reply.
Jo
Tamara Kelly
Hi Jo! I don't have a way to host pictures in the comments, but you are welcome to email me at tamarakelly@mooglyblog.com or share them on social media - on the Moogly Facebook page, or on your own sites, and tag me! 🙂 I'd love to see it!
I'm sorry it's floppy! I think the gauge is the key - tight stitches for a firmer fabric.
DIANE DELMAR
Late to the party here - stuck on Round 7. Its real floppy and I have 72 ch-2 spaces. I had 72 stitches in round 6. I've looked at the tutorial and at the chart and I don't know what I'm doing wrong
Tamara Kelly
Hi Diane! I'm not sure either, without being able to see what you've made so far. 🙁 I'm not sure how else to present that line of instruction.
Jo Miller
Hey Diane. I was late to the party on this one as well. BUT -- I finally got mine done and it's really very nice, BUT it is floppy like yours is going to turn out.....sorry, but it will.
Tamara wrote back to me at some point and said it really has to do with the tightness of your stitches, but I already crochet pretty tight, so don't know how much tighter I could have gotten it, with the yarn I was using (which was basically what the pattern called for)..
However, evidently others got the pattern to work just fine....so good luck - keep working on it and even if it's floppy - it's lovely with other balls of yarn sitting around. For some reason I never sent Tamara a picture of my finished work, but maybe I'll get around to that soon.
Dian
Diane,
Comment 51 of this blog might be helpful to you. Also try to understand the drawing. This is a confusing row until it finally clicks in your head. Good Luck!
Sara Myatt
I've wanted to make a basket to see if I liked making them. I looked for a pattern and found this one. I love it! I'm not one to work off a computer. I'm of the "old school" and like the paper in my hand. I entered my email address so I could print it out and tried several times but couldn't get it to print. Unfortunately I will have to find another pattern somewhere.
Tamara Kelly
Hi Sara! I don't know where you put your email, you shouldn't need to provide it to print at all. Did you use Print Friendly? There is a tutorial at https://www.mooglyblog.com/print-pattern-use-print-friendly-button-moogly/
You can also copy and paste into a word document.
Patti Ann
Directions are very confusing! I actually watched the video many time to rewrite the instructions. Then went to the remainder of the project and now find myself lost again. Have you ever thought about rewriting your directions in a different way to split the 2 portions up with more pictures of each step? But better yet add an 'entire video' of you making the entire basket. Some of us are visual and are not completely understanding your description of the directions. HELP... I as I read thru the other comments, I too would love to make this beautiful basket. Once concurred would love to make many more!
Tamara Kelly
I'm sorry Patti, but there are a number of reasons I won't be able to do that.
Patti Ann
sorry to hear that, since that was the outcome I moved on to another basket design and have now enjoyed making many! Reading through even more comments it certainly looks like I was not alone in my difficulty with this basket project. Maybe someone else out there could capture this project in a complete video tutorial and we could try it again.
Bente
I'm at row 8 of the outer section. Now I realize I have much more than 72 ch 1 spaces from fow 7. The instructions say I should have 24. How is this possible with ch 1 after every repeat?
I'm about ready to give up! Help please!!
Tamara Kelly
Hi Bente! Did you watch the tutorial video linked above?
Rita Miller
There's not a ch1 after every repeat. There's only a ch1 in the middle of the repeat: *dc2tog in next 2 sts, ch 1, dc2tog in same st as 2nd half of previous st and next st; repeat from *
Angie
I love this basket, very simple to complete. I have made 3, 1 for me, 1 for the hubby and one for my son. I would love to post photos be I am not sure if I can.
Tamara Kelly
Hi Angie! I'm so glad to hear it! Unfortunately I can't host photos in the blog comments, but if you post it on Ravelry or social media I'd love to see it!
Rita Miller
I made 25 of these, but smaller, so they'd be like candy dishes. I gave a bunch out as Christmas baskets with little Christmas candies in them (like Christmas Hershey's kisses). You can see them all on my Ravelry page here: https://www.ravelry.com/projects/RitaMiller/moroccan-basket along with how I made them smaller. This is my all-time favorite basket pattern. Thanks for the pattern, Tamara!
Tamara Kelly
Oh my gosh, they are fantastic! 😀 Thank you so much for sharing the project link! ♥
Jessie
Love this! Can you explain to me how much yarn is needed? Is it 350 total half in one color and half in another? And won't you need more of the one that you use for the liner. Thanks
Tamara Kelly
Thank you so much! It's 350 yds total, 2 balls of each color. 🙂
Momina
Hi Tamara.
This is a lovely basket. I am making this basket, I am on step 8 of the basket and I don’t understand the pattern. It’s becoming very difficult after round 7(but you explained round 7) and there is no video after that round.
Can you please explain how to work from round 8. I really love this pattern and I wish to complete it.
Thanks
Tamara Kelly
Hi Momina! The following rounds are demonstrated in the Moroccan Tile Stitch in the Round video, linked above, and at https://www.mooglyblog.com/moroccan-tile-stitch-round/ 🙂
Anna
Hi I used your patrern and I would like to share some pics. I done it using cotton cord and added one more row 🙂 thanks for sharing.
Tamara Kelly
I'd love to see it! Please feel free to share it on the Moogly Facebook page, or send me an email at tamarakelly@mooglyblog.com! 🙂
Mylene
love your moroccan basket so much but being a beginner, i'm very lost.
Really hope you will make a video from beginning to end including the inner piece.
Do let me know when this video is out. Appreciate it very much and so looking forward to it.
Tamara Kelly
Hi Mylene! I won't be able to make a video for this pattern, but there are tutorials for all the stitches used linked above!
Tammy
I just discovered this basket on YouTube but it just shows round 7. I am new to crocheting someone and also visually impaired but can see enough to crochet. However I need a step by step video to follow because I don’t follow the written directions as well as I do a visual step by step. Is there a way to get a complete walk through for the entire basket. I would really love to make it. Thank you
Tamara Kelly
I'm afraid I can't do that because I am no longer working with that yarn company. But there are video tutorials for the rest of the stitch pattern as well!
Brittany
Hi!! I love this basket! is there anyway you can create a video tutorial on round 8 for the outer liner?
Tamara Kelly
Hi Brittany! That's just the stitch worked in the round, so there's a tutorial linked above!
Ribin
I have watched the round 7 video and still figure it out. Is there another place I can go for a different explanation. Enjoying making the basket but frustrated because I can’t get past this row. Thanks.
Tamara Kelly
I'd be happy to try to walk you through it! Where are you having trouble exactly?
Anne Whiteman
Hi, I have been crocheting for over 50 years, and I don’t give up easily, but this pattern is not the same as your video tutorial on doing Moroccan stitch in the round, I have undone rows 8-11 three times now as my project looks nothing like your photo. I notice other people are having the same problem. Colour A dominates and takes over from colour B, whereas in the photo they compliment each other. Have you used a thinner yarn for colour A? Is there an actual tutorial of rows 8-11 apart from Moroccan stitch in the round? Kind regards, Anne
Tamara Kelly
All I can tell you is that it's exactly as written, exactly as the other patterns. They may have changed the yarn since then?
Anne Whiteman
Hi Tamara, thank you for your reply, as I said I don’t give up easily, and eventually figured out the pattern, and I am thrilled with the result, it does not help being left handed! I plan on giving the basket to my daughter for her 40th. Birthday in a couple of weeks, thanks again, kind regards, Anne
Tamara Kelly
I'm so glad to hear it! ♥ I hope you're able to celebrate together!
Annie L Meyer
Do you have a closer approx of the amount of yarn used? I will be using a different yarn as what you used is not available in my area.
Tamara Kelly
About 200 yds of each ought to do it!
Annie L Meyer
Thank you!
LC
I just finished making this basket, and I absolutely adore it! My husband thinks I am amazing for making it, LOL, but I couldn't have done it without your incredibly helpful tutorials and videos. Thank you so much for all the work you have put into this little project, I really appreciate you.
Tamara Kelly
♥ Thank you so much! Happy Holidays!