Baby sweater patterns aren't just for winter time! The Summer Breeze Baby Sweater is a sweet little crochet baby sweater vest that's perfect for warmer weather. Made of cool cotton with open, lightweight stitches, it's a great layer for warding off an evening chill, or all on it's own as a little top!


Sized to fit 0 to 3 month olds, this baby sweater pattern is fantastically versatile. Add long sleeves to make a great winter layer, or add more rows in the pattern to make a gorgeous baby sweater dress! As it is, she can wear it to her first Easter, garden party, wedding, or any time!
Summer Breeze Baby Sweater
Add this pattern to your Ravelry Queue and Favorites
- Easy/Intermediate; Size: 0-3 mths; Gauge: 11 sts x 9 rows = 4 inches in esc
- US-H, 5.00mm hook
- Worsted weight yarn: Color A - 60 yds; Color B - 140 yds (I Love This Cotton in Pink and Pistache shown)
- ½" or ⅝" button and matching thread
- 4 st markers
- Video tutorials: esc, seamless join and making the armholes (additional tutorials available)
- Special Abbreviation: Make Corner - [esc, ch 1, esc] in the next st or ch, place marker in the ch sp. Move the marker up to the corresponding ch sp with each new row.
Body Instructions: (please see above bullet points for special stitch instructions and links to video tutorials!)
Row 1 (RS): Using Color A, ch 37. Esc in 2nd ch from hook and next 6 ch, make corner, esc in the next 4 ch, make corner, esc in the next 10 ch, make corner, esc in the next 4 ch, make corner, esc in last 7 ch. Turn. (40 sts, 4 ch)
Row 2 (WS): Ch 1, esc in first 8 sts, make corner, esc in next 6 sts, make corner, esc in next 12 sts, make corner, esc in next 6 sts, make corner, esc in last 8 sts. Turn. (48 sts, 4 ch)
Row 3: Ch 1, esc in first 9 sts, make corner, esc in next 8 sts, make corner, esc in next 14 sts, make corner, esc in next 8 sts, make corner, esc in last 9 sts. Turn. (56 sts, 4 ch)
Row 4: Ch 1, esc in first 10 sts, make corner, esc in next 10 sts, make corner, esc in next 16 sts, make corner, esc in next 10 sts, make corner, esc in last 10 sts. Turn. (64 sts, 4 ch)
Row 5: Ch 1, esc in first 11 sts, make corner, esc in next 12 sts, make corner, esc in next 18 sts, make corner, esc in next 12 sts, make corner, esc in last 11 sts. Turn. (72 sts, 4 ch)
Row 6: Ch 1, esc in first 12 sts, [esc, ch 1, sc] in next st, sc in next 14 sts, [sc, ch 1, esc] in next st, esc in next 20 sts, [esc, ch 1, sc] in next st, sc in next 14 sts, [sc, ch 1, esc] in next st, esc in last 12 sts. Finish last st of row with Color B. Break Color A. Turn. (80 sts, 4 ch)
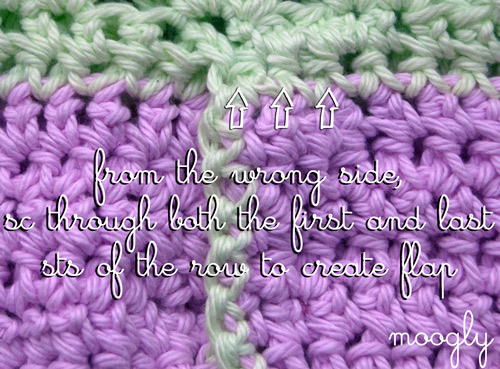
Row 7: Ch 1, esc in first 13 sts, esc in ch sp, ch 3, esc in next ch sp (skipping sts in between 1st and 2nd marked sts, remove markers). Esc in next 22 sts, esc in next ch sp, ch 3, esc in next ch sp (skipping sts in between 3rd and 4th marked sts, remove markers). Esc in last 13 sts. Turn. (52 sts, 6 ch)
Row 8: Overlap the fronts so that the RS right side is on top of the RS left side, as shown below. Ch 1, and working from the WS, esc through the first 3 and last 3 sts of previous row. Esc in next 7 sts, 2 esc in next st. *Esc in next 10 sts, 2 esc in next st. Repeat from * to end. Break yarn and seamless join to 2nd st. (60 sts)
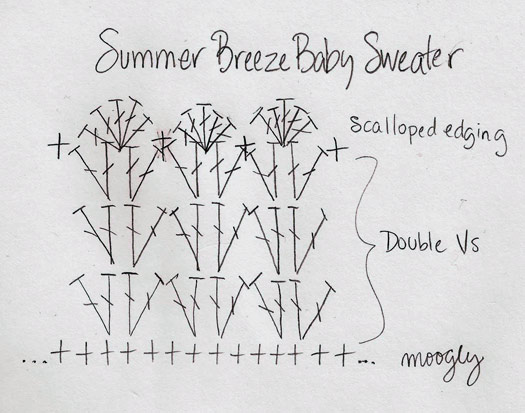
Round 9: Rejoin Color B to a st under the right armhole. Ch 3, dc in same st. Work 2 dc in next st. Skip next 2 sts. *[2 dc in next st] twice (double V made). Skip next 2 sts. Repeat from * to end. Join with a sl st to top of ch 3, then sl st in next st. (60 sts, or 15 double Vs)
Round 10: Ch 3, dc in same st. Work 2 dc in next st. Skip next 2 sts. *[2 dc in next st] twice (double V made). Skip next 2 sts. Repeat from * to end. Join with a sl st to top of ch 3, then sl st in next st. (60 sts, or 15 double Vs)
Round 11 - 16: Repeat Round 10.
Round 17: Ch 1, sc in same st. Skip next st, *work 5 dc in the sp between the previous st and the next st (in center of double V). Skip next 2 sts, sc in sp between the previous st and the next st (between the sets of double Vs). Skip the next 2 sts. Repeat from * to end, finishing with 5 dc in the center of the last double V. Break yarn and seamless join. (15 shells)
Sleeve Edging Instructions:
Row 1: From RS, rejoin Color B with a sl st in center bottom of armhole. Ch 1, sc even around armhole. Join to first sc with a sl st. (22 st)
Row 2: Ch 1, sc in same st. Work 3 dc in the next st. *Sc in the next st, 3 dc in the next st. Repeat from * to end. Break yarn and seamless join. (11 shells) Repeat on other armhole.
Neck Edging Instructions:
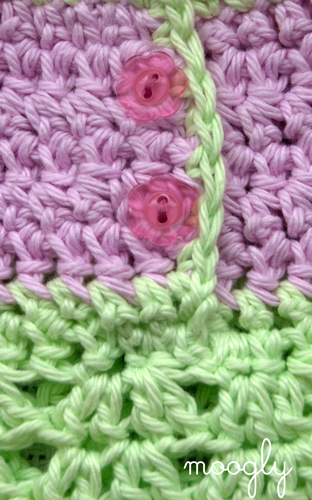 With Color B, join with a sl st to bottom of outer flap of opening. Ch 1 and sc in the side of the next row and evenly around the opening, working 3sc in both corners. Break yarn and finish off at bottom of inner flap. Weave in all ends. Sew on button to match up with a hole in the stitch pattern of the fabric.
Short and sweet and a nice little treat for someone new. This crochet baby sweater pattern works up super fast, perfect for a gift or your own little one! I hope you enjoy making it as much as I did, and I look forward to seeing your pictures on Ravelry and Facebook!
Be sure to Like the moogly Facebook page for the latest updates and have some fun with us! Written pattern copyright Tamara Kelly 2013. Please do not reprint, or repost this pattern, but please do link to this page to share this pattern with others. You may sell items made from this pattern, but please include a link to www.mooglyblog.com on the online listing, or on the sale tag if selling at a craft fair, storefront, or other in person sales.


Lea Anjn Robertson says
Love, love, love this sweater!! Can you tell me how I would adjust the pattern to fit a 3 year-old?
moogly says
Thank you Lea! You would need to start with a much bigger neckline and go from there. I'm hoping to add more sizes soon - it sounds like you are looking for a 3T?
Sharon says
I would REALLY like to have a bigger pattern (before summer if possible) for a 2 yr old! She is kinda petite, so I didn't know if maybe an increase in hook size would even work????? cant wait to hear from you!
moogly says
I'm getting a lot of requests for larger sizes - I think I'm looking at an entire series! 😀
Briana says
I just love all your baby sweaters, and this is no exception! I can't wait to finish up my current WIPs so I can start on this!
Another great design, and fantastic color choices!!
moogly says
Thanks so much Briana! 😀
Carole says
In Row 7 where you skip the stitches between the Markers ((skipping sts in between 1st and 2nd marked sts, remove markers). Esc in next 22 sts, esc in next ch sp, ch 3, esc in next ch sp (skipping sts in ) are you breaking the thread or doing ss to get from mrker 2 to marker 3?
moogly says
Hi Carole! You're not doing either, the ch 3 becomes the "armpit" and the skipped stitches curve over the upper shoulder. Thought it's for a different pattern, the photos #1-4 on this page might help you picture the construction a bit better: http://bellabambinaknits.blogspot.com/2009/11/how-to-make-sweater.html
Carole says
Thank you so much. Boy was I way off. This really helps.
moogly says
I'm so glad! I remember the first time I made a sweater using this method I was just as confused! 🙂
Robyn Laino says
I am so glad I wasn't the only one confused by this. Thanks for the helpful info. First sweater I am making.
Lea Ann Robertson says
Yes. I would need the pattern in a 3T. Your patterns are wonderful! Thanks for sharing!
Darlene Thorp says
Would you mind sharing the finished dimensions of this lovely sweater? I've just finished Row 8, and would appreciate having a way to check the size of the arm & neck openings, in particular. Thank you for sharing this pattern. I am super excited about giving it as a gift and would love to know how to make it in larger sizes, too!
Tamara Kelly says
Hi Darlene! When the sweater is laid flat as in the photos, the neck hole is about 4 inches across, and the arm openings are about 3 3/8 inches high. The width of the body is 9 1/4 inches wide (flaring out a bit toward the bottom), and the height of the finished sweater is 9 inches, shoulder to shell. I hope that helps! I hope to add more sizes as I can find the time. 🙂
Darlene Thorp says
Thanks. That does help. My gauge is running about 3/4" smaller, so the neck and armsholes turned out smaller, too. I think I'll stop here, and re-do using a larger hook. The pattern is too sweet not to try again!!
lorraine says
hi, I'm having trouble with the starting chain, I'm trying to make the summer breeze baby sweater. When I follow the instructions, I wind up with 4 unused stitches at the end of my work, I can't figure out what I'm doing wrong. Can you help me?
Tamara Kelly says
Gosh, I wish I could, but without seeing it, it's so hard to say. Assuming you've got the right stitch counts in the first Row, I'd probably just keep going according to the pattern and then unravel those remaining chains when you're done.
Qiana Cobb-Sinnie says
Very cute sweater! I am like the others in asking if there will be a pattern on the horizon for a toddler size? Thanks for sharing! 🙂
Tamara Kelly says
I'm not sure how far up the sizes I'll get, but I'll try!
nancy says
Hi, I love this sweater! I am having trouble though. Even with the correct amount of stitches, I find in the second row that to esc 4 might end up IN the increased stitch spot rather than before it. I have tried several times and made it to row 4, but the neckline is not coming out rectangular. it is crooked. are the stitches supposed to stop BEFORE the corner increase or be a part of it? I had thought about increasing the corner to 2 chains in between to see if that helps. have tried several times but keep ripping it out. Thank you so much!!
Tamara Kelly says
Hi nancy! Have you watched the armholes tutorial? It might help: https://www.mooglyblog.com/tutorial-armholes-top-down-crochet-baby-sweater/
The only sts worked in the ch 1 spot should be the [esc, ch 1, esc] of the corner. I'm not sure what's happening without taking a look at it unfortunately.
Janeth Jacome says
Hermosos podria darme Los patroness por favor gracias
kelli says
What brand of yarn did you use?
Tamara Kelly says
Hi kelli! I Love This Cotton in Pink and Pistache shown.
Roxanne says
Could someone Please do tutorials on these little sweaters on YouTube because Im a newbe and I don't understand patterns yet but, I can follow onthe YouTube tutorials very well. Thank you.
Tamara Kelly says
Hi Roxanne! There's a tutorial that should get you to the armholes, and the rest is charted! I know there's a learning curve, but learning to read patterns is worth it, I promise!
Dianne says
Just love this little top, can't wait for a larger size pattern. I would love to do one for my 2 year old grand daughter. Thanks again
Chickie Magoo says
Loving this little vest and waiting desperately for bigger versions, 1 year old or even 2 year old...toddler? Thank you for all of your wonderful patterns, I've made quite a few of them now 🙂
Tamara Kelly says
Thank you Chickie Magoo! It's on the list of things to do for sure!
Katie says
Love this sweater. First attempt at a sweater. I am struggling with step 8. I looked up rs/ws info and thought I got the concept figured out byooking at original tail.( folded like a sweater it so the left. ?) but am still having trouble on if this is right and the placement of "esc in first 3and last 3sts is confusing me. Help!
Tamara Kelly says
Hi Katie! Congrats on trying your first sweater! The RS and WS just means right side/wrong side. It helps to take a small piece of yarn and tie it (loosely) to the right side so you can always tell at a glance. In Row 8, the opening is going to overlap - 3 sts from each side will be on top of each other. You want to make those 3 esc sts through both layers. If you think of the button section of a polo shirt, this is the bottom of the button opening. Does that help at all?
Niki says
Hi! I love, love this little sweater. I have a question about gauge. I am using I Love This Cotton and am still not making gauge (11 stitches = 4 inches) with either size H or I hook. I am measuring on row two and with the "I" hook come up with 11 stitches equalling approx 3.5 inches. I don't believe I am crocheting tightly. Any ideas on what might be going on? I really Appreciate your feedback.
Tamara Kelly says
Different people simply have different gauges - there's nothing wrong with that! I might have been extra relaxed while crocheting that one too. 🙂 Bumping up yet another hook size might work!
Niki says
Thank you, Tamara! I will go up another hook size and see if I can get the correct gauge. I just read an article about hooks and learned that brand and hook composition will also affect gauge. Just curious, what type of hooks are your favorite? I am subject to hand and shoulder fatigue and would like to experiment with different hook types. Again, thank you so much for your quick response regarding gauge. I am amazed by your talent and thankful for the beautiful patterns you share.
Niki says
Hi, Is round 9 still worked from the wrong side? Thanks much!
Dorothy Szepesi says
I have a granddaughter 8 years old. She asked me to make her a sweater - or anything. But, I've been scouring the web, to little avail. Lots and lots of baby things and adult female, but girls? very little. We live in Texas so looking for tunics/shirt type of things, not heavy warm snuggly things. lol
Tamara Kelly says
Thanks for the feedback Dorothy! There are some tops here that might suit you too - the closest I was able to narrow it down was ages 4-12, but it looks like there are some good options here: http://rav.to/1j27AF9 🙂
Dorothy Szepesi says
You are right, that is a good place to look - at least getting closer to her size. There is one that would work - Crochet Sarafan Dress - but I would need to 'upsize' it. Were you going to put instructions someplace on how to do that??
Tamara Kelly says
I can upsize some of my patterns, but not other's. 🙂
Lettie De Witt says
Hi there, I really am a newby when it comes to reading crochet patterns, so I had to re do the yoke quite a few times before getting the right amount of stitches, but now I am well on my way with this cute little top, thank you very much for sharing the pattern, will include a pic next time when I get it finished.
Tamara Kelly says
😀 Sounds like you're doing well! Thank you Lettie!
Neema says
Hi Tamara! I am making this one for my daughter for this winter. I am using Caron simply soft's burgundy color and love it so far!
I have created the armholes and completed 4 rows of the body as well. However, I wanted to add a bit of a flare to the "skirt" part of it. How do I go about increasing the stitches in the double-v stitches? Also, I wanted to add sleeves (so it is a sweater-frock). How should I go about those?
neema says
Hi Tamara! I never got back to you on this one!
I did finally complete the frock, and loved how it turned out.
I went about creating a flared frock by adding a stitch in a few shells each row. Spaced it out so that by the time the length was achieved, each would have 6DC each, so the double VEE was 3+3 instead of 2+2. And then scalloped the edge with bunches of 6! I'd love to share a photo if you tell me how 🙂
Thank you for everything you do, and encouraging us to break the crochet rules once in a while 🙂
Tamara Kelly says
Sounds super cute! 😀 And thank you! I'd love to see it - you can post it to the Moogly Facebook page, or send it to me at tamarakelly at mooglyblog.com!
neema says
I am not on facebook, but will surely email 'em to you! Thanks Tamara!
Kate says
Love the pattern! I'm lost on round 9. Th way I'm reading the directions I end up with 20+ double v's and way more than 60 sts! Could you provide clarification? Thanks
RUTH says
I ALSO LOVE THIS SWEATER. MY 6 YEAR OLD GRAND DAUGHTER WOULD LOVE THIS ! I WISH I WAS SMART ENOUGH TO ADJUST IT.
Ginny says
Oh yes please make this little sweater in bigger sizes I just love all your patterns especially one's for little one's. Between you and Whistle and Ivy my favorite places :=) They are written so well and just teaching myself to crochet I hit both your site's daily. Thank you so much for all the beautiful patterns <3
Tamara Kelly says
🙂 Thank you so much Ginny!
CeCe Houston says
Going back over older posts brought back some fond memories. I made this Summer Breeze Baby Sweater for my fourth granddaughter who is 10 years old now. I made the Eloise sweater for another granddaughter who is now 14.
Oh how I love your patterns!