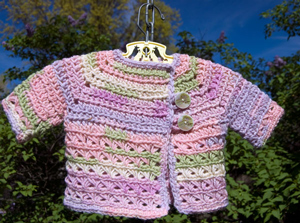
The Baby In Bloom Sweater is the perfect baby cardigan for seasonal changes - super lightweight and airy, just warm enough to ward off a chill. The big stitches and hook make it fast and drapey, while the asymmetrical front and broomstick lace make it new and different.


Baby In Bloom Sweater
Add this pattern to your Ravelry Queue and Favorites
This sweater features broomstick lace for the bottom half. If you are not familiar with broomstick lace, I've filmed a video tutorial! There is also a quick written set of instructions below in the Special Terms section.
- Hook: US J, 6mm
- Needle: US 19, 15mm, or equivalent-sized dowel
- Yarn: Lion Brand Baby Wool, 2.75 skeins, or 270 yards of worsted weight yarn for smallest size, larger size yardage is not known (English Garden colorway shown)
- Stitch markers - 4
- Buttons - 2 (La Mode Vintage Style 1716, 1" buttons shown)
- Sizes: Directions are listed as 0-3mths (6-9 mths, 12mths)
- Click here for a tutorial on how this sweater starts, and how to armholes are formed
- Klik hier voor een PDF van dit patroon in het Nederlands!
Special Terms:
hdc - half double crochet
pm - place marker
flo - front loop only
blo - back loop only
RS - right side
WS - wrong side
Loop Pass - In broomstick lace, all stitches are worked from the right side of the fabric. The first half of the technique is the loop pass, worked from left to right. Without twisting, transfer the loop on your hook onto the knitting needle. Skip the first stitch, and going into the blo, pull up a loop from each stitch and place it on the needle. You should have as many loops on your needle at the end as you had stitches in the previous row. Do NOT turn.
Return Pass - This is the second half of a broomstick lace row. Working from right to left, Insert the hook into the first 3 sts and pull them off the needle. Holding the loops somewhat taut so they don't loose height, bring the working yarn loosely up behind the loops, yo and pull through. Ch1 (this is the only ch of the row) and work 3 sc, going through the center of all three loops each time. Using the hook, slide three more loops off the hook and work 3 more sc in this set. Continue to end, working 3sc into each group of 3 loops. At the end you should have as many sc as you had loops. Do not turn, but use the loop on your hook at the end of the last sc to start the next row of Loops.
Baby in Bloom Sweater Instructions:
BODY:
For all sizes, ch 35.
Row 1 (RS): Hdc in 2nd ch from hook and in next 3 ch. Work 3hdc into next ch, and pm in center of these. Hdc in the next 3 ch, then work 3hdc in next ch (pm in center). Hdc in next 9 ch, then work 3hdc in next ch (pm in center). Hdc in the next 3 ch, then work 3hdc in next ch (pm in center). Hdc in last 11 ch. (42 hdc)
Row 2 (WS): Ch1 and turn. Working in flo, hdc in the first st and each st, working 3hdc in each st with a marker (pm in each new center st). (50 hdc)
Row 3 - 7 (9, 11) : Repeat Row 2, moving markers up to the new centers each time. 90 (106, 122) hdc
Row 8 (10, 12) (WS): Ch1 and turn. Working in flo, hdc to first marker. Remove marker and hdc in this st. Ch3, remove second marker, and hdc in that st. Hdc across to next marker. Remove marker and hdc in this st. Ch3, remove last marker, and hdc in that st. Hdc to end. Armholes made. 56 (64, 72) hdc and two ch 3 sps
Row 9 (11, 13) (RS): This is the setup row to get the st counts right for the broomstick lace. It's a little different for each, so make sure you are following the right set of instructions below:
Row 9 / 0-3 mths: Ch1 and turn. Working in flo, hdc in first st. Work 2 hdc in next st. *Hdc in next 4 sts, then 2 hdc in next st. Repeat from * 12 times. (75 hdc)
Row 11 / 6-9 mths: Ch1 and turn. *Working flo, hdc in 4 sts, then 2 hdc in the next st. Repeat from * to end. (84 hdc)
Row 13 / 12 mths: Ch1 and turn. *Working in flo, hdc in 5 sts, then 2 hdc in the next st. Repeat from * until 6 sts remain. Hdc in remaining 6 sts. (90 hdc)
Note:
If you are a small skein yarn, now is a good time to change skeins so that you don't have to change in the middle of the broomstick lace section. You can use the bit left over from the first skein for edging the sleeves. If you are making one of the larger sizes, you've probably already had to start a second skein!
Row 10 (12, 14) (RS): Loop Pass. Working in blo, make first half of broomstick lace row. 75 (84, 90) loops
Row 11 (13, 15) (RS): Return Pass. Working in groups of 3 loops and 3sc, make second half of broomstick lace row. 75 sc, 25 groups (84 sc, 28 groups; 90 sc, 30 groups)
Row 12-19 (14-23, 16-27) (all RS): Repeat last two rows for 5 (6, 7) total broomstick lace rows. Add more length in pattern as desired. Do not break yarn.
Edging: Staying on the RS, work sc evenly up the inside front edge of the sweater, across neckline, and down other front edge. When back at the bottom, work sc in blo across, break yarn, use seamless join and weave in ends.
SLEEVES:
Prefer a short sleeve or vest style sweater? Just work a row of sc around the armhole openings and you're done! For longer sleeves, continue as written below. To minimize seaming but keep the broomstick lace motif going, the yarn is attached to the body of the sweater at the shoulder and then the sleeves are worked flat from there, so the only seaming is the actual sleeve itself. If you prefer not to seam the sleeves, you can join each round and work plain hdc all the way down to the wrist.
Row 1 (RS): Using sl st, join yarn to center of armpit and ch1. Working in blo, hdc in each ch and st around. Do NOT join. 20 (24, 28) hdc
Row 2 (WS): Ch1 and turn. Working in flo:
0-3 mths: Hdc in the first 2 sts, then 2hdc in the next st. *Hdc in 4 sts, then 2hdc in next st. Repeat from * twice, then hdc in the last 2 sts. (24 hdc)
6-9 mths: *Hdc in 7 sts, 2hdc in next st. Repeat from * twice. (27 hdc)
12 mths: *Hdc in 13 sts, 2hdc in next st. Repeat from * once. (30 hdc)
Row 3 - 5 (7, 9): Ch1 and turn. Working in flo, hdc in each st across. 24 (27, 30) hdc
Row 6 (8, 10) (stay on RS): Loop Pass. Working in blo, make first half of broomstick lace row. 24 (27, 30) loops
Row 7 (9, 11) (RS): Return Pass. Working in groups of 3 loops and 3sc, make second half of broomstick lace row. 24 sc, 8 groups (27 sc, 9 groups; 30 sc, 10 groups)
Break yarn leaving 12" tail for seaming. Seam up the sleeve from wrist to armpit.
Edging: Join yarn with sl st to RS of wrist opening near seam. Ch1 and working in blo, sc around wrist. Break yarn, use seamless join, and weave in ends.
Repeat for second sleeve.
BUTTONS:
 Sew the button(s) to the inside, shorter flap of the sweater. Make chain loops long enough to go around the buttons and sew them in behind the edging of the longer front flap. For 1" buttons, I chained 10, but you'll need to play around a little to see what works for the buttons you choose.
What do you think? Do you have any little ones in mind for this sweater? What's your favorite spring or summer baby gift?
The Fine Print
Written pattern copyright Tamara Kelly, 2012. Please use a link to this page when sharing this pattern with others.


Debbie Boggie says
Thank You so much for sharing!!!
moogly says
You are very welcome! I'm finishing up a matching baby bonnet this week - the pattern should be up on Friday! 🙂
Erin says
Gorgeous, as always. The buttons are superb. 🙂
Dianne Taylor says
This is beautiful. I look forward to making this for a sweet little miracle! Thank you for sharing.
Avie says
Thank you so much for sharing,this is beatiful. I'm interesting to make it in bigger size for my little boy (4 year) would you like to give me the bigger patern?.
moogly says
Ah, that's quit a bit of upsizing! You'll have to give me some time to do the math on that one!
Avie says
woooww...thank you ..thank you so muchhhhh...I'm very apriciate your kindness and I'll wait for your upsizing
Pauline Turenne says
This sweater is beautiful! Thank you!
The baby for whom I would like to crochet it is now 4 1/2 months. I don't know how soon I will have the time to crochet the sweater, so I would appreciate instructions for the next two sizes up. I've never done broomstick lace, but I've just watched your tutorial. It is very well done; I'm looking forward to practicing this technique. Thank you for your help!
Pauline
moogly says
Hi Pauline! Thanks for commenting! I'll work on upsizing the pattern this afternoon, and hopefully will have directions added by this evening. 🙂
moogly says
Ok, they're up! Hooray!
Gloria says
Hi, I love this sweater and look forward to making one later on.
gloria
Jeanne says
This is an adorable sweater! I love the colors you chose for it. It is definitely in my Ravelry favorites and in my queue (actually, going to start it as soon as I submit this comment). I love the seamless and the quick aspects of it (I waller in crafter's ADD(can't really say suffer with it 'cause there's nothin' troublesome about it...not for me anyway (maybe DH who sees all my 'stuff' hehe)).
Where, oh where did you get those gorgeous buttons????
moogly says
Thanks Jeanne! I got the buttons at JoAnn Fabrics.
perla says
hi >>. if a change the yarn for bernat baby sport light 3 and 4mm hook to do these sweater 0-3 months mm you think it work???? thanks so much
moogly says
perla, unless you are a very loose crocheter I'm afraid it'll be tiny! The pattern calls for worsted weight 4 yarn and a 6mm hook - if you go down in both yarn weight and hook size you'll be shrinking it. Using a sport weight yarn and a bigger hook might work though, or you could try making the largest size with what you've got and see if it lands on 0-3 months. Aim for a 16 inch chest measurement and you'll be on track.
Janet says
LOVE this sweater...but I would really like to make an adult size...there's some math for ya! lol!!! Seriously, if you know of a similar pattern, or will be doing the math anyway, I would love to make something like this for me and my grown-up girls! 🙂 Thank you!!!
moogly says
Oh wow! Um... yeah, that's a whole lotta math! My advice would be to find an existing cardigan pattern you like and then just make the broomstick lace for the bottom!
Sande Francis says
What a darling little sweater! I just had this pattern brought to me in an email from HookedOnCrochet! I've added it to my Rav queue and will be printing it ASAP and looking for the perfect yarn. Thanks so much for making this pattern public.
cameron says
this is a very cute sweater. However since its November its pretty cold and getting colder...is there anyway to make the sweater suitable for the weather.
could you also please post your respond to my personal email.
thanks!
Lorenia Fish says
you have a beautiful little ones outfit. thank you so much for sharingt it.
Cheryl says
I love this sweater. Is there any way you could send instructions for 18 months to 3 years.
moogly says
Hi Cheryl! I'm glad you like the pattern! Coming up with that math may take a while though... What I'd recommend is finding the chest measurement of the child you have in mind, and then repeating Row 2 until you have reached that width. Then make the armholes row, and for the setup row, add enough stitches to get to a number divisible by 3, spacing them evenly around. Then work the broomstick rows as directed, making however many groups is appropriate for your stitch count. I hope that helps!
CrochetCornerThe says
This is beautiful. I ordered the same yarn and eager to try broomstick lace. Your video was wonderful and very helpful. I have started with the J hook as suggested and CH 35 to start. I am making a size 9 months, however it neck looks very small to me. I was wondering what your stitch gauge is! Maybe how long is your piece after CH 35 and 1st row of HDC's? I'd hate to continue and it be too small. Thanks for your reply. Experienced crocheter:-)
moogly says
Thanks for saying so! Alas, I no longer have the sweater (or bonnet), having gifted them, and I used up all that yarn. Also, I never have been able to find standardized neck measurements for babies. What I can do is tell you that the neck opening should be close to 10 inches or so when finished, judging by how it hangs on the hanger (still have the hanger!). I know that seems small, but my 5 year old's neck is just now 10 inches around, so it should be plenty. Keep in mind too, that the top button is a couple of inches below the neckline, so you gain a lot of room there too.
Margaret Kosta says
Help. I can't understand row 3 of the sweater for size 0-3 mths. If you crochet in the two ch3's under the arms and also make the 18+ increases you end up with more then 75 hdc. I can't keep ripping out and need help. Love the pattern, I make sweaters for charity and would like to use this patter.
moogly says
Hi Margaret! I think you're referring to Row 9? I do see a problem there, you're right, the stitch count is off! I will fix that now!
Margaret Kosta says
You are right, it is row 9. Thanks for fixing it.
moogly says
Thanks for letting me know! 😀
Fern says
Hi there.
I haven't touched a crochet hook since my teens, but I've fallen in love with this little sweater - it has my brand new niece's name all over it! 🙂
I've tried to make the bodice section twice today, but I can't get the increases to line up diagonally. The stitches are made in the loops between the stitches in the previous row, so should I always increase between the 1st and 2nd stitch of the group of 3 in the previous, or teh 2nd and 3rd? And do I then change when I work on the wrong side?
Apologies if I'm asking a really stupid question, and I hope I haven't confused you! 🙂
Thanks
Fern
moogly says
Hi Fern! I think what's happening is that you are working between the posts of the stitches instead of into the flo of the stitches. The increases should always be in the flo of the 2nd st of the group. Here's a video on flo that might help you out: https://www.mooglyblog.com/front-loop-only-flo-and-back-loop-only-blo/
Fern says
Thanks for getting back to me. I watched the flo / blo video before I started so as far as I know I'm not working between the posts - will give it another bash and let you know how it goes 🙂
Sharon says
Hi Tamara, I love this sweater, and have been trying to make it, but am having trouble with the 3rd row only coming up with 45 stitches my mother also tried doing it and also came up with the same count. I have 42 in the 2nd row as it should be, but not 50 in the 3rd. Please help. Thanks...........Sharon
Tamara Kelly says
Hi Sharon! There should be 42 sts in the first row, and 5o in the 2nd row. You place 4 markers in the first row, and then in row 2 you make 3 sts in each marked st. So in every marked st, you are increasing by 2 sts. An increase of 2 sts in 4 places means 8 additional sts, and of course 42 + 8 is 50. Does that help at all?
Pat Bell says
Where did you get those buttons??? They are absolutely PERFECT!!!!! WOW
Tamara Kelly says
My local JoAnn Fabrics! 🙂
BErnie berger says
I am having trouble with the sleeves. It say HDC around and you have 20 stitches. What about the chain 3 stitches that formed the armhole?
Thank you!
Tamara Kelly says
Hi Bernie! The 20 sts are evenly distributed around the arm hole, including the the ch 3. If you find it looks better with more sts though, that's fine! Just aim to have a multiple of 3 sts at Round 5. 🙂
Sam says
Thank you so much for sharing this pattern. Also, a big thanks for the video on broomstick lace.
MERRILL WILLIAMS says
When I print this pattern (which I love) pages 3 and 4 have ads over the top of the print
How do I get rid of this so IO can read the pattern. very frustrating.
Tamara Kelly says
Hi Merrill, and thank you! To get a clean print of the pattern, please use the green Print Friendly button at the bottom of the post. There's a tutorial if you need it HERE. 🙂
Kristine says
Hi, Can you please tell me what I am doing wrong?... I am having a problem getting 42 sts in row 1....when I chain 35 and do the pattern I'm always ending up with 8 or 9 sts at the end of the row and not 11! I've tried this 3-4 times and I always end up with only 39 or 40 sts! Also I have bought a lighter weight wool and wondering if that will work with this pattern.
Thanks
Kris
Tamara Kelly says
Hi Kristine! Easy one first, using a lighter weight wool will likely result in a slightly smaller sweater. Now, as for stitch count, that's a tough one without being there. Maybe breaking it down will help.
You chain 35, but since you skip the first one as the turning chain), there are really only 34 chains to work in. So you hdc in the first 4, which leaves 30 chains. Then you work 3 hdc in the next chain, which leaves 29 chains. Then hdc in the next 3 chains, which leaves 26 chains. 3 hdc in the next chain leaves 25. Hdc in the next 9 leaves 16. 3 hdc in the next leaves 15. Hdc in the next 3 leaves 12, 2 hdc in the next leaves 11. Does that help at all?