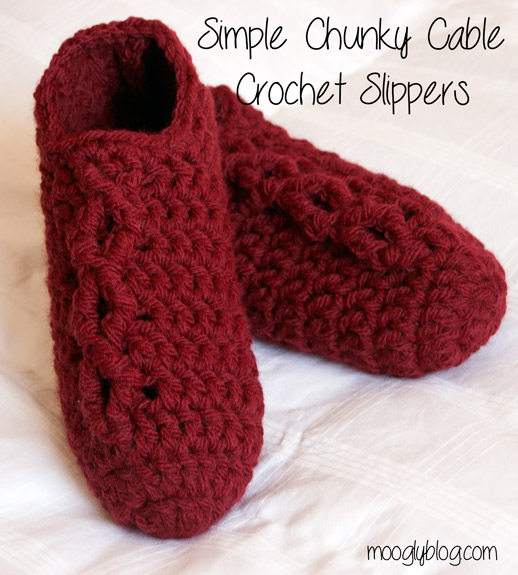
It is cold cold cold here right now, and there's a good chance it's cold where you are too! So here's an easy free pattern to warm up all those chilly feet. You can make a pair of Simple Chunky Cable Crochet Slippers in just one hour if you hurry, a little more if your fingers are frozen.
These super warm slippers come right up to the ankle, to keep you extra warm and toasty - and to make sure they stay on! If you wish to make them non-slip, there are a variety of options available, including these 7 Great Ways to Make Slippers Non Slip!
Simple Chunky Cable Crochet Slippers
Add this pattern to your Ravelry Queue
Note: This pattern is written for 2 sizes and 2 widths. You may wish print this pattern and then mark the numbers for the size you want to make.
- US - K, 6.5mm hook
- 150 yds Bulky weight yarn - original yarn is discontinued, I recommend Patons Shetland Chunky
- Gauge: 6 rows x 10 sts = 4" in dc
- Sizing: Women's shoe size 6-8, and Women's shoe size 9-11. Average and Wide width available for both. Directions are give for Average(Wide) in the instructions, with instructions for shoe size (length) on Row 14. These slippers do have a lot of stretch, so you may wish to try them on as you go and before cutting your yarn to make sure they are the right size.
- Special Stitches Used (Click for video tutorial): magic circle, fptrc, fptrc2tog, seamless join
- SLIPPERS MET KABEL (Dutch translation) by Elke Wellens of Het Haakbeest - Dank je wel Elke!
- CLICK HERE FOR THE VIDEO TUTORIAL FOR THIS PATTERN!
RIGHT FOOT INSTRUCTIONS:
Round 1: Starting with the magic circle, ch 2 (does not count as a st) and dc 10 into the center of the ring. Pull closed, and join to first dc with a sl st. (10 dc)
Round 2: Ch 2, work 2 dc in each st around. Join to first dc with a sl st. (20 dc)
Round 3: Ch 2, [dc in next 9(3) sts, 2 dc in next st] 2(5) times. Join to first dc with a sl st. (22(25) dc)
Round 4: Ch 2, dc in the next 18(21) sts, fptrc (front post treble crochet) around stitch 20(23) of Round 3 (1 row down and 2 to the left). Dc in next st. Fptrc around same st as previous post st. Dc in last st. Join to first dc with a sl st. (22(25) dc) (see photos below)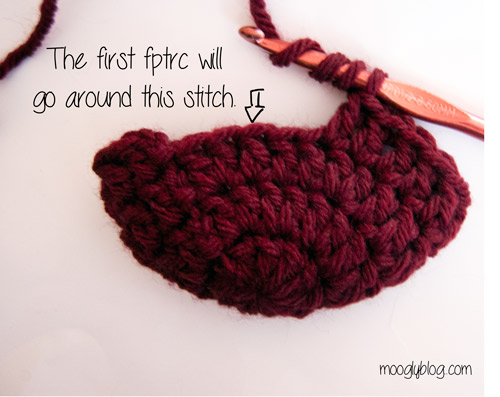

Round 5: Ch 2, dc in the next 19(22) sts, fptrc2tog around first and second post stitches made in previous round. Dc in last 2 sts. Join to first dc with a sl st. (22(25) dc)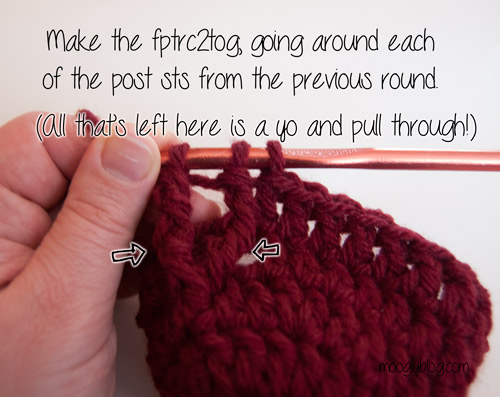
Round 6: Ch 2, dc in the next 18(21) sts. Fptrc around top of fptrc2tog from previous round. Dc in the next st. Fptrc around top of fptrc2tog again, then dc in the last st. Join to first dc with a sl st. (22(25) dc) (If possible, check for width after this row.)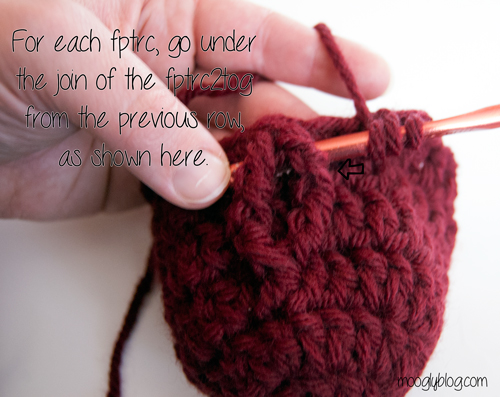
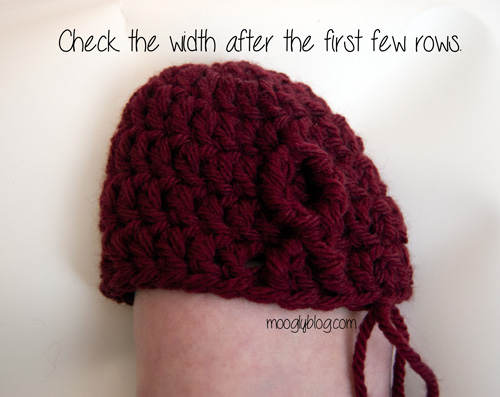
Round 7 - 10: Repeat Rounds 5 - 6 twice.
Row 11 (Switching to rows): Ch 2, dc in the next 17(20) sts. Turn. (17(20) dc)
Row 12 - 14: Repeat Row 11. For Size 6-8, go to instructions for Row 16.
Row 15 (Size 9-11 ONLY): Repeat Row 11.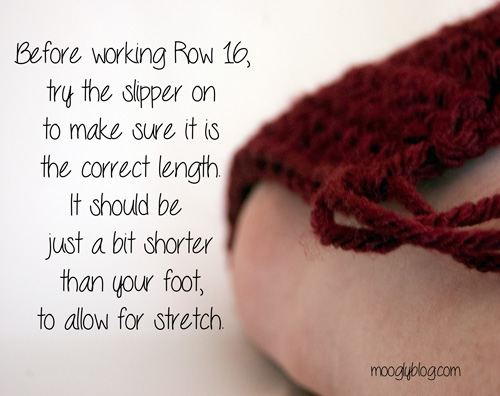
Row 16: Ch 1, sc in the first 9(10) sts. Fold the heel in half, right side together, and sc closed through both sides. (For Size 6-8, skip bottom sc to work even.) (8(10) sc)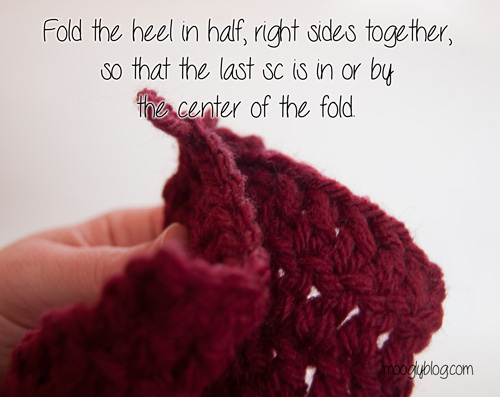

Finishing Edging: Ch1, sc all around opening evenly. Use seamless join to finish off. Break yarn and weave in ends.
LEFT FOOT INSTRUCTIONS:
Round 1: Starting with the magic circle, ch 2 (does not count as a st) and dc 10 into the center of the ring. Pull closed, and join to first dc with a sl st. (10 dc)
Round 2: Ch 2, work 2 dc in each st around. Join to first dc with a sl st. (20 dc)
Round 3: Ch 2, [dc in next 9(3) sts, 2 dc in next st] 2(5) times. Join to first dc with a sl st. (22(25) dc)
Round 4: Ch 2, dc in the first st, fptrc around stitch 4 of Round 3 (1 row down and 2 to the left). Dc in next st. Fptrc around same st as previous post st. Dc in last 18(21) sts. Join to first dc with a sl st. (22(25) dc)
Round 5: Ch 2, dc in the next 2 sts, fptrc2tog around first and second post stitches made in previous round. Dc in last 19(22) sts. Join to first dc with a sl st. (22(25) dc)
Round 6: Ch 2, dc in the first st. Fptrc around top of fptrc2tog from previous round. Dc in the next st. Fptrc around top of fptrc2tog again, then dc in the last 18(21) sts. Join to first dc with a sl st. (22(25) dc)
Round 7 - 10: Repeat Rounds 5 - 6 twice. Turn to work in rows after Round 10.
Row 11 (Switching to rows): Ch 2, dc in the sl st and the next 16(19) sts. Turn. (17(20) dc)
Row 12: Ch 2, dc in the next 17(20) sts. Turn. (17(20) dc)
Row 13 - 14: Repeat Row 12. For Size 6-8, go to instructions for Row 16.
Row 15 (Size 9-11 ONLY): Repeat Row 12.
Row 16: Ch 1, sc in the first 9(10) sts. Fold the heel in half, right side together (wrong side out), and sc closed through both sides. (For Size 6-8, skip bottom sc to work even.) Weave in ends. (8(10) sc)
Finishing Edging: Ch1, sc all around opening evenly. Use seamless join to finish off. Break yarn and weave in ends.
And now you've got your very own pair of slippers! This pattern is fast and easy to memorize, and made in Lion Brand Wool Ease Chunky the Simple Chunky Cable Crochet Slippers are stretchy, cozy, and warm too. I hope you like them as much as I do! I've made a few pairs now, but this pattern has not been officially tested, so let me know if you spot any errors!
 Be sure to Like the moogly Facebook page for the latest updates and have some fun with us! Written pattern copyright Tamara Kelly 2013. Please do not reprint, or repost this pattern, but please feel free to link to this page to share this pattern with others. You may sell items made from this pattern, but please include a link to www.mooglyblog.com on the online listing or sale tag if selling at a craft fair, storefront, or other in person sales.




Michele
These don't look simple, they look very difficult.
moogly
Looks can be deceiving! If the cables intimidate you, you can just substitute dc sts, but I do encourage you to watch the post stitch videos linked in the pattern and give them a try! It's a very basic cable pattern, and there are step by step photos, so I think it would be a good intro to crochet cabling project.
Beverly Doland
Simply Chunky Cable Slippers: 9 pages for slippers, REALLY? I canceled at 4. BEV
moogly
Bev, that's because there's a photo tutorial to help those who are unfamiliar with crochet cabling. If you use the green Print Friendly button at the end of the pattern, you can check the box to remove the photos, and that will dramatically reduce the number of pages needed to print the pattern.
Cathy
Thanks for the tip on removing pictures. Going to crochet slippers.
Tamara Kelly
🙂 Thank you Cathy!
Ashley
These were, in fact, very simple and fast! Love this pattern! Thank you!!
Tamara Kelly
😀 Thanks so much Ashley!!
Cyndi Aitken
I love this pattern, and it is so much simpler than it looks, and works up so quick! I wonder if they could be modified so that the cable is centered rather than offset, and then you really wouldn't need a separate pattern for left and right, one pattern would fit both feet? That would simplify it even more.
Tamie
I just whipped up a pair! They were very quick and easy. Just watch the tutorial, make a practice run and you will have it!
Valerie
Oh my, this does not seem to be easy or beginner friendly. What does fptrc or whatever that abbreviation mean? Can any one put this in simple English for me please? Thank you.
Tamara Kelly
fptrc is front post treble crochet - you may want to watch the video tutorial linked in the pattern!
Paula
I thought the same thing
judy
HOw do I get advertisements off that are interfering with the pattern
TY
Tamara Kelly
Hi Judy! Please use the Print Friendly button or open PrintFriendly.com in a second tab and put the URL for the pattern in the box there to get an ad free copy for printing or download.
Sharwari
Nice pattern
Carrie
I'm giving them a whirl at the moment! First shot at cabling and all I can say is THANK YOU THANK YOU THANK YOU for your wonderful videos. As you said above its actually easier then it looks. I look like a crochet superstar thanks to your wonderful projects and tutorials! I made an artfully simple cowl for my friend as a birthday gift and its BEAUTIFUL. Thank you so much Tamara!!
moogly
😀 Thanks so much Carrie! Cables are one of those things that once you've got it, you've got it. So glad you decided to give them a try!
Claudia
Thank you!
moogly
You're very welcome Claudia!
Diana
Love this pattern, simple and fast! Also, this is this first slipper pattern I have found where the sizing (large) is dead on. Fit my feet perfectly 🙂
moogly
😀 Thanks Diana! I'm so glad to hear it!
Naomi
How would these work up with 2 stands of ww weight together? Chunky yarn in colors I like is hard to find.
moogly
Naomi I think it would work pretty well! You'll want to check gauge, and might need to play with the hook size a little, but I definitely think it would work!
laura
Naomi , have you tried going to redheart.com they have a catalog that you can order from and have chuncky colored yarn and a 1-800 number that you can place your orders from if you choose not to do it online
anna
Very nice...
Have a great day !
Anna
Jodi
These slippers are great - my mom has real narrow feet and they fit her perfect - she loves them! The only thing I had problems understanding was in row 4 on the left foot it says to dc in sts - and it is actually just one st instead of multiples - I thought maybe the number had been left off - otherwise no problems understanding the pattern at all - thanks so much for sharing such a great pattern with us! 🙂
moogly
I'm so glad she likes them! You're right - there's a little typo there, it should be dc in the first st. I'll fix it now. Thank you so much for letting me know! 😀
Linda Maurice
Wow what a great pattern thank you...I work at an assisted living 3rd shift my residents love them some even wear them to bed.
Linda
Carole S.
Just made these (I used 2 strands of supersaver held together instead
of chunky) and they worked up beautifully. LOVE...LOVE...the pattern. Your directions were very easy to follow and specific. I too was a bit intiminated with the cables, but with your great directions I breezed thru the pattern. Thank you so much for the great slipper pattern. I put your website in my "favorites".
moogly
😀 That was just what I needed to read this morning Carole! Thank you!
Connie B.
Has anyone tried adding a non-slip sole to these? I would think if you are making them for someone older, they should have a non-slip sole. I haven't tried making them yet but plan to for residents at an assisted living facility. Thanks, Connie
moogly
I don't know if anyone has done it yet, but I do give several links for non-slip soles in the pattern above! 🙂
Yolanda
I'm also making the slippers for a convalescent home. I thought of using 3D paint with a cute design. best pattern I've and they are so smart looking, and I love doing anything with cabling. Thanks Lots, Auntie Yolie
Tamara Kelly
You're welcome Yolanda! 3D paint is a great way to make slippers non-slip! Thank you for your charity work! <3
Andrea
I have narrow feet. Do you have any suggestions on how I can adjust the pattern for that? I have had a problem with every slipper pattern I've tried. Thanks.
moogly
Andrea, there are a couple things you could try, but the first thing I'd try is going down a hook size, maybe 2 or even 3 (depending on just how narrow we're talking!). Get the first few rows done and then try it on to see. If that doesn't work let me know, and we can work out how to reduce stitches. 🙂
Andrea
Thank you. I'll try that and let you know how it goes. Andrea
MaryLee
I am self-taught, so I am confused as to the chain 2 in the first round not counting as a stitch. I thought that was always counted as the first double crochet in the row. Do I just skip over that to sl st in the first dc in each round? (Does my question even make sense?) 😉
Anxious to make these and learn new techniques!
moogly
Hi MaryLee! Sometimes it counts as a stitch, sometimes it doesn't - it all depends on the pattern! For this pattern, it does not count as a stitch, so when you join with a sl st at the end of the round, you do indeed just skip over it and work into the top of the first actual dc stitch. The reasoning here is to prevent a gap from the ch 2 being thinner than a dc stitch, and make a more solid slipper. 🙂
MaryLee
That makes perfect sense!! It's the missing info I needed to be able to continue knowing that I was doing it correctly. Got the yarn yesterday in two colors so I can make a few pairs of these adorable slippers. Thank you SO much for the pattern and the FAST reply!
Jodi
I just made 2 more pairs of these slippers - maybe some day I can make a pair for myself! haha!! I made another pair for my mom so she would have a back-up pair and I made a pair for a friend for her birthday - just finished them last night and need to get a pic taken and then get them in the bag and delivered! I can't thank you enough for such a great pattern - and for free - you are to generous! Thanks again! Jodi
moogly
Thanks so much for saying so, Jodi! I'm so glad you like it!
Chris
I have made only a couple simple afghans and dishcloths, and a few winter beanies, will I be able to get this? It looks imitating !
moogly
Chris I think if you're motivated and willing to take the time and watch the videos and look a the photos, this is a fantastic first crochet cabling project. (And if you get too frustrated, you can always just substitute plain dc stitches for the cables and make plain slippers!) 🙂
Jana
Hi. Do you have this pattern available in PDF format? I have a cool thing on my iPad called PDF converter, but for some reason, I am getting words on the right side cut off. I tried it twice and I can't get the whole pattern. Thanks!
moogly
Hi Jana! I don't have PDFs of the patterns available, and I don't know if it'll work on iPad or not, but if you click the green Print Friendly button at the bottom of the pattern that might give you a usable view!
Jana
Yay! That worked! It also gave me an option to generate a PDF, which I did and opened in my iBooks on my iPad no problem! Thanks!
moogly
So glad it worked Jana!
Jodi
Just made 2 more pairs today - plus 2 pairs last week - up to a total of 7 pairs! Bookmarked the new slipper pattern too - thanks again!
Penny
I too am self taught and have been crocheting for 40 yrs. However, I am having big problems trying to interpret the instructions for Row 3. Can you explain to me what this row means? And how many stitches should I have when it's completed? 22 or25? I really want to complete these slippers. Thank you.
moogly
Directions are give for Average(Wide) in the instructions.
So for the right foot, Round 3 reads: Round 3: Ch 2, [dc in next 9(3) sts, 2 dc in next st] 2(5) times. Join to first dc with a sl st. (22(25) dc)
If you are making the Average width size, you'll Ch 2, [dc in next 9 sts, 2 dc in next st] 2 times. Join to first dc with a sl st. (22 dc total)
If you are making the Wide width size, you'll Ch 2, [dc in next 3 sts, 2 dc in next st] 5 times. Join to first dc with a sl st. (25 dc total)
I hope that makes it clearer?
Penny
Thank you., that makes a lot more sense to me. I will give it another try.
Nikole Meadows
Like the simple quick projects!
carla
My mother and I sat and did a pair of these slippers in like an hour or less. We thought it was gonna be hard but very easy. We had a good time doing this together. Thank you...we are are working on Christmas and birthday gifts already. Thanks again for a nice (hard looking) but simple pattern. It was fun!!!
moogly
You are very welcome - and way ahead of the game! I need to follow your example! 😀
Melissa
Just made these this weekend and had a lot of fun! I used to crochet a lot but haven't done anything in about 35 years! Your tutorial videos were so helpful (didn't have that back in my day). I loved learning about front post crochet! Plus all your other tips. I will be making a pair for my son next. Really, really enjoyed this. Thank you so much for this pattern and all the instruction.
moogly
Thanks so much Melissa! I'm so glad to read this, brightened my Monday morning! 😀
DeAnne
Hi,
I am on round four and I am just double checking on the term "fptrc". Is this a basic front post double crochet? Or is it a "treble front post"?
Thank you
moogly
Hi DeAnne! That would be front post treble crochet. Just like front post double crochet, but with a treble! 😀
DeAnne
Thanks! I'm not sure that was crystal clear in all of your great detailed instructions and pics.
Thanks for the pattern 🙂
moogly
You're very welcome! I think I'll go add it to the pattern now. 🙂 Thanks for asking!
Amy
My nine year old son and I just learned to crochet basic stitches two weeks ago. We are so excited to learn how to make these slippers! I can't wait to get to the store for some yarn to make them. They look hard but sound easy to follow your pattern. So many other patterns left us scratching our heads. Thank you for all the details!
moogly
You're very welcome Amy! So exciting to hear about you two doing this together!
Cathy
You list the yarn as bulky wool. I am allergic to wool. Do you think it work well if I just used a regular bulky acrylic?
moogly
Yes Cathy, any bulky weight yarn should work! 🙂
Cathy
Thanks, that's what I thought but it is good to hear from the creator to be sure!
Kathy
I am on rows 7-10, it says to do rows 5-6 twice. It's just not computing in my head. Does that mean do 5 & 6 twice for each row 7-10? equaling a total of 16 rows??
Kathy
I think maybe it just clicked repeat rows 7-10 twice for a total of 8 rows?
Tamara Kelly
You got it! 😀
Antoinette holmeyer
When I got to row 15 and measured it on my foot, it only reached to my arch. It's not long enough.
Tamara Kelly
Hi Antoinette! Sounds like you're using a thinner yarn than called for, or your tension is far greater than mine! It's an easy enough fix though. I'd recommend repeating the cable rounds until you reach the arch and then repeating the rows even until you get the length you need. If you are using bulky yarn, you may also want to bump up a hook size or two.
Sherry Curr
Is there any way to download your 60 min slipper patten without signing up and giving out my CREDIT CARD number !!
Tamara Kelly
Sherry I don't offer a download, but if you use the green print friendly button at the bottom you'll get a printable PDF file! Sounds like you clicked an ad?
Sherilynn
I have a question on the Simple Chunky Cable slippers. I didn't have chunky so I'm using two strands of red heart super saver because I have a ton of it. I've heard it said that the older one get the more their brain cells die. 🙂 I just can't figure out row five.... I believe I got line 4 down but as much as I try that fifth row has yet to be figured out. Can someone please walk me through it in baby steps lol. I wanted to make them for my little grand daughter and so far I've only got the first four rows, at this point I'll never get it done. lol. Thanks for any help I can get.
Tamara Kelly
Hi Sherilynn, I hope I can help! Ok, so Round 5 is all dc sts except for that fptrc2tog - so I have to assume that's the stitch that's tripping you up? I have a video tutorial that demonstrates this stitch. It's in the context of another pattern, but the stitch itself is the same. https://www.mooglyblog.com/basics-of-the-diamond-crochet-cowl-and-fptrc2tog/
Let me know if you have any more questions after that! 🙂
fariba
Thank you for your great pattern . 😉
Darlajune
I LOVE LOVE LOVE your patterns and tutorials. They have been a great help to me. My son's girlfriend wants me to make her a pair of these but the yarn I have is http://shop.hobbylobby.com/products/pink-sparkle-i-love-this-cotton-yarn-110221/ medium weight. Would I need to use 2 strands of yarn for this pattern? Thanks much.
Tamara Kelly
Hi Darlajune! Yes, you'd want to hold two strands of I Love This Cotton together to sub for bulky weight yarn. 😀 And thank you! Here's a quick reference guide that I find useful for yarn substitutions: http://www.lionbrand.com/faq/16.html
Darlajune
Thanks for the quick reply!
Diane
In the UK, where I am typing this from a dc is what appears to be a single crochet in your patterns.
What is a dc for you - a half treble or a treble?
I would love to do this pattern but can't figure this out.
Thank you
Diane
Tamara Kelly
A dc for me is a treble crochet for you! 🙂 Here's a quick chart for the basic sts: http://www.yarnfwd.com/main/crochet.html
Stephanie M.
I dove into this project thinking it was going to be a straight-forward one hour project. Not so. I'm pretty good with crochet and have done some intermediate projects without an issue. Your tutorial for the fptc links to a fpdouble (or single) crochet which I found confusing...and then the tutorial for the fptrc2tog was confusing since it wasn't based off the project in the pattern.
I applaud your effort but this pattern is definitely a four hour pattern...unless you're familiar with this non-traditional stitch.
Tamara Kelly
Hi Stephanie! I'm sorry you had so much trouble with the pattern. The fptrc is the same as a fpdc, just with a tr instead of a dc (aka, yo twice to begin instead of once). If you're not familiar with treble sts or post stitches, there are video tutorials for those as well. The fptrc2tog is worked the same in both patterns - the cable of the slippers is just a small section of the same cable pattern of the cowl. The step by step photo tutorial also shows the cable stitches. I'll try to make videos specifically for fptrc and fptrc2tog in the future.
Darlajune
Thank you Tamara for this pattern. I am not the best 'crocheter' but I love this pattern. I was able to whip one up in an hour even though I was not familiar with the fptr2tog. I made the large size first. It fits me perfect. Then I made the smaller size for my son's girlfriend. It fit her perfectly.
I need help with something though. My oldest son's girlfriend would like a pair. The length of the small size fits her but the opening is too small for the foot to fit through. She says she has small, fat feet! LOL She has to buy children's socks b/c her feet are so small.
Can you give me some pointers on how to adapt the pattern for her foot? It is perfect except for the opening that you put your foot through to get it on.
Thanks.
Tamara Kelly
😀 Glad it worked for you Darlajune! So the opening of the small size is too small for her - how about the opening of the large size? Is that still too small? You can make the larger size (wide width) and then stop the length at Row 14 (or Row 12 or 13 if her feet are even shorter) and sew up the back. If the wide width size is still too narrow, going up a hook size might give you the extra ease needed.
Darlajune
Thanks, Tamara. I will try using the wider opening. I think that will work.Thank you so much.
Tamara Kelly
😀 You're very welcome!
Megan
Great pattern! Do you think these could be made in kids' sizes just by using WW instead of chunky? Or should I work it out by adjusting the pattern? Thank you!
Megan
Tamara Kelly
I think so! It's hard to say exactly what size you'd end up with, but with a little experimentation and improvisation I think that would work really well!
Krysia
I just taught myself how to crochet today, and I'm very confused by row 16. It says to only do 9 sc then fold in half with right rides together? I don't understand that. Is one side supposed to be higher? When I fold in half the sides don't match up. Am I supposed to adjust them to where they do match?
Tamara Kelly
Ok, first, WOW! I'm impressed and humbled you just learned today and have made a pair of slippers - so congrats!! Now as for that last row, yes, the one side is a little higher, but you adjust and sew the higher half to the lower half. This keeps you from having a knot on the bottom of the heel, and from having to cut the yarn to work the edging around the ankle. I hope that helps!
Krysia
Well thank you!!Your videos and instructions were great!! I got it done!
Tamara Kelly
😀 Glad to hear it! Thank you Krysia!
Darlajune
Wow Tamara! I have made a pair for my daughter and for my 2 son's girlfriends, who all have different type feet. Your suggestions for adapting the pattern to their foot sizes worked perfectly. They are CRAZY about these. They all had theirs on yesterday at our Thanksgiving dinner. Also, I used 2 strands of I Love This Cotton for all 3 pairs in their favorite colors, 2 colors for each slipper. Then I used their most favorite of the 2 colors as the trim around the opening. It really made the trim stand out. These are definitely winners with my family. I am so glad I FINALLY found a really good slipper pattern. I have tried so many. Thanks again, Tamara, for all the work & time you put into your patterns and video tutorials. I appreciate your efforts and your willingness to share with us fellow crocheters. Hope you had a Happy Thanksgiving! We sure did, and all my girls had warm feet.
Tamara Kelly
What a wonderful note to wake up to this morning! Thank you Darlajune! I'm so happy to read it. <3 It was a wonderful day, and I'm so glad yours was as well.
Nikhat
Hi
thank you for this excellent pattern. I have made 4 pairs of slippers so far, two with the twist pattern and two using simple double crochet. All have turned out perfect. I made the first one for my daughter and she loves it. It is in bright red chunky wool and her feet glow when she has the slippers on. The second pair was red again for a friend's birthday and she told me today that her mum tried them on and would like a pair! The next two, without the twist, are going to two friends as Christmas presents tomorrow.
I am looking forward to the weekend to crochet my next pair and then another and then.... I am addicted to this pattern.
Tamara Kelly
😀 Glad to hear it Nikhat! Thank you!
orange
So great pattern! I skipped round 10 and used just dc instead of the cable, and used super bulky yarn. It feels like soft boots 🙂
Tamara Kelly
😀 Glad you liked it orange!
Alison
Hi! I'm loving this beautiful pattern, but I've just completed two full cables (~row 8/9) and as I've been suspecting, my cables are running at an angle. Do you have any insight as to why my pattern would be making a spiral? What am I doing wrong :(?
Tamara Kelly
My best guess without seeing them is that you might be crocheting into the slip stitch join?
theleftandtheright
Tamara, thanks so much for this wonderful yet simple pattern. It's been unusually cold here in the Philippines at this time. Thick socks just don't give my feet the warmth they need, and I don't know why! It's like they keep my feet cold when I wear them with cold feet 😀 My feet cringe every morning from the cold floor of our house. So I searched for soft comfy crochet slippers and came upon your site. I like your pattern so much and it works that I made four pairs right away! I must say, you have a nice successful website, keep it going 🙂 By the way I just started my own blog a few days ago, and I wish to link to this page to share to more people about your pattern. For the ones I made, however, I wanted to make them quickly and get more heel coverage so I used plain dc instead of cabling and made a minor modification for the finishing edge, I also modified the pattern a bit to fit my little boy's feet. Can I ask for permission to link to this page and also show the minor changes I've used? I will be showing my own pictures of finished products using your pattern but with the changes I made, I greatly appreciate any positive response from you -- it will certainly help a newbie blogger like me for her first real blog post! Thanks!
Tamara Kelly
Thank so much, please do! 😀 Good luck with your new blog - and stay warm! 🙂
Chaysie
I am a beginner, I'm picking up pretty quick on crochet, however, I am pulling my hair out on round 3... just understanding everything in parenthesis and how many stitches I should have total. Please please please consider making a video tutorial for these slippers. I know you say to watch the vid for different stitches, but even for the first 3-4 rounds, would be amazingly helpful for us crochet dummies 🙂 Really want to make these... please help!
Tamara Kelly
Hi Chaysie! I hope to have a video tutorial for these very soon - it's next on my list to make!
Chaysie
Oh thank you so much Tamara! I'm up in michigan where the snow won't stop falling for nothing and I need some new slippers! Lol... Can't wait, will keep an eye out for updates, snd thank you for this amaze site!!
Tamara Kelly
I understand - even though I'm in relatively "balmy" Iowa lol. The video tutorial should go up tomorrow morning, barring and editing snafus!
Michelle
I LOVE these!!!! Thank you so much for the pattern! I always wanted to know how to do cables with crochet and now I know 🙂 I've already made 2 pairs! With my slippers, after I finished the heel, I increased 2 st and added some rows to the top so it goes up past my ankle. Sooo warm!!! I can't thank you enough for the step by step instructions with pictures and all the tutorials. Thank you!! <3
Tamara Kelly
😀 So glad to hear it Michelle!
Leslie
HELP! Ok, I want to learn how to make these! Oh, but I don't know how to crochet...except for remembering how to do a never-ending single chain. My grandmother tried to teach me when I was little...that's all I remember! 2 years ago I dragged out the dusty sewing machine and made all the women in my family kitchen aprons for Christmas. This past Christmas they got arm knitted scarves. So, is there a snowball's chance that I could learn how to do this in time for this Christmas? Any ideas, beginner video tutorials, or any type of help would be most appreciated!!
Tamara Kelly
Leslie, absolutely! 😀 If you go to this page: https://www.mooglyblog.com/category/video-tutorials/ - you'll see the Beginner Stitches right at the top - the Basic Stitches. Start there, and I bet you'll have it in no time! And basic stitches are all you need for this pattern!
Pamela
I made these slippers without making any changes & they fit perfectly! I used the average size instructions. My only glitch is the cable stitches swerve to the right on both of them. I was very careful to use the dc stitches & not the sl st stitches. I tried to follow all the instructions exactly. Any advice about where I goofed up?
Tamara Kelly
Hm, I'm not sure! If your stitch counts before and after the cable are right, it's hard to say. Are you making sure to skip the tops of the dc sts behind the cables? That's the only thing I can think of off the top of my head.
Pamela
I forgot to tell you that I'm left-handed. Would that make a difference?
Tamara Kelly
Possibly! I have to admit I'm not as familiar with left handed crochet. It's something I need to learn more about for sure!
Pamela
I was just wondering if you've found out anything about the differences with left handed crocheting?
Tamara Kelly
I believe left handedness may be why your slippers look different! I found this that might help: http://www.anniescatalog.com/crochet/content.html?content_id=554&type_id=T
sheilamarie walsh
dont understand why you put comments it waste paper and ink to print
why not just the pattern
Tamara Kelly
Hi sheilamarie, if you use the green Print Friendly button at the bottom it should provide you with a printable copy that is ad and comment free.
Angela roberts
Hello,
I have made these fab slippers for all of us. Daughters friend wanted some so made last night ....only I seem to have made left foot upside down this time! Didn't notice until sewing threads in and can't pull out as I added sequin yarn and sequins are stubborn little buggers to pull out! So off I go again ..Left foot forward ! Kindest. Angela
Marrie
Thank you! It is exactly adorable!!!! Thanks alot for sharing ittttttttttt 🙂
CheRyl
Book marking this for the weekend! Feeling a little but intimidated tho but (punches air) I can do it! >)
Tamara Kelly
😀 Be sure to watch the video tutorial if you get stuck!
Shirleyquillinan
In order to print out Simple Cable Crochet Slippers , 27 pages on both sides. That is the only way to copy it. I certainly hope it's worth it. I can promise I will never copy another. I do not understand why a free pattern has to come with a lot of unneseary information .
Tamara Kelly
Hi Shirley! The Print Friendly button at the bottom of the pattern is how you can print it out in just a few pages.
Rachel Martinez
These really are one of my favorite patterns for slippers. They're fairly quick and you can pretty much memorize the pattern after making it a couple of times. I love the cabling because it makes it look difficult, but it's really a quick item to whip out. This was the first pattern I ever tried with cables and it gave me courage to try other cable patterns. Thank you so much for this fabulous pattern. 🙂
Tamara Kelly
😀 Thank you so much Rachel!
Carly MaGuadog
I love this pattern. It's so easy to follow. It makes something that looks complicated simple to create. Thank you so much for all the free patterns. It's so appreciated!
Carly MaGuadog
Also, one quick question, the pattern for the left foot reads:
Row 11 (Switching to rows): Ch 2, dc in the sl st and the next 16(19) sts. Turn. (17(20) dc)
Row 12: Ch 2, dc in the next 17(20) sts. Turn. (17(20) dc)
Shouldn't Row 11 be 17(20) dc's, not 16(19)? If the stitch count is 17(20) in that row and row 12 doesn't have any increases in the pattern and the stitch count is also 17(20)? I really hope that makes sense. Thanks in advance for clarifying. =)
Tamara Kelly
It's dc in the slip stitch AND the next 16(19) for a total of 17(20). 🙂
Tamara Kelly
Thank you Carly!
JD WOLFE
i really like the looks of these. wondering if the design would be as snug (but not as attractive) without the decorative cables? would omitting them change the fit? i think not, but if anyone knows, i won't have to experiment myself.
thanks for the quick, cute pattern.
jd in st louis
Tamara Kelly
Other people have made them without the cables before and they turned out really well! 🙂
Marianne
You may have answered this already, but what size would you use to make a man's slipper size 10 average
Tamara Kelly
I would make the larger Women's size in wide - men's shoes typically run wider. 🙂 If you can try them on as you go that would be best, that way you'll know if you need to add an extra row to the length before closing up the heal.
Tracy
This is the first pair of slippers I've made that fit perfect! The pattern is quick and easy! Thanks for sharing. 🙂
Tamara Kelly
Oh I'm so glad to hear it! Thank you Tracy! 😀
Jan
Taught myself to crochet about 8 months ago. Have made lots of toys, a few blankets. Tried another slipper pattern and was completely lost. THIS PATTERN AND INSTRUCTIONS ARE GREAT! Made a Trial run with worsted weight so i could really see the stitches and I'm ready to make a real pair. THANKS!
Tamara Kelly
😀 Oh I'm so glad to hear it! Thank you so much Jan!
Dee Hoy
Thank you so much for this pattern. I made one last night before bed and took me a couple of hours watching the video sorting my boy out and the dog so it wasnt a continuous couple of hours but i did make it. I thought the cable ws a tiny bit tricky but it was the unknown I reakon i could make the other one in about half hour so will be making xmas preent slippers now!!! any idea how i can make them non slip!!!!
Tamara Kelly
Hi Dee! I'm glad you were able to get them figured out! There's a link in the blog post, for non-slip options: https://www.mooglyblog.com/make-slippers-non-slip/ And be sure to read the comments, there's a lot of great ideas!
Terra
Thank you for the great pattern! I have one question.are these supposed.to be open in the back? I think so by the pattern but wasn't sure. Thanks again!
Tamara Kelly
No, the last line of the pattern is closing up the back. 🙂
Shannon
I'm not sure if this was covered in the comments or not. But in Rnd 3, it says "dc in the next 9 (3) sts" then "2dc in the next st"... Is the (3) supposed to be (13) or am I supposed to add 3 extra dcs in the rnd each time?
Tamara Kelly
The number in parenthesis is for the larger size. If you are making the smaller size, just ignore that number.
Shannon
I understand that the parentheses are for the larger size. My confusion is, in this rnd, the number in the parentheses is smaller. Do I crochet 3 dcs then 2dc in one st and repeat? Or was it supposed to be a larger number?
Tamara Kelly
It is the correct number - having a smaller number in the parenthesis means that you'll have more repeats, and more increases, for a smaller size. 🙂 Hence the "2(5) times"
Anna
Thank you for the pattern Free is always appreciated. I didn't really pay close attention to when come comments were made, but I just wanted to say ignore the complainers. You were generous enough to give us the pattern. You have given us a printer friendly button. And even if you hadn't, cut and paste always works. If they don't have that, deal with lifes little disappointments.
Thanks again.
Tamara Kelly
🙂 Thank you so much Anna! I really appreciate it!
Tina
Your pattern and tutorial are perfect! I came across the tutorial on youtube this morning after looking for a better way t make sock slippers. I had used a purchased pattern that was a disaster! Finished both socks only to find out they were nearly 4 sizes too big and looked horrible. I followed the pattern to a T. Any way, yours whipped up in less than an hour for the pair and they are perfect! Love, love love them! Thanks so much.
Tamara Kelly
Thank you so much Tina! 😀 I'm so glad it worked for you!
jd wolfe
these slippers look warm, cozy, and not too difficult. those unwilling to read thru 9 pages for a pattern are not very adventurous, not very grateful, and not worth paying attention to!! these slippers have made their way on to my To-Do list as i have a nice stash of wool-ese chunky yarn!
thanks,
jd in st louis
Tamara Kelly
Thank you JD! I would also note that using the green Print Friendly button allows you to omit any of the photos you don't need, so you can print it out much shorter. But then if you do need the photos, it's of course going to take some space! 🙂
Lisa
I love this pattern! I made 2 pair over the weekend and am going to get more yarn so I can make some more for Christmas presents. This is a very easy pattern- the video was a huge help with the cables and I was very excited to see the finished product look like the pictures! Thanks for such a super easy pattern.
Tamara Kelly
I'm so glad to hear it, thank you Lisa!
Sally Berger
I need help with the left slipper. I made the right one first and it looks just like the picture of yours. I followed the written instructions for the left one and the cables are not in the position shown in your picture of the left slipper. They are on the right side of the left slipper rather than on the top left. I am an experienced crocheter and have re-read the written instructions several times looking for my mistake and can't find it. The video tutorial only shows the right slipper so it couldn't help me either.
Tamara Kelly
The cable should shift because of the number of stitches worked before and after the post stitches. I'm not sure why that isn't the case for you.
Sally Berger
Thanks for getting back to me. The directions for the left slipper on my version of the pattern, which I found at allfreecfochet.com, were incorrect. After the Ch 2 to start Round 4 it said to dc in the first st & then to fptrc around stictch 4 of Round 3. This put the cable on the inside of the slipper. Before I heard back from you I did the calculation to dc in the next 16 sts of Round 4 and then fptrc around stitch 18 of Round 3. This put the cable in the correct position on the left slipper & it turned out as well as the right one did. Thanks again.
Tamara Kelly
Ah sorry about that, sounds like they didn't transcribe the pattern correctly. I'm glad you came to the blog!
Robin
Hi, these look wonderful. I love the idea of starting at the toe and working up. Kind of like amigurumi! Fabulous. I wondered about the possibility of felting them after they've been all worked up. I was thinking of using a 100% yarn, in the suggested weight, and since I am a size 6, would go with the size 9-11. I wanted to ask you, as the designer, what you think?
Tamara Kelly
Thank you! I think it could work, but I haven't tried it to see how much they'll shrink down - that will depend a lot on the yarn and how much you ffelt them... Sounds like an interesting experiment though!
betty
This pattern comes out huge!
Tamara Kelly
It sounds like you might need to check your gauge, or try the smaller size. If they are still too big for you, you can go down another hook size or two. 🙂
jd wolfe
so, to the issue of felting that was asked. i have yet to make this pattern - but, if it runs large, it may well be perfect for at least partial felting (fulling). if this is your first felting project, use 100% wool (NOT SUPERWASH) like sheep's pride or wool of the andes - then felt by hand to be sure they don't get to small. if you have a good shoe 'mold' (an old pair of good fitting shoes that you don't mind getting wet) you can cover the shoe with plastic wrap and slip the wet felted slipper over the shoe mold and let it dry. the size and shape should be perfect for you.
jd in st louis
Tamara Kelly
Great advice JD, thank you!
Linda groVes
Thnk you so much for your illustrations and tutorial. It was so much better than trying to figure it out from just a pattern. I really enjoyed it. And the size is perfect.
Tamara Kelly
🙂 I'm so glad to hear it, thank you Linda!
Ladee
I am probably what you would call a "lazy" intermediate crocheter lol If the pattern looks too difficult I will save and MAYBE go back to it later. That said, I will tackle the new-to-me cable but hate making left & right slippers. Is there a way to adapt the pattern so the cable goes up the center front of the slipper instead of left or right?
Tamara Kelly
Yes! Just move the opening - where you shift from rounds to rows - so that the cable is in the middle. 🙂
Carole byars
I've clicked the Printer Friendly button several times with no result. What else can I try?
Tamara Kelly
It sounds like you might have a pop up blocker. In this case, please go to PrintFriendly.com and enter the URL there. 🙂
Marilee
I'm broke this Christmas season, so I was happy to find a nice FREE pattern that's quick and easy. I had some bulky, soft yarn in my stash and knocked out my first pair this afternoon. This pattern is much easier than it looks.
Thank you for helping me with Christmas giving this year!
Tamara Kelly
♥ Thank you Marilee! I'm so glad it was able to help! I hope you have a wonderful Christmas!
Peggy bell
The printed pattern says to make firstfront post treble crochet around double crochet of round three but the video tutorial says to make front post treble crochet around double crochet of round two. Can you please clarify?
Thank you
Tamara Kelly
I may have misspoke in the video, I would always recommend following the written pattern.
Karen
Love this pattern. It whips up so quickly, however, the cables on my slippers slant off to the side like they're following the rounds instead of going straight up the foot as shown in the picture. How do to correct this?
Tamara Kelly
Hi Karen! And thank you! The cables are meant to sort of be on one side or the other (right foot vs left foot), but it sounds like yours have more angle than that? Rounds do tend to have a bit more of an angle to them than rows, but then they would be going the same direction. I know this sounds silly, but is it possible you have them twisted on your feet? It's always so hard to guess without being there of course.
Cheryl Talbot
I love these slippers, so easy and the video helped me in places. I have watched a few of your tutorials and love them.
Thank you for the time you have made in sharing your patterns and tutorials and I Love your Moogly site
Thanks Cheryl
Tamara Kelly
Thank you so very much Cheryl! ♥
Juls
Cannot wait to try and make these slippers for my kids and grandkids! So two questions, where is the link for the video showing how to cable stitch and is there a way to make these taller as boots? Would I just keep going around until I get to the height I need? Any suggestions?
Thank you for all your hard work and great ideas!
Tamara Kelly
Thank you Juls! The video for this pattern (linked above in the bullet points) demos the cables far better than my more generic cabling video but the key is post stitches - and if you aren't familiar with those, click here! 🙂 And yes, you could just keep crocheting evenly around the ankle opening for boots - that would make a great fold over cuff! 🙂
Kim Pike
Thank you for this awesome pattern! It definitely is so much easier than it looks. (Though being left handed I had to think reverse all the time). I just made a pair in 2 hours or so using Caron Simply Soft (medium 4) using double strands. Perfect weight!!! These are a gift and next will be making a pair for me!! Thanks again Tamara 👍
Tamara Kelly
Thank you so much Kim! I'm so glad to hear it! Happy holidays!
Julianne Johnson
I actually made one pair, no problem, at Christmas. Now I'm trying to repeat as a special request and I'm struggling. I've watched the tutorials and have the directions in front of me and don't know what I'm doing wrong. The left slipper defies me. I've ripped this one down to row four half a dozen times but will not give up as son-i- law with bony, skinny feet loves them.
Tamara Kelly
Hi Julianne! I'm so sorry to hear it! :/ I wish I knew what to say, it's hard to guess at what the issue might be - especially since you've had success before!
Nicky van der Walt
Absolutely love this pattern, i have followed your video tutorial and found it so easy, have made 5 pairs now for the family.
thanks again for the lovely explanation and easy to follow pics as well. Love your work. 🙂
Tamara Kelly
Oh yay! Thank you so much, Nicky!
Mary Ash
Thank you for your wonderful pattern and tutorial. Thanks to both I was able to learn how to make a Migic Circle (Ring) and a nice warm pair of slippers. I will be making slippers for family this year thanks to your help. I did not crochet the cable and doublecrocheted throughout the pattern instead. I am a novice crocheter so I used the simplest method possible. Thanks so much for all your help!
Tamara Kelly
I'm so glad to hear it, thank you Mary! And congrats on learning to crochet! ♥
Carol
Hi Tamara. I am most anxious to try this pattern. I have a question. I want to make a pair of these for my daughter. She normally wears a size 8 1/2. So should I go with the directions for the larger size? (9-11) I see that you say these are a little bit loose fitting. Not sure what to do. Don't want them to be over-sized.
Tamara Kelly
Hi Carol! As long as the yarn you are using has some stretch, I would think the smaller size would be best! 🙂
Steph
Ran up a pair in 2 hours (with a break for supper this evening. Pattern I’d easy to understand and the slippers look fabulous! I’ll have to make a few more pairs for spares!
Tamara Kelly
Thank you so much, I'm so glad to hear it! ♥
Katie
Would wool-ease thick and quick work with this patern? Looking to do a bit of stash busting. Also wool-ease chunky seams to be discontinued.
Tamara Kelly
If you can get gauge it should work! Might have to play with hook size though. 🙂
Katie
Thank you! I got my gauge with a J/6mm hook
Laura
Thank you so munch for this pattern! I made these for my hubby and he LOVES them. It was my first time doing cable stitches and your instructions made it easy. Thanks again!
Tamara Kelly
Thank you, Laura!
Lavinia
I've made these slippers and I likee them because they are quick to make and very pretty and conformable .
I love your instruction video.
Thank you
Tamara Kelly
♥ Thank you so much!
Elysa
I love these!! I held two strands of ww together and still used a j hook. I left off row 10 and changed the last row of DC to a hdc and they fit my 8.5s perfectly. I'm going to make another pair and go down a hook size so I can hopefully keep the pattern the same. But these are so cozy! They stayed on all night and don't slip around while I'm walking. Thank you so much!
Tamara Kelly
I'm so glad you like them, thank you! ♥
Mary Jane Scott
I can't wait to try these. I've never made slippers before, but want to try these! Thank you for a lovely pattern.
Tamara Kelly
♥ Thank you so much!
Mary Jane Scott
Mine don't look like your's. My cables aren't as nicely defined as yours, (or the same shape) and run on an angle to the side??? Wish I could attach the photo I took of them.
Tamara Kelly
Hi Mary Jane! It could be gauge/tension, it could be the yarn used. You can email me at tamarakelly@mooglyblog.com if you'd like me to take a look!