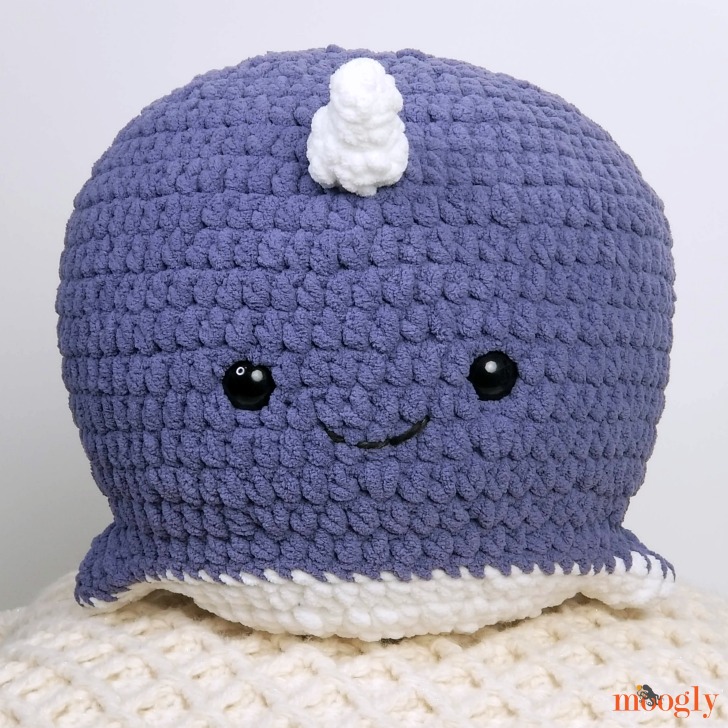
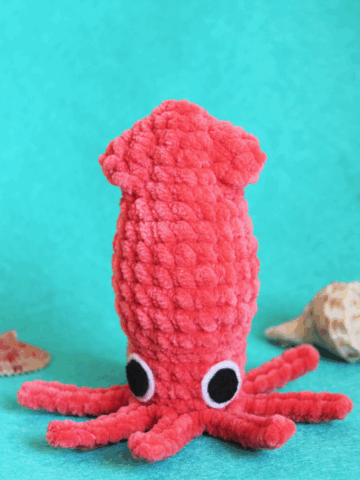
The Octopus Squish has a new friend - the Narwhal Squish! Just like it's pal, it's cute, cuddly, squishy, and a free crochet pattern on Moogly! Crochet the unicorn of the sea with Bernat Blanket!
Disclaimer: This post includes affiliate links; materials provided by Yarnspirations and Furls.
Prefer an ad-free PDF? You've got options!


Prefer the free blog version? Keep scrolling!
Especially Squishy
The Narwhal Squish is filled with the same microbead pillow ball as the Octopus Squish. It's just the perfect size, and so huggable! And once again I've used Bernat Blanket, so it's a speedy project to make, taking just an evening or two. Of course, if you prefer, you can fill it with Fiberfill.

What Face will you Create?
Narhwals are so fun, and this Narwhal Squish is no different! I used safety eyes and a bit of black yarn for the face, but you can create your own look with how you sew on the smile and the buttons or eyes you choose!

A Note on Toys for Kids
The Narwhal Squish itself is far too big for babies to choke on, but if you use buttons for the eyes, they may not be. This pattern has not been tested for safety for children under 3 years of age. If you are crocheting it for a baby or toddler, please embroider on the face rather than using buttons. If using it as a photo prop, be sure not to leave the toy with a baby unattended.

Narwhal Squish
Add this pattern to your Ravelry Queue and Favorites
US-L, 7.0 mm hook - Furls
280 yds Bernat Blanket (6 - Super Bulky/UK: 14-16 ply; 100% polyester; 300g/10.5 oz; 201 m/220 yds)
Color A: Dusk Blue (200 yds, 1 ball)
Color B: White (80 yds, 1 ball)
12" (30 cm) worsted or bulky weight black yarn
22mm Safety Eyes
10" Round Microbead Pillow (blue) - Amazon
Gauge: 4"/10cm across after Rnd 3.
Size: 10" around excluding horn, fins and tail.
HELPFUL LINKS AND TUTORIALS
NOTES:
Rnds 1 - 18 (and the horn) are worked in a spiral.
Do not ch 1 unless directed, and do not join any rnds with a sl st.
Move a stitch marker along the first st of each rnd as you work to keep track of your progress.
INSTRUCTIONS:
Body
Rnd 1: With Color A, make a magic circle, ch 1, sc in the ring, 9 hdc in the ring. (10 sts)
Rnd 2: 2 hdc in each st around. (20 hdc)
Rnd 3: *Hdc in the next st, 2 hdc in the next st; rep from * around. (30 hdc)
Rnd 4: *2 hdc in the next st, hdc in the next 2 sts; rep from * around. (40 hdc)
Rnd 5: *Hdc in the next 3 sts, 2 hdc in the next st; rep from * around. (50 hdc)
Rnd 6: *Hdc in the next st, 2 hdc in the next st, hdc in the next 3 sts; rep from * around. (60 hdc)
Rnd 7: Hdc in the next 5 sts, 2 hdc in the next st, *hdc in the next 9 sts, 2 hdc in the next st; rep from * until 4 sts rem, hdc in last 4 sts. (66 hdc)
Rnd 8: *2 hdc in the next st, hdc in the next 10 sts; rep from * around. (72 hdc)
Rnd 9: Hdc in the next 8 sts, 2 hdc in the next st, *hdc in the next 17 sts, 2 hdc in the next st; rep from * until 9 sts rem, hdc in last 9 sts. (76 hdc)
Rnd 10 - 15: Hdc in each st around.
Rnd 16: *Hdc in next 17 sts, hdc2tog; rep from * around. (72 hdc)
Rnd 17: Hdc in next 4 sts, hdc2tog, *hdc in next 7 sts, hdc2tog; rep from * around until 3 sts rem, hdc in last 3 sts. (64 sts)
Rnd 18: *Hdc2tog, hdc in next 6 sts; rep from * around. (56 sts)
Rnd 19: Hdc in next 10 sts, 2 dc in next st, 3 tr in next st, 2 dc in next st, hdc in next 25 sts, 2 dc in next st, 3 tr in next st, 2 dc in next st, hdc in next 10 sts, sc in next 5 sts; turn. (64 sts)
Row 20: Ch 1, sc in first 5 sts (rem sts left unworked); turn. (5 sts)
Row 21: Ch 5, skip the ch closest to the hook, sc in next ch, hdc in next ch, dc in next ch, 2 tr in next ch, dc in next st of Row 20, hdc in next st, sc in next st, hdc in next st, dc in next st, ch 6, skip the ch closest to the hook, sc in next ch, hdc in next ch, dc in next ch, tr2tog in next 2 chs; break yarn and sew to side of tail (bottom of Row 20).
Belly
Rnd 1 - 5: With Color B, rep Rnd 1 - 5 of Body. (50 hdc)
Rnd 6: 2 hdc in next st, hdc in next 8 sts, 2 dc in next st, 3 tr in next st, 2 dc in next st, hdc in next 4 sts, 2 hdc in next st, hdc in next 8 sts, 2 hdc in next st, hdc in next 7 sts, 2 hdc in next st, 2 dc in next st, 3 tr in next st, 2 dc in next st, hdc in next 4 sts, 2 hdc in next st, hdc in next 2 sts, 2 hdc in next st, sc in next 5 sts; turn. (64 sts)
Row 7 and 8: Repeat Row 20 and 21 of Body.
Horn
Rnd 1: With Color B, make a magic circle, work 3 sc in the ring. (3 sc)
Rnd 2: Working all sts in BLO, 2 sc in next st, sc in next st, 2 sc in next st. (5 sc)
Rnd 3: Working all sts in BLO, [sc in next st, 2 sc in next st] twice, sc in next st. (7 sc)
Rnd 4: Working all sts in BLO, [2 sc in next st, sc in next st] 3 times, sc in next st. (10 sc)
Finishing: BLO sl st in next st, break yarn leaving a 12" tail, seamless join to next st. Stuff horn with first end.
Assembly
Add the Horn: Using the long tail, sew horn to Rnd 9 of Body, between the fins and opposite the tail.

Create the Face: Add the Safety Eyes or buttons to the Body and sew on a smile using the short length of black yarn.
Prep for Finishing: Insert the Pillow into the Body, then match up the Body and Belly. Making sure the fins and tail are matched up, use stitch markers to secure the pieces together.

Final Seam: Using Color A, whip stitch through Body and Belly working evenly around the entire body, including the fins and tail. Use Seamless Finishing to join, break yarn and weave in end.
Looking for more free crochet toy and softie patterns? Browse them all on the Moogly Free Patterns Page or Ravelry! In particular, be sure to check out the Octopus Squish and Benevolent Bumble Bee!

If this pattern inspires you to make your own project, and you post a photo on social media, be sure to tag me @mooglyblog or #mooglyblog so I can check it out too!
THE FINE PRINT
Follow Moogly on Facebook, Twitter, Pinterest, Instagram, and YouTube! Thank you to Yarnspirations for providing the materials shown in this post. Written pattern copyright Tamara Kelly 2020, all rights reserved. Please do not reprint or repost this pattern, but please do link to this page to share this pattern with others.
If you wish to make items for sale from this pattern or translate it to another language, please visit the About page for details.


Kayla says
This narwhal is too too cute!!! I'm working on making him for a baby shower gift right now! I've added it to the tail, and I made the tail without issue, however it looks terribly off center. I've verified that my stitch count is correct, and pulled it out 1000 times, but it's still so off center. I thought maybe this is one of those things that will work itself out as I make and attach the bottom? I just want to make sure he doesn't have a terribly off center tail! Is this normal?
Tamara Kelly says
Hi Kayla, and thank you! It should be centered between the flippers/fins(arms?) - I'm not sure how it got skewed, but you may need to scooch it over. Sometimes personal gauge makes things a little wonky.
Sophie says
On the belly instructions, what does "3tr" mean? By the way, thank you for this lovely tutorial for such a cute project!
Tamara Kelly says
Hi Sophie! Tr stands for treble: https://www.mooglyblog.com/treble-crochet-triple-crochet-trc/
So 3 tr means work 3 treble crochet stitches into the indicated stitch. 🙂
Jill says
Kayla - I am having the same problem with the off center tail. I’m so glad to see I’m not the only one!
Carrie says
I had this problem until I realized I forgot to turn the piece after row 19
Diane says
So cute! My safety eyes were very pointed, so I filed them off a bit so that they wouldn’t puncture the micro bead pillow. Thanks for the pattern! Love your site!
Tamara Kelly says
Thank you so much, Diane! Great tip!
Michele Santellan says
Hi. I'm doing the tail and one side of it says regular treble and the other side says tr2gether, which would be a decrease. Is that correct?
Love the pattern
Tamara Kelly says
Hi Michelle! Yes, we decrease on the other side to create the shape. 🙂
Priya says
I used bernat blanket yarn and made as per instructions and used 7 mm hook. The pillow didn’t fit into the narwhal. 😭
Tamara Kelly says
Hi Priya! Did you get gauge?
Priya says
I did. It’s fine. I am doing the octopus as well. Will fill it with poly fill as well. Probably will make a bigger one to use the pillow. 😁
Tamara Kelly says
Every once in a while I get a ball that is a little overstuffed, a bit bigger than the rest - new sewers I guess! So in the rare case that happens I open up a seam and let some of the filling out, and then stitch it back up!
Priya says
It was an amazing project. I created one. But the pillow tha I got from Amazon didn’t fit in now sure why. I filled it with poly fill from my old cushions. The person I gifted it to loved the gift
Katie says
I love this narwhal so much I made one for myself after gifting one to my neice for her 16th birthday! We both love them! It is also my quit smoking project to keep my hands and mind busy. So far so good!
Tamara Kelly says
♥ Thank you so much! I'm so glad you like it!!