In just a couple of weeks, I'll be at the Knit and Crochet Show in Manchester, New Hampshire - helping to celebrate the Crochet Guild of America's 20th Anniversary. I'm super excited to go, and all that excitement has inspired two new crochet patterns! And since I missed last week due to flooding, I thought I'd best share both this week... Introducing the Manchester Handbag and Sunglasses Case!

his post has the pattern for the handbag - click HERE to go to the pattern for the Sunglasses Case! They make a great set - but of course they are super fun on their own as well!
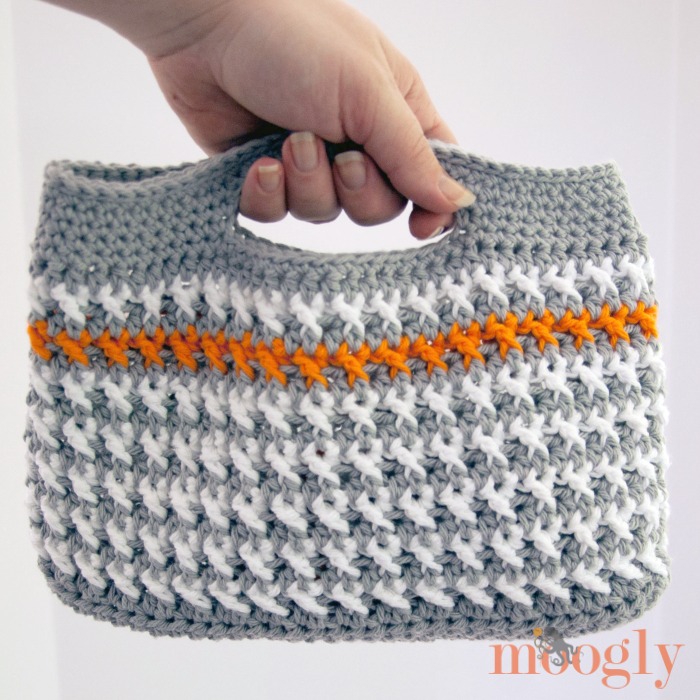

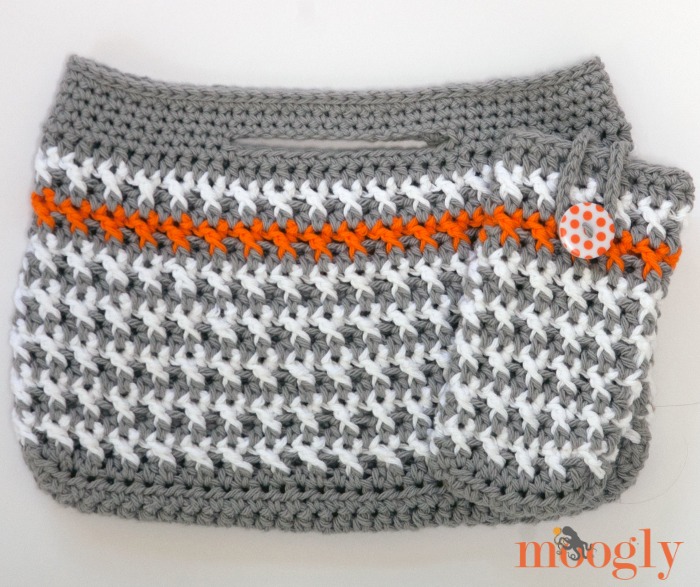
Manchester Handbag
Add this pattern to your Ravelry Queue and Favorites
- US - I, 5.5mm Hook (Furls Fiberarts Hook shown)
- 180 yds total Bernat Handicrafter (Worsted; 100% cotton)
Stormy Skies, Sail White, and Orangesicle shown - Finished size: 11" wide and 7" tall underneath the handles.
- Video tutorials that apply to this pattern: Diagonal Dip Stitch; Half Double Crochet; Bag Bottoms; Post Stitches (fpdc); Seamless Join
NOTE: You can carry the yarn along the inside of the bag rather than cutting it after each row, if desired.
Row 1: With Color A, ch 33, hdc in the 2nd ch from the hook, hdc in each remaining ch to end; turn. (32 sts)
Row 2 - 4: Ch 1, hdc in each st across; turn. (32 sts)
Round 5: (See Bag Bottoms tutorial linked above) Ch 1, hdc in 32 sts across, hdc 4 along the side, hdc 32 across the foundation chain, hdc 4 up the last side; join with Color B with a sl st in first hdc of round, do not turn. (72 sts)
Round 6: Continuing with Color B, Ch 1, hdc in the 1st st, fpdc around last st of previous round, skip the next st, *hdc in the next st, fpdc around the skipped st (before the last hdc st), skip the next st; repeat from * to end, join with Color A with a sl st in first hdc of round. (72 sts)
Round 7: Continuing with Color A, ch 1, hdc in each st around; join with Color B with a sl st in first hdc of round. (72 sts)
Round 8 - 15: Repeat Rounds 6-7; join with Color C with a sl st at the end of Round 15. (72 sts)
Round 16: Continuing with Color C, repeat Round 6; join with Color A with a sl st in first hdc of round, break Color C. ( 72 sts)
Round 17 - 19: Repeat Round 7, then 6-7; break Color B after Round 18, continue with Color A to join with a sl st at end of round 19. (72 sts)
Round 20: Ch 1, sc in each st around; join with a sl st in first sc of round. (72 sts)
HANDLES NOTE: (Individual tension may mean you need to adjust starting and end points as needed to make the handles centered and matched. The following worked for me, use the stitch counts as a guide for your own bag.)
Round 21: Ch 1, sc in the 1st 22 sts, ch 14, skip 14 sts, sc in the next 22 sts, ch 14, skip the last 14 sts; join with a sl st in the first sc of the round. (72 sts inc chs)
Round 22: Ch 1, sc in each st and ch around; join with a sl st in the first sc of the round. (72 sts)
Round 23 - 24: Ch 1, sc in each st around; join with a sl st in the first sc of the round. (72 sts)
Round 25: Sl st in each st around. Break yarn and finish off. (See Seamless Join tutorial linked above)
The Fine Print
And that's it for the bag! The post stitches plus color changes create a great pattern and texture to this simple bag. I hope you enjoy making it. And be sure to CLICK HERE to get the pattern for the matching Sunglasses Case!
Written pattern and photos copyright Tamara Kelly 2014. You are welcome to make finished items from this pattern to sell - see the About page for details. To print this pattern for personal use, please use the Print Friendly button below - there's a tutorial HERE if you need help.


shakila says
thanks very much for the lovely patterns. they are not only free but u are gracious enough to let others sell what they make out of these patterns.
Tamara Kelly says
😀 I'm glad you like them Shakila!
Carolee says
This is so pretty! I love all of your patterns. I'll be making this one for sure.
As a side note though, I'm currently making placemats for my outdoor patio. I'm doing 4 different patterns with four different colors (with black) and alternating the main colors for each pair (make sense?)
I'm just finishing up my 6th and still trying to decide the pattern for the remaining two. I absolutely love the look of this stitch on the body of the bag and think it would be perfect.
Any chance you could tell me how to obtain this stitch pattern in rows?
Sorry for the very wordy post.
Thanks very much.
Tamara Kelly says
Thank you Carolee! To make it in rows, you'll need a multiple of two plus one. (So, an odd number). The work the pattern as written, ending each post stitch row with an hdc stitch. The plain hdc rows will be the wrong side rows, and the cable rows will be the right side rows. 🙂
Carolee says
Thank you for the response. I'm starting one now. So with color A I've chained 43 (I'm using chunky yarn and an 8mm hook). I'm working HDC across for 42 stitches. So this first row will be wrong side. Do I switch to color B for row 2 and then alternate each row?
Thanks again Tamara 🙂
Carolee says
I'm not sure if it's because I'm using the chunky yarn, but I just can't seem to get this right... I can't tell from your photo or the instructions but when a FPDC row is complete, will every post from previous row be worked, or will it be every other post?
Tamara Kelly says
Hi Carolee! Out of every two sts, one will have an hdc in it, and the other will have a fpdc worked around it. Does that help?
Tamara Kelly says
Don't switch colors until the first fpdc row. 🙂
Renae says
So cute! Could you please share your guage and the dimensions of your finished projects for these?
Danielle Drown says
Oh I love this! But how would you add a strap? Chasing two little boys means I usually need my hands free lol
D, Bookmom says
Beautiful pattern. And I love the furls hooks and that stunning yarn bowl!
Francine from Callaloo Soup says
I love this and would also love to know the finished dimensions? I think something like this wold be nice for carrying around my Kindle 🙂
Tamara Kelly says
Ah, I meant to include that - will have to edit! It's about 11" wide and 7" tall below the handle opening. 😀
Ericka says
Oh my gosh, this is ADORABLE!!! I love crocheting in cotton - and I love this stitch. You are so talented - thank you for being so gracious with your patterns and help.
Ericka
https://www.etsy.com/shop/StudioCbyE?ref=search_shop_redirect
Ericka says
ps, where did you get the Stormy Skies Bernat Cotton?
Angela Fern says
so cute!! I can't wait to make one!!! I am about half way done with my "at the beach" bag, I ended up using navy and white just like yours!! Its such a nice big size! I love it!! Thanks for another new bag pattern, they are my fav to make!!!!
Marrie says
Hey, i loved dis 1 alot!!!
Last nite i was thinking about a crochet next project, and immediately i found an amazing idea of creating a scholar's hat! I hope i have solved your problem if you think that what must be your next crochet project ;).. please if you lyked this idea so help me making it, AS U R A CROCHET 'LEGEND" ! >3 Love your website as i always DID, DO and WILL :*
Carrie says
Hey Danielle!
To make a courier bag you would simply need to not make the CH spaces in the sc. That means that in round 21, you would sc around (just like you did in round 20). Now you don't have to hole for the handles. After you did that work the rest of the pattern as written. After that you would crochet a strap and sew it on. For the strap I would ch 5+3 (5 being the number of sts across, 3 the ch three at the end of the row. Only if you are using double crochet though. If you want to make a sc strap I would do 5+1.). That is just preferencehowever, you can make it as skinny or thick as you want.
I hope that helped. Just howler if you need more help! 🙂 I totally understand the, "My hands are to full carrying two boys and pushing a shopping cart! No way am I going to carry a PURSE too!!!" 🙂
Carrie
Denise Miller says
I love this little bag. Thank you for the pattern.
Tamara Kelly says
Thank you!
Jane says
I'm thinking of making this as a crossbody bag...what do you think? I love the colors and the stitch pattern but I use a walker so can't carry handbags.
Tamara Kelly says
I think that would be lovely! 🙂
Cari says
This bag is so cute! Im making it for my 27 yr old daughter, using neon pink and white then neon yellow for the stripe
Tamara Kelly says
😀 Thank you Cari! Those colors sound fab!
Tiza says
I am looking for a crochet pattern for doll. Pls help
Tamara Kelly says
Hi Tiza! There are over 4000 patterns in the doll category on Ravelry: http://rav.to/1u053zK 🙂
Colleen (New Zealand) says
Tamara, Thank you SOOOOOOOOOOO much for sharing your wonderful talent.
I did my first one and loved it! So did my friends.
I'm on to my 5th one now, everyone's chosen different colours, but they all look wonderful.
The stitch is so easy, (once I got the hang of it!)
Tamara Kelly says
😀 That's fantastic! Thank you so much Colleen!
Tami says
i love the handbag and sunglasses case!
I'm having trouble with the fpdc row. I end up having 44 stitches, because how I am understanding the pattern is this; ch 1, hdc, go back and fpdc around the ch, go back to the u worked stitch before the first hdc and stitch an hdc, then go to the first hdc and fpdc around it, and continue on around.
Is this correct?!
Please, help! I really want to make these!!
Tami says
That should read "unworked."
Tamara Kelly says
Hi Tami! I believe this video tutorial will help: https://www.mooglyblog.com/diagonal-dip-post-stitch/ 🙂
Tami says
Thank you so much for the quick response!
The video will help for sure. I can't wait to make one for myself and a few for gifts!
Jo ATKIN says
I'm having trouble with the stitches when you complete a row. They don't connect as they should...what am I doing wrong? Thanks in advance...I've made three ofnthese, and always have the same problem.
Any help you can give, is much appreciated.
Tamara Kelly says
Hi Jo! I'm afraid it's impossible to say without a photo or more info. How do you mean they don't "connect"?
Jo atkin says
Finally got it. When ending a round, It would not in a place where a fp or hdc was in the right place..
But after trying over and over, I finally got it to behave...thank you for your great patterns, and for answering an old lady...keep em coming
Tamara Kelly says
I'm glad you were able to get it Jo! 🙂 Thank yoU!
Helen Bier says
Hello my name is Helen and I have a YouTube channel I was wondering if I could use this pattern one day to do a tutorial using purse thank you Helen
Tamara Kelly says
Hi Helen! I'm afraid I have to say no. I have my own youtube channel I do tutorials on. 🙂 Thank you for asking though!
Gillian Joseph says
This bag is adorable. I made it in a couple of hours. in almost the same colours as yours.
Thank you
Tamara Kelly says
Thank you so much, I'm so glad you like it! I'd love to share a photo of it in the Moogly email newsletter if you'd like to send it in! tamarakelly@mooglyblog.com