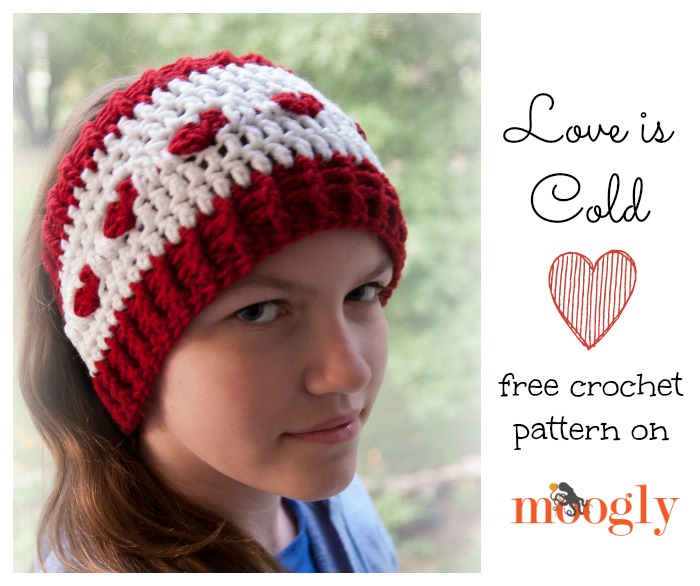
 At the end of 2014 I was honored to have an original crochet pattern published in one of the final issues of Too Yarn Cute Crochet eMagazine. And now that some time has passed (and with Valentine's Day on the horizon!) I'm excited to be able to share the Love Is Cold Ear Warmer pattern here on Moogly!
Disclaimer: This post includes affiliate links.
Prefer an ad-free PDF? You've got options!


Prefer the free blog version? Keep scrolling!
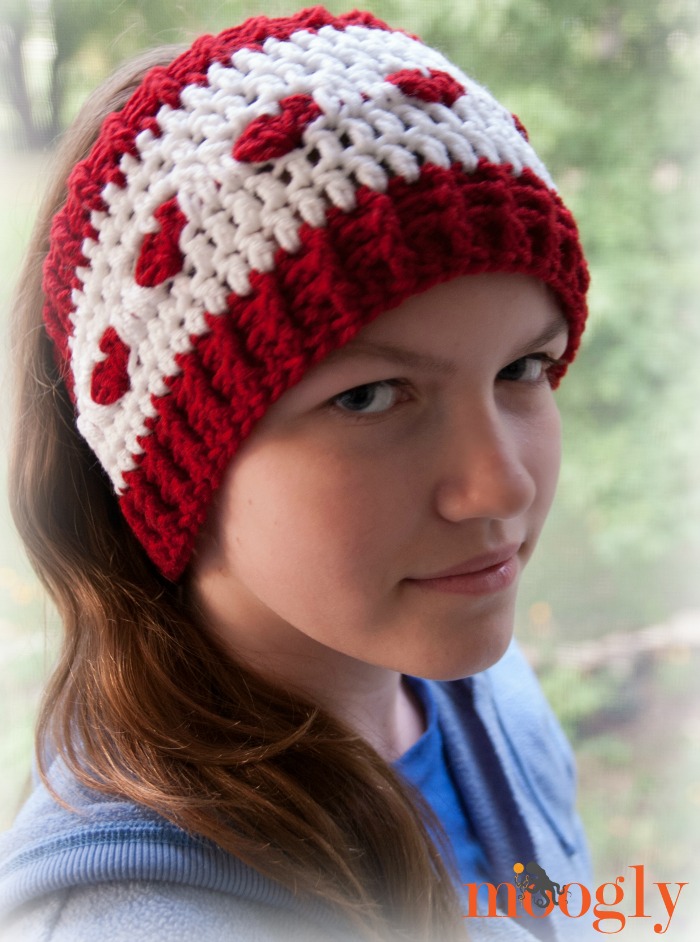
Love Is Cold EarWarmer
Add this pattern to your Ravelry Queue and Favorites
US – I, 5.5mm hook - Furls
90 yards Red Heart with Love (worsted or Aran weight yarn) in 2 colors
Sizes: 2 sizes are included, and stitch counts in the pattern are listed as Small 20-22”(Large 22-24”).
VIDEO TUTORIAL: Love Is Cold Ear Warmer Full Length Tutorial
NOTES:
- Standard instructions are given for Round 1, but if you are familiar with or willing to learn foundation double crochet, then you can substitute 50(60) fdc for the Round 1 instructions. This will give a much stretchier and more elastic ear warmer.
- In Round 5, when you pull up the loop and remove the hook, placing a stitch marker in the loop will help you not lose stitches.
- For crochet abbreviations and tutorials see the Crochet Abbreviations page.
Love Is Cold EarWarmer Instructions
Round 1: Leaving a long tail, with Color A, ch 52(62), dc in the 4th ch from the hook and each remaining ch to end, join with sl st to work in the round. (50(60) sts)
Round 2: Ch 2 (does not count as a st), *fpdc in next st, bpdc in next st; repeat from * to end, join with sl st to first fpdc.
Round 3: Repeat Round 2, break yarn and finish off.
Round 4: With Color B, join with a sl st to first st of previous round, ch 1, sc in the first 9 sts, hdc in the next 10 sts, dc in the next 12(22) sts, hdc in the next 10 sts, sc in the last 9 sts; join with sl st in first sc.
Round 5: Ch 1, sc in the first 9 sts, hdc in the next 10 sts, dc in the next 12(22) sts, hdc in the next 10 sts, sc in the last 9 sts; join with sl st in first sc. Pull up the working loop and remove the hook.
Round 6: With Color A, join to first st of previous round. Ch 1, work 3 sc in the first st, ch 2, skip 4 sts, 3 sc in the next st, ch 2, skip 4 sts, [(2 dc, hdc, 2 dc) in the next st, ch 2, skip 4 sts] 6(8) times, [3 sc in the next st, ch 2, skip 4] twice; join with sl st in first sc, break yarn and finish off.
Round 7: Pull working loop of Round 5 to front, leaving working yarn behind, and insert hook in loop. *[Ch 1, skip 1 st, sc in the next st, ch 1, skip 1 st, sc2tog twice in Round 5] twice**, ^[ch 1, skip 2 sts, sc in the next st, ch 1, skip 2 sts, hdc2tog twice in Round 5] twice^^, [ch 1, skip 2 sts, sc in the next st, ch 1, skip 2 sts, dc2tog twice in Round 5] 2(4) times; repeat from ^ to ^^, and then repeat from * to **, join with sl st in first sc. CLICK HERE FOR TUTORIAL FOR ROUND 7 only!
Round 8: Ch 1, sc in the ch 1 and the next 8 sts and ch sps, hdc in the next 10 sts and ch sps, dc in the next 12(22) sts and ch sps, hdc in the next 10 sts and ch sps, sc in the last 9 sts and ch sps; join with sl st in first sc.
Round 9: Ch 1, sc in the first 9 sts, hdc in the next 10 sts, dc in the next 12(22) sts, hdc in the next 10 sts, sc in the last 9 sts; join with sl st in first sc, break yarn and finish off.
Round 10: With Color A, join with a sl st to the first st of the previous round, ch 2, dc in each st around.
Round 11: Repeat Round 2.
Round 12: Repeat Round 3. Weave in ends, using first tail to close up the bottom of Round 1.
Now put it on and keep your ears warm enough to hear sweet nothings! I hope you enjoy this free crochet pattern - and that you feel warm wearing it!
The Fine Print
Written pattern copyright Tamara Kelly 2015. Please do not reprint or repost this pattern, but please do link to this page to share this pattern with others. If you wish to make items for sale from this pattern, please visit the About page for details.


Linda D. says
So cute. So many projects on my to do list. will save this for a Christmas gift. Thank you for sharing! 🙂
Tamara Kelly says
😀 Thanks Linda!
Diana says
My daughter and granddaughters will love this adorable ear warmer for Valentines Day!
Thank you for sharing such great patterns!
Diana
Tracey Reichert says
Help, not figuring out round 7,
Christina says
I am struggling with Round 7 as well, would love some tips. Not sure if I should be working over the Round 6, in front of, behind? Thanks!
Tamara Kelly says
Basically, you enclose Rnd 6 when working into Rnd 5, and then work into it when not directed to work into Rnd 5. 🙂 I'll be making a video this week!
Gigi LePore says
Thank you...I was having this problem too, so I'll wait for the video. Love all your patterns.
Tamara Kelly says
Hi Gigi! The video is up! You can find it on the home page on Moogly, or you can take another look at the pattern - it's linked at Round 7. 🙂
Bek says
I was having trouble understanding Row 7 too, was trying to do all the instructing into row 5, but the only time you need to work in to row 5 is when you are doing sc2tog, hdc2tog or dc2tog over the top of the 2 ch in row 6
So when it says [ch 1, skip 1 st, sc in the next st, this is into the top of the 5dc we did in red.
Hope this help 😉
Tamara Kelly says
Yes! I'll be making a tutorial video for this one too. 🙂 Thanks Bek!
Angie K says
Oh my gosh! This is so helpful! Thank you for sharing. I may give it a go before the video comes out.
Tamara Kelly says
Oh good! I'm so glad to hear it!
Deb says
Totally floundering on round 7 as well. May I please ask for help/guidance. Love the pattern and ty for sharing 🙂
Tamara Kelly says
Sorry Deb, video coming this week! 🙂
pAM SHIELDS says
SO PROUD OF YOU WINNING THAT AWARD... ALL YOUR STUFF IS BEAUTIFUL~! LOVE ALL THE THINGS YOU DO! KEEP UP THE GREAT WORK!
AGAIN.. VERY PROUD OF YOU! LOVE YOUR MODEL ALSO..
Tamara Kelly says
Thank you so very much Pam! ♥
Sandy lucci says
After working up many Web patterns, I always enjoy seeing a new MOOGLY pattern, because, I know the instructions will be easy to read, understand and work up and I will love it! Love your work!
Tamara Kelly says
Thank you Sandy! 😀
roxanne says
I am so confused on row 7 please help
Tamara Kelly says
Video coming this week! 😀
Peg Terry says
I gave my granddaughter the hat and scarf for Christmas. Surely, I will enjoy making the headband.
Kelly says
I'm struggling with Row #7 too.
Tamara Kelly says
Video coming this week! 🙂
Kelly says
Thanks Tamara. I was working on this project and improvised to make it work. However, I do like your version so much better. Will be looking forward to the video tutorial to make another - the right way. 🙂 I've learned so much from you over the past couple of years. Thanks for your giving spirit!
Tamara Kelly says
Thank you so much!
Patty says
I will have to wait for the video, having difficulty with round 7 too. So many steps.
Tamara Kelly says
If all goes well, it will be up tomorrow! 🙂
Brenda SKINNER says
Thanks,anyways. I finally figured it out.Now it is so easy,have made 4 of them with no problems.
Tamara Kelly says
I'm so glad to hear it Brenda! 😀
Suzanne says
I too need help with round 7
Tamara Kelly says
Video tutorial coming this week! 🙂
NIcole says
I can't seem to make any sense of round 7 either. 🙁
Tamara Kelly says
I'll be filming a tutorial this week. 🙂
Brenda Skinner says
Need clearer instructions or video tutorial for row 7 please.
Tamara Kelly says
I'll be making a video for this pattern this week! 🙂
Tamara Kelly says
I will be filming a tutorial for it this week. 🙂
Myra Wade says
Love this pattern. I have 5 great nieces and have been wondering what I could do for ValentinesDay. Now I have my answer! Thank you so much. I'm always excited to see a moogly post in my emails!
Tamara Kelly says
Thank you Myra!
Suzanne says
Wow what happened to my comment? I too am having trouble with round 7,
Tamara Kelly says
All comments go up for moderation. I'll be making a video for this pattern this week! 🙂
Erin says
Almost finished making this for my mother in law! No problems with understanding this pattern. Very cute and festive. 🙂
Tamara Kelly says
Thank you Erin! 😀
Hempel Bonnie says
I CANNOT FIGURE OUT THE VALENTINE EAR WARMER INSTRUCTIONS!!!!!!! Am I the only one asking about this pattern??? I've been crocheting for years, and cannot figure out row 7.
HELP PLEASE.
Tamara Kelly says
Hi Hempel! You're not alone, there will be a video tutorial later this week. 🙂
Rebecca Plemons says
well I can't even get past round 2, the slip stitch at this point is leaving a gap at the bottom. Please help, I so want to hook this. Tia.
Tamara Kelly says
Hi Rebecca! It sounds like you're using foundation stitches? If so, this might help: https://www.mooglyblog.com/joining-foundation-stitches-to-work-in-the-round/
rebecca plemons says
Thank you so much. I enjoy your blog and I'm grateful for all the free patterns. Have a great day!
Tamara Kelly says
Thank you Rebecca, you too! 😀
Janet says
Hi Tamara, I'm on row 6, have counted my stitches and do have 50 (making the small one) pattern calls for dc/hdc/dc 6times, in order to be able to finish the round I am needing to make an extra shell. Help please! Thank you
Tamara Kelly says
Are you sure you skipped 4 sts every time?
Janet says
Thank you for replying. After watching the video of row 7 I figured what the problem was by looking at your work. Thank you for sharing your beautiful patterns!
Tamara Kelly says
I'm so glad it helped! Thank you Janet!
Marta says
How do I print this pattern ?
Tamara Kelly says
The green Print Friendly button at the bottom - CLICK HERE for a tutorial! 🙂
Carmel says
Thank you so much, Made this tonight to go with finger less gloves and neck warmer for my friends birthday party Friday,
Carmel from Cork Ireland,
Tamara Kelly says
😀 I'm so glad you liked it! Thank you!
Andrea says
I love this pattern! Worked up in a flash. I used t-shirt yarn. It's soft and snug for now. This is an experiment, to see if t-shirt yarn works for something that needs to hold its shape. This way it's not too too hot, for my space heater of a kid. Thank you so much for sharing!
Tamara Kelly says
Thank you so much Andrea, sounds cozy and soft!
Barbara says
Hi. I am trying to print this pattern with your Printer Friendly button but it seems to not be working. I prefer to work from paper as using the internet burns my internet time. Help with printing would be welcome. I'd like to crochet this as a gift. Thank you.
Tamara Kelly says
Hi Barbara! That button seems to be on the fritz lately. Please go to PrintFriendly.com and enter the URL for the pattern there. That usually works when the button is being stubborn.
Helen antonellis says
I loved making this. Take the extra time to use the foundation stitch, the chain method was definitely not stretchy enough and didn't fit. Remade using foundation stitch and it was much better.
Tamara Kelly says
😀 I'm so glad you enjoyed it Helen! Yes, that foundation stitch is amazing for stretch!
peggy says
I know I must have done something wrong but with all the crocheting stitchesvtogether, I m not starting out row 8with the equivalent. ,Stitch's /spaces to complete round 8. Is there multiply crochet in some stitches of round 8? Hope this is making sense
Tamara Kelly says
Hi Peggy! No, each st in Round 8 is in it's own space. Did you watch the tutorial for Round 7?
Linda Bowers says
Thank you for the pattern. I am glad you did the tutorial for round 7 so much easier to understand!. Such a cute idea for Valentine Day gifts.
Tamara Kelly says
Thank you Linda!
Irene Marshall says
Hi
Would love to try this . Is it American hook sizes and stitches. I am Scottish
Tamara Kelly says
Hi Irene! Yes, it's written in American terms, and the mm size for the hook is included. 🙂 Thank you!
Nina says
If I wanted to make this smaller for a 4 year old, how many stitches would I do for round one? Is this pattern only in multiples of 10? Thank you
Tamara Kelly says
Hi Nina! You could try 40 sts, I'm just worried it's too small!
Nina says
Thank you!! I'll give it a go
Chris says
Im working on row 4 the larger size and the numbers aren' tworking as written.
Help please.
Tamara Kelly says
Hi Chris! There should be 60 sts to work into. You sc in the first 9, hdc in the next 10, dc in the next 22, hdc in the next 10, and sc in the last 9. 9+10+22+10+9=60 🙂