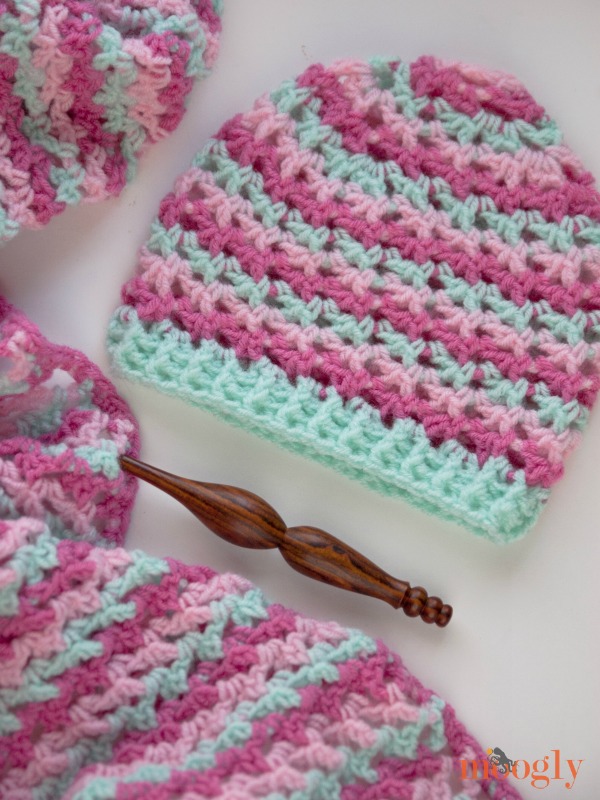
The Loopy Love Blanket was last week's free crochet pattern, and it includes 7 sizes. This week I'm sharing the Loopy Love Hat, which comes in 5 sizes to fit newborns to adults!
Disclaimer: This post includes affiliate links; materials provided by Red Heart Yarns and Furls.
Prefer an ad-free PDF? You've got options!


Prefer the free blog version? Keep scrolling!
Make It a Set!
The Loopy Love Hat uses the same stitches as the Loopy Love Blanket, but working in the round without turning - this creates a lovely swirling effect! If you prefer a more exact match then you can turn after joining every round. After making the baby size blanket I had more than enough to make the baby/toddler size hat (though it was cutting it close on the color I used for the blanket edging). So there should be enough left over to make the smaller newborn size hat as well.
You might be able to squeak out the child size with the leftovers too, as long as you use the blanket edging color as the least used color in the hat. If you've got the yardage to spare and prefer a slouchier hat, just add more rows in the section where you're working evenly!

Loopy Love Hat
Add this pattern to your Ravelry Queue and Favorites
US - I, 5.5mm hook - Furls Crochet
US - H, 5.0mm hook (used for brim only)
80 - 150 yds Red Heart Anne Geddes Baby Yarn (Sport/Light “3″ weight yarn)
3 colors ( in Robin, Taffy, and Rosie shown)
SIZES: Newborn (12-14"); Baby/Toddler (14-17"); Child (17-20"); Teen/Small Adult (20-22"); Large Adult (22-24") - be sure to scroll down to the instructions for the size you wish to make!
Helpful Links and Tutorials
CSDC - Chainless Starting Double Crochet (optional)
Fpdc - Front post double crochet & Bpdc - Back post double crochet
Matching Patterns:
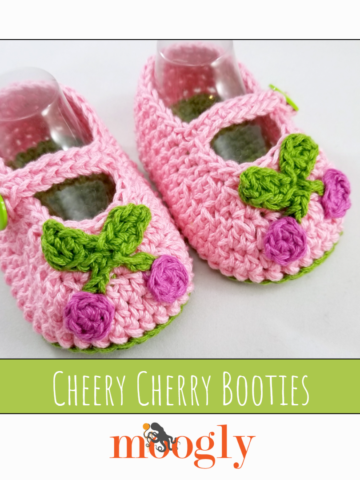
Loopy Love Newborn Baby Booties
Loopy Love Bigger Baby Booties
NOTE:
INSTRUCTIONS
Newborn Instructions
Round 1: With larger hook and Color A, make a magic circle and work 6 sc in the ring, join with a sl st in the first st to work in the round. (6 sts)
Round 2: Ch 1, sc in the 1st st, ch 3, dc in same st as previous st, skip next st. *Sc in next st, ch 3, dc in same st as previous st, skip next st. Repeat from * once, join with a sl st in the first ch-3 loop of the round. (3 ch-3 loops)
Round 3: With Color B, ch 1, [sc, ch 3, dc] twice in each loop around, join with a sl st in the first ch-3 loop of the round. (6 ch-3 loops)
Round 4: With Color C, ch 1, [sc, ch 3, dc] in first loop, [sc, ch 3, dc] twice in next loop. *[Sc, ch 3, dc] in next loop, [sc, ch3, dc] twice in next loop. Repeat from * once, join with a sl st in the first ch-3 loop of the round. (9 ch-3 loops)
Round 5: With Color A, ch 1, [sc, ch 3, dc] in the first 2 loops, [sc. ch 3, dc] twice in the next loop. *[Sc, ch 3, dc] in each of the next 2 loops, [sc, ch 3, dc] twice in the next loop. Repeat from * once, join with a sl st in the first ch-3 loop of the round. (12 ch-3 loops)
Round 6: With Color B, ch 1, [sc, ch 3, dc] in the first 3 loops, [sc. ch 3, dc] twice in the next loop. *[Sc, ch 3, dc] in each of the next 3 loops, [sc, ch 3, dc] twice in the next loop. Repeat from * once, join with a sl st in the first ch-3 loop of the round. (15 ch-3 loops)
Round 7 - 13: Alternating through all colors in set pattern, ch 1, [sc, ch 3, dc] in same loop. *[Sc, ch 3, dc] in next loop. Repeat from * to end, join with a sl st in first ch-3 loop of the round. (15 ch-3 loops)
Round 14: With smaller hook and next color in pattern, ch 3 (or CSDC) (counts as dc), 2 dc in first loop, *3 dc in next loop. Repeat from * to end, join with a sl st in top of ch 3 or CSDC. (46 sts)
Round 15 - 16: (Continuing with smaller hook and same color as previous round.) Ch 2 (does not count as a st), fpdc in first st, bpdc in next st. *Fpdc in next st, bpdc in next st. Repeat from * to end, join with a sl st in top of first fpdc. (46 sts) Break yarn and weave in ends.
Baby/Toddler Instructions
Round 1: With Color A, make a magic circle and work 6 sc in the ring, join with a sl st in the first st to work in the round. (6 sts)
Round 2: Ch 1, sc in the 1st st, ch 3, dc in same st as previous st, skip next st. *Sc in next st, ch 3, dc in same st as previous st, skip next st. Repeat from * once, join with a sl st in the first ch-3 loop of the round. (3 ch-3 loops)
Round 3: With Color B, ch 1, [sc, ch 3, dc] twice in each loop around, join with a sl st in the first ch-3 loop of the round. (6 ch-3 loops)
Round 4: With Color C, ch 1, [sc, ch 3, dc] in first loop, [sc, ch 3, dc] twice in next loop. *[Sc, ch 3, dc] in next loop, [sc, ch3, dc] twice in next loop. Repeat from * once, join with a sl st in the first ch-3 loop of the round. (9 ch-3 loops)
Round 5: With Color A, ch 1, [sc, ch 3, dc] in the first 2 loops, [sc. ch 3, dc] twice in the next loop. *[Sc, ch 3, dc] in each of the next 2 loops, [sc, ch 3, dc] twice in the next loop. Repeat from * once, join with a sl st in the first ch-3 loop of the round. (12 ch-3 loops)
Round 6: With Color B, ch 1, [sc, ch 3, dc] in the first 3 loops, [sc. ch 3, dc] twice in the next loop. *[Sc, ch 3, dc] in each of the next 3 loops, [sc, ch 3, dc] twice in the next loop. Repeat from * once, join with a sl st in the first ch-3 loop of the round. (15 ch-3 loops)
Round 7: With Color C, ch 1, [sc, ch 3, dc] in the first 4 loops, [sc. ch 3, dc] twice in the next loop. *[Sc, ch 3, dc] in each of the next 4 loops, [sc, ch 3, dc] twice in the next loop. Repeat from * once, join with a sl st in the first ch-3 loop of the round. (18 ch-3 loops)
Round 8 - 15: Alternating through all colors in set pattern, ch 1, [sc, ch 3, dc] once in each loop around. Join with a sl st in first ch-loop of the round. (18 ch-3 loops)
Round 16: With smaller hook and next color in pattern, ch 3 (or CSDC) (counts as dc), 2 dc in first loop, *3 dc in next loop. Repeat from * to end, join with a sl st in top of ch 3 or CSDC. (54 sts)
Round 17 - 18: (Continuing with smaller hook and same color as previous round.) Ch 2 (does not count as a st), fpdc in first st, bpdc in next st. *Fpdc in next st, bpdc in next st. Repeat from * to end, join with a sl st in top of first fpdc. (54 sts) Break yarn and weave in ends.
Child Instructions
Round 1: With Color A, make a magic circle and work 6 sc in the ring, join with a sl st in the first st to work in the round. (6 sts)
Round 2: Ch 1, sc in the 1st st, ch 3, dc in same st as previous st, skip next st. *Sc in next st, ch 3, dc in same st as previous st, skip next st. Repeat from * once, join with a sl st in the first ch-3 loop of the round. (3 ch-3 loops)
Round 3: With Color B, ch 1, [sc, ch 3, dc] twice in each loop around, join with a sl st in the first ch-3 loop of the round. (6 ch-3 loops)
Round 4: With Color C, ch 1, [sc, ch 3, dc] in first loop, [sc, ch 3, dc] twice in next loop. *[Sc, ch 3, dc] in next loop, [sc, ch3, dc] twice in next loop. Repeat from * once, join with a sl st in the first ch-3 loop of the round. (9 ch-3 loops)
Round 5: With Color A, ch 1, [sc, ch 3, dc] in the first 2 loops, [sc. ch 3, dc] twice in the next loop. *[Sc, ch 3, dc] in each of the next 2 loops, [sc, ch 3, dc] twice in the next loop. Repeat from * once, join with a sl st in the first ch-3 loop of the round. (12 ch-3 loops)
Round 6: With Color B, ch 1, [sc, ch 3, dc] in the first 3 loops, [sc. ch 3, dc] twice in the next loop. *[Sc, ch 3, dc] in each of the next 3 loops, [sc, ch 3, dc] twice in the next loop. Repeat from * once, join with a sl st in the first ch-3 loop of the round. (15 ch-3 loops)
Round 7: With Color C, ch 1, [sc, ch 3, dc] in the first 4 loops, [sc. ch 3, dc] twice in the next loop. *[Sc, ch 3, dc] in each of the next 4 loops, [sc, ch 3, dc] twice in the next loop. Repeat from * once, join with a sl st in the first ch-3 loop of the round. (18 ch-3 loops)
Round 8: With Color A, ch 1, [sc, ch 3, dc] in the first 5 loops, [sc. ch 3, dc] twice in the next loop. *[Sc, ch 3, dc] in each of the next 5 loops, [sc, ch 3, dc] twice in the next loop. Repeat from * once, join with a sl st in the first ch-3 loop of the round. (21 ch-3 loops)
Round 9 - 17: Alternating through all colors in set pattern, ch 1, [sc, ch 3, dc] once in each loop around. Join with a sl st in first ch-loop of the round. (21 ch-3 loops)
Round 18: With smaller hook and next color in pattern, ch 3 (or CSDC) (counts as dc), 2 dc in first loop, 3 dc in each of next 5 loops, 2dc in the next loop. *3 dc in next 6 loops, 2 dc in next loop. Repeat from * once, join with a sl st in top of ch 3 or CSDC. (60 sts)
Round 19 - 20: (Continuing with smaller hook and same color as previous round.) Ch 2 (does not count as a st), fpdc in first st, bpdc in next st. *Fpdc in next st, bpdc in next st. Repeat from * to end, join with a sl st in top of first fpdc. (60 sts) Break yarn and weave in ends.
Teen/Small Adult Instructions
Round 1: With Color A, make a magic circle and work 6 sc in the ring, join with a sl st in the first st to work in the round. (6 sts)
Round 2: Ch 1, sc in the 1st st, ch 3, dc in same st as previous st, skip next st. *Sc in next st, ch 3, dc in same st as previous st, skip next st. Repeat from * once, join with a sl st in the first ch-3 loop of the round. (3 ch-3 loops)
Round 3: With Color B, ch 1, [sc, ch 3, dc] twice in each loop around, join with a sl st in the first ch-3 loop of the round. (6 ch-3 loops)
Round 4: With Color C, ch 1, [sc, ch 3, dc] in first loop, [sc, ch 3, dc] twice in next loop. *[Sc, ch 3, dc] in next loop, [sc, ch3, dc] twice in next loop. Repeat from * once, join with a sl st in the first ch-3 loop of the round. (9 ch-3 loops)
Round 5: With Color A, ch 1, [sc, ch 3, dc] in the first 2 loops, [sc. ch 3, dc] twice in the next loop. *[Sc, ch 3, dc] in each of the next 2 loops, [sc, ch 3, dc] twice in the next loop. Repeat from * once, join with a sl st in the first ch-3 loop of the round. (12 ch-3 loops)
Round 6: With Color B, ch 1, [sc, ch 3, dc] in the first 3 loops, [sc. ch 3, dc] twice in the next loop. *[Sc, ch 3, dc] in each of the next 3 loops, [sc, ch 3, dc] twice in the next loop. Repeat from * once, join with a sl st in the first ch-3 loop of the round. (15 ch-3 loops)
Round 7: With Color C, ch 1, [sc, ch 3, dc] in the first 4 loops, [sc. ch 3, dc] twice in the next loop. *[Sc, ch 3, dc] in each of the next 4 loops, [sc, ch 3, dc] twice in the next loop. Repeat from * once, join with a sl st in the first ch-3 loop of the round. (18 ch-3 loops)
Round 8: With Color A, ch 1, [sc, ch 3, dc] in the first 5 loops, [sc. ch 3, dc] twice in the next loop. *[Sc, ch 3, dc] in each of the next 5 loops, [sc, ch 3, dc] twice in the next loop. Repeat from * once, join with a sl st in the first ch-3 loop of the round. (21 ch-3 loops)
Round 9: With Color B, ch 1, [sc, ch 3, dc] in the first 6 loops, [sc. ch 3, dc] twice in the next loop. *[Sc, ch 3, dc] in each of the next 6 loops, [sc, ch 3, dc] twice in the next loop. Repeat from * once, join with a sl st in the first ch-3 loop of the round. (24 ch-3 loops)
Round 10 - 19: Alternating through all colors in set pattern, ch 1, [sc, ch 3, dc] once in each loop around. Join with a sl st in first ch-loop of the round. (24 ch-3 loops)
Round 20: With smaller hook and next color in pattern, ch 3 (or CSDC) (counts as dc), 2 dc in first loop, 3 dc in next loop, 2 dc in the next loop. *3 dc in next 2 loops, 2 dc in next loop. Repeat from * to end, join with a sl st in top of ch 3 or CSDC. (64 sts)
Round 21 - 23: (Continuing with smaller hook and same color as previous round.) Ch 2 (does not count as a st), fpdc in first st, bpdc in next st. *Fpdc in next st, bpdc in next st. Repeat from * to end, join with a sl st in top of first fpdc. (64 sts) Break yarn and weave in ends.
Large Adult Instructions
Round 1: With Color A, make a magic circle and work 6 sc in the ring, join with a sl st in the first st to work in the round. (6 sts)
Round 2: Ch 1, sc in the 1st st, ch 3, dc in same st as previous st, skip next st. *Sc in next st, ch 3, dc in same st as previous st, skip next st. Repeat from * once, join with a sl st in the first ch-3 loop of the round. (3 ch-3 loops)
Round 3: With Color B, ch 1, [sc, ch 3, dc] twice in each loop around, join with a sl st in the first ch-3 loop of the round. (6 ch-3 loops)
Round 4: With Color C, ch 1, [sc, ch 3, dc] in first loop, [sc, ch 3, dc] twice in next loop. *[Sc, ch 3, dc] in next loop, [sc, ch3, dc] twice in next loop. Repeat from * once, join with a sl st in the first ch-3 loop of the round. (9 ch-3 loops)
Round 5: With Color A, ch 1, [sc, ch 3, dc] in the first 2 loops, [sc. ch 3, dc] twice in the next loop. *[Sc, ch 3, dc] in each of the next 2 loops, [sc, ch 3, dc] twice in the next loop. Repeat from * once, join with a sl st in the first ch-3 loop of the round. (12 ch-3 loops)
Round 6: With Color B, ch 1, [sc, ch 3, dc] in the first 3 loops, [sc. ch 3, dc] twice in the next loop. *[Sc, ch 3, dc] in each of the next 3 loops, [sc, ch 3, dc] twice in the next loop. Repeat from * once, join with a sl st in the first ch-3 loop of the round. (15 ch-3 loops)
Round 7: With Color C, ch 1, [sc, ch 3, dc] in the first 4 loops, [sc. ch 3, dc] twice in the next loop. *[Sc, ch 3, dc] in each of the next 4 loops, [sc, ch 3, dc] twice in the next loop. Repeat from * once, join with a sl st in the first ch-3 loop of the round. (18 ch-3 loops)
Round 8: With Color A, ch 1, [sc, ch 3, dc] in the first 5 loops, [sc. ch 3, dc] twice in the next loop. *[Sc, ch 3, dc] in each of the next 5 loops, [sc, ch 3, dc] twice in the next loop. Repeat from * once, join with a sl st in the first ch-3 loop of the round. (21 ch-3 loops)
Round 9: With Color B, ch 1, [sc, ch 3, dc] in the first 6 loops, [sc. ch 3, dc] twice in the next loop. *[Sc, ch 3, dc] in each of the next 6 loops, [sc, ch 3, dc] twice in the next loop. Repeat from * once, join with a sl st in the first ch-3 loop of the round. (24 ch-3 loops)
Round 10: With Color C, ch 1, [sc, ch 3, dc] in the first 7 loops, [sc. ch 3, dc] twice in the next loop. *[Sc, ch 3, dc] in each of the next 7 loops, [sc, ch 3, dc] twice in the next loop. Repeat from * once, join with a sl st in the first ch-3 loop of the round. (27 ch-3 loops)
Round 11 - 21: Alternating through all colors in set pattern, ch 1, [sc, ch 3, dc] once in each loop around. Join with a sl st in first ch-loop of the round. (27 ch-3 loops)
Round 22: With smaller hook and next color in pattern, ch 3 (or CSDC) (counts as dc), 2 dc in first loop, *2 dc in next loop, 3 dc in next loop. Repeat from * to end, join with a sl st in top of ch 3 or CSDC. (68 sts)
Round 23 - 25: (Continuing with smaller hook and same color as previous round.) Ch 2 (does not count as a st), fpdc in first st, bpdc in next st. *Fpdc in next st, bpdc in next st. Repeat from * to end, join with a sl st in top of first fpdc. (68 sts) Break yarn and weave in ends.
The Fine Print
Thank you to Red Heart Yarns for sponsoring the yarn for this hat! Written pattern copyright Tamara Kelly 2014. Please do not reprint or repost this pattern, but please do link to this page to share this pattern with others. If you wish to make items for sale from this pattern, please visit the About page for details.


Janice says
Hi Tamara! I'm itching to make this baby hat for a 3-months-old girl already! But I only have sock weight yarn with nice colours for it. Do you think I can simply go up a size and follow your pattern straight or I'll have to breakdown and recalculate the numer of stitches in each round? The number of rounds can be a work-as-I-go. Thanks!
Tamara Kelly says
Hi Janice! You should be able to go up a size or two - basically, make the diameter about 5 inches across before you start working evenly around, and you should be all set!
Julie galvan says
How tall is the teen/small adult size?
Tamara Kelly says
8-10" depending on gauge.
Camille says
I am loving on that crochet hook in the picture! Where did you get it?!
Tamara Kelly says
Thank you Camille! It's a Furls: http://furlscrochet.com/collections/crochet/products/handmade-wood-furls-crochet-hook-alpha-series#oid=1009_5 😀 It's a joy to use!
Rose Kute says
ohhh I love this hat. Thank you
Tamara Kelly says
😀 I'm so glad Rose! Thank you!
Milena-Irshad says
Hi Tamara! I just want to ask about "Baby/ Toddler" - what that is mean - like 6-12 months or? I'm not sure.
Thank you in advance.
Carol says
i prefer to use 4 weight yarn, how does that change the pattern?
Tamara Kelly says
It will make them bigger! So you may need to follow the smaller directions to make the size you want. 🙂
Milena-Irshad says
Dear Tamara, you can delete my previous question - i'v read carefully your instructions and understand - i make this wonderful hat! Thank you.
Tamara Kelly says
😀 I'm so glad! Thank you!
Bernice says
Good Evening,
I love this pattern. I would love to make it for myself in an adult size but I would like to use an amazing hand dyed sock yarn that I have. Its a super wash merino sock yarn... What would be your suggestion for this? Should I increase any particular row to make sure it fits me?
Thank you so much for your time.
Tamara Kelly says
Thank you Bernice! Sock yarn is thinner than light yarn usually, so I would bump up a hook size or two until I was able to get gauge with the yarn. 🙂
Barb says
Love the hat, I can't wait to try it. Thank you
Tamara Kelly says
😀 Thank you Barb!
Pat says
I like this hat pattern. I have used it twice with worsted weight yarn and have found that for a teen/small adult size stopping the increasing size after the round with 18 ch-3 loops works and for a large adult size stopping the increase after the round with 21 ch-3 loops. I have noticed that the very top tends to stick up somewhat in a point when using worsted weight acrylic yarn; the second time I made a Loopy Love Hat I made some passes through the first two rows with the yarn end I was hiding anyway, and that helped minimize the "point!" 🙂
This is a good school/team colors pattern! I made this hat and a scarf from the Loopy Love Blanket pattern with the New Orleans Saints colors of black, old gold and white. Also made a two-color one with school colors of green and gold.
Thanks for sharing!
Tamara Kelly says
😀 Thanks so much Pat - and thanks for sharing the tips for worsted!!
vinodini says
beautiful patterns, certainly try them. thanks a lot
Aleta says
I love Moogly. If you knew how much I loved your site... It might be considered scary.
Thanks for having such a wonderful site.
Tamara Kelly says
Hehheh 😀 Thanks so much Aleta!
Mary says
Love this hat! Have made several. But for the Newborn hat, you need to put one extra dc in Round 14 in order to come out with 46 sts total at the end of the round. Following the instructions for Round 14 as is only gives you 45 sts total. There needs to be 46 so that the last two rounds of alternating fpdc and bpdc come out right.
DoNna says
How do I start this hat if not using the Magic Circle technique? I have not tried that yet and prefer to start it the normal way. Than You
Tamara Kelly says
Hi Donna! You can chain 4 and sl st in the first ch to form a ring, and then crochet into that ring. 🙂
Jolene says
is the base supposed start as a triangle. I'm having a problem with the very start. It seem to have several stitches after the last dc. It looks like its missing another combination Thank you
Tamara Kelly says
It is somewhat triangular at the start, yes! Using a stitch marker to mark your first st of each row can be a big help!
Carol kanter says
Hi,
I LOVE THE LOOKS OF THIS & started, but got tangled up with all the yarns.
CAn you explain how to carry up the floats? I did this with another hat no problem, but this has got me stymied.
Tamara Kelly says
You do have to move the skeins around a bit to keep the yarns from tangling. If it gets to crazy, you can always cut them too!
carrie guay says
Will you maybe come up with a matching baby sweater and little shoes?
Tamara Kelly says
I already have! 😀 Sweater: click here; booties: click here
tracie says
when i completed this hat it had a point on top. i went EXACTLY by the pattern. What happened?
Tamara Kelly says
Hi Tracie! It could be a tension issue. You could try lightly blocking it with water to reduce the pointiness!
tracie says
i made a 2nd hat & it was less pointy. i tried to not work so tight & it looked much better. Thank you for replying
Tamara Kelly says
😀 I'm glad to hear it! Thank you!
candora says
I love this hat pattern. Thank you Tamara..:-)
Tamara Kelly says
😀 Thank you Candora!
isabelle moss says
Could you make a tutorial on this hat?:)
Tamara Kelly says
Hi Isabelle! There is a tutorial for the stitch pattern, what part were you having trouble with?
lady J says
thanks for this pattern! I made it for myself as a slouch hat with a thin yarn, just used a crochet hat sizing guide to make sure it fit. i used a 3.75 mm hook for yarn that called for a 3-3.5mm to get a lacier effect and went for as many rows as necessary to get it to be longer and slouchy ( i didn't count, just tried it on occasionally, then went down to a 3mm hook for the brim. thanks again, i love my new bright mustard hat!
Tamara Kelly says
😀 I'm so glad to hear it, thank you!
Katy says
How long does the small adult take to make?
Tamara Kelly says
It depends on how quick a crocheter you are, but it shouldn't take more than a couple hours. 🙂
Jean says
I am struggling with the joining of the rounds . It says to join with slip stitch to the ch-3, however, there is a sc that must be skipped over to do this, or am I reading it wrong?
Tamara Kelly says
Yes, you skip over that sc. 🙂
Darcy Palmer says
Dear Tamara,
Thank you so much for your patterns. I love them. Every one that I've made has come out great. I've made a least half of dozen Luscious One Skein hats, as well as matching scarves, boot cuffs and gloves. I just made a Loopy Love hat today and it's so cute!
Thanks again for sharing your patterns for free!!!!
Tamara Kelly says
😀 Thank you Darcy!
Sarah says
Does this pattern come in a video form? I'm having a lot of trouble following these written instructions. No I am NOT a beginner. TIA
Tamara Kelly says
Hello Sarah! There isn't a tutorial specifically for this pattern, but there is for the main stitch pattern: click here
SuZie says
I have been crocheting for years but had never made anything other than simple double-crochet scarves. I told myself I had to branch out, and this was my first attempt at deciphering a pattern. I was nervous and had to look up most of the abbreviations, but to my supriprise, the hat came out beautifully! This was a lot of fun and I learned so much. The stitch count at the end of each step was a phenomenal help. Thank you so much!
Tamara Kelly says
Hello Suzie! Yay! Oh I'm so glad to hear it! 😀 Thank you!
Faith Wheeler says
I don't have one of the hooks you show, so can you use a regular hook instead. Faith Wheeler
Tamara Kelly says
The type of hook used doesn't matter, you can make this pattern using whatever hook style and brand you prefer. 🙂
Elizabeth VanDyke says
how can I get your site on my PC? I love your patterns and would like to print them, if possible
Tamara Kelly says
Hello Elizabeth, and thank you! 😀 Downloading the whole site might not be a great idea for your computer memory, but you can download or print patterns using the green Print Friendly button that's right by the sharing buttons on the pattern above! Here's a tutorial: click here
Fran says
Hi this might be a silly question but just finishing new born hat and it says round 15-16 is fpdc and bpdc. Do i do 2 rounds of this or one? As it says round 15-16. Thanks so much.
Tamara Kelly says
Hi Fran! You do two rounds that are exactly the same. 🙂 So the fpdc sts should line up on top of each other, and same with the bpdc sts.
julie-dawn says
I love the look of this hat but I'm new to crochet and anything I have made has been in DK so I would like to know if it would be ok to use, I know it sounds a daft question it's just I live in the UK and the weights of yarn are all different, it just confuses me
thanks
Tamara Kelly says
Hello Julie-Dawn! This is in Sport weight, which is very very close to DK, so you should be fine! 🙂
maria cristina vera miranda says
Mil gracias Tamara por compartir tus creaciones, admiro mucho tus tejidos. Me encanta el crochet, es mi pasión, es mi terapia.
Tamara Kelly says
Muchas gracias! ♥
Becky says
This hat and blanket are my absolute favorite! Is there a way to downsize the hat pattern to be a preemie size?
Tamara Kelly says
Thank you so much Becky! There are a few different preemie sizes, but I'd recommend following the instructions through Rnd 4 and then jumping to the instructions for Rnd 7, and eliminate a few of the rnds worked even before jumping to Rnd 14-16 to finish. 🙂