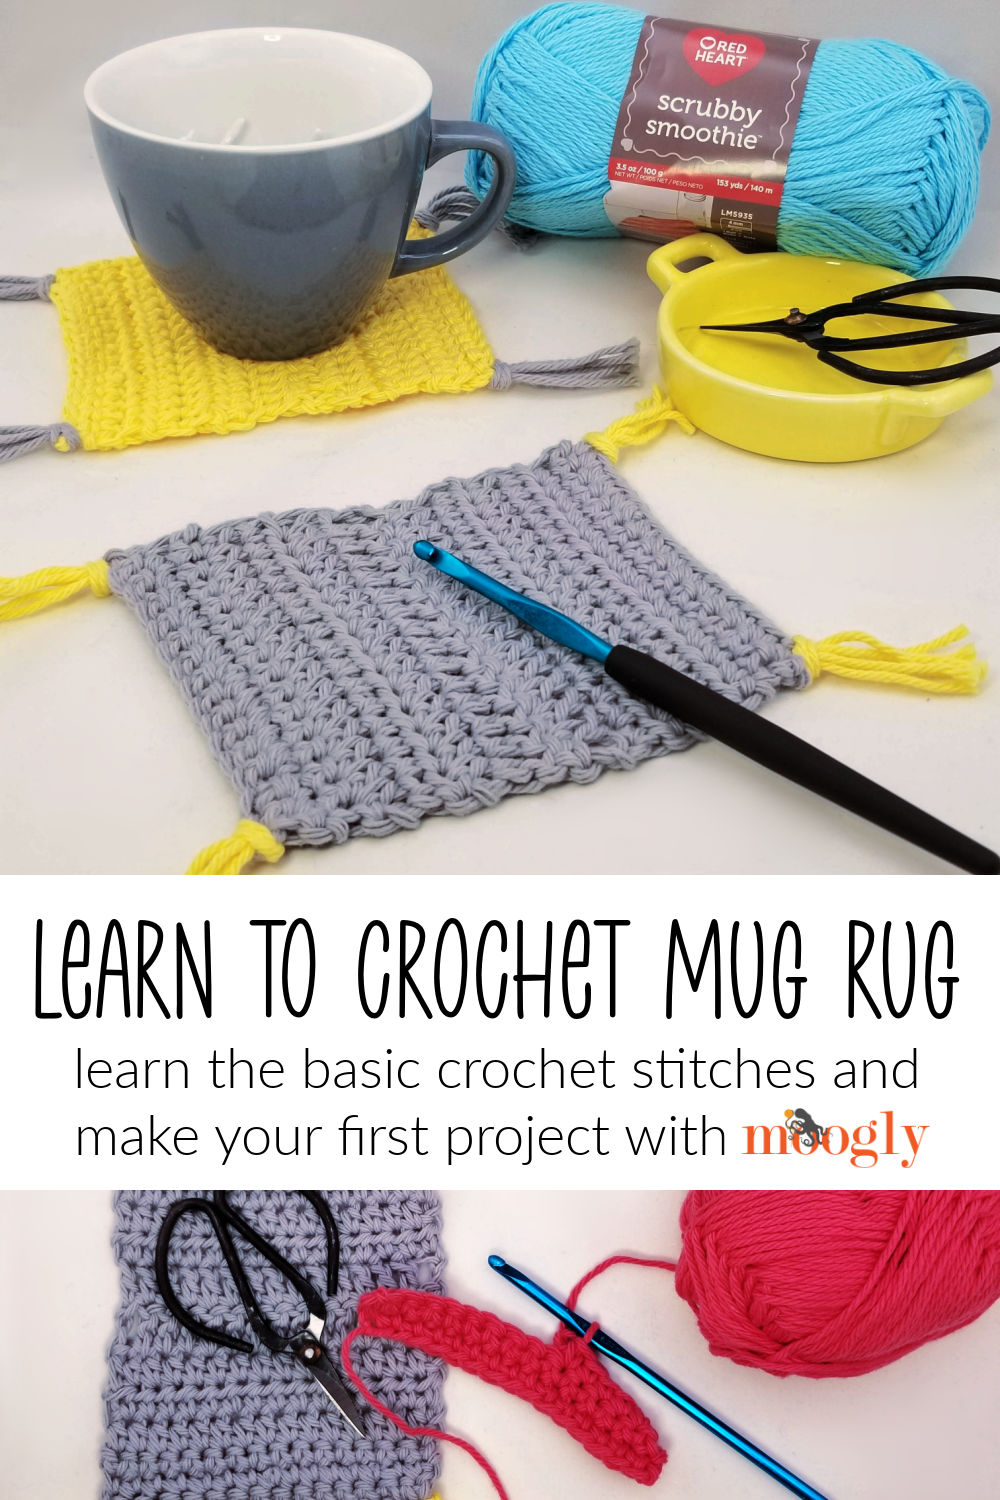
To celebrate National Crochet Month, I've got a great beginner pattern to share - the Learn to Crochet Mug Rug! Master the basics of crochet and pattern reading with this free easy coaster pattern on Moogly!
 Disclaimer: This post includes affiliate links; materials provided by Yarnspirations.
Designed for Crochet Beginners
This simple project uses only the basic stitches and is just the right-sized project to learn with. And the instructions for the Learn to Crochet Mug Rug are included in both crochet lingo and plain English! To complete the lessons, video tutorials are linked below!

Share Crochet with Friends and Family
Have you ever had a friend or family tell you they wish they could learn to crochet? Want to share the yarny fun? Share the link to this pattern with them - and crochet these fun Mug Rugs together!


Learn to Crochet Mug Rug
Add this pattern to your Ravelry Queue and Favorites
US-H, 5.0mm crochet hook - Susan Bates
30 yards smooth worsted weight yarn
Shown: Red Heart Scrubby Smoothie ("4"/worsted, 100% cotton)
Susan Bates Crystalline Stitch Markers
Size: Approximately 5.5" long x 4.5" wide
Helpful Links and Tutorials:
Learn to Crochet Mug Rug Tutorial
Abbreviations Used:
ch(s) - chain(s)
dc – double crochet
hdc – half double crochet
rem – remain(s) or remaining
rep – repeat
sc – single crochet
st(s) - stitch(es)
TIP:
Use two stitch markers to help you maintain your stitch count as you crochet. Put a stitch marker in the first stitch of each row (moving it up from the row previous row as you work into that stitch).
This will help you see where to end each row so you are less likely to add or lose stitches. Nonetheless, it is recommended to count your stitches every couple of rows to make sure. Maintaining stitch count is how we get straight sides on our work.
I recommend that you print out this pattern, and then follow along with the Learn to Crochet Mug Rug Tutorial - you'll learn the stitches and the lingo together!
Instructions
The first version of each row is in standard crochet terms, the second version is in plain English – this is for educational purposes, you only make each row once.
Row 1: Ch 16, skip ch closest to hook, sc in each rem ch across; turn. (15 sts)
Row 1: Make a slip knot, and then chain 16. Skip the chain that is closest to your hook, and make a single crochet in the next chain. Then, single crochet in each remaining chain, finishing in the first chain you made, next to the slip knot. Then, turn your work over, like the page of a book. (You should have made 15 total single crochets in this row, and will make 15 total stitches in every row of this pattern.)
Row 2: Ch 1, sc in each st across; turn.
Row 2: Make one chain – this is the turning chain, and it does not count as a stitch. Single crochet in each stitch of the previous row. At the end, turn your work over, like the page of a book – in the same direction as last time.
Row 3: Rep Row 2.
Row 3: Repeat Row 2 – follow the same instructions for this row.
Row 4: Ch 1, hdc in each st across; turn.
Row 4: Make one chain for the turning chain. Half double crochet in each stitch of the previous row. At the end, turn your work over the same way.
Rows 5 and 6: Rep Row 4.
Rows 5 and 6: Repeat Row 4 – follow the same instructions for each of these rows.
Row 7: Ch 3 (counts as first st), dc in each rem st across; turn.
Row 7: Make 3 chains – these will be your turning chain and they will count as the first double crochet of the row. So do not crochet into the first st of the previous row – skip over it, and double crochet into each remaining stitch across. Then turn as before.
Row 8: Rep Row 7.
Row 8: Repeat Row 7 – follow the same instructions for this row. However, remember that the chain 3 counts as a stitch, so you’ll want to make sure to make your last double crochet for this row in the top of the chain 3 that started Row 7.
Rows 9 – 11: Rep Row 4.
Rows 9 – 11: Repeat Row 4 – follow the same instructions for all three rows.
Rows 12 – 14: Rep Row 2.
Rows 12 – 14: Repeat Row 2 – follow the same instructions for all three rows.
Finishing: Break yarn, weave in ends. Add fringe at corners if desired.
Finishing: Cut the yarn you’ve been crocheting with, leaving a 6” length still attached to the project. Pull this end through the last loop on your hook, so secure the stitch. Use a yarn needle to hide both ends in the other stitches.
For the Fringe: Cut 12 pieces of yarn, each about 6” long. In groups of 4, fold yarn in half. Insert hook in corner stitch of mug rug, and pull the center fold of the yarn pieces through the stitch. Pull all the ends of the yarn up through this loop to secure. Trim the length as desired using a pair of sharp scissors.
LOOKING FOR MORE?
Are you looking for more free beginner patterns? Ready to add a new skill! You can browse all my free patterns here on Moogly or search my patterns on Ravelry! I recommend making the Crafty Carrying Case your next project - it adds just a few new skills, and you make your own needle and scissors holder!

If the Learn to Crochet Mug Rug pattern inspires you to make your own project, and you post a photo on social media, be sure to tag me @mooglyblog or #mooglyblog so I can check it out too!
THE FINE PRINT
Follow Moogly on Facebook, Twitter, Pinterest, and Instagram! Thank you to Yarnspirations for providing the materials shown in this post. Written pattern copyright Tamara Kelly 2021, all rights reserved. Please do not reprint or repost this pattern, but please do link to this page to share this pattern with others.
To print or download, use the Print Friendly button below, or go to PrintFriendly.com, or right-click to copy and paste it into a word processing document if those options do not work for you (please note that Print Friendly is a free outside website that the button links to, and you can click here for a tutorial on how to use it, but I cannot provide additional technical support for this service).
If you wish to make items for sale from this pattern or translate it to another language, please visit the About page for details.


Justina says
I think the Whaley Cute Basket is adorable and I would love to make it!