When you're planning a crochet or knit project, there are a few different factors to consider - and color layout is a big one! Anneka Holden is a member of the Moogly Afghan Crochet Along Group on Facebook, and she is sharing how to make pattern color templates for these projects - like a coloring page you can play with to plan your design! I'm so excited to get to share her method with you here on Moogly!
 Disclaimer: This guest post is written by Anneka Holden, posted here with permission.
Meet Anneka!
Hello everyone! My name is Anneka Holden and I’m a crocheter, artist, and teacher from Canada. If you are wondering how to read my name, it’s like Monica, but without the M. You can see some of my crochet work on my Instagram, On a Cat Creations. I have been crocheting for exactly half of my life this year: 17 years!
I decided to join the Moogly CAL as I’ve never really crocheted squares before and I have learned so much already! I love seeing everyone’s different squares on the Moogly Afghan CAL Facebook group and I especially love the kind and caring community of all the members.
What exactly do I mean by creating templates?
Seeing all the different ways that a single pattern is interpreted inspired me to start pre-planning my colours and that is what I’m here to talk to you about: how I’ve been improving my crochet skills with colour planning and creating templates that can work with any simple paint application.
So, what exactly do I mean by creating templates? Let me show you 2 examples from the Moogly CAL.
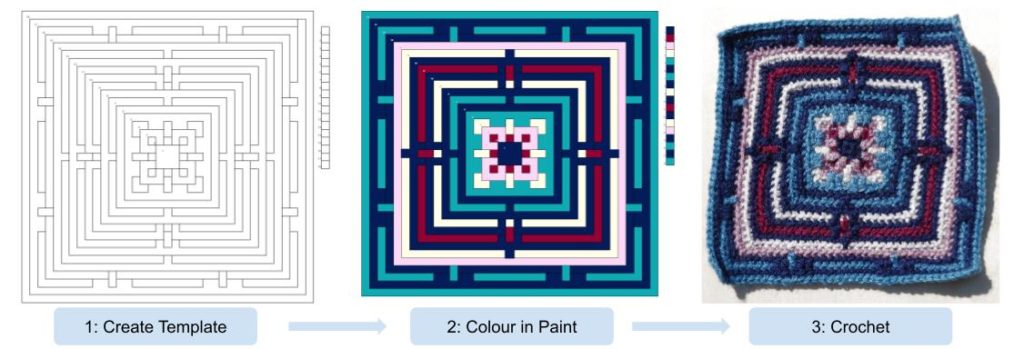
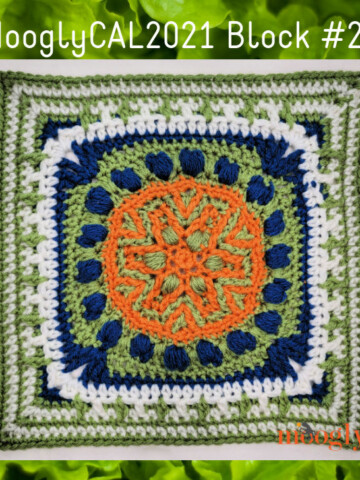
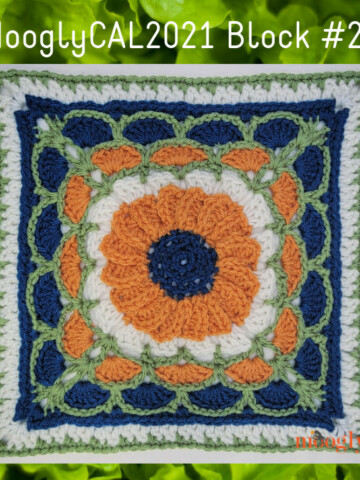
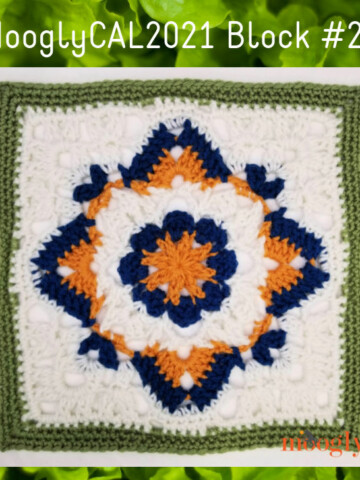
Square #6: Guiding Light by Oombawka Design
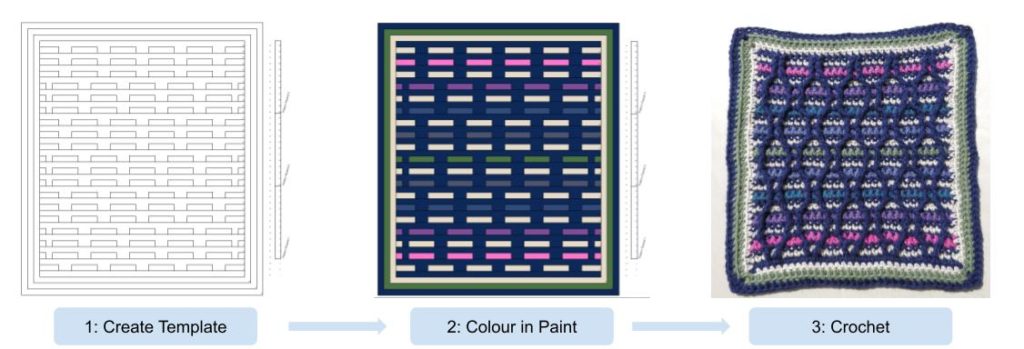
Square #8: Striped Hourglass by Moogly
Before I started working this way, I had tried simply starting a pattern and randomly choosing when to change colour, or sketching out an idea on paper with coloured pencils. Both of these have worked well for me, but they have also flopped and I have frogged a lot. I find that by having a digital template, I can play around with my colour placement quickly and efficiently to pre-visualize what the pattern will look like as I’ve always been horrible at visualizing in my mind.
How to make Pattern Color Templates
So, the question is, how do I take a written pattern and turn it into a template? I’m sure that there are many ways to do it, but I have been using Google Sheets as it’s online, simple, free, and it autosaves. Using a spreadsheet works very well for patterns that use rows and for patterns with 4 sides. It will not work as well for circular patterns, due to the nature of squares. The Guiding Light Square is in the round with 4 rotations, while the Striped Hourglass Square is in rows so both were easy to replicate using a spreadsheet.
Square the Grid - Step One
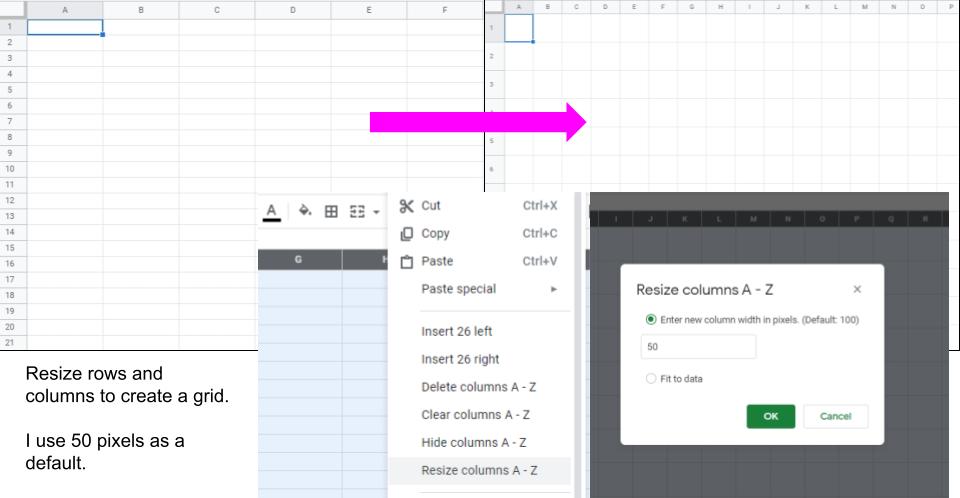
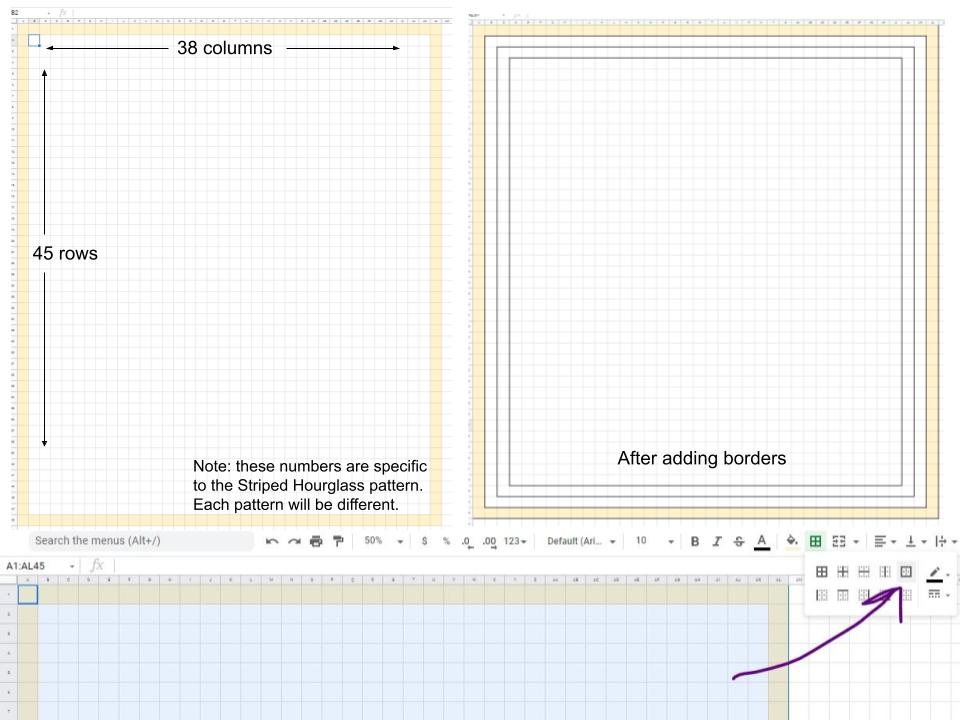
So let’s begin! First of all, I need to make my spreadsheet into a square grid. This is easily done by selecting all the columns and setting the width. I usually use 50 pixels. Then do the same with the rows and their height.
Rows and Columns - Step Two
Then I need to figure out how many rows and how many columns I’ll need. I’ll use Moogly’s Striped Hourglass as an example throughout.
Looking at the pattern, I can see that it is 39 rows and that each row has 32 stitches. In addition, there are 3 border rows around it. So I start with finding the exterior border and shading it a random colour. (yellow in images). For this pattern I’ll need 45 rows (39 + 3 + 3) and 38 columns (32 + 3 + 3). The pattern might not be perfectly square on the computer, but when crocheted, it will be, so no worries. However, if it’s really bothering you, try changing your column width.
In this pattern, 55 pixels works well to give a square look. This will only be an issue on patterns written in rows as crochet stitches are slightly wider than they are tall.
Border Lines - Step Three
Now it’s time to start the hard work, creating all the border lines. It takes time and patience, just like crocheting. Creating square borders is very easy. Select the entire square, and choose “Outer Borders” to create a black line around the outside edge. Repeat this for however many border rows you have, stepping one square inside each time.
Main Pattern - Step Four
With the border complete, I’m going to start on the main pattern. The entire process is a mix of merging cells and creating borders. I also like to colour fill to visually check that I am putting everything in the right place. The colours don’t matter here as I will clear them all in the end.
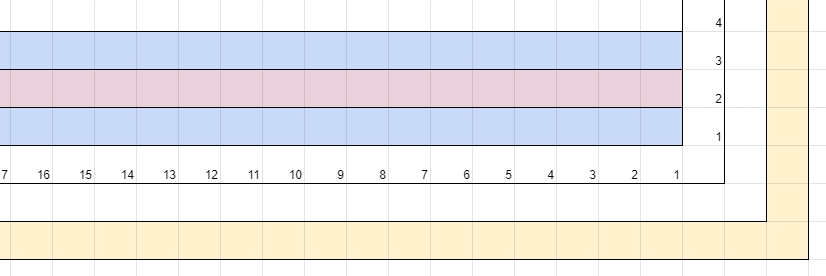
When planning, each single crochet is generally one square, and each double crochet is generally two squares. I’ll be merging each dc post stitch into the row below it. The first 2 rows are just single crochets, so I’ve made borders around all of row 1 and all of row 2. I did the same for row 3, but this is where I will start to merge down. I added numbers along the border row to help me count, but I’ll delete them later.
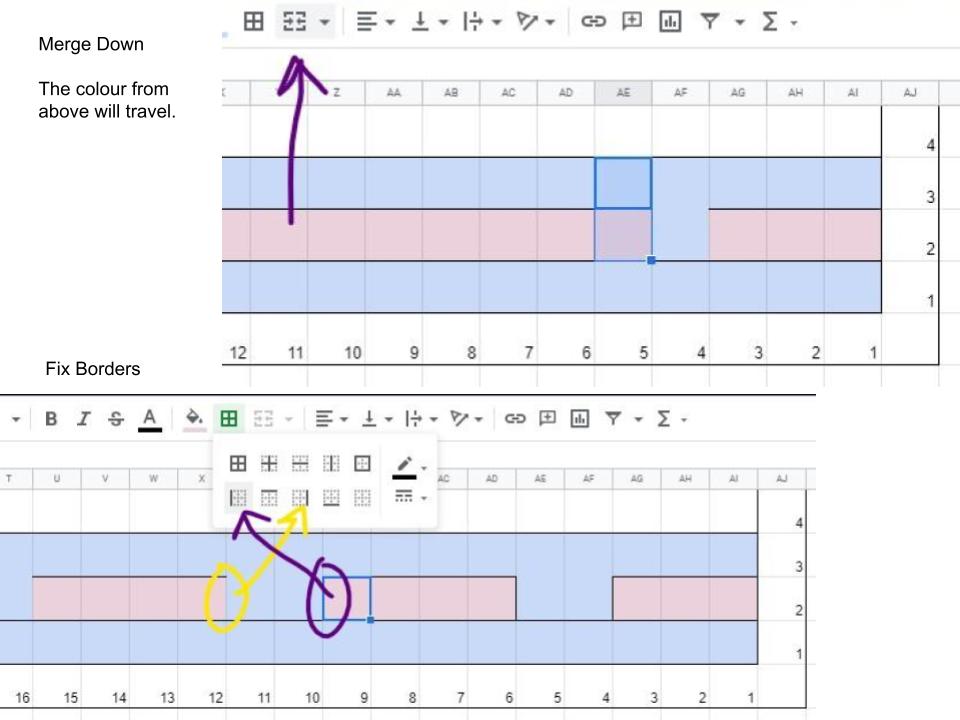
Looking at the pattern for row 3, I can see that the 4th and 5th stitches will be dc post stitches, so I’ll select those squares and the one below them to merge. If you coloured the rows, the colour will always come down (that’s why I start at the bottom). I’ll do this for all the post stitches in this row and then I’ll fix the borders with left/right borders. Here I’m selecting the squares from row 2 to add borders to; if I added them to the merged stitches, they would break up the row above it.
You can save time by copy-pasting a repeated section. Google Sheets will copy merges, borders and colours all in one. For this pattern, it was very useful to copy and paste entire rows as rows 2-3 are essentially the same as rows 10-11, 12-13 and 14-15. And rows 4-5 can be repeated for rows 6-7 and 8-9. Then all of 4-15 is repeated twice.
I have not tried to replicate the post stitches connecting on the diagonal as they do in the pattern as it is unnecessary. I’m creating this for ease of colouring and not full accuracy. Continue to work through the pattern, merging and creating borders, making sure that the borders are all complete. This is essential for easy colour filling in paint.

As this pattern repeats a lot of sections, I only had to create rows 1-5 and just copy/pasted them according to the changes in the pattern. Each pattern will be different of course, so you might not always get to copy/paste this much.
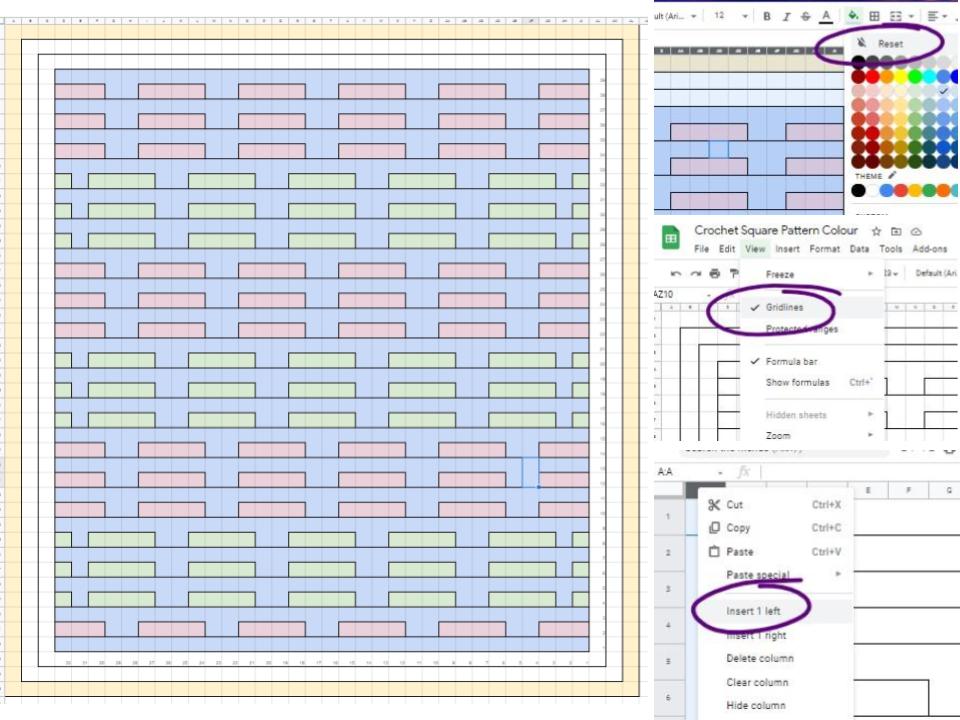
When you have finished the square - select all and reset the colours to give yourself a blank canvas. Then turn off the gridlines (check that you didn’t forget any borders). I also like to add an extra row and column to the beginning so that my outer border isn’t touching the edge.
Play Time - Step Five
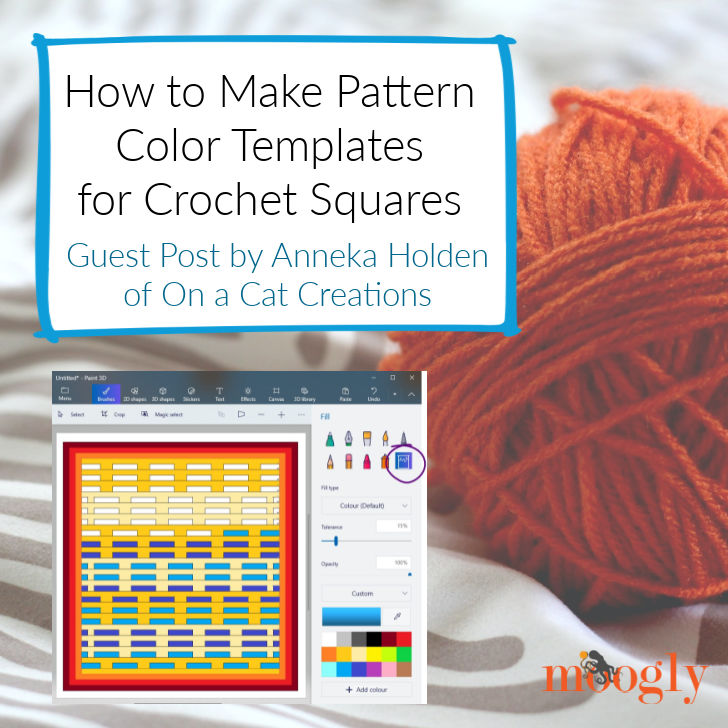
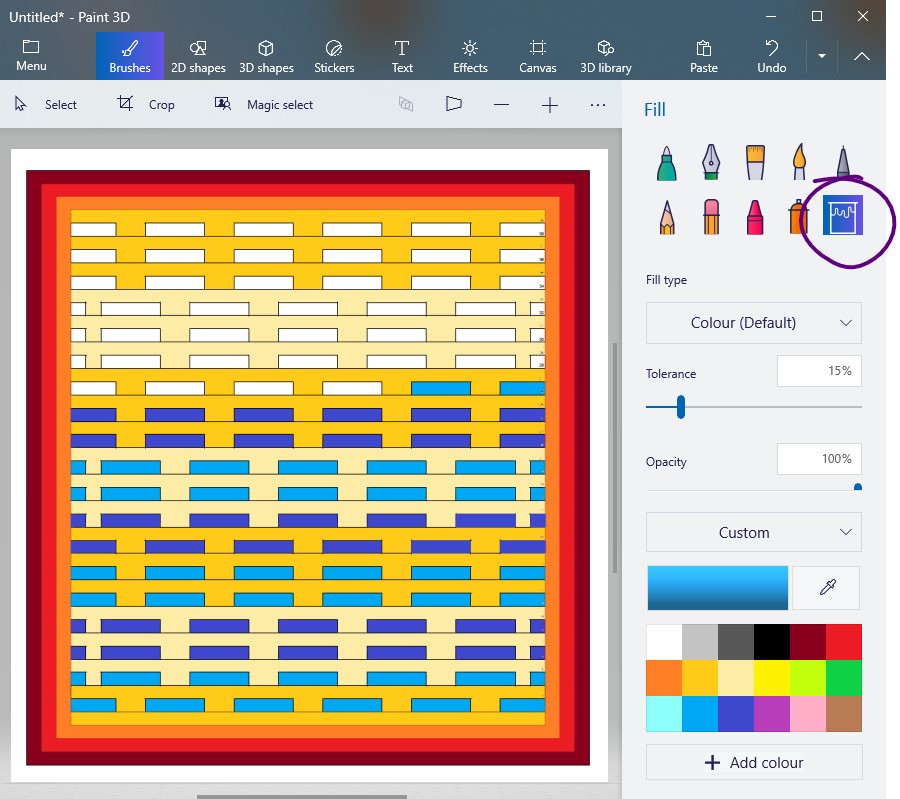
Finally - it’s time to play with colours! You can download a PDF directly from Google Sheets if your paint program will work with PDFs, but mine doesn’t, so I simply take a screenshot. I usually need to zoom out in the spreadsheet and also in my browser (ctrl +/-) in order to get the entire image on the screen.
I like to use Paint 3D for the final task of colour planning as it gives a tolerance setting for any sort of pixel-sized colour distortion while regular Paint tends to leave lots of small white dots. It’s also easy to add custom colours to it so that you can try to match your yarn.
Crochet Time - The Last Step!
Then all that is left to do is to crochet the square! Hopefully, if you are happy with your plan, you will be happy with your end result and won’t be frogging as much. I frog a lot less when I plan ahead. This also forces me to pre-read the pattern fully before beginning, so I am less likely to make mistakes (although I still do make mistakes… Don’t we all?) I hope that you enjoyed this little tutorial and happy crocheting!
Feel free to message me through my Instagram if you have any questions.
Thank you so much for showing us how to make pattern color templates, Anneka! What a wonderful way to plan your projects! Be sure to follow her on Instagram to see what's she's up to, and follow all the Moogly fun on your favorite social media sites: Facebook, Twitter, Pinterest, and Instagram!


Leave a Reply