
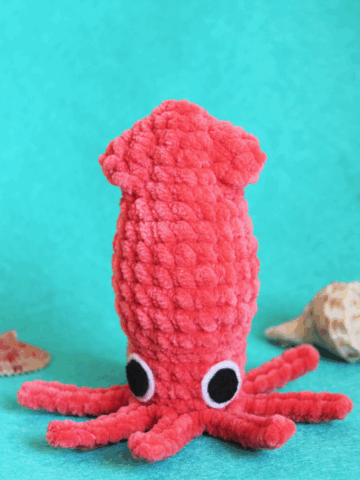
The Halloween Monster Candy Bucket is a fun crochet candy tote pattern that works up quickly and easily in Bernat Blanket! Celebrate spooky season and trick or treat in style with this free Moogly pattern!
Disclaimer: This post includes affiliate links; materials provided by Yarnspirations.
Prefer an ad-free PDF? You've got options!


Prefer the free blog version? Keep scrolling!
Part of the 2021 Halloween CAL on CAL Central

Visit Underground Crafter to see the other free crochet patterns that were included in this Halloween crochet along!

Featuring Bernat Blanket O'Go - and You!
The Halloween Monster Candy Bucket is made with Bernat Blanket O'Go! It's the same Bernat Blanket you know and love, but with a completely tangle-free experience! There are 19 different colorways to choose from, or you can use up some of your own Bernat Blanket odds and ends. This yarn is discontinued, so you can use your favorite shades of Bernat Blanket!

Once you've got your colors, you can dress it up however you like. Add button tentacle suckers, a funny face - or a creepy face! - it's totally up to you, and a great way to personalize your project, maybe even getting the kids involved!

Do Those Tentacles Look Familiar?
We've got a theme going here! Be sure to check out the Halloween Tentacle Candy Bowl for another creepy, free crochet pattern this season!

Why Just Carry a Plastic Bag?
The Halloween Monster Candy Bucket is a great way to finish off their costume - and you can use it year after year! Make one for all the kids in their favorite colors, and they might just make a second appearance in the spring as whimsical Easter Baskets. I tested it out - it can hold over 3lbs of candy!

Halloween Monster Candy Bucket
Add this pattern to your Ravelry Queue and Favorites
US-K. 6.5mm crochet hook - Susan Bates
300 yds Bernat Blanket O'Go (6/Super Bulky; 100% polyester; 300g/10.5 oz; 201 m/220 yds)
Colorway Shown: Agave (2 balls)
This yarn has been discontinued, but Bernat Blanket is the perfect substitute!

2 large buttons - 2 ½" shown (optional)
Stitch Markers - Susan Bates
Gauge: 4″/10cm across after Rnd 3 of Underbelly
Finished Size: Approx 9" tall excluding handles
Helpful Links and Tutorials:
Halloween Monster Candy Bucket Tutorial
FSC - Foundation Single Crochet
FHDC - Foundation Half Double Crochet
NOTES:
Most of the rnds in this pattern are worked in a spiral - do not ch at the beginning of a rnd or join with a sl st unless instructed.
Move a stitch marker along the first st of each rnd as you work to keep track of your progress.
You can make the pieces in any order, and mix up the colors for your own custom creation!
INSTRUCTIONS:
UNDERBELLY - COLOR C
Rnd 1: Make a magic circle, ch 1, sc in the ring, 9 hdc in the ring. (10 sts)
Rnd 2: 2 hdc in each st around. (20 hdc)
Rnd 3: *Hdc in the next st, 2 hdc in the next st; rep from * around. (30 hdc)
Rnd 4: *2 hdc in the next st, hdc in the next 2 sts; rep from * around. (40 hdc)
Rnd 5: *Hdc in the next 3 sts, 2 hdc in the next st; rep from * around. (50 hdc)
Rnd 6: *(Hdc in next 7 sts, 2 hdc in the next st) twice, hdc in next 8 sts, 2 hdc in the next st; rep from * around. (56 hdc) – DO NOT BREAK YARN.
UNDER-TENTACLES - COLOR C
Under-Tentacle #1:
Row 1: Hdc in next 7 sts; turn (rem sts left unworked). (7 hdc)
Rows 2 – 4: Ch 1, hdc in each st across; turn.
Row 5: Ch 1, hdc2tog, hdc in the next 4 sts, 2 hdc in the last st; turn.
Row 6: Ch 1, 2 hdc in the first st, hdc in next 2 sts, hdc2tog twice; turn. (6 hdc)
Row 7: Ch 1, hdc2tog twice, hdc in the next st, 2 hdc in the last st; turn. (5 hdc)
Row 8: Ch 1, hdc2tog, hdc in next st, hdc2tog; turn. (3 hdc)
Row 9: Ch 1, hdc2tog, hdc in the last st; turn. (2 hdc)
Row 10: Ch 1, hdc2tog; break yarn and finish off. (1 hdc)
Under-Tentacles #2 – 8:
Row 1: Join to next st of Rnd 18, ch 1, hdc in same st and next 6 sts; turn. (7 hdc)
Rows 2 – 10: Rep as for Under-Tentacle #1. Weave in all ends.
TOP OF BUCKET - COLORS A and B
Rnd 1: With Color A, FSC 1, FHDC 55. (56 sts) Use tail to sew bottom of rnd closed.
Rnds 2 - 9: Hdc in each st around. Finish last st of Rnd 9 with Color B.
Rnds 10 - 12: Rep Rnd 2 – DO NOT BREAK YARN, continue with Tentacles below.
TENTACLES - COLOR B
Tentacle #1:
Row 1: Hdc in next 7 sts; turn (rem sts left unworked). (7 hdc)
Rows 2 – 4: Ch 1, hdc in each st across; turn.
Row 5: Ch 1, 2 hdc in the first st, hdc in the next 4 sts, hdc2tog; turn.
Row 6: Ch 1, hdc2tog twice, hdc in next 2 sts, 2 hdc in the last st; turn. (6 hdc)
Row 7: Ch 1, 2 hdc in the first st, hdc in the next st, hdc2tog twice; turn. (5 hdc)
Row 8: Ch 1, hdc2tog, hdc in next st, hdc2tog; turn. (3 hdc)
Row 9: Ch 1, hdc in the first st, hdc2tog; turn. (2 hdc)
Row 10: Ch 1, hdc2tog; break yarn and finish off. (1 hdc)
Tentacles #2 – 8:
Row 1: Join to next st of Rnd 18, ch 1, hdc in same st and next 6 sts; turn. (7 hdc)
Row 2 – 10: Rep as for Tentacle #1. Weave in all ends. Set piece aside.
ADD HANDLE
Rnd 1: Using Color A, join to back of bucket in bottom of foundation stitches, ch 1, hdc in each st around; join and fasten off. (56 sts) Place stitch markers for handles, marking 4 sts on either side of the bucket opening.

Row 2: Join to first marked st, ch 1, hdc in same st, hdc in next 3 sts; turn. (4 hdc)
Row 3 - 23 (or to desired handle length): Ch 1, hdc in each st across; turn. After last row, break yarn leaving a long tail.

Sew: Using the whip stitch, sew the Row 23 to the marked 4 sts on the opposite side of the bucket. Be sure not to twist the handle.
ASSEMBLY
Add details to if desired: Sew on buttons or safety eyes or embroider on a face - dress up your candy bucket to your own taste before assembly. Be sure to center the face opposite the color change.

Assemble Bucket: Using Color B, sc through Tentacles and Under-Tentacles from the Top of Bucket side of the project, working evenly around the entire body. Use Seamless Finishing to join, break yarn and weave in ends.

SHARE YOUR FINISHED PROJECTS WITH US!
If the Halloween Monster Candy Bucket pattern inspires you to make your own project, and you post a photo on social media, be sure to tag me @mooglyblog or #mooglyblog so I can check it out too! And send it in to tamarakelly@mooglyblog.com to see it featured in the Moogly email newsletter!

THE FINE PRINT
Follow Moogly on Facebook, Twitter, Pinterest, Instagram, and TikTok! Thank you to Yarnspirations for providing the materials shown in this post. Written pattern copyright Tamara Kelly 2021, all rights reserved. Please do not reprint or repost this pattern, but please do link to this page to share this pattern with others.
If you wish to make items for sale from this pattern or translate it to another language, please visit the About page for details.


Leave a Reply