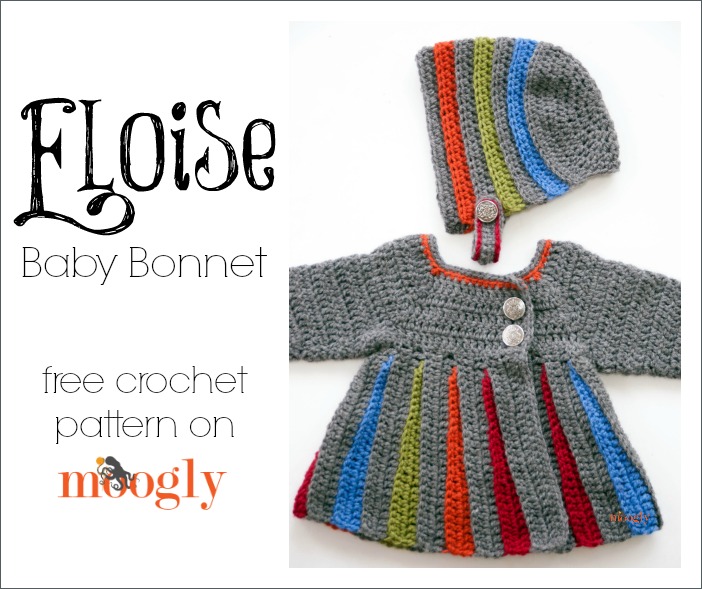
The Eloise Baby Sweater has been such a popular pattern, I wanted to design a hat to go with! When I asked what sort of hat people were looking for, the resounding answer was a bonnet! And so.. introducing the Eloise Bonnet!
Disclaimer: This post includes affiliate links.
Prefer an ad-free PDF? You've got options!


Prefer the free blog version? Keep scrolling!
It's a Baby Bonnet!
The Eloise Bonnet is available in 3 sizes, ending around 19", which should fit even most 2-3 year olds. This is a baby style bonnet, so it's sized for babies! If there's interest in a larger hat for girls/adults, let me know and I'll design something a little more grown up.
![]()
This bonnet uses hdc stitches in place of the dc stitches found in the sweater. This allowed for more precise sizing, as well as a thicker, warmer hat! To make it truly weatherproof however, I would suggest a sewn fleece lining.
![]()
Eloise Bonnet
Add this pattern to your Ravelry Queue and Favorites
US – J, 6.0mm - Furls
90-125 yds Lion Brand Wool-Ease Worsted (worsted weight) in 2-5 colors
2+ Buttons – ⅞″ (22mm)
Gauge: 9 sts x 5 rows = 3″ in dc
Sizes: 3 months (14-17"); 6 months (14 - 17"; shown); 12 months (16-19")
Pattern stitch counts in the pattern are written as 3mths(6mths, 12mths) – when only one number is shown, it applies to all sizes.
For tutorials, click on the linked stitches or visit the Crochet Abbreviations page
Matching Pattern: Click here for the Eloise Baby Sweater pattern.
Eloise Bonnet Instructions
Rnd 1: With Color A, make a magic circle and hdc 9 in the ring; join to first st with a sl st. (9 hdc)
Rnd 2: Ch 1, 2 hdc in each st around; join to first st with a sl st. (18 hdc)
Rnd 3: Ch 1, hdc in the first st, 2 hdc in the next st, *hdc in the next st, 2 hdc in the next st; repeat from * around; join to first st with a sl st. (27 hdc)
Rnd 4: Ch 1, 2 hdc in the first st, hdc in the next 2 sts, *2 hdc in the next st, hdc in the next 2 sts; repeat from * around; join to first st with a sl st. (36 hdc)
Rnd 5: Ch 1, hdc in the first 3 sts, 2 hdc in the next st, *hdc in the next 3 sts, 2 hdc in the next st; repeat from * around; join to first st with a sl st. (45 hdc)
SIZE 3 MTHS GO TO BRIM INSTRUCTIONS BELOW
Rnd 6: Ch 1, 2 hdc in the first st, hdc in the next 4 sts, *2 hdc in the next st, hdc in the next 4 sts; repeat from * around; join to first st with a sl st. (54 hdc)
SIZE 6 MTHS GO TO BRIM INSTRUCTIONS BELOW
Rnd 7: Ch 1, hdc in the first 5 sts, 2 hdc in the next st, *hdc in the next 5 sts, 2 hdc in the next st; repeat from * around; join to first st with a sl st. (63 hdc)
BRIM INSTRUCTIONS:
Row 1: Ch 1, hdc in first 39(48, 56) sts; turn. Leave remaining sts unworked. (39(48, 56) sts)
Row 2: Ch 1, hdc in each st across; turn. Break yarn and finish off. (39(48, 56) sts)
Row 3: With Color B, join to BLO (back loop only) of first st, hdc in BLO of each st across; turn. (39(48, 56) sts)
Row 4: Repeat Row 2.
Row 5 - 6: With Color A, repeat Rows 3 - 4.
Row 7 - 8: With Color C, repeat Rows 3 - 4.
Row 9 - 10: With Color A, repeat Rows 3 - 4.
SIZE 3 MTHS GO TO STRAP INSTRUCTIONS BELOW.
Row 11 - 12: With Color D, repeat Rows 3 - 4.
Row 13 - 14: With Color A, repeat Rows 3 - 4.
SIZE 6 MTHS GO TO STRAP INSTRUCTIONS BELOW.
Row 15 - 16: With Color E, repeat Rows 3 - 4.
Row 17 - 18: With Color A, repeat Rows 3 - 4.
STRAP INSTRUCTIONS: (if you have the recipient nearby, you can adjust the length and placement of the strap for a custom fit)
Row 1: With Color A, ch 22(24, 26), sc in 5th ch from hook and each remaining ch across; turn. (18(20, 22) sts plus ch-4 loop)
Row 2: Ch 1, sc 18(20, 22), sc 5 in ch-4 loop space, sc 18(20, 22) across the bottom of Row 1, working into the foundation chain, sc 3 in the end of Row 1; join with a sl st in the first sc of this round. Break and finish off. (41(45, 49) sts)
Row 3: With other color of choice, sl st all around Row 2 (work as if surface crochet). Break yarn and finish off.
Assembly: Sew button and strap to one side of bonnet, as shown. On opposite side, sew the button on. Use the ch-4 loop as a button hole to button closed.
I hope you enjoy this pattern for the Eloise Bonnet!
The Fine Print
Written pattern copyright Tamara Kelly 2014. Please do not reprint or repost this pattern, but please do link to this page to share this pattern with others. If you wish to make items for sale from this pattern, please visit the About page for details.


Nicole H says
Its so cute! If you're taking votes, I would loooove a big kid or teen/adult version of this. Bonnets are just so beautiful. I really like how you've made a more modern version of the bonnet here. Thanks again for the pattern!
Tamara Kelly says
😀 Thank you so much Nicole! I'm plotting it out already!
LouVennia Smith says
I just made this sweater for my 4yo...I would love to make a bonnet to match!!!
Rita says
It is so pretty...Love the colors!
Tamara Kelly says
Thank you Rita!
Corinna says
Yes please. A big girl hat to go with the big girl sweater would be awesome.
Tamara Kelly says
🙂 Thank you Corinna!
Melanie says
Oh, please design a beanie for adults, preferably not too slouchy. This is such a cute idea, love the colors! Thank you for considering it.
Tamara Kelly says
😀 Thank you Melanie! I can see a couple different styles in my future!
Kirsten says
looks lovely!!! Do you have a pattern for a 1 year old? My niece turns almost one
Tamara Kelly says
Hi Kirsten! The 12mth size should fit most 1 year olds. 🙂
Beth says
What a delightful little sweater! I would love to be able to make it for my grand daughters. I would need a size 2T and a 6 for my precious girls. Any chance that you might be able to offer a pattern with larger sizing? It's adorable!
Tamara Kelly says
Hi Beth! The sweater is indeed available in those sizes, and I plan on adding larger hats in the new year. 🙂 Thank you!
LaDonna says
What would be the best way to make a lining fir this adorabke bonnet?
Tamara Kelly says
Sewing isn't really my area of expertise, but tracing the shapes would be a good start I think?
Diane says
I just finished making the sweater for my granddaughter. It is beautiful! Thanks so much for the pattern. I would love to make the bonnet in a larger size. Can you offer any advice?
Tamara Kelly says
Hi Diane! You can make the circle that starts it bigger, about as big as you'd make for a hat you were making her, and then work the rows from there. 🙂 I also designed a more "grown up" hat for this sweater called A Very Good Hat, which you can find at: https://www.mooglyblog.com/good-hat/
fiona says
I would really like a bonnet pattern for an older child say 8-12. Love the bonnet and cardigan. Well done
Tamara Kelly says
Thank you Fiona!
CHAR says
TAMARA, YOUR DESIGNS ARE WONDERFUL. ALSO THE LITTLE TIPS YOU GIVE ALONG THE WAY ARE MORE THAN GENERIOUS. I MADE THE ELOISE JACKET FOR MY BABY GREAT- GRANDDAUGHTER. IT WAS GORGIOUS! ONLY PROBLEM WAS THAT I DIDN'T HAVE THE CORRECT MEASUREMENTS. DISPITE ASKING NURMEROUS TIMES. SHE MUST TRUELY BE TINY BECAUSE THE 12 MONTH SIZE WAS TOO LARGE. I THINK PROBABLY A NINE MONTH SIZE WOULD BE BETTER. CAN YOU TEACH US HOW TO COUSTOMIZE THE SIZE AS NEEDED. THANK YOU AGAIN TAMARA FOR YOUR DEDICATION TO THE CRAFT.
Tamara Kelly says
Thank you so much Char! Children grow so fast that it's hard to get an exact measurement! To make it just a bit smaller, you can just go down a hook size or two. 🙂
Plumefragile says
His model is splendid ! Cheer !
Please, do you have the French tutorial ?
cordially
Tamara Kelly says
Thank you! I'm afraid I do not have a version en francais, but this may help: http://oombawkadesigncrochet.com/2014/05/french-crochet-terms-and-u-s-crochet-terms.html 🙂
Tajuana says
Do you have a tutorial of this pattern i do better when I seen it being do? Thanks
Tamara Kelly says
No, I'm afraid I don't have a tutorial for this pattern at this time.
Charlene Sargent says
I HAVE MADE THIS SWEATER FOR MY YEAR OLD GREAT-GRANDDAUGHTER AS WELL AS THE BONNET. BOTH ARE VERY CUTE AND THE YARN IS VERY WARM FOR THE COLD NEW YORK WEATHER. I MADE A SIMILAR SWEATER FOR HER 2 YEAR OLD BROTHER. I FOUND THAT PATTERN (ALTHOUGH SIMPLE) MUCH HARDER. THANK YOU FOR A GREAT, SWEET PATTERN.
Tamara Kelly says
I'm so glad you like it, thank you!
Anita says
Hi Tamara, I found your video on YouTube and made the beautiful Eloise sweater for my granddaughter. I enjoyed making it so much. Thanks for a lovely and easy to follow pattern.
I have just completed a second sweater that I would like to sell from my Etsy shop. I've posted the listing and want to make sure I'm giving you the proper credit and link to your blog. Please let me know if this is ok as is or if you want me to change it.
https://www.etsy.com/listing/263181913/hand-crocheted-baby-or-little-girls?ref=shop_home_active_9
Thanks again for a great pattern,
Anita
Tamara Kelly says
Thank you so much Anita! That's wonderful - and the sweater and hat are super cute too! 😀 Thank you!
Linda Jonas says
Hi. Love your Eloise sweater. I am in the process of making the bonnet and have a question. You say that the bonnet can be made in 3 month, 6 month and 12 month sizes. I was wondering how I would make an 18 month size? Thanks
Tamara Kelly says
Thank you Linda! I would add a Round 8 before the brim, increasing by 9 sts - Ch 1, hdc in the first 6 sts, 2 hdc in the next st, *hdc in the next 6 sts, 2 hdc in the next st; repeat from * around; join to first st with a sl st. (72 hdc) Then for the brim, I'd crochet in the first 64 sts leaving the rest unworked. 🙂
eMILY says
Tamara, Did you ever make this bonnet pattern for big kids and/or adults? I would love to make this for my granddaughters. Maybe even one for myself! 😉 I would definitely prefer the bonnet style to the beanie version...grown up hair!! Thank you for sharing your patterns they are just lovely! Emily
Tamara Kelly says
Hello Emily! I'm afraid I did not, but I can give you the formula for doing so! 🙂 Just work the initial circle to the same circumference as you would for a beanie that size, and then work the brim in stripes in rows, as many as needed to fit! For the stitch count for the brim, you want to leave about 12-15% of the circle stitches unworked for the neck opening.
Meenaxi Panakkal says
Thank you, Tamara! This pattern is amazing. Enjoyed making the sweater for my 31/2 year old niece. She rocks this sweater.
Tamara Kelly says
😀 Thank you so much!!
Judy says
I'm stuck at the beginning! Please explain sl st in the stitch, then sl st in the same stitch again. I cannot figure it out.
Your sweater is wonderful and I hope to make it if I can get past this.
Thank you so much.
Tamara Kelly says
Hi Judy, and thank you! ♥
I'm afraid I'm not sure which part you're referring to. At the end of each round, you join with a slip stitch in the first st of the round - usually a hdc.
Rnd 3 is all sl sts, but you don't work one into the sl st join at the end of the previous rnd - that's just for joining, and doesn't "count" as a stitch.
If I'm off on this advice, can you give me more info of where you're having trouble?