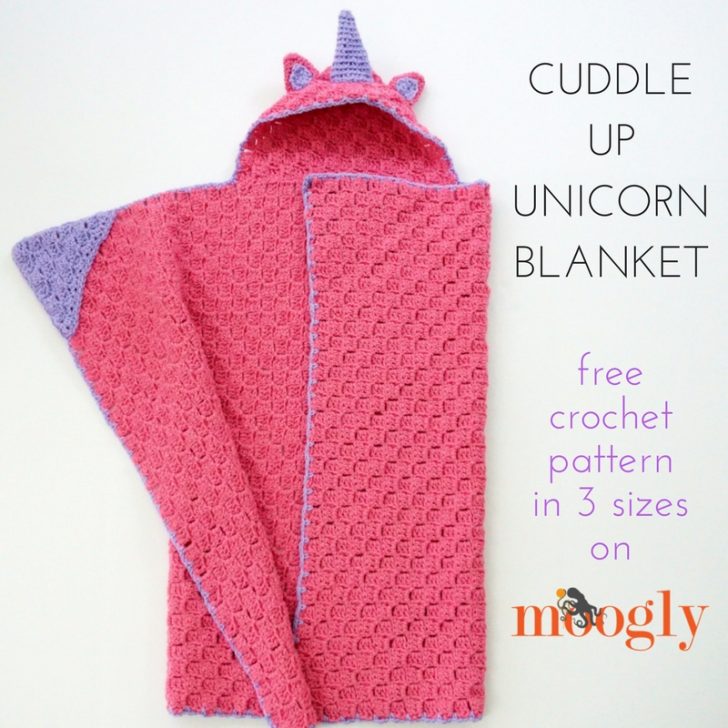
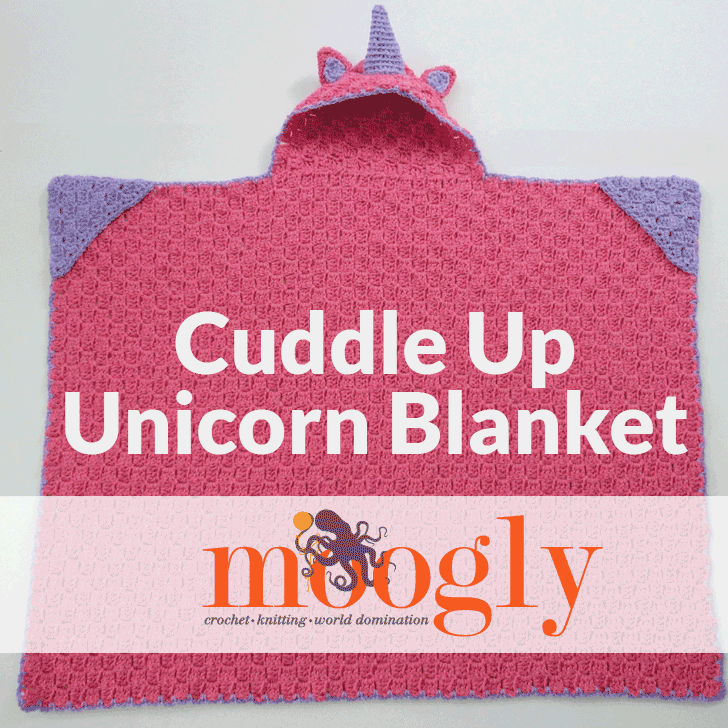
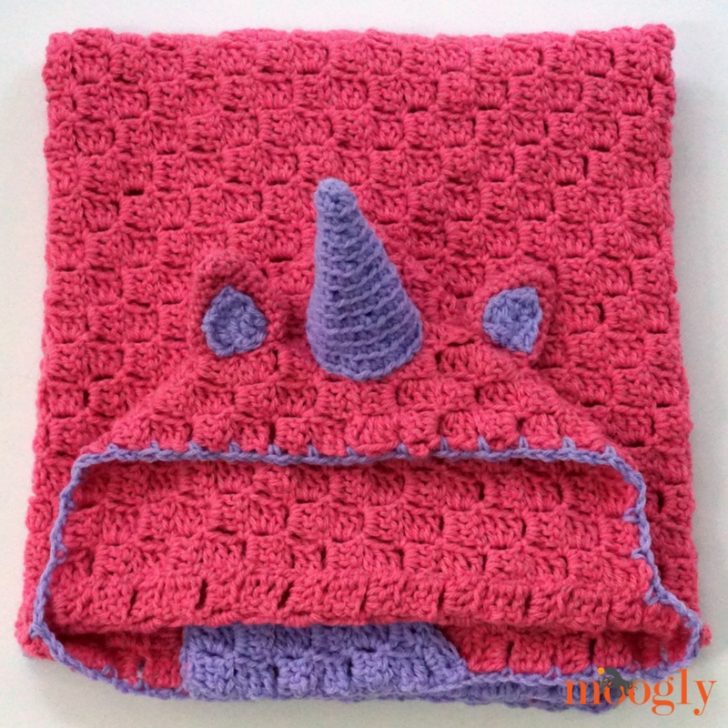
The Cuddle Up Unicorn Blanket features the corner to corner stitch, super cozy styling - and a spiral horn ready for any little one's fairy tale dreams! Enjoy the crochet pattern here on Moogly!
Disclaimer: Yarn for this pattern was provided by Lion Brand; this post includes affiliate links.
Prefer an ad-free PDF? You've got options!


Prefer the free blog version? Keep scrolling!
Featuring the C2C Box Stitch
I had so much fun making this blanket! The corner to corner stitch (aka C2C or diagonal box stitch) is one of the most relaxing stitch patterns out there. And it makes this pattern as simple as possible - and fun for both the maker and the recipient.

I also have to show off this video Geoff helped me make - so cute!
Mane or No Mane?
When I was designing the Cuddle Up Unicorn Blanket, I made the ¾ year old size, using two skeins of Lion Brand Pound of Love, one Bubblegum, and one Lavender. I had intended to add a mane with the Lavender color, but talking to the little girls in my life, they preferred it without! So I've got lots of leftover purple yarn... and a recommendation!
If you want to add a mane (or have a use for more yarn - and don't we all??), then I'd go with the two balls of Pound of Love. But if you prefer to leave it off, as shown here, you can substitute one ball of Lion Brand Vanna's Choice in Lilac for the Lavender - or whatever color you choose!
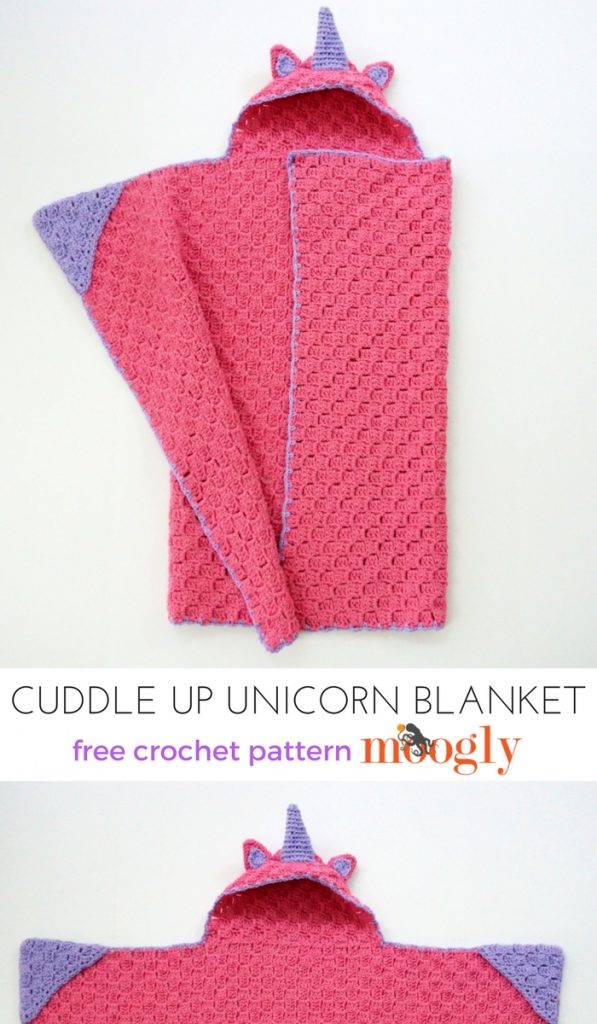
Cuddle Up Unicorn Blanket
Add this pattern to your Ravelry Queue and Favorites
US - K, 6.5 mm hook - Furls Crochet
1100 - 2000 yds Lion Brand Pound of Love (worsted/“4”/UK: 10 ply; 1020 yds/933 m; 16 oz).
Color A: Bubblegum - 980-1778 yds (1 ball for size ¾; 2 balls for sizes ⅚ and ⅞).
Color B: Lavender - 120-222 yds (1 ball all sizes),
Stitch markers - Clover
Gauge: 5 blocks (ch-3 and dc 3 is one block) = 4" in pattern
Sizes (by age, based on average height): ¾ (shown); ⅚; ⅞
Helpful Links:
How to Corner to Corner Crochet
Crochet Abbreviations
Magic Circle
BLO - back loop only
Whip Stitch Seaming
Join with sc
NOTE: The directions for the "Blanket Pieces" and "Hands" are not written as standard crochet instructions, as they use the Corner to Corner technique. See the video tutorial linked above if needed for more info on how to work this stitch.
INSTRUCTIONS:
Body Blanket Piece - Color A
Size ¾: (measures approximately 28" x 36")
Rows 1 - 35: Work Corner to Corner stitch increases - start with one block, increasing on both ends on each row, to 35 blocks across.
Row 36 - 45: Work Corner to Corner stitch evenly - decrease on one side, and increase on the other, maintaining 35 blocks across for each row.
Row 46 - 79: Work Corner to Corner stitch decreases - decrease on each side of each row, until only 1 block remains. Break yarn and set aside.
Size ⅚: (measures approximately 33" x 42")
Rows 1 - 41: Work Corner to Corner stitch increases - start with one block, increasing on both ends on each row, to 41 blocks across.
Row 42 - 53: Work Corner to Corner stitch evenly - decrease on one side, and increase on the other, maintaining 41 blocks across for each row.
Row 54 - 93: Work Corner to Corner stitch decreases - decrease on each side of each row, until only 1 block remains. Break yarn and set aside.
Size ⅞: (measures approximately 38" x 48")
Rows 1 - 47: Work Corner to Corner stitch increases - start with one block, increasing on both ends on each row, to 47 blocks across.
Row 48 - 61: Work Corner to Corner stitch evenly - decrease on one side, and increase on the other, maintaining 47 blocks across for each row.
Row 62 - 107: Work Corner to Corner stitch decreases - decrease on each side of each row, until only 1 block remains. Break yarn and set aside.
Hood Blanket Piece - Color A
Size ¾: (measures approximately 8" x 12")
Rows 1 - 10: Work Corner to Corner stitch increases - start with one block, increasing on both ends on each row, to 10 blocks across.
Row 11 - 15 Work Corner to Corner stitch evenly - decrease on one side, and increase on the other, maintaining 10 blocks across for each row.
Row 16 - 24: Work Corner to Corner stitch decreases - decrease on each side of each row, until only 1 block remains. Break yarn leaving a long tail and set aside.
Size ⅚: (measures approximately 9" x 14")
Rows 1 - 11: Work Corner to Corner stitch increases - start with one block, increasing on both ends on each row, to 11 blocks across.
Row 12 - 17: Work Corner to Corner stitch evenly - decrease on one side, and increase on the other, maintaining 11 blocks across for each row.
Row 18 - 27: Work Corner to Corner stitch decreases - decrease on each side of each row, until only 1 block remains. Break yarn leaving a long tail and set aside.
Size ⅞: (measures approximately 10" x 18")
Rows 1 - 13: Work Corner to Corner stitch increases - start with one block, increasing on both ends on each row, to 13 blocks across.
Row 14 - 23: Work Corner to Corner stitch evenly - decrease on one side, and increase on the other, maintaining 13 blocks across for each row.
Row 24 - 35: Work Corner to Corner stitch decreases - decrease on each side of each row, until only 1 block remains. Break yarn leaving a long tail and set aside.
Hands (make 2) - Color B
Size ¾:
Rows 1 - 6: Work Corner to Corner stitch increases - start with one block, increasing on both ends on each row, to 6 blocks across.
Row 7: Ch 2, dc in first st, hdc in next st, sc in next st, *(sc, hdc, dc) in next ch-3 sp,** skip next 3 sts; rep from * across ending last rep at **, turn.
Row 8: Ch 1, sc in each st across; break yarn and set aside.
Size ⅚:
Rows 1 - 7: Work Corner to Corner stitch increases - start with one block, increasing on both ends on each row, to 7 blocks across.
Row 8: Ch 2, dc in first st, hdc in next st, sc in next st, *(sc, hdc, dc) in next ch-3 sp,** skip next 3 sts; rep from * across ending last rep at **, turn.
Row 9: Ch 1, sc in each st across; break yarn and set aside.
Size ⅞:
Rows 1 - 8: Work Corner to Corner stitch increases - start with one block, increasing on both ends on each row, to 8 blocks across.
Row 9: Ch 2, dc in first st, hdc in next st, sc in next st, *(sc, hdc, dc) in next ch-3 sp,** skip next 3 sts; rep from * across ending last rep at **, turn.
Row 10: Ch 1, sc in each st across; break yarn and set aside.
Horn (all sizes) - Color B
Round 1: Make a magic circle, sc 6 in the ring, do not join (work as a spiral). (6 sts)
Round 2: Working in blo, *sc in the next st, 2 sc in the next st; rep from * around. (9 sts)
Round 3: Working in blo, sc in each st around. (9 sts)
Round 4: Working in blo, *sc in the next 2 sts, 2 sc in the next st; rep from * around. (12 sts)
Round 5: Rep Rnd 3. (12 sts)
Round 6: Working in blo, *sc in the next 3 sts, 2 sc in the next st; rep from * around. (15 sts)
Round 7: Rep Rnd 3. (15 sts)
Round 8: Working in blo, *sc in the next 2 sts, 2 sc in the next st, sc in the next 2 sts; rep from * around. (18 sts)
Round 9: Rep Rnd 3. (18 sts)
Round 10: Working in blo, *sc in the next 5 sts, 2 sc in the next st; rep from * around. (21 sts)
Round 11: Rep Rnd 3. (21 sts)
Round 12: Working in blo, *sc in the next 6 sts, 2 sc in the next st; rep from * around. (24 sts)
Round 13: Rep Rnd 3. (24 sts)
Round 14: Sl st in next st, break yarn and finish off leaving a long tail. Set aside.
Ears (all sizes, make 2)
Ear Outer - Color A:
Round 1: Make a magic circle, sc 6 in the ring; join. (6 sts)
Round 2: Ch 1, sc in the first st, 2 sc in the next st, *sc in the next st, 2 sc in the next st; rep from * around, join. (9 sts)
Round 3: Ch 1, sc in each st around; join. (9 sts)
Round 4: Ch 1, sc in the first 2 sts, 2 sc in the next st, *sc in the next 2 sts, 2 sc in the next st; rep from * around, join. (12 sts)
Round 5: Rep Rnd 3. (12 sts)
Round 6: Ch 1, sc in the first 3 sts, 2 sc in the next st, *sc in the next 3 sts, 2 sc in the next st; rep from * around, join. (15 sts)
Round 7: Rep Rnd 3. (15 sts)
Round 8: Ch 1, sc in the 1st 4 sts, 2 sc in the next st, *sc in the next 4 sts, 2 sc in the next st; rep from * around, join. (18 sts)
Round 9: Rep Rnd 3. (18 sts) Break yarn leaving a long tail, set aside.
Ear Inner - Color B:
Row 1: Ch 2, 3 dc in 2nd ch from hook; turn. (3 sts)
Row 2: Ch 2, 2 dc in the first st, dc in the next st, 2 dc in the last st; break yarn leaving a long tail. (5 sts)
Assembly (all sizes)
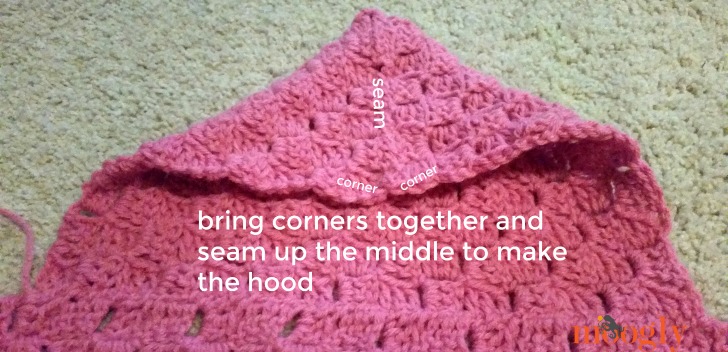
1: Whip stitch Hood Blanket Piece to Body Blanket Piece so that longer sides are together, centered on the Body Blanket Piece.
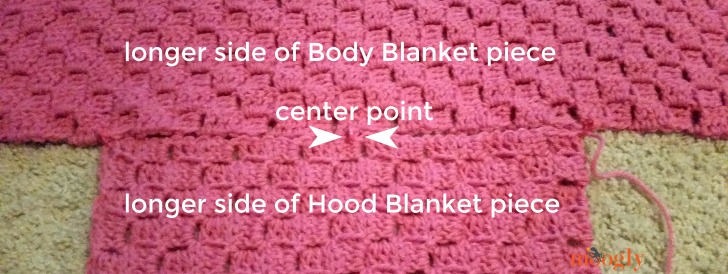
2: Whip stitch the top of the Hood Blanket Piece to form the hood (see photo below).
3: Flatten Ears and sew Ears and Horn to the top of hood using long tails.
4: Use stitch markers to pin hands to top two corners, matching up the blocks of the pattern. Go to Finishing.
Finishing (all sizes) - Color B
Join with sc between any 2 blocks along bottom edge of Body Blanket Piece, ch 2, *sc between next pair of blocks, ch 2; rep from * around working 3 sc in each corner, and going through both the Body Blanket Piece and the Hands when at the corners, to secure the Hands to the blanket. Join and finish off. Weave in ends.
And that's the free crochet pattern for the Cuddle Up Unicorn Blanket - in 3 sizes no less! It's long on paper, but really pretty simple, particularly if you are already familiar with the c2c stitch. And if not, there's a video tutorial above.
I hope you enjoy making it - and giving it! I can't wait to see the ones you make. Be sure to tag me on social media so I can take a peek! And if you have any questions or spot any errors, please let me know!
The Fine Print
Written pattern copyright Tamara Kelly 2017, all rights reserved. Please do not reprint or repost this pattern. Please do link to this page to share this pattern with others. For more info, please visit the About page. Thank you to Lion Brand Yarn for providing the yarn for this pattern.


wurdnurd says
Next project: Figure out the adult sizing...
Tamara Kelly says
That's what I'm hearing! 😀
Nicola Jackson says
I would love to make this for a adult
Tamara Kelly says
Hi Nicola! The great thing about C2C is you can make it any size very easily! Just keep increasing til you have the height/width you want!
Nicola Jackson says
Im kind of new to c2c and just made my 1st blanket so not sure if i have the brains to work it out
Jody says
I'd love to see the adult size! 😀
Miki says
How cute! I'm thinking this will be for our unicorn grandollar! ;0)
Tamara Kelly says
😀 Thank you so much!
Mundo do Crochê says
I loved this recipe. This will be my next project, my grandchildren love unicorns. This piece is beautiful. Congratulations and continue with this wonderful work. By the way, I have a crochet shop, who can access, I am grateful: http://www.mundodocroche.com.br/tapete-de-barbante-quadrado
Lori DuBois says
Hi, I love the pattern but am stuck on the horn...do I not close the magic ring? Also, I've downloaded this many times but the 2 photos that should be coming up in between the 1st 2 steps under finishing dont ever come up and I'm completely clueless about how to attach the hood. I've been crocheting for almost 45 years and I've never attempted to make anything but blankets fire, but my 6 yo granddaughter loves horses & unicorns so I wanted to make this for her. The horn is all I have left to make and then assemble it...I'm excited to finish it! I just need a bit of your help & expertise, please!?
Thank you!
Tamara Kelly says
Hi Lori! I'm sorry the photos weren't included before, that was an oversight on my part and I've fixed it now.
You do close the magic ring at the start of the horn. 🙂
Lori says
Sorry to double-up on comments here, I've never commented on a blog before & when the 1st ones didnt show up I thought I'd done it wrong! THANK YOU SO MUCH for posting those pix, now it makes sense to me! 😀
Lori says
Is there a way I can get the 2 photos that are missing from the assembly instructions please? I wanted to get this finished up today so I could ship it to my 6 yo granddaughter along w/her new school clothes tomorrow, but, I can't figure out how to attach the hood proprly from just the written portion; I'm thinking the photos may help. Thanks for a great pattern!
Tamara Kelly says
Oh my gosh, I can't believe I forgot to add those! I've done so now. Thank you for letting me know!
Gloria says
Is there a way to get the corner to corner written instructions? I don't always have a computer near by for the instructions.
thalia gane says
So want to start making this blanket but not sure of the correct yarn, as I live in South Africa. Would I use a double knit, or a chunky?
Tamara Kelly says
Hi Thalia! This is a worsted weight yarn, which is in between DK and Chunky. If you click on the name of the yarn, you'll go to the Lion Brand page with all the details on it. 🙂
Josie says
I would love to make this pattern for my grt grand daughter who is 11 years old.could you please tell me how to adapt this pattern. She is quite mad about unicorns.many thanks from Josie.
Tamara Kelly says
Hi Josie!
For the blanket, you can add more increase rows until you have the height desired, and then add more rows worked even until you have the width desired. It's the same for the hood - you can custom adjust it to her as you go. 🙂 The ears and horn can stay the same, as will the assembly instructions.
Josie says
Thank you very much.cant wait to start.from josie
Alicia Downs says
Left over purple? Might be the wrong color of purple, but what about a cream (or other color) scarf or hat with purple hearts in honor of our military?
Tamara Kelly says
That is a wonderful idea Alicia, thank you! ♥
Lori J DuBois says
Hi Tamara!
I finished making this cute Unicorn blanket early this morning & would love to send you a pic of how it turned out. Could you tell me how to get the pic to you please? Thanks again for the great pattern!
Lori
Tamara Kelly says
Hi Lori! Thank you! You can share on the Moogly Facebook page, or send me a photo at tamarakelly@mooglyblog.com! Thank you!
Kathy says
Are there instructions available for the mane?
Tamara Kelly says
Hi Kathy! No, I would just tie strands of yarn on the same way I would for fringe, or if I were adding a braid to a children's hat. Here's a link to a photo tutorial (I wouldn't braid the mane of course, but the attaching is the same) https://katiescrochetgoodies.com/2014/04/how-to-add-braids-to-crochet-or-knit-hat.html
Emily says
Making the size 7/8 and it seems as if the pattern might be off. Show the middle be rows 48-61 and then the end rows 62-107? The size 5/6 is 53 rows wide so if the size 7/8 is supposed to be 6" longer shouldn't the middle go further than 53 rows?
Tamara Kelly says
Yes! Oh my gosh, thank you so much for letting me know, I can't believe this one has sat that long with my typo! I'll get that fixed right now. 🙂
Micaela (CAE) says
Oh my goodness! This is SO stinkin' adorable! I am SO going to have to make this! I've just (and still have more to go) shamelessly added a TON of your patterns from the archive to my Pinterest boards and Ravelry! I'm so glad your site has made it so easy to do so! Also, I had to pin the GIF instead of the image because that's so cute! Thank you for sharing this with us even if it is through Lion Brand! Xoxo / Cae
Tamara Kelly says
😀 Thank you so much Micaela!
Sophie says
Hi, i'm not sure to understand the "ERRATA" for the size 7/8. 🙂
Tamara Kelly says
Hi Sophie! The pattern has been updated, so as long as you aren't using an old version printed before 11/3/17 you don't need to worry about it! 🙂
Leann m lewis says
This is so cute! I'm going to start 3 of these for my granddaughters. Two I will have to adjust sizes, they are mid teen years. Maybe do those curly Qs for the name. Then I'm thinking for the 3 grandsons to make it more of a dinosaur. With triangles on the top and down the back of just the hood. This will be for Christmas after next, as I made them all blankets this past Christmas.
Briana C. says
Hi! I'm a little stuck on the hood part. Would you happen to have a picture of what it's supposed to look like before its sewn together? I'm just confused on the decreasing on one side and increasing on the other to keep 10 rows across.
Tamara Kelly says
Hi Briana! It's the same method used when making the body - or am I not understanding the question? It's just square. 🙂
Briana C. says
Its rows 11-15 where it says to keep it evenly to have 10 blocks in each row.
Tamara Kelly says
Did you make the body first? It's the same thing you did for Row 36 – 45: Work Corner to Corner stitch evenly – decrease on one side, and increase on the other, maintaining 35 blocks across for each row. Around the 9 minute mark in the video above should show this too. 🙂
Courtney D says
I absolutely adore this as do my 7 year old identical twin daughters. I am almost done with one the main blanket part of one. I had a question though if it's alright. Had you decided to do a mane on yours, how would you have done it? My girls both want a rainbow mane and I have been mulling it over whole crocheting the blanket and I am looking for ideas.
Tamara Kelly says
I think the same way I'd do fringe - cut the lengths, knot them along the center of the rows. 🙂
Michelle says
Hi there, I have a question about the hood. What are the dimensions? The 3-4 size, would it be 10x10 squares? I've never followed a written C2C pattern. Always a graph, so without a visual of it before assembly, I don't fully understand. Thank you
Tamara Kelly says
The dimensions for each hood are listed in inches next to it's "age" size.
Tanya says
Do you have a picture of the ears before they are assembled? I’m not sure that I am doing them properly and am confused.
Tamara Kelly says
I'm afraid I don't - you just sort of flatten them and sew on the purple bits.
Kristy Kochan says
Do you happen to have a newborn size pattern?
Tamara Kelly says
Not for this pattern I'm afraid, but you can adjust the blanket size by jumping to the decreases when ready!
MJ Slick says
What size hook for the horn?
Tamara Kelly says
The same hook size is used throughout the pattern. 🙂 If you need to change to get the look you like, feel free!
Z says
If I were to make this for a child who wears 10/12 clothing would you have an estimation on how much yarn I would need? Pretty sure I can figure out changing the dimensions but I really suck at figuring out yardage. The child in question is 8 and would love this for her upcoming birthday but she is really fricking tall for her age.
Tamara Kelly says
It's hard to say for sure, but a third skein of the main color (in the same yarn) should be plenty!
Janice Jennings says
Hi just saw your cuddle up unicorn blanket I am up to ro 42 - 53 it says decrease one side and increase on the other side. Sorry but I am not sure how to do thi
Janice
Tamara Kelly says
Hi Janice! I've linked a video tutorial above that will help! 🙂 https://www.mooglyblog.com/corner-to-corner-crochet-c2c/
Janice Jennings says
Wow thankyou Tamara
I love doing the C2c but was confused, but nit confused anymore. Will send a photo once finished.
Thankyou
Janice
Kayla says
Correct me if I’m wrong, but on Round 8 of the Horn, it says sc in next 2, 2sc in next stitch, sc in next 2 stitches. Shouldn’t that be sc in next 4 sets? At least that’s how I did it, with the 4, and it came out right. I’m only bringing notice to it in case there’s a beginner that may not understand increases.
Tamara Kelly says
Hi Kayla! I could've written those instructions two ways. The alternate version for Rnd 8 would be:
Round 8: Working in blo, sc in the next 2 sts, *2 sc in the next st, sc in the next 4 sts; rep from * around until 3 sts rem, 2 sc in the next st, sc in the last 2 sts. (18 sts)
They both say the same thing, I just went with the shorter version. 🙂
Cheri says
I'm trying to understand with Kayla - Round 8 as stated adds up to 21 stitches, not 18. My horn kept suddenly appearing too wide until I stopped and did the math and figured out to do the sc in 4 stitches, 2 sc in next stitch and repeat.
Tamara Kelly says
Hi Cheri! The repeat - "*sc in the next 2 sts, 2 sc in the next st, sc in the next 2 sts" is 5 sts, and you do that repeat 3 times, increasing from 15 to 18.