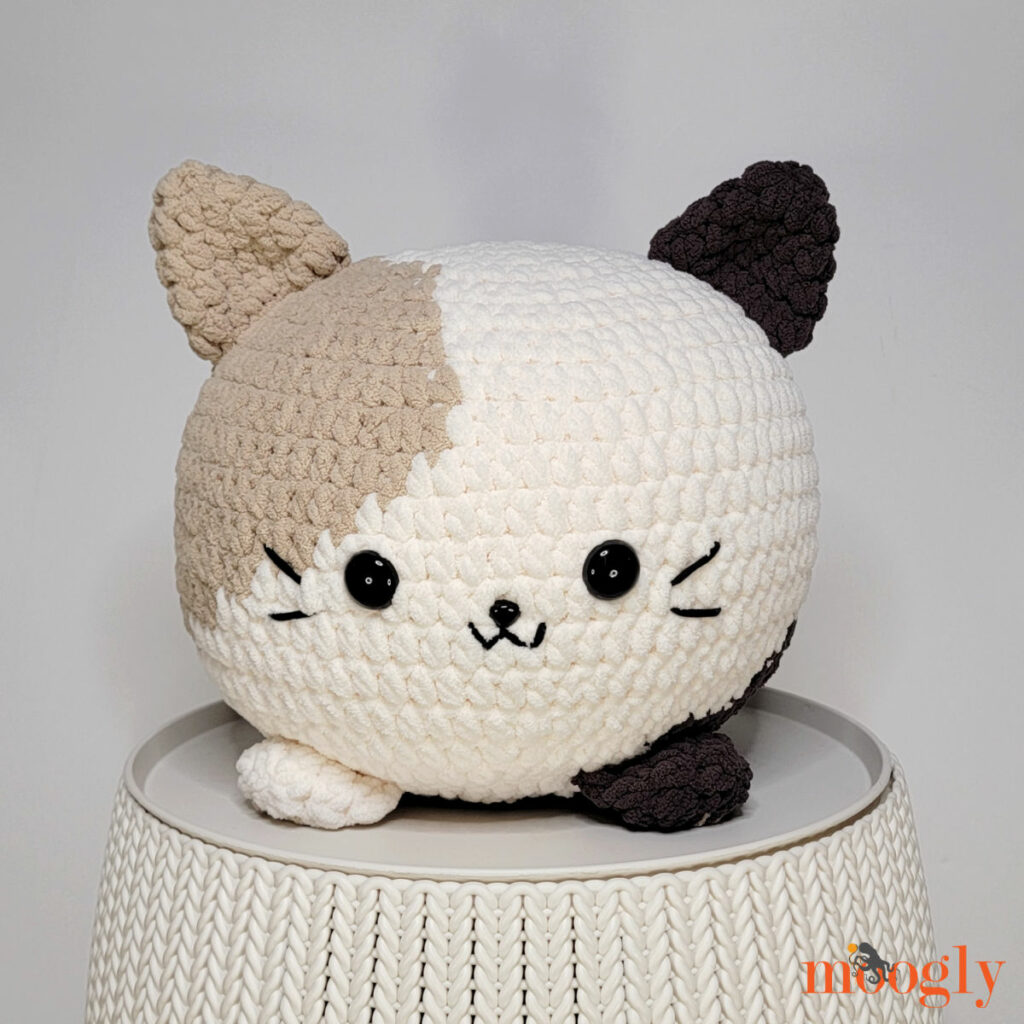
The Cat Squish is a cuddly calico kitty, and a very squishy, free crochet pattern on Moogly! Featuring Bernat Blanket, this pattern will sink its claws right into you - in the most delightful way!
Disclaimer: This post includes affiliate links; materials provided by Yarnspirations.
Prefer an ad-free PDF? You've got options!


Prefer the free blog version? Keep scrolling!
Part of the 2023 Softie Crochet Along on #CALCentralCrochet!

How the 2023 Softie CAL Works
Every Monday from March 20 to June 26, 2023, we’ll share a free crochet pattern for a softie. You can make these softies to keep, for gifts, or to donate to charity while chatting with other crocheters in our groups and sharing your projects to win giveaway prizes!
Don’t forget to enter the giveaway in this post on Underground Crafter by Sunday, July 2, 2023 at 11:59 p.m. Eastern.
How To Join the 2022 Softie CAL
- Sign up for Crochet Along updates and the Underground Crafter newsletter to get regular updates, including an update as each CAL pattern is released - and some amazing bonuses!
- You can join in by crocheting the patterns as you have time.
- Share your progress and post pictures of your finished projects. Tag your projects and posts #CALCentralCrochet on all social media.
- If you’d like to chat with other crocheters, join the CAL Central Facebook group or visit this thread in the CAL Central Ravelry group.
Visit Underground Crafter to learn more about the prizes, enter the end-of-CAL giveaway, and to get links to each Softie CAL post as it is released.
Grab that Bernat Blanket!
I love using Bernat Blanket for my large amigurumi squishes, and the Cat Squish is no exception! For this one I used a standard skein of the white color, and then grabbed an O'Go for the other colors, which I needed just a bit of.

Of course, you can use leftover bits of whatever colors you like to create your own custom cat! And any worsted or bulky weight yarn you have works great for the whisker and mouth details - but I think Bernat Maker Home Dec is purr-fect!

Cute and Cuddly for Kids and Adults
This crochet cat pillow is fun to make - and pet and squeeze! I used safety eyes, but this pattern has not been tested for safety for children under 3 years of age. If you are crocheting it for a baby or toddler, you may wish to embroider on the face and make sure that the pieces are sewn on quite securely. If using it as a photo prop, be sure not to leave the toy with a baby unattended.

Cat Squish
Add this pattern to your Ravelry Queue and Favorites
8.0 mm hook, Susan Bates
235 yds Bernat Blanket (6 - Super Bulky; 100% polyester; 300g/10.5 oz; 201 m/220 yds)
A - Whipped Cream ( less than 1 ball) - white
B - light brown (less than 1 ball)
C - dark brown (less than 1 ball)
Note: This pattern originally used Bernat Blanket O'Go for Colors B and C. This put-up is discontinued, but can be substituted with standard Bernat Blanket.
2 yds Bernat Maker (5 - Bulky; 72% cotton, 28% nylon; 250g/8.8 oz; 317 yds/290 m)
D - Black
10" Microbead Pillow Ball or fiber fill
Gauge: 5"/10cm across after Rnd 3.
Size: approx 10" across/tall excluding ears, feet, and tail

HELPFUL LINKS AND TUTORIALS
NOTES:
Rnds are worked in a spiral.
Do not ch 1 at the beginning of a rnd or join any rnds with a sl st unless specifically directed in the pattern.
Move a stitch marker along the first st of each rnd as you work to keep track of your progress.
When changing colors, finish the last stitch of the previous color with the new color.
Please note that some pieces switch between Rows and Rounds.

CAT SQUISH INSTRUCTIONS:
Body - Colors A, B, and C
NOTE: For the Body, crochet OVER color A, but BREAK color B/C and rejoin for each round.
Rnd 1: With A, make a magic circle, ch 1, sc in the ring, 9 hdc in the ring. (10 sts)
Rnd 2: 2 hdc in each st around. (20 hdc)
Rnd 3: *Hdc in the next st, 2 hdc in the next st; rep from * around. (30 hdc)
Rnd 4: [2 hdc in the next st, hdc in the next 2 sts] 6 times, with B [2 hdc in the next st, hdc in the next 2 sts] 2 times, with A [2 hdc in the next st, hdc in the next 2 sts] 2 times. (40 hdc)
Rnd 5: [Hdc in the next 3 sts, 2 hdc in the next st] 5 times, hdc in the next 3 sts, with B 2 hdc in the next st, [hdc in the next 3 sts, 2 hdc in the next st ] 2 times, hdc in the next st, with A hdc in the next 2 sts, 2 hdc in the next st, hdc in the next 3 sts, 2 hdc in the next st. (50 hdc)
Rnd 6: [Hdc in the next st, 2 hdc in the next st, hdc in the next 3 sts] 5 times, hdc in the next st, 2 hdc in the next st, with B [hdc in the next 4 sts, 2 hdc in the next st] 3 times, with A hdc in the next 4 sts, 2 hdc in the next st, hdc in the next 3 sts. (60 hdc)
Rnd 7: Hdc in the next 5 sts, 2 hdc in the next st, [hdc in the next 9 sts, 2 hdc in the next st] 2 times, hdc in the next 6 sts, with B hdc in the next 3 sts, 2 hdc in the next st, hdc in the next 9 sts, 2 hdc in the next st, hdc in the next 6 sts, with A hdc in the next 3 sts, 2 hdc in the next st, hdc in last 4 sts. (66 hdc)
Rnd 8: [2 hdc in the next st, hdc in the next 10 sts] 3 times, 2 hdc in the next st, with B [hdc in the next 10 sts, 2 hdc in the next st] 2 times, hdc in the next 2 sts, with A hdc in the last 8 sts. (72 hdc)
Rnd 9: Hdc in the next 8 sts, 2 hdc in the next st, hdc in the next 17 sts, 2 hdc in the next st, hdc in the next 11 sts, with B hdc in the next 6 sts, 2 hdc in the next st, hdc in the next 17 sts, 2 hdc in the next st, hdc in the next st, with A hdc in the last 8 sts. (76 hdc)
Rnd 10: Hdc in the next 41 sts, with B hdc in the next 26 sts, with A hdc in the last 9 sts.
Rnd 11: Hdc in the next 42 sts, with B hdc in the next 24 sts, with A hdc in the last 10 sts.
Rnd 12: Hdc in the next 43 sts, with B hdc in the next 22 sts, with A hdc in the last 11 sts.
Rnd 13: Hdc in the next 45 sts, with B hdc in the next 18 sts, with A hdc in the last 13 sts.
Rnd 14: Hdc in the next 47 sts, with B hdc in the next 14 sts, with A hdc in the last 15 sts.
Rnd 15: Hdc in the next 16 sts, with C hdc in the next 4 sts, with A hdc in the next 30 sts, with B hdc in the next 8 sts, with A hdc in the last 18 sts.
Rnd 16: Hdc in the next 11 sts, with C hdc in the next 6 sts, hdc2tog, hdc in the next 6 sts, with A hdc in the next 11 sts, hdc2tog, [hdc in the next 17 sts, hdc2tog] 2 times. (72 sts)
Rnd 17: Hdc in the next 10 sts, with C hdc2tog, hdc in the next 10 sts, hdc2tog, hdc in the next st, with A hdc in the next 9 sts, hdc2tog, [hdc in the next 10 sts, hdc2tog] 3 times. (66 sts)
Rnd 18: Hdc in the next 5 sts, hdc2tog, with C hdc in the next 9 sts, hdc2tog, hdc in the next 8 sts, with A hdc in the next st, hdc2tog, [hdc in the next 9 sts, hdc2tog] 3 times, hdc in the last 4 sts. (60 sts)
Rnd 19: Sc in next st, sl st in next st, break yarn and finish off with seamless join.
Tail - Color A and C
Rnd 1: With C, make a magic circle, ch 1, 6 sc in the ring. (6 sts)
Rnd 2: Sc in each st around, finishing last st with A. Break C.
Rnds 3 - 6: With A, sc in each st around.
Rnds 7 - 9: Loosely sl st in next 2 sts, sc in next 4 sts. After Rnd 9, break yarn leaving a long tail for sewing, and seamless join.

Ears (make 2) - Make 1 in B and 1 in C
Rnd 1: Make a magic circle, ch 1, sc in the ring, 5 hdc in the ring. (6 sts)
Rnd 2: *Hdc in the next st, 2 hdc in the next st; rep from * around. (9 sts)
Rnd 3: *2 hdc in next st, hdc in next 2 sts; rep from * around. (12 sts)
Rnd 4: *Hdc in the next st, 2 hdc in the next st, hdc in the next 2 sts; rep from * around. (15 sts)
Rnd 5: *Hdc in the next 4 sts, 2 hdc in next st; rep from * around. (18 sts)
Rnd 6: Sc in the next st, sl st in next st, break yarn leaving a long tail for sewing, and seamless join.

Feet (make 4) - Make 3 in Color C and 1 in Color A, with Toe Beans in Color B
Rnd 1: Make a magic circle, ch 1, sc in the ring, 6 hdc in the ring. (7 sts)
Rnd 2: 2 hdc in each st around. (14 sts)
Rnd 3: Hdc in next st, sc in next 5 sts, hdc in next 2 sts, sc in the next 5 sts, hdc in next st. (14 sts) Secure active loop with a stitch marker and weave in your first end now.
Add Toe Beans (optional): With Color B, cut a 12" length of yarn. Using a stitch marker, sew three small dashes on one side of the foot, as shown. Weave in ends.

Row 4: Fold piece flat, ch 1, sc through next st and last st, sc through next 6 sets of sts; break yarn and finish off.

Cat Squish Belly - Colors C and A
NOTE: For the Belly Rnds 4-6, crochet OVER color C, but BREAK color A and rejoin for each round.
Rnd 1 - 3: With Color C, rep Rnd 1 - 3 of Body. (30 hdc)
Rnd 4: [2 hdc in the next st, hdc in the next 2 sts] 6 times, with A [2 hdc in the next st, hdc in the next 2 sts] 2 times, with C [2 hdc in the next st, hdc in the next 2 sts] 2 times. (40 hdc)
Rnd 5: [Hdc in the next 3 sts, 2 hdc in the next st] 4 times, with A [hdc in the next 3 sts, 2 hdc in the next st] 5 times, with C hdc in the next 3 sts, 2 hdc in the last st. (50 hdc)
Add Feet: Place stitch markers at st #3 and 9 (first foot - brown), 15 and 21 (second foot - brown), 28 and 34 (third foot - white), and 40 and 46 (fourth foot - brown). Use these stitch markers to attach the last row of each foot to the RS of the belly. Make sure the toe beans face the same direction as the belly.


Rnd 6: Working through both layers as needed, [hdc in the next st, 2 hdc in the next st, hdc in the next 3 sts] 3 times, hdc in the next st, 2 hdc in the next st, hdc in the next 2 sts, with A hdc in the next st, *hdc in the next st, 2 hdc in the next st, hdc in the next 3 sts; rep from * around, finishing last st with C. (60 hdc) Break A leaving a long tail for sewing.
Rnd 7: With C, sc in next st, sl st in next st, break yarn and seamless join, leaving a long tail for sewing.

Ears, Face, and Tail to Body Assembly
NOTE: Orient the Body so that Rnd 19 is in front. The sc st should be in the center front.
1 - Add Safety Eyes: Add safety eyes to body, around Rnds 13 and 14. Use the sc to help with placement.

2 - Add Nose: Add safety nose to body, around Rnds Rows 14 and 15. Use the eyes to help with placement. Tip - if you find your safety nose wants to pull out of the fabric, try adding a small square of felt behind the Body, and before adding the backing.

3 - Add Whiskers and Mouth: Use Color D and a yarn needle to add whiskers and mouth to the face, as shown above.
4 - Sew on Ears: Use the long tails to sew the Ears to opposite sides, around Rnds 5-8. Put the B ear on the same side as the B spot, and the C ear on the same side as the C spot. Sew them on "flat" so that they look like cat ears, with a slight curve if desired. See below for reference.


5 - Sew on Tail: Use the long tail to sew the Tail to back of the Body, around Rnd 17. See below for reference.

Final Cat Squish Assembly
1 - Insert stuffing into body.
2 - Use stitch markers to attach Belly to Body, with the colors mostly matched (A with A, C with C). Adjust as needed so feet look correctly oriented.

3 - Using long tails of Belly, sew Belly to Body with whip stitch in matching colors.

Meow you doin’?
Ready for your next project? Check out the Moogly Free Patterns Page or Ravelry!

If the Cat Squish pattern inspires you to make your own project, and you post a photo on social media, be sure to tag #CALCentralCrochet and me @mooglyblog or #mooglyblog so I can check it out too!
The Fine Print
Follow Moogly on Facebook, Twitter, Pinterest, TikTok, and Instagram! Thank you to Yarnspirations for providing the materials shown in this post. Written pattern copyright Tamara Kelly 2023, all rights reserved. Please do not reprint or repost this pattern, but please do link to this page to share this pattern with others.
If you wish to make items for sale from this pattern or translate it to another language, please visit the About page for details.


sane says
Merci beaucoup pour ce modèle So Cute
Tamara Kelly says
Merci! ♥
Linda says
Where can I find the microbes filler balls at?
Tamara Kelly says
Hi Linda! They are at https://amzn.to/3SUtrrs 🙂
Mary Heindl says
On round 16 the number of stitches are adding up to 55
Not 72
It’s not matching with the written pattern
I know that, I’m doing it correctly
But round 15 has the correct number of stitches
Please help
Mary
Tamara Kelly says
Hi Mary! My best guess is that you missed the "2 times" at the end of the instructions?
Stripping it out to just the numbers for that round, we have 11+6+1+6+11+1+17+1+17+1=72
Toni Monton says
I think it's fixed, it adds up to 72.
Dee says
I made this sweet kitty and omg I think it’s one of the cutest things I have ever made. It didn’t look this perfect but I’m so proud of it. I now want to make ALL the squishies. Thank you so much for the beautiful pattern and instructions. I also followed along on the video as it was very helpful.
Tamara Kelly says
♥ Thank you so much!
Wendy says
I only find 1 color of Bernat Blanket O'go Biscotti online. What other one was used
Wendy says
Never mind. I figured it out lol
Tamara Kelly says
😀 I hope the photo included above helped!
Bonnie Anderson says
Where can I find the pattern for the adorable blue kitty in the ad for the Softie crochet along from earlier this year (2023)?
Thank you!
Tamara Kelly says
Hi Bonnie! I'm not sure - that CAL is put together on Underground Crafter, so she should have the answer: https://undergroundcrafter.com/2023/03/20/2023-softie-crochet-along/ 🙂
Bonnie Anderson says
Thank you!
Roxy says
Grazieeeee è bellissimo, proverò a farlo per utilizzarlo come fermaporta 🤩
Linda Heron says
Did you ever find the pattern for the blue kitty? If so can you share a link of where to find it. It is adorable.
Maria says
Hello
I was wondering if there is a visual tutorial on YouTube? I never could understand how to read and follow a crochet pattern .
I want to make this cute cat for my great granddaughter . I would need step my step instructions as to follow along .
I have crocheted blankets and granny squares from watching YouTube , so I understand crocheting.
I really hope you have a YouTube Video with step by step instructions.
Thank you for sharing this so adorable cat.
Tamara Kelly says
Hi Maria! This pattern is primary just hdc stitches worked in a spiral, so it would just be me reading the pattern out loud and making hdc stitches. All the add on parts, like ears and feet, are shown step by step, but the body parts stop after the first few rounds, as they are all the same except for color changes. https://www.mooglyblog.com/cat-squish-tutorial/
Linda Heron says
Never got the pattern
Vicki says
I am having a problem with row 6. It says that after changing back to color A to do 4 hdc, 2 hdc in the next st, hdc in next 3 sts. I only have enough stitches for the 3 hdcs. I am using stitch markers and have checked my stitches for every row. Thank you for such a great pattern!
Tamara Kelly says
Oh my gosh, thank you so much for letting me know! The repeat 4 times should have been a 3 - editing it now! Thank you again for letting me know!
April Omoto says
I am working the belly now and it says Rounds 1-3: rep round 1-4 of body (40 HDC). I am assuming that it really is rounds 1-3 for 30 cdc and then round 4 continues in the next line. Just want to make sure that is the case.
Tamara Kelly says
Whoops! Thank you so much, it's fixed! And yes, you are correct. 🙂
Kristina says
I’m on round 4 and it says 2 hdc in next st, hdc in next 2 in color A 2 times, then goes on to repeat those instructions again to make 40 stitches. Do I change colors again or are both sets of instructions in color A?
Tamara Kelly says
Hi Kristina! Here's a cut and paste of Rnd 4:
Rnd 4: [2 hdc in the next st, hdc in the next 2 sts] 6 times, with B [2 hdc in the next st, hdc in the next 2 sts] 2 times, with A [2 hdc in the next st, hdc in the next 2 sts] 2 times. (40 hdc)
So to break it down, you do:
Color A: 2 hdc in the next st, hdc in the next 2 sts (4 sts)
Color A: 2 hdc in the next st, hdc in the next 2 sts (8 sts)
Color A: 2 hdc in the next st, hdc in the next 2 sts (12 sts)
Color A: 2 hdc in the next st, hdc in the next 2 sts (16 sts)
Color A: 2 hdc in the next st, hdc in the next 2 sts (20 sts)
Color A: 2 hdc in the next st, hdc in the next 2 sts (24 sts)
Color B: 2 hdc in the next st, hdc in the next 2 sts (28 sts)
Color B: 2 hdc in the next st, hdc in the next 2 sts (32 sts)
Color A: 2 hdc in the next st, hdc in the next 2 sts (36 sts)
Color A: 2 hdc in the next st, hdc in the next 2 sts (40 sts)
Does that help?
Alexandra says
Oh my goodness - this is my favorite Squish!
Tamara Kelly says
♥ Thank you so much!
Belinda says
This cat is absolutely adorable!! I love it! I think I'll make one for myself. Thank you!😊
Tamara Kelly says
♥ Thank you so much!
Karen Moore says
I'm doing the cat in white as the main color, and pink and gray as the patches. I'm using Just Chenille yarn to make it really soft and squishy. I have holes in my finished rows. Should I go down a hook size? I'm already going to rip it out so no worries on saving what I have already done lol. Also, do I just lay the white strand down and crochet over it on the patches parts. Won't this show through? PS Iove this kitty so much! I'm making some for my granddaughters for Christmas.
Thanks, Karen
Tamara Kelly says
Hi Karen!
It does sound like going down a hook size will help! You do crochet over the white, a little might peek out but you can hold it behind, and you don't have to crochet over it with *each* stitch, just enough to carry it along!
Karen Moore says
OK 😊 thanks
Leanne says
Hi, I'm no longer having an issue with the belly. I figured it out (insert palm to face here) lol.
Tamara Kelly says
I'm so glad! ♥
Sarah Larue says
I made this cat squish for my mother in law’s birthday and she absolutely loved it! I used Bernat plush yarn and totally love that stuff
Tamara Kelly says
♥ Thank you so much!!!
Toni Monton says
I'd like to know what people used for stuffing and which they preferred. This cat is adorable and I want to get it just right. Thanks!
My says
Please help. I used velvet yarn with 4.5mm hook as recommended on the yarn label, I have done 6 rows, but instead of hdc I did sc, and it is not flat but kind of wavy as if there were too many stitches. Why is it like that? Is it because I did sc, or the wrong size of the hook?
(I tried hdc but after 2 rows it was already wavy, I thought my hdc were too tight).
Tamara Kelly says
Hi My! It shoulds smooth out as you go, but I've not worked this pattern in velvet to be sure.
My says
Thanks a lot for your reply. I will continue and see how how it turns out. Very lovely cat, cow, pig, bunny I want to make all of them. Thanks for sharing your patterns.
Sandy says
Just found this pattern and decided to give it a try. Question about Round 19 of the body. Is that supposed to be one sc, the one slip stitch around the whole spiral or just two stitches and then fasten off?
Tamara Kelly says
Hi Sandy! Rnd 19 is just a few stitches to be able to taper down the "jog" created by working in a spiral. 🙂
Ewa says
Hi, I really can’t understand this belly start off. Do we start with 10 hdc in magic circle and then round 2 and 3 each 10 hdc?
Tamara Kelly says
Hi Ewa! The first 3 rounds of the Belly are exactly the same as the first 3 rounds of the Body, made with Color C!
Gert Wister says
Now that Bernat Blanket and Baby Blanket yarns are discontinued, what yarn(s) are you using for these patterns? Having a difficult time finding [6] yarn. Thanks.
Tamara Kelly says
Hi Gert! While the O'Go style of skein has been discontinued, the standard skein version of Bernat Blanket has not - at least as far as I know!
Faith says
I was wondering if you had a pattern for a tuxedo cat squish or could make one?
Tamara Kelly says
I don't, it would just be a matter of figuring out where to put the color changes, right?
黄金の光 says
I love this squish
Tamara Kelly says
Thank you so mucH!!
Dee Overturf says
I have made two of your squishies (cat and penguin) and they were so easy to follow and the instructions very clear. Thank you for all the amazing patterns!
Tamara Kelly says
Thank you so much, Dee! ♥
Carleen says
Hi, is the pattern in US or UK stitches? Also my LO wants me to make it a little longer in the belly area so he can sleep on it, where would you suggest to put extra rows please?
Also thank you for your time and effort into this amazing pattern 🥰
Tamara Kelly says
Hi Carleen! They are in US terms! 🙂 I would add more repeats to the Rnds 10-15 section where you're just working even. 🙂 Thank you so much!