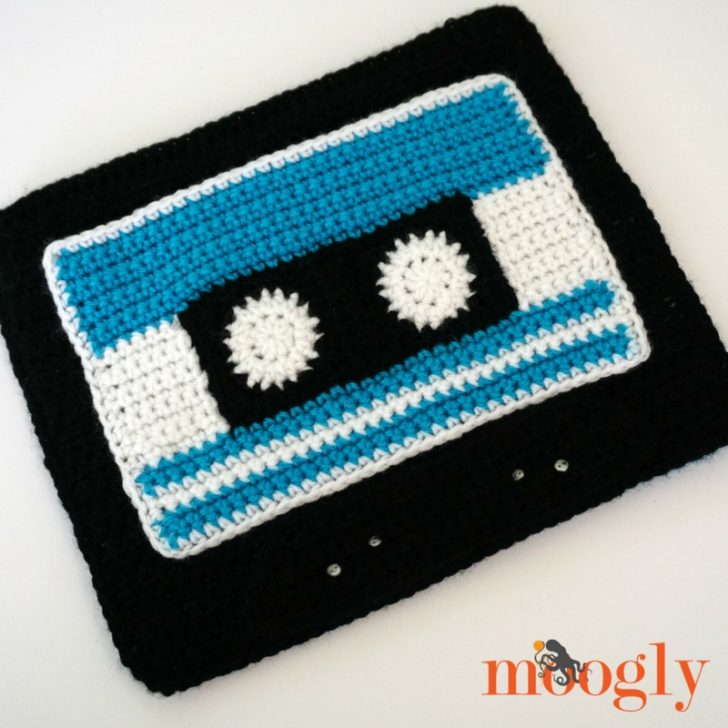
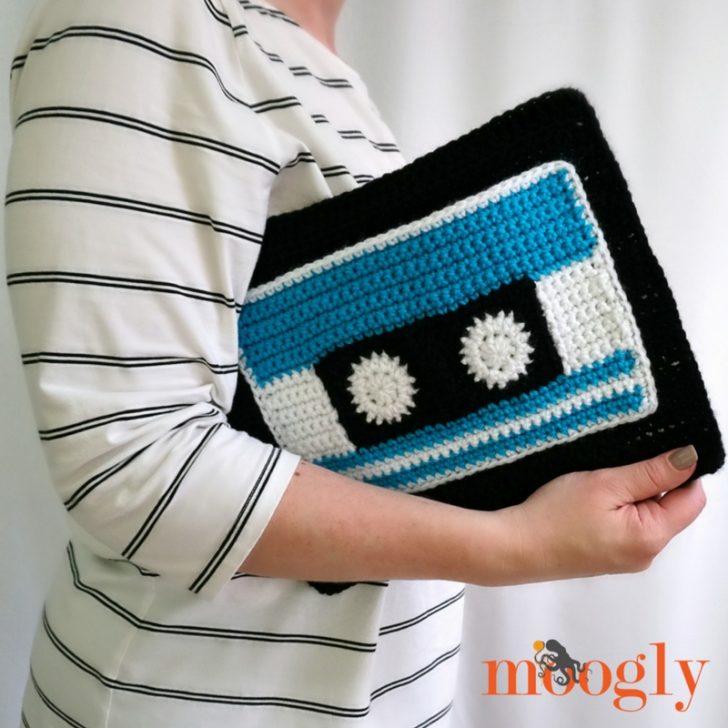
It's all about 90s retro these days, and what's more retro than the cassette tape?! The Cassette Tape Pouch is the perfect clutch to carry when you're at the party for your hot new mixtape - or to fill with pencils and supplies when the kids go back to school this fall!
Disclaimer: This post includes affiliate links; material support provided by Lion Brand Yarn and Dritz.
Prefer an ad-free PDF? You've got options!


Prefer the free blog version? Keep scrolling!
Simple Stitches, Big Effect
The Cassette Tape Pouch is so much fun to make! Just a few small pieces come together to give this fun retro look - all the stitches are simple, but the effect is... well, pretty effective! It's a great pattern to customize, and made with Lion Brand Vanna's Choice is great for kids, adults, and your entire gift list!
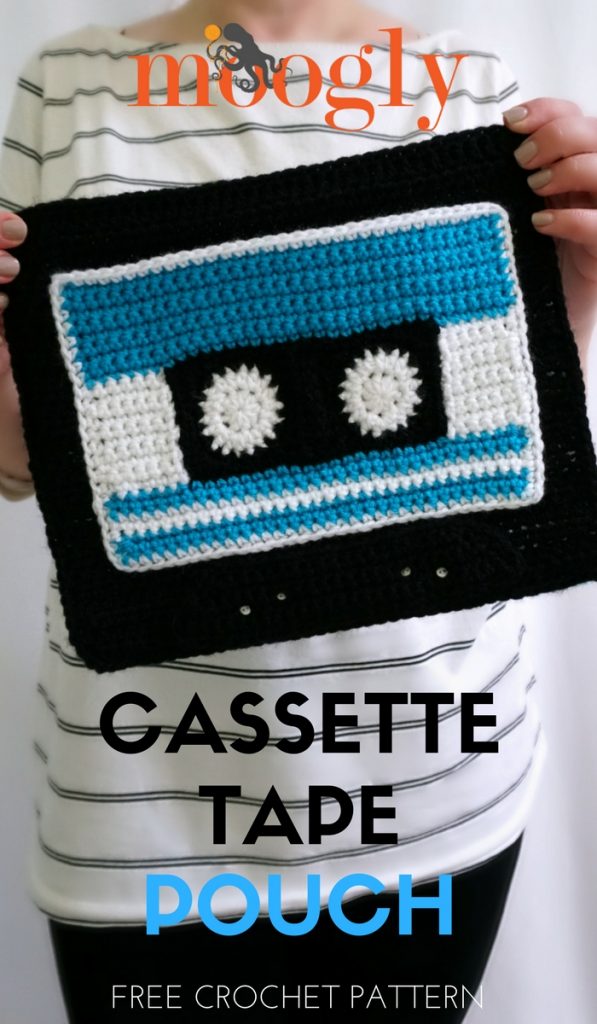
Cassette Tape Pouch
Add this pattern to your Ravelry Queue and Favorites
US-I. 5.5mm hook - Furls Crochet
310 yds Lion Brand Vanna's Choice (Aran/yarn symbol “4”/UK: 10 ply; 145 yds; 3oz)
A: White (1 ball, or 90 yds)
B: Black (1 ball, or 140 yds)
C: Aqua (1 ball, or 80 yds)
Zipper - 20" black
4 Buttons (optional)
Stitch Markers - Clover
Gauge: 14 sts x 16 rows = 4" / 10 cm in sc
Finished Size: 12" wide x 10" tall (laid flat)
Helpful Links and Tutorials
NOTE: Make the pieces in the order listed.
INSTRUCTIONS
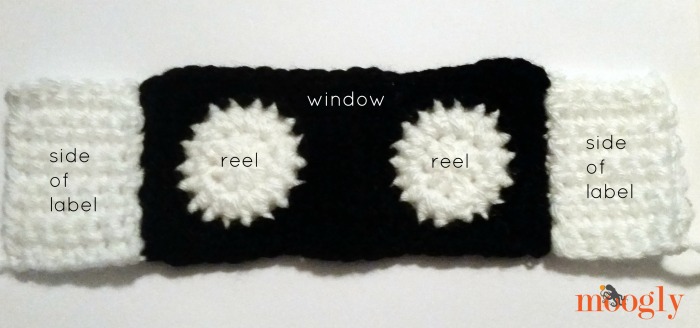
Reels - Make 2:
Rnd 1: With Color A, make a magic circle, ch 1, 9 hdc in the ring; join. (9 sts)
Rnd 2: Ch 1, 2 hdc in each st around; join and break yarn. (18 sts)
Rnd 3: With Color B, join with sc in any st, 2 sc in next st, *sc in next st, 2 sc in next st; join and break yarn. (27 sts)
Window - Joins the Reels:
Row 1: With Color B, join to any st of one Reel with dc, hdc in next 2 sts, sc in next 3 sts, hdc in next 2 sts, dc in next st; turn (remaining sts left unworked). (9 sts)
Row 2: Ch 2, dc in each st across; turn. (9 sts)
Row 3: Ch 2, dc in 1st st, hdc in next 2 sts, sc in next 3 sts, hdc in next 2 sts, dc in last st; break yarn leaving long tail. (9 sts) Use the long tail to whipstitch Row 3 to any 9 sts of second Reel.
Edging: With Color B, join to 1st unworked st of any Reel with sc, *sc in next 3 sts, hdc in next st, (2 hdc, dc, 2 hdc) in next st, hdc in next st, sc in next 4 sts, hdc in next st, (2 hdc, dc, 2 hdc) in next st, hdc in next st, sc in next 4 sts, sc 6 evenly across Rows 1-3;** sc in next unworked st of second Reel; rep from * around, join and break yarn. (64 sts)
Sides of Label Sticker - Make 2:
Row 1: With Color A, ch 7, sc in 2nd ch from hook and each rem ch across; turn. (6 sts)
Rows 2 - 10: Ch 1, sc in each st across; turn. (6 sts) Break yarn leaving long tail after Row 10. Use the long tail to whipstitch one Side of Label Sticker to each end of Reels, as shown below.
Top of Label Sticker:
Row 1: With Color C, join to upper right corner (or upper left if crocheting left handed) with sc, sc evenly across to opposite corner; turn. (33 sts)
Rows 2 - 9: Ch 1, sc in each st across; turn. (33 sts) Break yarn after Row 9.
Bottom of Label Sticker - Turn to work along opposite side of Reels/Window piece, from RS:
Row 1: With Color C, join to upper corner with sc, sc evenly across; turn. (33 sts)
Row 2: Ch 1, sc in each st across; turn. (33 sts)
Row 3: With Color A, ch 1, sc in each st across; turn. (33 sts)
Row 4: Rep Row 2.
Row 5: With Color C, rep Row 3.
Row 6: Rep Row 2, break Color C.
Edging: With Color A, ch 1, sc evenly around entire Label; join and break yarn. Personalize Label with surface crochet, appliques, buttons, etc if desired. Set Label aside.
Thick Bottom - The trapezoid of plastic at the bottom of a standard cassette tape:
Row 1: With Color B, ch 28, sc in 2nd ch from hook and each rem ch across; turn. (27 sts)
Row 2: Ch 1, sc2tog, sc in next 3 sts, ch 1, sk 1 st, sc in next 15 sts, ch 1, sk 1 st, sc in next 3 sts, sc2tog; turn. (23 sts, 2 chs)
Row 3: Ch 1, sc2tog, sc in next 5 sts (inc ch sp), ch 1, sk 1 st, sc in next 9 sts, ch 1, sk 1 st, sc in next 5 sts (inc ch sp), sc2tog; turn. (21 sts, 2 chs)
Row 4: Ch 1, sc2tog, sc in next 19 sts (inc ch sps), sc2tog; turn. (21 sts)
Row 5: Ch 1, sc2tog, sc in next 17 sts, sc2tog; turn. (19 sts)
Edging: Ch 1, sc evenly around entire piece; join and break. Set Thick Bottom aside.
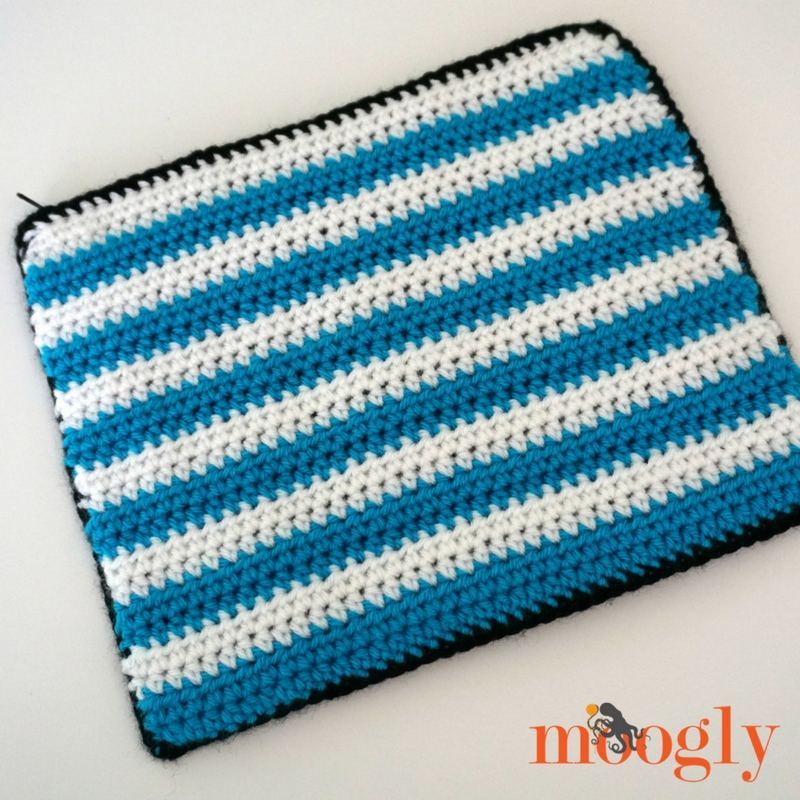
Back of Pouch:
Row 1: With Color C, ch 40, hdc in 2nd ch from hook and each rem ch across; turn. (39 sts)
Row 2: Ch 1, hdc in each st across; turn. (39 sts)
Row 3: With Color A, ch 1, hdc in each st across; turn. (33 sts)
Row 4: Rep Row 2.
Rows 5 and 6: With Color C, rep Rows 3 and 4.
Row 7 - 24: Rep Rows 3 - 6. Break both yarns after Row 24. Set Back of Pouch aside.
Front of Pouch - Add rows if needed to match size of Back of Pouch:
Row 1: With Color B, ch 40, hdc in 2nd ch from hook and each rem ch across; turn. (39 sts)
Row 2 - 24: Ch 1, hdc in each st across; turn. (39 sts) Break yarn after Row 24 or secure active loop of Row 24 with st marker.
Assembly and Finishing:
1: Sew Thick Bottom to center bottom edge of Front of Pouch.
2: Sew Buttons (optional) into the ch-1 holes left in Thick Bottom, going through Front of Pouch.
3: Sew Label to Front of Pouch as shown, leaving top open to serve as a front pocket.
4: Shorten zipper as needed per package directions.
Step 5: Reinsert hook in active loop of Color B or join to first st of Front of Pouch with sc, sc evenly around pouch opening enclosing zipper in stitches (see package directions); join and break.
OR Sc evenly around without zipper; join and break, and proceed to Step 6.
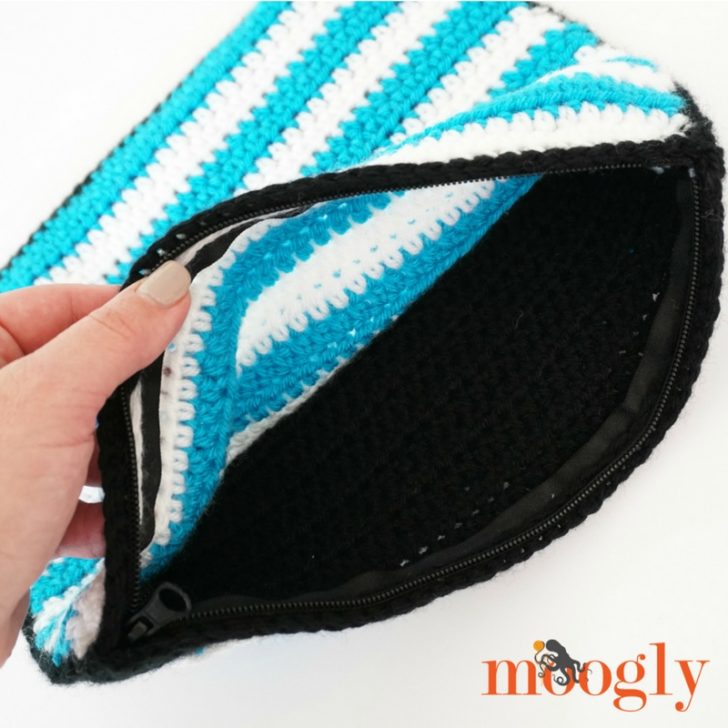
Step 6: Sew zipper to base of last round of stitching with matching yarn if not secured in previous round; weave in ends.
So what will you put in your Cassette Tape Pouch? Will you carry it as an awesome retro fun clutch, or fill it with stuff for the kids?
The Cassette Tape Pouch free crochet pattern makes a great sized bag, and I can't wait to see how you all personalize yours! Add a name, add musical note appliques, add more colors - make it your own hot mixtape of crochet! Be sure to share your photos with me on social media - I love to see what you make!
The Fine Print
Written pattern copyright Tamara Kelly 2017, all rights reserved. Please do not reprint or repost this pattern, but please do link to this page to share this pattern with others. If you wish to make items for sale from this pattern or translate it to another language, please visit the About page for details. Thank you to Lion Brand Yarn for providing the yarn, and thank you to Dritz for providing the zipper for this pattern.


LeAnn carver says
I can't wait to make this!!! Thanks, Tamara!!!!!
Tamara Kelly says
😀 Thank you so much LeAnn!
Julie says
I LOVE THIS SO MUCH. As soon as I have the time I'm going to make this. I'm going to make mine based off Guardians Of The Galaxy !!!
Tamara Kelly says
😀 Thank you so much Julie! That will be awesome!! (If you share pics online, I'd love to see it!)
Erica says
Great Pattern! This will be the perfect Christmas gift!
Any recommendations for increasing the size to make it a little larger to be a pillow? Should I just expand the edging?
Tamara Kelly says
Thank you! 😀 The Back of Pouch/Front of Pouch can be easily customized to fit any pillow size, so adding the "pocket" should work as is - or if you are going *really* big, you could make the pocket portion with 2 strands held together and a bigger hook! 🙂