
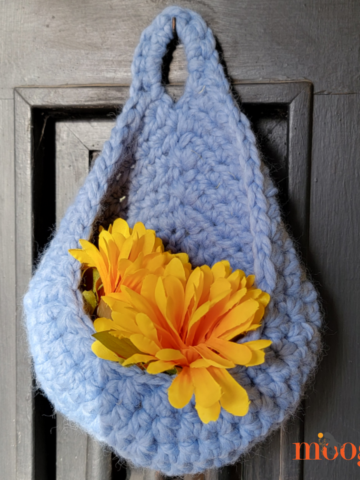
Wreaths are fine and lovely, but what about celebrating spring with a giant carrot? This Carrot Door Basket is fun, spring-y, and full of life - and a free crochet pattern on Moogly!
Disclaimer: This post includes affiliate links; material provided by Yarnspirations.
Prefer an ad-free PDF? You've got options!


Prefer the free blog version? Keep scrolling!
Good for Your Eyes
Okay, so it turns out that whole eating carrots for your eyes thing is a myth. But the Carrot Door Basket is a great way to make your eyes smile by adding some festive fun to your front door! Add artificial greenery for a big look that's low maintenance, that you can enjoy year after year.

A Quick Last Minute Make
You can whip up the Carrot Door Basket in an evening, using supplies available from your local craft store - Bernat Blanket, a bit of fiberfill, a foam ball, and some artificial greenery. Or stuff it with their Easter goodies for a unique basket they won't forget!

Carrot Door Basket
Add this pattern to your Ravelry Queue and Favorites
US - M, 9.0 mm - Susan Bates
125 yds Bernat Blanket (6 - Super Bulky; 220 yds/201 m; 10.5oz)
Colorway used: Orange Leaf (1 ball)
5.7" foam ball for artificial flowers
Gauge: 9 ldc x 4.5 rows = 4" in pattern
Finished Size: Approx 15" long, assembled, excluding greenery
Helpful Links and Tutorials
CSDC - Chainless Starting Double Crochet
Special Stitch:
CSDC/dc2tog - pull up st loop to the height of a dc st, yo with loop, insert hook in first st, yo and pull up a loop, yo and pull through 2 loops, yo and insert hook into next st, yo and pull up a loop, yo and pull through 2 loops, yo and pull through rem 3 loops to finish st.
NOTE:
Only the first rnd is worked in the round. Do not join at the end of the rows after that.
Carrot Door Basket INSTRUCTIONS:
Rnd 1 [RS]: Make a magic circle, work CSDC and 5 dc in ring; join with a sl st. (6 sts)
Row 2 [RS]: (CSDC, ldc) in first st, ldc in next st, [2 ldc in next st, ldc in next st] twice; turn. (9 sts)
Row 3 [WS]: (CSDC, ldc) in first st, ldc in next 2 sts, [2 ldc in next st, ldc in next 2 sts] twice; turn. (12 sts)
Row 4: (CSDC, ldc) in first st, ldc in next 3 sts, [2 ldc in next st, ldc in next 3 sts] twice; turn. (15 sts)
Row 5: (CSDC, ldc) in first st, ldc in next 4 sts, [2 ldc in next st, ldc in next 4 sts] twice; turn. (18 sts)
Row 6: (CSDC, dc) in first st, ldc in next 5 sts, [2 ldc in next st, ldc in next 5 sts] twice; turn. (21 sts)
Row 7: (CSDC, dc in first st), ldc in next 6 sts, [2 dc in next st, ldc in next 6 sts] twice; turn. (24 sts)
Row 8: CSDC in first st, ldc in next 2 sts, [2 ldc in next st, ldc in next 7 sts] twice, 2 ldc in next st, ldc in last 4 sts; turn. (27 sts)
Row 9: CSDC in first st, ldc in next st, [2 ldc in next st, ldc in next 8 sts] twice, 2 ldc in next st, ldc in last 6 sts; turn. (30 sts)
Row 10: (CSDC, ldc) in first st, ldc in next 9 sts, [2 ldc in next st, ldc in next 9 sts] twice; turn. (33 sts)
Row 11: (CSDC, ldc) in the first st, ldc in the next 10 sts, [2 ldc in next st, ldc in next 10 sts] twice; turn. (36 sts)
Row 12: CSDC in first st, ldc in next 4 sts, [2 ldc in next st, ldc in next 11 sts] twice, 2 ldc in next st, ldc in last 6 sts; turn. (39 sts)
Row 13: CSCD in first st, ldc in next 2 sts, [2 ldc in next st, ldc in next 12 sts] twice, 2 ldc in next st, ldc in last 9 sts; turn. (42 sts)
Row 14: (CSDC, ldc) in the first st, ldc in the next 13 sts, [2 ldc in next st, ldc in next 13 sts] twice; turn. (45 sts)
Row 15: (CSDC, ldc) in the first st, ldc in the next 14 sts, [2 ldc in next st, ldc in next 14 sts] twice; turn. (48 sts)
Row 16: CSDC in first st, ldc in next 3 sts, [2 ldc in next st, ldc in next 15 sts] twice, 2 ldc in next st, ldc in last 11 sts; turn. (51 sts)
Row 17: CSDC in first st, ldc in next 3 sts, [2 ldc in next st, ldc in next 16 sts] twice, 2 ldc in next st, ldc in last 12 sts; turn. (54 sts)
Row 18: CSDC/dc2tog in first 2 sts, dc2tog around; break yarn leaving a long tail for seaming. (27 sts) Use this tail to seam the carrot together, from Row 18 down to Row 2. Weave in ends.

Hanging Loop and Drawstring:
Ch for 22" or to the desired length; break yarn and set aside.
Assembly instructions:
Fill tip of carrot with fiberfill, leaving space at the top for the foam ball.
Insert foam ball in top of carrot. Add more fiberfill around top edge of ball if desired.

Weave drawstring between posts of sts of last row, joining in back at the seam. Weave in ends.

Add greenery to center top of foam ball.

Use the drawstring to gather the top of the carrot around the greenery, and to hang finished carrot.
Looking for more free food crochet patterns? Or perhaps some last-minute Easter patterns? Looking for something else? Check out the Moogly Free Patterns Page or Ravelry!

THE FINE PRINT
Follow Moogly on Facebook, Twitter, Pinterest, and Instagram! Thank you to Yarnspirations for providing the materials shown in this post. Written pattern copyright Tamara Kelly 2021, all rights reserved. Please do not reprint or repost this pattern, but please do link to this page to share this pattern with others.
If you wish to make items for sale from this pattern or translate it to another language, please visit the About page for details.


Jackie says
This pattern is adorable !
Alexandra says
This is so awesome! I have seen many carrot wreaths, but none like this one!
Virginia says
I love this carrot and the pattern looks very easy to make.
Tamara Kelly says
Thank you so much! ♥