Last weekend the clan and I headed off to Brookfield Zoo, one of the best zoos in the Midwest. While packing, I realized I was looking at hauling five stainless steel water bottles around for 6+ hours. Not to mention lunch, snacks, sunscreen, etc etc. Oof! It was time for a redistribution of weight - and at 10pm with a 5:30am wake up call, I wasn't going to be running to the store. One big ball of yarn and hook to the rescue!
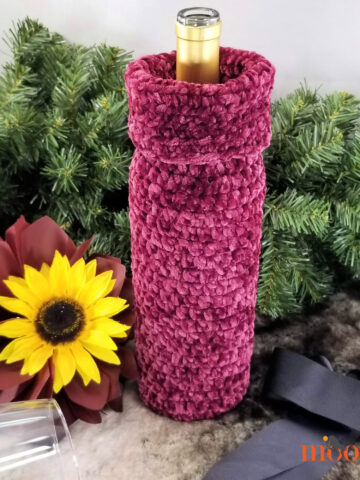
 I made the first Stainless Steel Water Bottle Sling that night, and two more in the car on the way to the zoo (don't worry, I didn't drive). The pattern is easy to memorize, and fit all three kid's water bottles we brought, even though they were all different sizes and manufacturers. The only alterations I made between them were to make two different "heights" to accommodate a shorter and taller bottle - seen above on my two handsome models. If you have a particularly wide bottle, you can just add a couple rounds to the bottom using standard increases, as in the pattern.
The kids carried their bottles all day long without a single complaint - and these are kids who occasionally moan about carrying their own towels to the pool. Breathable cotton yarn and wide straps that weren't too long made them comfortable and easy to use - and washable to boot! We'll be using these on all our outings from now on - hiking, park trips, zoo visits, you name it!


Stainless Steel Water Bottle Sling
Add this pattern to your Ravelry Queue
- US - I, 5.5mm hook
- 100-200 yards worsted weight kitchen cotton yarn (Recommended: Lily Sugar'n Cream)
- Start with a Magic Circle, working 6 sc into the ring. Join to first sc with a sl st, and ch1. Pull starting end to tighten circle.
- Sc twice into each st around. (12 sc) Join to first sc with a sl st, and ch1.
- *Sc in next st, then work 2sc into next st. Repeat from * to end. (18 sc) Join to first sc with a sl st, and ch1.
- *Sc in next 2 sts, then work 2sc into next st. Repeat from * to end. (24 sc) Join to first sc with a sl st, and ch1.
- *Sc in next 3 sts, then work 2sc into next st. Repeat from * to end. (30 sc) Join to first sc with a sl st, and ch1.

- Working in BLO, sc evenly around. (30 sc). Join to first sc with a sl st, and ch1.
- Sc evenly around. (30 sc) Join to first sc with a sl st.

- Ch 4 (counts as first dc and ch), sk first 2 sts, and dc in the next st.
 *Ch 1, sk next st, dc in next st. Repeat from * until 1 st remains. Ch 1 and join with a sl st in the ch 4 sp. (15 dc and 15 ch)
- Ch 4. *Skip next dc and dc in next ch sp, then ch 1. Repeat to end. Join with sl st in the ch 4 sp. (15 dc and 15 ch)

- Repeat Row 9.
- Ch 1 and sc twice in each ch sp around. (30 sc) Join with sl st to first sc.
- Ch 1 and sc evenly around. (30 sc). Join with sl st to first sc.
, then sc evenly around.")
- Repeat Row 8.
- Repeat Row 9.
- Repeat Row 10.
- Repeat Row 11.
- Repeat Row 12.
- If your water bottle is the shorter type, approximately 6-8 inches tall, then move to the Strap directions below. If your water bottle is taller, approximately 8-10 inches, repeat Rows 8-12 once more moving on to the Strap.
Make the Strap:
- Ch 2 and dc in the same st. Dc in the next 5 sts. Turn.
- Repeat Row 1 until desired length is reached.
 Remember that the strap will stretch a few inches, especially with a full water bottle inside, so make it a bit shorter than you want it to hang. For reference, I made about 40 rows for my 5 year old, 42 rows for my 6 year old, and 50 rows for my 10 year old.
 - Break the yarn, leaving 6-12" inches for sewing, and finish off. Use this tail to whip stitch the strap tightly to the opposite side of the opening. The strap is 6 sts wide and the opening is 30 sts around, so you should have 9 sts between the strap ends on each side.

- In the middle of one side of the opening, away from the handles, join the yarn with a sl st and ch 1. Sc evenly around the opening and along the side of the handle, working a sc2tog over each corner, as shown below - this gives nice tight angles for the handle and adds a little sturdiness.
 Come back around to the first sc and use the seamless join to finish off. Then repeat on other side of the sling and handle. Next, weave in ends.
 And that's all there is to it! It took me about an hour and to make each sling, and the payoff was well worth it. The kids carried their own water, no whining occurred (well, not about that at least), and we have the perfect accessory for our next summer outing. I'm sure they'll get a ton of use next week with the 4th of July holiday. Enjoy your summer vacation and drink your water!

Pattern and photos copyright Tamara Kelly 2012. Be sure to Like the moogly Facebook page for the latest updates and have some fun with us! You can email me at TamaraKelly@mooglyblog.com. Please do not reprint this pattern, but please do feel free to link to this page to share with others. For seller info, see the About page.


Joan C. Monahan says
I was reading the pattern on how to make this water bottle cozy and got an idea. How about making the strap say the 50 row length and put button holes an inch apart or so at the end of the strap. Then put a button on the inside of the top of the cozy so you could adjust the length, making it a one-size-fits-all? I haven't tried making it yet. It was just a thought that came to me. What do you think?
Joan Monahan
moogly says
Joan I think that's a great idea! 😀
Gloria E Acevedo says
Yes you can I've done it with a couple of pieces I've done.
Ellie says
How would you crochet the buttonholes? Or would you use a sewing machine on the crocheted strap?
I love the idea, just not sure how to execute it!
Tamara Kelly says
The easiest way to create button holes is to simple chain and skip enough stitches to create the right sized hole for your button, and then work the next row across all the chains. 🙂
Jenna Carodiskey-Wiebe says
I love making these...I have sent my kids to camp with them, and they make GREAT dance teacher gifts!
moogly says
Great idea Jenna!
Stacy says
Can 4 ply. Yarn hold a 1 liter bottle of water?
Tamara Kelly says
It all depends on the strength of the fibers - I'd say if it's easy to break with your hands, it wouldn't be a good fit.
Gerry Terry says
I just finished my 1st one,I used Sugar n Cream in an ombre color,it looks great,will be making alot more for my active family,especially since we are in our 4th heat wave.Your directions were easy to follow ,Thank you GT
moogly says
Yay, I'm so glad it worked out for you Gerry! Thanks for posting!
Angelina A Larocque says
This idea is so brilliant. I'm going to crochet some for my family & friends. Thank you for a great idea.
Leslie Roussel says
Each of my nieces and nephews, grown kids and grand-kids will bet getting these! Great idea, and good way to use up leftover yarn.
I have ideas for an adjustable strap, and will let you know how they turn out.
moogly says
So glad you like it! And I can't wait to see that adjustable strap - great modification idea!
Myra says
Just finished one in red cotton, great idea also for adults. This one is for me:) I wanted to post a photo, but didn't find out how:)
moogly says
Glad you like it Myra! If you like, you can post a picture over on the facebook page! I'd love to see it!
Jenn L says
I grew up in Brookfield! We used to joke around that my sister was born on Goat Island and my brother in Tropic World. I probably came from the snake house 😀
moogly says
LOL! We love it there! Well, the zoo part anyway. 😛
myra says
Just discovered your answer:) thanks, I shall post the picture on your facebook page.
janie says
I'm going to make one of these to use when riding as a passenger on our motorcycle. I don't have anywhere to attach a cupholder. This will work for my coffee mug, water bottle or soda.
Thanks!
moogly says
You're welcome janie! 😀 Enjoy your Fall rides!
Elizabeth says
I just completed one of these and am looking forward to using it to go to the gym! Thanks for posting such great, simple, useful patterns for we excited beginners.
moogly says
You are very welcome Elizabeth! 😀
Christine says
I love this idea! I found it on Ravelry while searching for things to make out of a big pile of cotton I have. I am specifically looking for things to make that I can sell for a fundraiser. Do you mind if I use your pattern for that purpose?
Tamara Kelly says
Thank you, and please do Christine! You can read the full sellers policy here: https://www.mooglyblog.com/about-moogly/
Christine says
Wonderful - thank you!
Sharon A. Moles says
I want the pattern for crocheted sandles for the toes?
Tamara Kelly says
Hi Sharon! I think this is the roundup you're looking for: https://www.mooglyblog.com/barefoot-sandals/
Patricia Seaton says
Thanks for a great pattern. This worked up so nicely and pattern was clear,easy to follow. I had white and two shades of blue cotton that I used for my husband's. He uses the stainless steel water bottles - the sling can absorb the "sweat". Now I want to make them for everyone, myself included.
Tamara Kelly says
😀 So glad you both enjoy the pattern! My boys use there's every day for their summer day camp, and the originals are still going strong!
juliw says
love this...easy and nice...now I wont have to carry the bottles
maria says
Just wondering, since I don't live in the US, why are you particular about using stainless steel water bottles and not plastic?
Tamara Kelly says
Personally we don't use them because until recently it was difficult to find plastic bottles without BPA. And the stainless steel ones just stood up to kid abuse better! And for the pattern, because stainless steel bottles are usually the same diameter, as opposed to plastic which tends to come in all different sizes. But of course you can put any bottle type you like in there! 🙂
JenB says
I LOVE this pattern (I love all your stuff!).
I would like to try making one with plarn!
Tamara Kelly says
😀 Thanks Jen! Great idea!
Cayty says
I tweaked the pattern adding two more initial circle rounds for a total of 42 stitches and then lengthened the repeating pattern to make a new yoga mat bag. It worked beautifully! (And I've made quite a few bottle holders per pattern:) ) You have an amazing ability to create and translate your creativity to others. Thanks!
Tamara Kelly says
😀 That's awesome! Thank you Cayty!
Pamela says
I loved your tutorial, it was clear and easy to follow. The pictures were great. Share your page on my blog (http://crochetwithpassion.wordpress.com/2014/08/25/water-bottle-sling/). Was just letting you know, thanks again for the great post.
Tamara Kelly says
😀 Thank you Pamela!
lubna says
Wonderful bottle cozy when I look it I started to make it for my son
Tamara Kelly says
😀 Thank you!
Jamie says
Love this pattern so much. Thank you for sharing!! I have been making them for about a year - and I have probably created 40 of them. I have given them as gifts and people love them!! People are always coming up to me and asking if I made it - (often crocheters - who are then sent to your blog). I tend to give them away so fast I never have any in my stash. If someone likes the one I'm using and don't know how to crochet - I often give it away - and go home and grab another for me.
Thanks again for sharing this wonderful idea!
Tamara Kelly says
😀 That's so fantastic Jamie! Thank you so much!!
Hannah says
I made one of these, using 52 rows in the strap, and it stretched so it falls to my knees! So I was wondering, how many rows should I use for an adult size? Thanks.
Tamara Kelly says
Adults come in so very many different sizes I can't give an exact row count. If stretching is a problem, lining the strap with some ribbon can be a big help!
Rosie says
I noticed this pattern when you first posted it, but never got round to making any. Then just recently my husband deployed with the Army so my girls started taking their Daddy Dolls EVERYWHERE. The dolls are an odd size/shape and don't fit most doll carriers... But with a little adjustment, (increasing the height slightly, making an oval base instead of round) your water bottle carrier works great! Now they have their hands free again for playing! Thanks!
Tamara Kelly says
♥ How great! Thank you Rosie.
Michelle says
Thank you, Moogly! Decided to whip one up and came across this pattern. Just right! Once again, your site comes in to save the day!
Tamara Kelly says
😀 Thank you! I'm so glad you found it at the right moment!
Pong says
Been following you a while. Love all your work and blogs. I will make a couple of these slings and send to my friend and her troops who station oversea. Again, thanks for sharing! 😀
Tamara Kelly says
Thank you so much Pong! ♥
Kathleen ashman says
I love this pattern, Tamara. I whipped it up easily in the morning for my stainless steel water bottle to use the same day. It came out super cute! Thank you, Tamara for this wonderful pattern! I shall use it again to make them for family members as I already have several requests.
Tamara Kelly says
😀 I'm so glad to hear it! Thank you Kathleen!
Kathi says
Would love to add a cell phone pocket. Any ideas how?
Tamara Kelly says
I would crochet the pouch sized for your phone (they are all so different now!) with a little extra space to account for the curve, and then sew it to the top and bottom "solid" sections! 🙂
Lindsey says
hi tamara, I am starting a new blog and this crochet pattern is one of my favorites. It is SO functional! Can i share this on my blog with a link back to your page and credits?
thanks,
lindsey
Tamara Kelly says
Hi Lindsey! You are welcome to share the link and one photo, but of course not the written pattern itself. Thanks so much, and best of luck!
Ashley says
I need to make 2 more rows for the bottom circle. Can you tell me how to do it please? This is the first pattern I have even done. Usually I just make blankets from some stitches I know. Thanks in advance 🙂
Tamara Kelly says
Hi Ashley! I'm honored you picked this as your first pattern, thank you! 😀
This pattern uses the standard formula for circles, so it's a great way to learn it!
So to squeeze in 2 more rounds to make the circle bigger, we're going to continue the pattern you might have spotted in the previous rounds.
New Round "6": *Sc in next 4 sts, then work 2sc into next st. Repeat from * to end. (36 sc) Join to first sc with a sl st, and ch1.
New Round "7": *Sc in next 5 sts, then work 2sc into next st. Repeat from * to end. (42 sc) Join to first sc with a sl st, and ch1.
You can see what has changed in each round - the number of stitches worked between the increases (the increases are where we work 2 sts in 1 st), and the final st count for each round. So there are 6 increases in each round, and the number of stitches in between grows to keep it even.
Does that make sense?
Ashley says
Yes it does! Thanks love! 🙂
Karen King says
Love you idea. I volunteer at Brookfield Zoo 2 days a week & will be making one for my bottle & my employee cup.
Tamara Kelly says
That's so awesome Karen! 😀 Thank you!
Karen king says
Your welcome
Kelsey says
I just found this pattern and I love it! I was just wondering why all the patterns for water bottle holders call for cotton yarn? I don’t have any on hand right now but I do have tons of acrylic yarn. Would it make much difference?
Tamara Kelly says
I think cotton is just the "go-to" for foodie type stuff - and it absorbs condensation. But you can absolutely use acrylic if you like!
Toni says
How many rows should I make the strap for an adult?
Tamara Kelly says
Hi Toni! Adults come in lots of sizes - you could take your measurements from right shoulder across to left hip, or about 55-60" for a "one size fits most."
Liana Kowalzik says
I love this! No plastic bottles left in hot cars! We sometimes use glass bottles with ceramic and wire bale flip tops as water bottles. (There's a brand of fizzy french lemonade you can buy and keep the bottles.) The lovely crocheted bag will protect the bottles from a chip or crack if it accidentally bangs up against something. Plenty of time to make stocking stuffers in everyone's favorite color, too.
Tamara Kelly says
Hi Liana! I'm so glad you like it, thank you!
Crystalyn says
Im a little late to this party, lol. But I just found this pattern, and whipped this up super quick and it is so cute! Thank you!!! this will make lugging water around Disneyland MUCH easier!!
Tamara Kelly says
😀 Thank you! And have fun!!
Karen says
Crystalyn,
Great pattern, I volunteer at Brookfield zoo and carry my Klein Kanteen for liquid refreshments. I'm going to be making this holder for ease in carrying my bottle. So happy to hear you & your family had a great time at our zoo.
Tamara Kelly says
😀 I'm so glad you like it Karen!
Karen king says
Thanks Tamara. If your ever at the zoo on a Tuesday or Thursday look me up. I work in the animals habitat my name tag says Karen K.
Clara says
Love the pattern and have made several but find it doesn't look right where you join each row with the sst then ch 4.the gap there is bigger than the rest of the gaps.Am I correct? Clara.C
Tamara Kelly says
Yes, the best solution is to replace the first 3 chs with a Chainless Starting Double Crochet: https://www.mooglyblog.com/improved-csdc/
Clara says
Thank you. Will try that.
Jeanie says
I'm at the age where bending hurts especially in shower. Made some adjustments and these are perfect for holding shampoo and body wash bottles. Hang on screw hooks and no more bending. Thank you so much for your wonderful patterns. I have done quiet a few of your different patterns and love them all.
Tamara Kelly says
Oh what a clever use for the pattern! ♥ Thank you so much, Jeanie!
Darlene V Quinn says
I just finished making this except for attaching the end of the strap and the finishing. I have to keep reading the instructions for when I should attach yarn and single crochet around. Unfortunately, I ran out of time the night before I needed to use it, but I'm sure, once I get the finishing down, I will be using it in the future. I have a tall, thin, aluminum bottle and it's very cold to carry in the winter. I looked everywhere for a pattern and yours was the most suitable for my bottle. Thank you.
Tamara Kelly says
♥ I'm so glad to hear it, please let me know if you need any help!
Renee says
Hi, Tamara.
I have made this so many times that I can't remember who all has them and loves them. I'd like to know if it's possible to make the bottom an oval shape and then work up the sides so that two small water bottles, or a water bottle and sunscreen (etc.) could be carried with it? If so, would you help me out with the basic instructions for the bottom?
Thanks for your consideration.
Renee
Tamara Kelly says
Hi Renee! Great question! I have linked an oval tutorial at https://www.mooglyblog.com/how-to-make-5-basic-crochet-shapes-free-patterns-and-links/ As long as you have an even number of stitches, you can then work the sides as written! 🙂
Renee says
As soon as that page opened, I remembered seeing it. I should have searched your site first, so thank you for the link.
Addison says
I am kinda new to crochet. What does “evenly around” mean? I’m so confused.
Tamara Kelly says
Hi Addison! Great question! Here, as in Rnd 6, we work a blo sc in each st around. No increases or decreases. 🙂