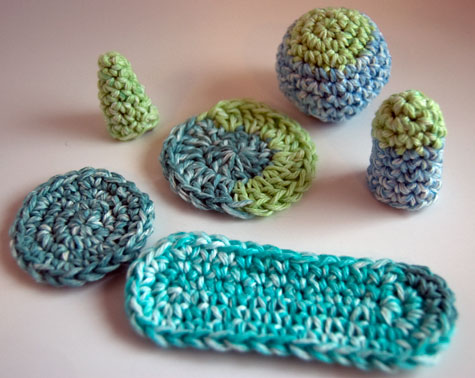
The sculptural qualities of crochet are amazing! With crochet, any shape is possible - you can take off in any direction, add or subtract any stitches you like, go wild! That said, there are several basic shapes most crocheters will eventually use, beyond the straight line. These shapes are the building blocks of hats, bags, toys, amigurumi, finger puppets, and so much more. So let's round five of them up today and pin them all down in one place!
1. CIRCLES:
 Circles are how you start a hat, some bags, spheres, and more. There are two common ways to start - with a magic circle, or with a short chain that is joined. From there, you work the crochet stitches into the center space. Most of the time, if you are using sc, you'll start with 6sc. If you are using dc, you'll likely start with 12dc. Exceptions abound, of course, but almost all of them follow the same formula.
- Work X sts into the center.
- Work 2 sts into each st of the previous round.
- Work *1 st into the next st, then 2 sts into the next st* repeating around.
- Work *1 st into the next 2 sts, then 2 sts into the next st* repeating around.
- Work *1 st into the next 3 sts, then 2 sts into the next st* repeating around.
- Continue adding another st before increasing in each round, until desired size is achieved.
2. SPHERES:
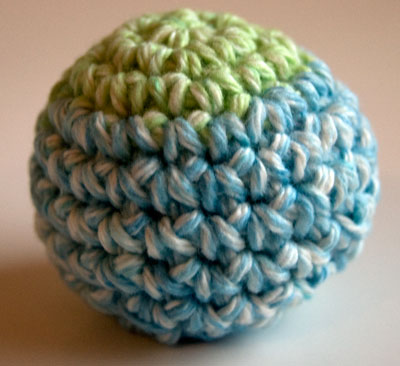 Most of the time, when you want to make a sphere - doll head, toy ball, etc. - you'll make a circle about as wide as you want your sphere to be, work a few rounds even, and then decrease the same way you increased. But one clever crocheter/mathematician has come up with the PERFECT! sphere! She's got directions for several sizes - above you can see a ball I crocheted using her 10 row version.
2. OVALS:
 The oval is the base of bags, cozies, and believe it or not, one of the trickiest shapes to get right on your own. Or maybe that's just me. We've been through several oval tutorials, hopefully this Oval Tutorial by Mohu sticks around, it's very good! Another option for a different oval shape is available on Louies Loops - sometimes it takes something different!
4. CONES:
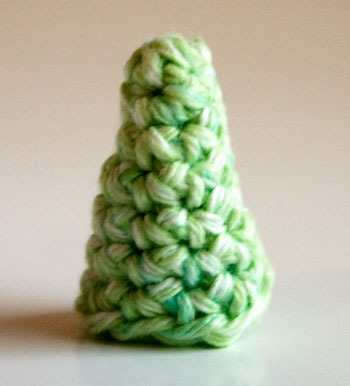 The cone is easy as pie, though the first few rounds of crocheting are as tight as they come. Start with just a few stitches in a magic circle, then instead of increasing in each stitch in the next round as you would for a flat circle, increase only 1 to 3 stitches each row. The more increases you make each round, the wider your finished cone will be. This one started with 3sc in the circle, then increased just 1 stitch per round for 7 rounds, with 10 total stitches in the last round.
5. CYLINDERS:
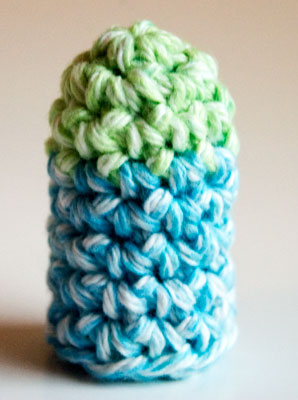 Cylinders are used in amigurumi a lot - legs, arms, tails, you name it. They also make perfect finger puppet bases! Making a cylinder is very simple:
- Work the desired number of stitches in a magic circle.
- Work standard circle increase rows until desired width is achieved.
- Work even until desired length is achieved.
The above cylinder is one I use when making finger puppets: 5sc in the magic circle, increase to 10sc in the second round, then work even for about 8 rounds (or more) until the puppet is as tall as I want it to be.
With these five basic shapes you are ready to tackle all kinds of projects! Even design your own! I hope having them all in one place will make it easier for you too. And you can look for some great patterns using the cylinder in the coming weeks! How will you use these shapes? Let me know in the comments!
 Be sure to check out and like the Moogly Facebook page to get all the latest updates, fun links, and sneak peeks! Written patterns copyright Tamara Kelly 2012. Please do not copy or repost this page, but do include links to this blog post when sharing these patterns with others. You can contact me via Facebook messages or at TamaraKelly@mooglyblog.com.



Erin
Excellent post! I love the pictures you used, too, and the yarn choice. Well done!
moogly
Thanks so much! 😀 The yarn was Sugar'n Cream Stripes in Country Stripes colorway - one of my favorites!
Corina
This is awesome!! Ty so much!
moogly
You're welcome! 😀
Lala
How do you increase and decrease?
moogly
Hi Lala! Increasing usually means wording two stitches into the same stitch from the previous row. I have a video on decreasing that should help you with that portion: https://www.mooglyblog.com/decreases-sc2tog-and-dc2tog/
Hope that helps!
Lala
Thanks!
Avie
This is so inspirating..this what I search for so long to learn the basic crochet.thank you for your tutorial.
Anu
Hey! i'm a beginner to crochet and your blog is tons of help! I love your tutorials, they are so clear and simple to understand... and this post is simply outstanding! it really helps people new to the art like me... thank you for an exceptional tutorial and great pictures to go with it! 😉 🙂
moogly
Wow, thanks so much for saying so Anu! You are very welcome! I'm so glad you're enjoying crocheting and feel honored to be part of your start! 😀
Lina
Thank you so much... This is what I'm looking for. Your post is very helpful for beginners who love crochet like me... I can't wait to try this.. 😀
And also I'm looking for friends who also love crocheting, so that I can learn crochet faster.. can you help me where I should find the best crochet community online?
Thank you so much..
moogly
Hello Lina, and I'm so glad you're enjoying moogly! I think the best online community these days has to be Ravelry - http://www.ravelry.com/
You can fill out your profile (and only share the parts you're comfortable with), and then jump right into the forums/groups. Post or just lurk and read, either is just fine. The two best forums for crochet are, in my opinion, Crochet on Ravelry and Crochet Liberation Front. I hope you enjoy them!
Lina
Thank you so much for your suggestion... I'll join ravelry soon 😀
And also can I ask you more help?
It's about crochet pattern... I love it so much and I want to make it by my own hand as a gift for my sister engagement next month. But I'm having some trouble and I was getting out of time. Could you please give me your email address or can I contact you through ravelry? so that I can explain my trouble in detail..?
You're very kind and I'm sorry to bother you, I'm really new in this and have no friends that I can ask about.. >.<
Thank you..
moogly
Of course Lina! My email is mooglystore@gmail.com. I'd be happy to help in any way I can. 🙂
Winnie Cooper
Hello... Thank you for sharing this... I'm still trying to understand copyright policies and being able to sell my finished products... Are these shapes considered copyrighted if I use them to create something of my own and sell it? I'm so confused about what you can and cannot do... Please excuse me.. I am very new to this and I don't want to violate any laws, even the smallest of them... Thank you...
moogly
Winnie, copyright is tricky as it varies from country to country, and I am not a lawyer and not qualified to give legal advice. However, I can speak my opinion. 😉 You cannot copyright a shape, and you can sell any finished item you make using these shapes. If you want to write a pattern, you can use these shape instructions to help you, but you should re-write them in your own words and to fit your own pattern. The only possible copyright violation here would be copying the words from these sites and selling them as your own written pattern. Again I am not a lawyer and this is not legal advice! But I think you're very very safe here. 😀
Winnie Cooper
Thank you! 🙂
Linda
thank you for sharing. this is very helpful
Txell
Hi!
I'm trying to do the oval shape and I have one doubt.
At first row, After I'd made the ten sc, What's the meanning of 3 sc in ch, join with sl st to first sc?
Please, please help me!
moogly
Hi Txell! Here's the original line with the part I think you're referring to bolded.
Sc in 2nd ch from hook, sc in back loop only till you reach the last ch (10 sc*), 3 sc in last ch wrapping around (should resemble a hook), continue across in unused loops of foundation ch, sc across to last ch st (10 sc), 3 sc in ch, join with sl st to first sc.
So what this means, is that you sc in 10 of the unused loops of the foundation chains (opposite the first set of sc you made), which brings you to the last ch with unused loops, where you sc 3 times in the unused loops of that stitch. This creates a second "hook" around the end and you can join to work in the round by working a slip stitch in the top of the very first sc you made (the "sc in 2nd ch from hook).
Is that a little clearer?
Txell
Hi, I really thank you your andswer, but I can't understand you pretty well. Can you tell me how many st must have every round, please! I think that this will be very helpful for the beginners.
Have a very nice day!
Ps: sorry for my english, it's too bad, I know it
moogly
It's not my tutorial so I can't rewrite it all here, but as written on Bukisa, the first round would have 26 sts, the second round would have 32, the third round would have 38... etc. Each round will increase by 6 sts.
Txell
Ok, thank you very much!
Sara
Boy I love Pinterest; this is awesome! I haven't been able to find an oval pattern that I like until now. I need some cotton yarn so I can finally make some Corningware pads so I don't have to worry about it damaging my counters 🙂
Odalys Mercedes Alvarez
Ms. Kelly, I wanted (no needed) to thank you for your amazing crochet blog. I recently lost my mother to cancer and crochet is my largest remaining link to her. Through your thoughtful and exceptional blog I have expanded my knowledge base immeasurably. Thank you for putting yourself and your crochet out there for those of us who are more timid.
Tamara Kelly
Odalys, my condolences! I know it's something almost all of us will face someday, but I cannot imagine the loss. I'm so sorry. And I'm so very glad that my little blog has been some help. You are most welcome.
Bertha Hawley
Hi Tamara, I love your blog. I too have had problems making a balanced and flat oval. Clicked your link to Bukisa, but can't come up with a tutorial. I even joined the site, no help. Would you please add the direct link for the tut. I think I figured it out from your two previous answers to other's questions, but would like to have the original pattern.
Thanks
Tamara Kelly
It was a direct link, but sadly it seems they have taken it off the site - I have found a replacement though and will add it!
Becky
Hi! I just wanted to say that I could search all day long for the patterns and tips I need for my projects and yet I keep winding up back here. You are fabulous and I love your patterns and you have the easiest to understand tutorials and patterns. Thank you for doing what you do 🙂
Tamara Kelly
😀 Thank you so very much Becky!! <3
Dezeray
Can you tell me your pattern for the circle? I'm mainly wondering about the ch and where you place your sl st at the end of the round. Thank you!
Tamara Kelly
Hi Dezeray! Maybe this video would help?
sally
I was very happy to find an oval pattern/tutorial, but when I try to access the link it just sends me to yahoo. Any help would be appreciated. Am I doing something wrong?
Tamara Kelly
Every oval tutorial I've linked to has eventually been taken down - I've been through a few now. 🙁
lori draughon
I can not find the link to make the oval shape on yahoo, I click on your link, but then can't find it. Any idea of what I am doing wrong?
Laurie
Thank you! It really helps to understand when the shapes and geometry are lasted it so well. One idea: there is an amigurumi site that helped me with an oval this evening, maybe you could link until it goes away? 😉 http://blog.mohumohu.com/post/88475494207/crochet-oval-tutorial
Thank you again! Moogly is indeed a site to which I always return dieting a search of the Neato.
Tamara Kelly
Thank you Laurie! On both counts! 😀
Marjory harrington
I want to crochet a mermaid cocoon for 12 year old,,but battle with the increase rows ...it looks like a triangle not a cocoon..the increase rows is wrong
Tamara Kelly
I would recommend following one of the mermaid patterns out now - there have been a bunch lately!
jen
hello again!
please i had trouble with the cone and i cant figure out why. i was making an increase of 1 st in the first stitch of every round while working seamless (no ch1, no ss) and i started to get cupping. i'm confused as to the cause. any help is appreciated 🙂
Tamara Kelly
It might be the start of your circle, working in the round. Maybe less stitches? Sometimes it just takes some experimentation, and different yarns can react differently as well.
jen
i will do some experimenting. thank you!
Mirjam
What a great set of tutorials. Very helpful. Thank you!
Tamara Kelly
Thank you Mirjam!
Shynae
Hi, I was wondering how to make a curve when crocheting a tube (cylinder).. I just used triple on the outside and single on the inside.. is there a way to use only single crochet when doing a curve?
Tamara Kelly
Hi Shyne! If you want to use all sc, you can create a curve by doing "short rows" - take a bit of yarn from the other end of the skein, and crochet half the circle, then break off, then crochet all the way around with your main yarn, working into the "half" rows as you come to it. You can do this as many times as needed. 🙂
Monica
Is this an American or British site as the crochet terms vary
Tamara Kelly
American. 🙂