![]()
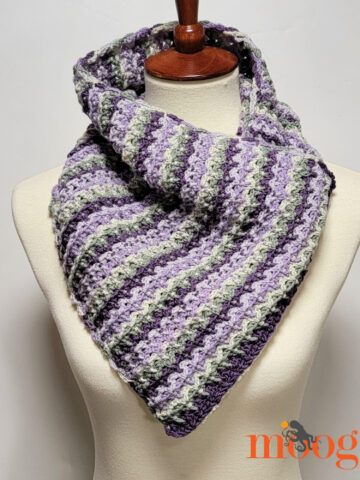
It's only August, but already the sunsets are earlier, the temps are dropping a little lower, and Autumn is surely on its way. Fend off the chill of overactive AC now and cool temps later with this Chevron Lace Wrap! Made with fingering weight cotton it's a not-too-warm shawl in the fall and spring, and a warm breathable scarf in the winter.
Prefer an ad-free PDF? You've got options!


Prefer the free blog version? Keep scrolling!
Easy to memorize for on the go!
Best of all it's made with a memorable and easy two line repeat - so once you've got a few rows down, you can curl up on the couch with a movie or take it on the road! It took me about three weeks to finish it in between other projects, and I took it halfway across the country with me on vacation - all I needed was the cone of yarn and a hook. But simple as it is, it still looks interesting and so modern!
![]()
Chevron Lace Wrap
Add this pattern to your Ravelry Queue and Favorites
- US - H, 5.0 mm hook
- 800 - 1000 yards of fingering weight cotton (shown: Article 984C, Honeysuckle Cotton)
- Size: 68" long and 14" wide
- VIDEO TUTORIAL: Basics of the Chevron Lace Wrap
- Clicca qui per la traduzione Italiana di Creazioni Art EC!
Stitch Multiple: Mult of 20, plus 11
Special Stitch:
dc cluster - With loop from previous stitch still on hook, yo and insert hook into next st. Yo and pull loop through st, yo, pull through first two loops on hook. (2 loops remain on hook.) Yo, and skipping the next 3 sts, insert hook into the next st, yo, pull loop through st, yo, pull through two loops on hook. (3 loops now on hook.) Yo and pull through all 3 loops on hook to finish stitch. (In other words, this is a dc2tog, skipping 3 sts between the two halves.)
Sample Charted Instructions
Chevron Lace Wrap Instructions
Row 1: FSC 91, turn. (If you prefer to avoid foundation stitches, you can ch 92, skip the first ch, and sc in the rest of the ch - 91 sc made.)
Row 2: Ch 3. Dc in the 3rd st. *[Ch 1, skip 1 st, dc in the next st] 3 times. Ch 1, skip 1 st, and work [dc, ch 3, dc] all in the next st. [Ch 1, skip 1 st, dc in the next st] 3 times. Ch 1, skip 1 st, work dc cluster. Repeat from * 3 times. [Ch 1, skip 1 st, dc in next st] 3 times. Ch 1, skip 1 st, and work [dc, ch 1, dc] in the last st of the row. Turn.
Row 3: Ch 3 (counts as first dc). Dc 2 times in the first st (the base of the ch 3). NOTE: For this row, work into and count the ch sps in the previous row as stitches. Dc in the next 7 sts (as per note, this includes 3 dc sts and 4 ch sps from the previous row). *Work dc cluster (skipping the next ch sp, top of previous dc cluster, and next ch sp). Dc in the next 6 sts. Working in the ch 3 sp [dc 2, ch 3, dc 2]. Dc in the next 6 sts. Repeat from * 3 times. Work dc2tog over the last two dc sts of the previous row, skipping the ch sp and turning ch. Turn.
![]() Row 4: Ch 3. Dc in the 3rd st. *[Ch 1, skip 1 st, dc in the next st] 3 times. Ch 1, and working in the ch 3 sp [dc, ch 3, dc]. Ch 1, dc in the next st. [Ch 1, skip 1 st, dc in the next st] 2 times. Ch 1, skip 1 st, work dc cluster. Repeat from * 3 times. [Ch 1, skip 1 st, dc in next st] 3 times. Ch 1, skip 1 st, and work [dc, ch 1, dc] in the last st of the row. Turn.
Row 4: Ch 3. Dc in the 3rd st. *[Ch 1, skip 1 st, dc in the next st] 3 times. Ch 1, and working in the ch 3 sp [dc, ch 3, dc]. Ch 1, dc in the next st. [Ch 1, skip 1 st, dc in the next st] 2 times. Ch 1, skip 1 st, work dc cluster. Repeat from * 3 times. [Ch 1, skip 1 st, dc in next st] 3 times. Ch 1, skip 1 st, and work [dc, ch 1, dc] in the last st of the row. Turn.
Rows 5 - 108 (or until desired length is reached): Repeat Rows 3 and 4, being sure to end on a repeat of Row 4. Turn.
Row 109: Ch 1, and sc in each st and ch sp to end. Work a sc2tog (skipping ch sp, top of dc cluster, and ch sp) over each previous cluster, and work 3 sc into each ch 3 sp. Do not break yarn.
Edging: Sc again in last st of row, coming around to work up the side. Sc twice around each ch 3 and dc st for side edging. Continue to sc evenly around, working sc2tog clusters and 3 sc in sts where appropriate to maintain pattern. Come back up the other side as before, and work another sc row in pattern over the top of Row 109. Break yarn and use seamless finishing method to finish off.
Blocking: If using 100% cotton yarn, as shown, use wet towel method of blocking, placing wrap between dry towel and wet towel and pressing hot dry iron to wet towel. If using other fibers, block as appropriate.![]()
What do you think? I used black because it's what I had on hand, and it's the most common color I wear, but I think this would look absolutely amazing with lots of color! Something with a long color repeat would be breathtaking. I can't wait to see what you all make with this pattern!
The Fine Print
Be sure to Like the moogly Facebook page for the latest updates and have some fun with us! Written pattern copyright Tamara Kelly 2012. Please do not reprint or repost this pattern, but please feel free to link to this page to share this pattern with others. For seller information please see the About page. You can contact me via Facebook messages or at TamaraKelly@mooglyblog.com.


Jenn L says
Thank you! This is perfect timing, as I just finished a baby blanket and needed something with a simple repeat for the next project.
moogly says
You are very welcome! 😀
Susette says
Why are we set up the stitches in multiples of 20 when you suggest to chain 91/92 stitches?
Tamara Kelly says
I think I was trying to say to add a multiple of 20 to the listed beginning stitch count. But it was 2012! I believe the actual stitch multiple is a multiple of 20 plus 11.
marilyn says
belonging to it is still spelled its
moogly says
Bad day for typos for me! Hope I caught them all this time.
Viki says
NO, you didn't! It's a crochet tutorial and many are so thankful for the time and effort AND generosity Ms. Kelly put into sharing it with us. "It's" or "its" - does it make a difference here? IT'S a beautiful wrap and that's ITS purpose ! ! ! LOL . . .
Maxx says
Bravo!
Tamara Kelly says
😀 Thank you!
Lauren says
Hi! Do you have an etsy store where you sell these? I have no clue how to read a crochet pattern but I really love this scarf!!
moogly says
Hi Lauren! I don't have an etsy store currently, but I DO take commissions! I'd love to make a scarf for you, to your own specifications! I'll send you an email! 😀
Ruby Altizer says
Would love to have one of these. Could you give me price etc and how long it would take to get ine?
Tamara Kelly says
Hi Ruby! I don't make finished items for sale anymore, but please check the Moogly Makers page for commissioned crafters! 🙂
amber says
I've been working on this for the past 2 days and can't get passed row 3. When I do the repeat of row 2 do the dc, ch3, dc in same stitch suppose to be done in the chain 3 space of row 3. I've frogged this project 4 times now and can't get row 4 (row 2 repeat) to work. Any advice?
Thanks
moogly says
Yes! I'm so sorry, I realize now that that wasn't clear at all. My apologies! Yes, work the [dc, ch 3, dc] into the ch 3 sp of the previous row.
amber says
Thank you! I'm starting this over again for the 4th time I can't give up on it its too pretty.
Cindy says
I cannot get past Row 3 either. The stitches are off when I do the Dc in the next 6 sts. Should I just line them up? I have started the pattern over 3 times to make sure I have counted correctly.
moogly says
Hm, sorry for the trouble. I'll draw a chart today and add it to the pattern - that should help!
Cindy says
Thank you for being so quick to reply. It is a beautiful scarf and I am eager to make it. 🙂
Blessings,
Cindy
Jenn L says
Thank you for the chart! I was getting stuck in the same place.
moogly says
I'm glad it's helping! I also realized that Row 4 needed full instructions - hopefully this will help everyone!
moogly says
Ok, the chart is now up! Hope this helps you visualize where the stitches go! 😀
amber says
The chart was very helpful, thank you. On the row 2 the instructions say to skip the 1st stitch after the (dc, ch 3, dc), but on the row 2 repeat if that stitch is skipped it doesn't line up right. Your chart shows the dc going into the 1st stitch after the (dc, ch 3, dc) and now everything lines up perfectly. Thank you so much for all of your responses. Your pattern taught me to FSC and read a crochet chart, so thanks again. I'm glad I didn't give up on this pattern. 🙂
moogly says
Thank you for letting me know there's a problem and not just giving up - it's just a one-crocheter operation here (the husband is a great computer guy, but not much with yarn lol!), so feedback is super valuable! I'm glad the chart did the trick!
Susan Williams says
Hi, I'm thrilled with your pattern. The corrections for row 4 must have done the trick because I'm having no trouble following this pattern at all. I'm making it in Alpaca yarn in Plum. It's beautiful so far. Thank you so much for the pattern. How wonderfully generous of you!
Anya says
Plum will be beautiful! I have to have one of these. Is it a good beginner project for someone who wants to learn how to knit? Thanks so much, A-
Anya says
Excuse me. I guess crochet is the more correct term? Or is crochet a form of knitting? I'm so confused, lol
moogly says
Anya, yes it's crochet! Crochet is done with 1 hook, while knitting is usually done with two needles. I wouldn't recommend it for a beginner, unless they were very motivated.
Ellen says
I'm more of a novice crocheter but I love this! It's harder for me to read the patterns but pick it up so much better from the video tutorials. Is the video you have on ripple stitches how you begin this wrap?
moogly says
Ellen, the video shows just the basic idea of ripples, so the stitch count and pattern is a little different. Hopefully the written instructions combined with the chart and closeup photo will help fill in the blanks! If not, I can add a video of the wrap to my to-do list, it'll just take a few weeks to get it up!
Ellen says
I'm certainly going to try, but I think a video would be AWESOME!
RAjitha says
I love this pattern and planning to make it for my grandmom. Just wanted to know, if I want to increase the width of the shawl, how many stitches do i add to the base?
moogly says
Hi RAjitha! To change the width, just add multiples of 20 stitches to the starting row!
aNGELA says
Love this pattern. If I wanted to make it narrower, I would do 20 stitches less, yes?
Thanks!
Tamara Kelly says
Thank you, and yes! 😀
angela says
Thanks for the quick reply! 🙂
Katie says
I am using a 6 ply omega sinfonia black yarn. I am happy with my progress and am about 1/3 done. I love the pattern and can't wait to finish the scarf! I am nervous about the edging. When you say sctog clusters or 3 scs where appropriate I am guessing you would sctog cluster on a "valley" or where the dc clusters are and 3 scs on a point? I am just not very good at edging and guessing how many scs to do. I do like knowing to use 2 scs in a dc st or a ch 3. That helps tremendously instead of me guessing and not being happy with the edging. I appreciate your help.
moogly says
Yes, Kate, you've got it! The tricky part about edging is that everyone does it a little differently - but as long as you like the end result, you've done it "right"!
Jan says
Hi!
I was hoping to make a thicker, bulkier wrap for this winter. Could this pattern be used with a bulky yarn as well, with perhaps a larger hook?
thanks,
Jan
moogly says
Jan, I don't see why not - I think it would work great!
BethBuckley says
I'm working it with a bulky yarn. Had to greatly decrease number of stitches. I don't really like how it looks. Maybe not a super bulky yarn but just your basic worsted weight would look better.
moogly says
Hi Beth! I know that at least one person has used worsted and liked it! Sorry bulky didn't work well for you.
BethBuckley says
I switched to a light, soft weight 4. It looks much better. Thanks so much for the pattern.
moogly says
I'm so glad! And you're very welcome!
Justine says
I just finished this wrap in brown fishermans wool! It will be a cold winter in Oregon so I am definitely prepared! I will have to post my wrap on my blog sometime so you can see it! Yes I will link back to this page. This is such a wonderful pattern and it worked up fast. I put about 15 hours into it. It took me about 30 minutes to complete 4 rows (I know this because I always showed up to work 30 minutes early and crocheted in my car...hehe) I am only 20 and my boyfriend says he refuses to be seen with me in public because he finds it "old lady-ish" if I were to wear this as a wrap! So, I wrap up at home and scarf it in public! Thanks for helping me keep warm! 🙂
moogly says
You are very welcome Justine! 😀
Carol says
Is fingering weight the same as Size 3 crochet cotton?
Thanks for your help.
moogly says
Yes Carol, fingering and size 3 thread are the same size. 🙂
Elizabeth says
When you say size 3, do you mean yarn size 3, or thread size 3? In the picture it seems like a lot bigger than size 3 thread.
Tamara Kelly says
I used a fingering weight yarn, which is the yarn symbol 1: super fine. Size 3 thread is the thickest thread commonly available, and would be a good substitute, but you could also use sock yarn or anything fingering weight or with the "1" symbol. 🙂 Or you could use thicker yarn and make a warmer wrap!
Elizabeth says
I was actually thinking it would make a Peru christening blanket in white.It's baby seasonin part of Utah.
Laura says
Hi there!
I am finishing up the diamond cowl and getting ready to get started on this wrap 🙂 I was looking at the chart and the written directions. The chart says that Row 1 should be FDC but the written directions say FSC. Which one is appropriate?
Thank you so much for all your great patterns!
Laura
moogly says
Doh! It's FSC. Handwritten chart error! Sorry about that - thanks for letting me know!
Laura says
No problem! Thanks again for your great patterns!
Laura
moogly says
Ok, all fixed! Thanks again for the heads up! 😀
Yolanda Martinez says
Hi...Love the pattern...but even with the pattern diagram having trouble...may I am having a senior moment....:0)..will try again...I really like this pattern...wish me luck...Thanks
moogly says
Hi Yolanda! Have you watched the video? That might help you out: https://www.mooglyblog.com/basics-of-the-chevron-lace-wrap/
Yolanda Martinez says
Yeay...I am finally on my way....Thanks..is starting to look really nice....
Katie says
I finished my scarf at the full size. I love it! I watched your video and I have a question. I noticed on the first row of the dc and ch 1's that it looks like the dcs are in between the stitches, at least I think that is what I am seeing. Is that what you did? I didn't do that on my scarf.
moogly says
Hi Katie, I'm glad you like the finished scarf! I crocheted into the tops of the stitches, not between them, just as you did. Sorry that wasn't as clear in the video!
Bea says
Hi - I sent a comment yesterday but I'm not certain it went through - here's an abbreviated version: I'M GLAD I FOUND YOU & YOUR WEB SITE!!!!!!!!!!! The Chevron scarf is beautiful; I had my challenges but with the written pattern, the diagram, & the video (and the others' feedback), I'm well on my way making a scarf. I'm using 7 colors (using 2 colors at a time; after 4 rows I take out 1 color & add a new, etc. - the suggestion for this was in the pattern I couldn't figure out) Thanks very much for your interest in crochet & easy access to available input! Bea
moogly says
Bea, I did see it! (You commented on the video page, I believe) And I'm very glad to have been of help! It sounds like you'll be making a beautiful scarf!
Archana Nair says
I loved this pattern. Can you please help me with modifying this design in terms of the no. of stitches if i am using a fine yarn (a non wool sugarcane yarn) which needs a 3.75 crochet needle? Would appreciate if you can send me an email with the details. Thank you.
moogly says
Hi Archana! I will send you an email, but the pattern calls for fingering weight yarn, which "normally" would use a 3.25mm hook. So the H hook should still work here - it's how this garment gets such good drape.
Yolanda Martinez says
Hi..almost done with my wrap...I used sock yarn that I had in my stach...it just falls so nice....Love it...Thank you so much for sharing such a beutiful
pattern....
moogly says
😀 I hope you get a chance to post a picture on the moogly page, if you like!
Creaciones Susana says
I love this desing, Adorable !! Thanks a lot for sharring whit us ♥
Regards !
Genifurr says
I love this pattern and I just started, but I was wondering if I turned after the first row?
moogly says
Yes, you should turn after every row. 🙂 And thank you!
Viki says
Just curious, if you get to the end of a row, how else would you continue to the next row unless you turn?
Tamara Kelly says
Heh, it's just one of those pattern conventions! I guess it's so you don't work all around like a granny square. 😛
vera says
if you are increasing or decreasing by 20 stitches to make it bigger or smaller, casting on 91/92? shouldn't it be 101 or 102?
moogly says
Hello vera! The repeat going up or down is 10, so a full repeat of the pattern, zigging both up and down, is 20. If you increase or decrease by 10, the end/start of the rows will change a bit, but you can do it that way if you like! I was just trying to keep it simple. 🙂
Marie in DK says
I've had the exact same problems as mentioned above around round 4. I can see now that I need to learn how to read a crochet chart - I've been resisting it because I've gotten it into my head that I can't do it. But necessity is the mother of invention, I suppose. Will give it a go with this chart - thank you for including it 🙂
Tamara Kelly says
There were some issues with the 4th row as it was written but I had hoped that my revisions had fixed them! I'm sorry it's still causing confusion!
Bernadette Mercer says
I have a question. Is there a way to increase the chevrons after a couple of rows? I think this would look amazing as a long skirt. Any suggestions?
Tamara Kelly says
That would be pretty Bernadette! I think I'd take a page from this pattern on how to increase the chevrons: http://www.ravelry.com/patterns/library/rainbow-ripple-baby-blanket
Denise says
I love the shawl but there is so much advertising covering it up that I can't make out the instructions.
Tamara Kelly says
I'm sorry Denise, we've made some changes to the blog and I just discovered that the individual pattern pages layout is all screwed up! 🙁 I'm sorry, we'll have it fixed as fast as possible. Right now you should still be able to make out the green Print Friendly button at the end of the pattern - click that and you'll get a clean copy!
Denise says
Thank you. Much better. I was able to see it and print it.
Kaleigh says
I am stuck at the end of row 3. After reading the instructions and the chart multiple times (more than I care to admit, lol) i've figured out my problem. I didn't start with a row of fsc, I did sc into a long row of chains. At the end of row 3 it says I need to dc2tog skipping the ch sp and turning chain. My problem is that since I started it differently I'm trying to finish row 3 but the stitches that I'm working into aren't the same as the end of row two. They are the same as the beginning of row 2. Any suggestions or should I start over and use fsc instead? I also wanted to tell you that your shawl is beautiful and I'm trying to make mine with white size 5 crochet thread to wear on my wedding day next summer! I didn't want it to be too warm since my wedding will be outdoors in the summer.
Tamara Kelly says
Congratulations Kaleigh! Ending the sides in the same way should be fine, it'll just make the overall shawl more symmetrical. 🙂 If you like it, go with it!
Lara says
Thanks for this great pattern. I have made it in royal blue cotton for my Mum for Mothers Day. I wanted to particularly thank you for the instructions on finishing off the last row. It looks great and sooooo tidy! I will be using this all the time now - you have improved all my crochet - thank you. Xxxx
Lara says
I also found that I needed to use the chart and couldn't reconcile it to the written pattern but as it is only two rows repeated it was easy to learn.
Thanks again
Tamara Kelly says
You're welcome! I'm glad you enjoyed it!
Pat says
I usually make projects from stitches I've learned over the years, but noticed you start Row 1: FSC 91, turn. I'm making a guess that FSC 91 is a way to avoid making a chain and then the first row? But your pattern does not actually state that, so I'm wondering if you can tell me how to do this FSC 91 or have a link for how to do it?
Tamara Kelly says
Hi Pat! You'll notice that the FSC in the pattern is in blue lettering - this is a hotlink to a video tutorial here on moogly! Here's the direct link: https://www.mooglyblog.com/foundation-single-crochet-fsc/
Becky says
Help! I have crocheted Row 2 more times than I care to admit, have counted and recounted the stitches and each time I get to the end of that row I have 4 stitches remaining in which I am supposed to "Ch1, skip 1 st and work [dc, ch 1, dc] in the last st of the row." In other words, skipping one stitch leaves 2 unworked stitches. I'm about to give up : (
Tamara Kelly says
Don't give up Becky! If you're sure you've got the right number of stitches in Row 2, then just skip that last stitch of Row 1, and go on to Row 3. Then, when you're ready to finish the wrap, carefully undo the knot and undo that first FSC st, then knot and weave in the end. No one will ever know!
amber says
Did you block the wrap when you were finished?
I'm on my second wrap. My first one I made for a friend, another friend saw it and asked me to make her one. 🙂
Tamara Kelly says
Depending on the fiber you used, blocking could help a lot! I did some mild blocking - if I'd used wool or alpaca I would've pinned it out.
The Cogaroo says
Do you have an estimate of how much worsted weight yarn it would take to make this? If not, I understand. I want to make either this or the Sunset Shawlette. Any information you can provide will be greatly appreciated. 😉
Tamara Kelly says
I know on Ravelry someone used DK and about 750 yds. Others have made it with worsted but they didn't say how much they used.
R Kazery says
I simply love this scarf! Thank you for sharing! God Bless!
emily says
I'm stuck :/ I'm starting row 3 and I'm not sure if I messed up or if the written pattern is off? It seems like I should be doing the Dc chain 3 Dc after the 7 Dc not the Dc cluster? Is that correct?
Tamara Kelly says
The [dc, ch 3, dc] (increase) is worked into the ch 3 sps of Row 2, and the dc2tog (skipping 3 in the middle) is worked above the decreases of Row 2. There are 7 dc between each increase and decrease. I'm not sure where in the row you are. Does the chart or video help?
Cynthia says
Thank you!!!! I LOVE this pattern. Took me 4 times to figure it out and I finally got smart and read the chart lol.
Btw, do you have a no sell clause on items made with your pattern? I don't want to make a booboo. Thanks so much!
Tamara Kelly says
😀 It is a confusing pattern to write out, I'm so glad the chart helped! You are welcome to sell any finished items made with Moogly patterns - you can read more about it on the About page! 😀 Thanks for asking!
Cynthia says
Thank you! <3
Rosanne says
Hi,
I so enjoyed making this wrap! I just wrote about it on my blog (see link). The lovely thing went with me to Rome!
Thanks and take care!
Rosanne
Tamara Kelly says
It's beautiful Rosanne! Rome, wow!
sheila mogard says
Beautiful, fun,works-up quickly,looks great for any occasion [depending on type of yarn used] only PLUS'S +++++++ Tho can look very different, and using the same pattern. What more can you ask for?
I love your graph. Do you have others?
=
=
Tamara Kelly says
Several of my patterns do have graphs, and I add them when they're requested, so if there's a pattern you see of mine that you need a graph for, please just let me know! 🙂
Penny I says
How do you make the wrap longer instead of 92 sc how many would you have to add to it and in what sequences.
Tamara Kelly says
Hi Penny! Here's a quote from the pattern:
So add groups of 20 until you have the width you desire. The section after the asterisk that you are told repeat 3x in the pattern will then be repeated one more time for each set of 20 sts that you have added. 🙂
hello says
First of all thank you for posing the pattern for free. Secondly.. I am using the 5 hook with a medium 4 caron simply soft party . It looks nice. But.... the zig zags are not as sharp and the decrease holes are not defined and crispy they seem way too loose.
hello says
Sorry wrong yang I'm using a size 3 light what size is fingering?
Tamara Kelly says
Fingering is like sock yarn - it would have the yarn symbol "1" on it. It's closer to crochet thread than worsted. You can make this pattern in worsted of course, but it will have the softer look - but also be warmer!
cynthia says
Hello! Thanks for posting this pattern. I'm fairly new to crocheting and have managed to get through the first 4 rows by watching and rewatching the video. Just have a quick question around the edging (getting ahead of myself =))...is the edging only done around the end of the wrap or do you do it all the way around on all sides?
Thanks!
Tamara Kelly says
The edging will go all the way around. 🙂
jessica says
I have a question about yarn type. I haven't used many different types of yarn, would baby yarn work for this?
Tamara Kelly says
It will probably be a bit thicker, if it has the yarn symbol "2" or higher, but that should be fine! 🙂
Yvonne says
I absolutely love this pattern. Aren't you the smart one for coming up with it? I am going to make it as a shawl using worsted weight (4) yarn and changing the starting stitch count and row count as you have suggested. Thank you! Thank you!Thank you! I don't know what we crocheters would do without people like you who are readily willing to post beautiful patterns.
Tamara Kelly says
Thank you so much Yvonne! 🙂
Marie says
Hello, Thank you so much for this pattern I absolutely love it. I am a bit to crocheting and need a little help on which steps to repeat on the second row. Sorry I'm going to try & explain this the best way I can. Going by your video when you get to the end of row two to continue do I go back to the ch 3 Dcc in the 3rd stitch or do I skip it. I also wasn't sure if I'm continuing would I do the last step (ch 1 dc in same stitch) I hope I made that clear, like I said I'm new I understand how to do the stitches just get confused on what to repeat. But I'm not giving up love this scarf!
Marie
Tamara Kelly says
Hi Marie! Thank you! I'm afraid I'm a little confused by your question. When you repeat a row, you repeat the entire row, every time. Does that help?
Marie says
Yes Thank you! I will give it another try I did all of row 2 and repeated the steps to complete all 91 on the chain but it didn't look right maybe I missed something. Thank you! Again!
Marie says
Thank you! I will try it again it just didn't look right like maybe I wasn't suppose to do the chain 3 I between or something, maybe I missed a step.
danielle drown says
I used this pattern to create a cowel, I didn't have enough yarn to do the shawl. Thank you for all your beautiful patterns!
Tamara Kelly says
Sounds lovely! Thank you Danielle!
Jessica says
I love how my shawl came out using this pattern! Only one problem, I'm stuck at row 109 and edging. Is there any way you can make a video or is there one already. At row 109 it says to sc to the end (of the row?) but then you mention to sc tog at ch3 space. I'm so confused. There's no way I managed to make this beautiful pattern and am unable to end it. PLEAS HELP
Tamara Kelly says
Hi Jessica! Basically for row 109 sc across, but to maintain the chevrons you'll sc together in the "dips" and add sc sts in the "peaks". Then you sc all around for the edging, again working sc decreases in the dips and increases in the peaks. Does that help?
Vida says
Hi! How is the wrap in terms of weight? I have avoided using cotton for scarves and other bigger items because I've read several accounts that it will be a bit heavy; so now I'm having a dilemma.
Tamara Kelly says
Hi Vida! Within the same thickness cotton can be heavy in comparison to wool or acrylic. However, this pattern is designed with fingering or thread weight cotton, so it's relatively light. To make it even lighter, you could absolutely substitute any sock yarn type wool. 🙂
Vida says
I was planning on using DK cotton for this one. Can't wait to see how it will turn out. Thanks again, Tamara!
Tamara Kelly says
😀 Thank you Vida!
Elizabeth says
Have you ever used Cotton-ish yarn by Vicky Howell? It says it's #3 weight, but it seems more like a #2. Since it is almost impossible where I live to find fingering weight yarn in the stores without wool, I decided to try this. It turned out great! I decreased by about half (started with 51 stitches), still using an H hook (I'm not sure how you used that size hook for the super fine yarn). It turned out to be 12 inches wide and probably 65 inches long (I'm 5'7, and I measured it from floor to almost my hairline). I wish I would have only decreased 20 stitches, because I still have quite a bit of yarn left. Anyway, I love how it turned out, this yarn drapes really well. The color I used is called Cotton Gin, but it's really a deep lilac color, about the same as real lilacs. Thanks so much for sharing the pattern!
Shabrina handmade crochet says
What a wonderful pattern..
I've tried your pattern..
You can see my chevron wrap here http://shabrinahandmadecrochet.wordpress.com/2014/05/12/chevron-lace-wrap/
Thank's for share you pattern ^^
Tamara Kelly says
It's beautiful!! <3
Alice v says
Just bought yarn to make this. I'm HOPING a few skeins of Patons Lace will do the trick. Thank you for generously sharing your time and knowledge with so many. I have only been crocheting for about a year and a half, but your blog is one of the first I discovered (through Pintrest) and has always been an inspiration. Your photography is amazing, and I adore the round ups you post. This is my first Moogly pattern, and I'm so very excited!!
Tamara Kelly says
😀 Thank you so much Alice!!
Clotilde/Craftybegonia says
Totally gorgeous, I love chevron patterns!
Sarah says
This is gorgeous! I have some yarn that would go with this, I just need to work out if I can get the right hook/yarn combination to make it workable...
Sarah says
Question: how stretchy is this pattern lengthwise? I have this idea vaguely in mind at some point to do a narrower version of this, more of a scarf than a shawl, but if it stretches a lot lengthwise then it might end up being kinda skinny and no longer as pretty.
Tamara Kelly says
That's going to depend a lot on the yarn you use - I used cotton thread so there wasn't much at all. Several people have made scarves though and they did look lovely!
Sarah says
Finally occurred to me to look on Ravelry, and of course a gajillion people have made various lengths and widths of the pattern in all kinds of different yarns! So I think I'll be able to figure it out 😉
Maddie says
Thank you for the pattern Tamara. Somehow, I can't seem to get it right though. I am on my fourth attempt but, like Emily in reply 89 my chevron in row 3 starts going up, instead of down as in your instructions. What am I doing wrong?
I have 6 chevron 'tops' and 4 downward pointing points. When I get to row 3 the description is not matching what I have in front of me. When I start row 3 with 3 ch, 2 dc in the base and then 7 dc, My 7th dc is in the chain space, instead of in the stitch (as shown in the chart). Basically I fumble from here onwards, trying to match everything to match up with the 3 ch spaces in the increase but I can't get it to work.
Have you got any clue where I am going wrong? Is it to do with the turning (this is just a desperate idea, because I think turning is just simple turning, but hey, might that be it?) I've watched the video a gazzilion times but I can't get my head around it.
I really hope you understand my explanation and can point me in the right direction.
Tamara Kelly says
Hi Maddie! I can't quite figure out how you have 6 ups and 4 downs. But focusing on Row 3, the 7th stitch should be in a chain space. Then the sc2tog is in the next st and the st 4 sts away (counting ch sps as sts). I'm afraid I can't figure out how this is wrong?
LEEANN says
YOUR LOVELY COMMENTS ARE ENDEARING, BUT MY 'PUTER HAD TO PRINT EVERY ONE SO THAT THE PATTERN WOULD PRINT. IS THERE A WAY TO AVOID THIS? (46 PP) LMM
Tamara Kelly says
Hi Leeann! You'll want to use the Print Friendly button to avoid all that. Here's how: https://www.mooglyblog.com/print-pattern-use-print-friendly-button-moogly/ 🙂
Jen says
This is so lovely and all the information is so clear and helpful. I'm looking forward to making this. Thank you for taking the time to share it all. Enjoy your day! Jen
Melissa says
I want to make this from some really special yarn, something very soft and luxurious, as something special to crochet during vacation. What would you suggest?
Tamara Kelly says
Oh gosh... maybe something in silk or alpaca?
Melissa says
Thanks, I can't wait to try it!! Thanks for all your free patterns, your designs are the bomb!!
Leeann says
This scarf has so many color and size possibilities! Simple and stylish. Bravo!
Tamara Kelly says
😀 Thank you so much!
Tez says
Hi! I'm making this scarf/wrap for a friend of mine for christmas. But she's also wanting fingerless gloves. Do you happen to have a pattern for gloves to match this wrap? Thank you so much for all these gorgeous patterns! I've made a couple of them, and they're so easy to follow. Very well written!
Tamara Kelly says
Thank you so much Tez! I do not have a matching mitts pattern - yet! I like that idea! 😀
Thomas says
Tanks a lot for your explains ! Merci beaucoup de donner vos explications . Votre modèle est très sympa pour démarrer
Tamara Kelly says
Merci!
Luyasa says
I was looking for a stola to make for my first "Abendkleid" (sorry, i don't know the word in english, i have only a very small ammount oft vocabularies -.-). Thats perfect, because it is not a triangle and i can make it as big as i like to.
Thank you so much! I will start this project today. 🙂
Liebe Grüße
Lu
Tamara Kelly says
😀 Thank you Luyasa!
Christina Herstein says
What other yarns can you recommend...not sure what fingering yarn is 🙁 I tried looking for the "honeysuckle online" and I'm not quite sure if I have found it or not, but I would love to hear some of your other yarn suggestions. Thanks for your time.
Christina
Tamara Kelly says
Fingering is like sock yarn - it would have the yarn symbol "1" on the package. Heavier thread, like a 5, or baby yarn, can be good substitutes. Or, since it's not a fitted garment, you can just use whatever yarn you like! 😀
Justine says
This is a beautifully written pattern! Very clear and easy to understand. Thank you for sharing. I'm currently working on it and it's turning out great. I will be sure to post my project on Ravelry. Thanks again!
Tamara Kelly says
😀 Thank you so much Justine!
Cathy Garrard says
I cannot find the print friendly button on the free scarf pattern
Tamara Kelly says
It's at the bottom of the post, beneath the social sharing buttons and above the related posts. 🙂
Aubree Flanery says
I'm looking for a very light weight scarf to wear to a fancy event. What hook size would you recommend if using thread?
Tamara Kelly says
There are several different thread weights, so I'd just use the one recommended on the label. If it's the thicker crochet cotton thread, perhaps even an F would work!
Teena says
Hi! I have a question about changing the width. Your directions say work in multiples of 20 st, so say I want the scarf a little smaller: the initial fcs would be 71, then? 😮 I'm a little confused about this, ahah
Tamara Kelly says
You've got it! 🙂 For a more scarfy pattern in this stitch, check out the Chevron Lace Infinity Scarf. 🙂
Cassie m says
Hi! This is gorgeous! I can't wait to start it!
Do you have any tips on how to turn it into an infinity scarf? I am a relative beginner, so please speak simply. Lol!
Thanks!!
Cas
Tamara Kelly says
Hi Cassie! Thank you! For an infinity scarf with this stitch pattern, check out the Chevron Lace Infinity Scarf! 🙂
Rose says
Hello,
Thank you very much for this great pattern!
You says that we have to work with multiple of 20 to increase or decrease the wide but I dont get it: your instructions tell to chain 91, your chart show a 31 foundation chain... Maybe you know a tutorial about this "multiple" questions? Sorry! :-/
Tamara Kelly says
Hi Rose! Most patterns have a multiple of x plus y - you start with a multiple of some number, and then need to add another number of stitches at the end to cap it off. This one is a multiple of 20, plus 11. So to increase or decrease width you'd add or subtract 20 from 91. 🙂
Rose says
Brillant! Tank you for your patience and kindness!!!!
Lina says
http://monsterbank.blog.se/
Hi, is this ok with you? She have downloaded it it and is sharing it from her drive
Tamara Kelly says
No, it's not. Thank you Lina!
Lina says
You are welcome. Things like that drives me nuts. The site is down now, your doing? Good job in that case, she had a lot on ther that was so not ok.
Tamara Kelly says
It is down, though I don't think that it was me - I did send a note to the blog company, but dealing with this stuff across national borders is tricky! 🙂
Melissa says
Did anyone happen to see the tunic on that page, with spiral on the front? the name of the book was at the bottom, and I can't remember 🙁
Melissa says
I found it, a Doris Chan design! BTW, I made this wrap, love the pattern, love the FO!
Tamara Kelly says
😀 Great, thank you Melissa!
Gertrud says
Hi,
I've been fiddling with this pattern for a while, but somehow it just doesn't look right. Probably because of the yarn. I have Aunt Lydia's #3 and #10 mercerized cotton thread. With a 5 mm hook, the result is not at all nice. Would you be able to tell me what yarn I can substitute for the Honeysuckle you used?
Tamara Kelly says
Hi Gertrud! The yarn I used was a fingering weight cotton, 4 ply fashion weight. There are lots of ideas here: http://rav.to/1HeZqCr I'd go with a smooth one, but non mercerized might be best.
el says
hi. i'm quite new to crochet. i'm using a sport weight yarn & a 5mm hook but the width of my shawl seems smaller than yours. just wondering, does this pattern require blocking? thank you.
Tamara Kelly says
It can, depending on the fiber content of your yarn! It could just be a matter of tension though.
Deirdre says
Now i am confused. At the end of row 3 you sayibg dc2tog, skipping the ch1 space and the turning chain. But your diagram shows even stitches across. Not sure what to do there. Plus wouldn't skipping the turning chain on every other row (as your pattern repeats row 3 and 4) wouldn't you be decreasing those rows when skipping the turning chain?and if it is a decrease, does row 4 compensate for the decrease?
Tamara Kelly says
When confused, always follow the diagram. 🙂
Ashley says
Are the instructions correct? Am I really supposed to use an H hook for the fingering weight yarn? It feels REALLY big! I can't even get past row 1 because it's turning out so lumpy and hole-ey. 🙁 What am I doing wrong?
Tamara Kelly says
I like to use an H hook with fingering weight quite often, but you can use a smaller hook if you prefer! You might try blocking a swatch though to see if you really want it denser.
Linda Burch says
What is the name brand of the yarn you are using for this pattern and where do I get it from?
Tamara Kelly says
Unfortunately this yarn is discontinued. But any fingering weight yarn should be a good substitute!
Linda Burch says
Thank you for your response. What name brand is a good fingering weight yarn.
Linda B
Tamara Kelly says
There are dozens of great ones - Knit Picks is good if you like ordering online! Otherwise look for "sock" yarn at the store. 🙂 What's good is such a matter of personal preference.
lessi says
Hi! I am looking to crochet this pattern but on a smaller scale... can you tell me what the variation is?
Tamara Kelly says
Maybe this will help: Chevron Lace Scarf
lessi says
Thank you! That is exactly what I was looking for!!!
Kimk says
I love the look of this wrap. Like many others, I'm relatively new to crochet and am still getting my head around the charts.
The video is useful but I did find it confusing with the ends of each row.
I've undone and restarted several times, and with different yarn but still end up with one edge working fine but the other growing longer (in terms of stitch count not tension). When I start with 91st and follow your video my rows end opposite to yours.
Any help would be appreciated.
Tamara Kelly says
Hi Kimk! I'm sorry you're having trouble. Chevrons are one of the trickiest shapes to crochet.
Kristy says
Would mercerized cotton work for this?? Looking to make a lightweight scarf and LOVE your pattern 😉
Tamara Kelly says
Thank you so much Kristy! I think it would work very well! 🙂
Ashley says
Hello!
At the end of row 4 where it says "Ch 1, skip 1 st, and work [dc, ch 1, dc] in the last st of the row.", when I get to that part I'm already on the last stitch and all that's left is the chain 3. Do I stitch into one of the chains or the space itself? Thank you!
Tamara Kelly says
Have you watched the video tutorial?
Brenda says
Hi! I am using your "wrap" pattern along with another pattern to make a flowing tunic. If you want to see the progress on ravelry my user id is bubbasboo and the project is titled TRUMPET VINE CHEVRON LACE TUNIC. See the notes I posted there. I will update the pics as I progress. Thanks so much for your pattern.
Tamara Kelly says
Looks like it will be a gorgeous project, Brenda! Thank you!
Rhymeswithlevi says
I just finished mine last week and posted it in ravelry.com. I'm very pleased with how it came out. My grandma would be so proud of me! Thank you for the free pattern!
Tamara Kelly says
😀 Thank you so much! I'm glad you liked it!
Patr8ce says
I have enjoyed making this wrap. And thanks so much for adding the symbol chart. It's basically all I've used to crochet it. Was wondering if the dimensions of the wrap (68" x 14") are the dimensions after blocking. TIA
Tamara Kelly says
Thank you! The dimensions were before blocking - back when I made this, I wasn't the devoted blocker I am now. 😉
Patrice says
Ok great, Tamara, thanks. I'm just getting into blocking myself. I used Cascade UltraPima Fine (the yarn my customer chose) and it's 16" wide so I'm not sure if I'm going to block it. The fabric has A LOT of stretch to it. I'll probably blog about it at some point and will have a link in it to your pattern.
Tamara Kelly says
I think with that yarn blocking would be great! 🙂
Patrice says
Will definitely consider it.
gmail sign in says
It's free? ;o Thank you so much for sharing this pattern! I can't wait to try it! Thank you very much!!
Tamara Kelly says
😀 Thank you!
Tanya Elbert says
I'm having trouble with the edging. Is there a video you can post of this? My corners don't come out looking the same. One is more rounded and the other is more pointy. Thanks for your help
Tamara Kelly says
Hi Tanya! Unfortunatley, I can't return to this pattern right now for tutorials, but it's normal for them to be a little different, as the stitches are different! To combat this, a stiff blocking will help, and you can add a picot to the 3sc sections to increase the pointiness where needed. 🙂
DiAne says
Hi! This pattern is so pretty, and I desperately wanted to make a poncho with it. But I just couldn't figure out why it was not working out. After reading the blogs, I realize that the part that is confusing is the last part of the 3rd row- skipping the ch space and turning ch. I kept trying to crochet that too. I hope maybe this will help other people too. Thank you for sharing your beautiful pattern!
Tamara Kelly says
Ah, perhaps so! Thank you, and thank you for sharing that Diane! 🙂
Cheryl Thwaites says
I have just completed this wrap in 8/4 cotton in light olive and it looks fabulous, such understated elegance. I love this pattern so much that I will repeat it, but have decided to add another 20 stitches next time. I had no problem with the pattern at all. Thank you so much!
Tamara Kelly says
Thank you so much, Cheryl!
Patricia says
Can you tell me the article number and color of me you are you using this on Etsy
Tamara Kelly says
Hi Patricia! This yarn was discontinued over 10 years ago.