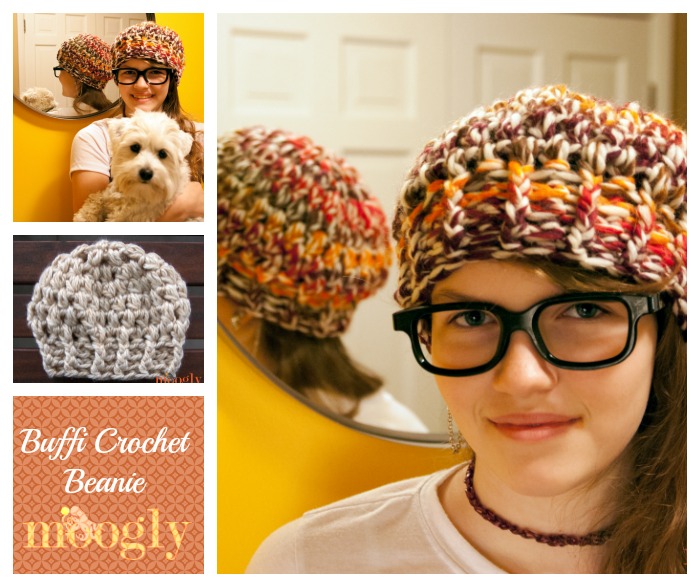
Bulky yarns are so fun to crochet with - and super bulky is super fun! Gotta love a crochet pattern that whips up in a flash and looks this good! The Buffi Crochet Beanie uses puff stitches and post stitches for a ton of fun and texture - and it's a free crochet pattern right here on Moogly!
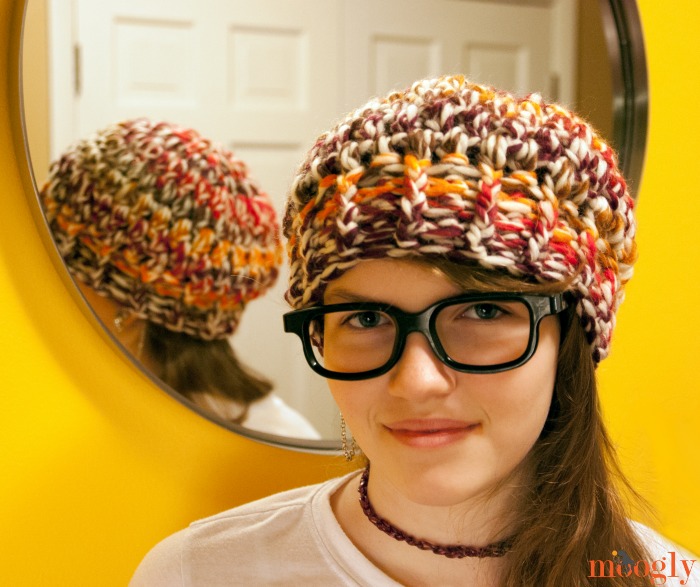

I made the Buffi Crochet Beanies with two different super bulky yarns - Adriafil Asso and Lion Brand Heartland Thick & Quick. Both look and feel amazing, and I love the different looks they give the same pattern! The Asso has some great fun color changes, with twisted plies that look like two yarns held together. And the Heartland Thick & Quick features a more subtle tweedy look. I love them both!
![]()
Buffi Crochet Beanie
Add this pattern to your Ravelry Queue and Favorites
- US - N, 10.00m hook
- 70 - 108 yds super bulky yarn
Adriafil Asso; 54 yds/48 m; 50 g/1.76 oz; 75% wool/25% acrylic; Color 63 - large hat
Lion Brand Heartland Thick & Quick; 125 yds/114 m; 142 g/5.01 oz; 100% acrylic; Acadia - small hat
Gauge: 3.5" after Round 2
Sizes: Small (17-19"); Medium (19-22"); Large (22-24")
Special Stitch:
puff st - yo, insert hook into indicated st, yo and pull up a loop, yo and insert hook in same st, yo and pull up a loop, yo and pull through all 5 loops on hook.
NOTE:
For abbreviations, stitch definitions, and tutorials, please see the Crochet Abbreviations page.
Instructions
ALL SIZES:
Round 1: Starting with a magic circle, ch 2 (does not count as a st here and throughout pattern), [puff st into the circle, ch 2] 4 times; join with a sl st in the first puff st. (12 sts - 4 puffs/8 chs)
Round 2: Ch 2, [puff st in st, ch 2, puff st in ch sp, ch 2] 4 times; join with a sl st in the first puff st. (24 sts - 8 puffs/16 chs)
Round 3: Ch 2, [puff st in st, ch 1, puff st in ch sp, ch 1] 8 times; join with a sl st in the first puff st. (32 sts - 16 puffs/16 chs) Go to the instructions for the size you are making below.
![]()
SMALL:
Round 4: Ch 2, [puff st in st, ch 1, skip ch sp, puff st in st, ch 1, puff st in ch sp, ch 1] 8 times; join with a sl st in the first puff st. (48 sts - 24 puffs/24 chs)
Round 5: Sl st into ch sp, ch 2, [puff st in ch sp, ch 1, skip puff st] 24 times; join with a sl st in the first puff st. (48 sts - 24 puffs/24 chs)
Round 6: Repeat Round 5. Go to the instructions for the brim below.
MEDIUM:
Round 4: Ch 2, [puff st in st, ch 1, skip ch sp, (puff st in st, ch 1, puff st in ch sp, ch 1) 3 times] 4 times; join with a sl st in the first puff st. (56 sts - 28 puffs/28 chs)
Round 5: Sl st into ch sp, ch 2, [puff st in ch sp, ch 1, skip puff st] 28 times; join with a sl st in the first puff st. (56 sts - 28 puffs/28 chs)
Rounds 6 - 7: Repeat Round 5. Go to the instructions for the brim below.
LARGE:
Round 4: Ch 2, [puff st in st, ch 1, puff st in ch sp, ch 1] 16 times; join with a sl st in the first puff st. (64 sts - 32 puffs/32 chs)
Round 5: Sl st into ch sp, ch 2, [puff st in ch sp, ch 1, skip puff st] 32 times; join with a sl st in the first puff st. (64 sts - 32 puffs/32 chs)
Rounds 6 - 7: Repeat Round 5. Go to the instructions for the brim below.
BRIM:
Round 1: Sl st into ch sp, ch 2, puff st in each ch sp around (do not ch between puffs); join with a sl st in the first puff st. (24, 28, or 32 sts)
Rounds 2 - 5: Ch 2, *fpdc, bpdc; repeat from * around; join with a sl st in the first fpdc. Break yarn and finish off.
And that's it for the Buffi Crochet Beanie! I hope you enjoy the pattern - I can't wait to see the fun spin you all put on it!
The Fine Print
Written pattern copyright Tamara Kelly 2014. Please do not reprint or repost this pattern. Please do link to this page to share this pattern with others. If you wish to make items for sale from this pattern, please visit the About page for details. Thank you to Adriafil and Lion Brand Yarn for providing the yarns for this pattern!

Tracy G in SLP
Cute, cute, cute! Thanks so much for sharing so many free patterns. I'm wearing my Artfully Simply cowl today and I love it! 🙂
Tamara Kelly
😀 Thank you so much Tracy!
Zipporah
It certainly does look comfy! I love crochet but one issue I have with it are the holes and gaps that are often present. Seems to defy the goal of warmth. But this pattern looks like it maximizes warmth while minimizing gaps and draftiness. I look forward to trying it out! Thanks!
Tamara Kelly
😀 Thanks Zipporah! I tend to overheat, so I do like a little more breathability in my hats, but I know some people add felt liners too!
Raena
I love it! The colors in the yarn you used make the hat so much fun. It will be the perfect hat to send to my brother's girlfriend since they're battling the cold in Wyoming. Thank you for sharing another great pattern with us.
Tamara Kelly
Thank you! 😀
Gayathri
That's a lovely beanie. It would make a great gift to someone and the best part is that can be done in less time.
Thanks for sharing the pattern.
Lauren
Thank you! What would the alternative start to Magic Ring be? I can not master that. Lol.
Tamara Kelly
I'd start with a ch 4 and join in a ring. 🙂 Thank you!
Terra
What color did you use for the multicolor?
Tamara Kelly
The label just has the number listed in the pattern. 🙂
Faith
i love that yarn! I've never seen it before! So funky! Gotta get some!
Kita
Being allergic to wool, I always appreciate when yarn recommendations have a non-wool suggestion. Thanks for that!
Tamara Kelly
You're very welcome Kita! It's rare that a substitution can't be found. 🙂
Amy
Question on gauge....3.5" after round 2. Is that from center to outside? I've never made a hat before. I've got 2.5" after round 3. But....I'm using different yarn. I'll likely need to adjust. But....just wondering if this is measured from center to outside, or totally across? Thank you, and for the pattern!
Tamara Kelly
Hi Amy! Great question! That would be all the way across, the diameter. 🙂 You're welcome, and thank you!
Barbara
Thank you for a great pattern! Can we use #5 bulky yarn? And if so, which hook size? Thank you!!
Tamara Kelly
Thank you Barbara! You can, but it will turn out a bit smaller. A K or L hook would likely work well with bulky. 🙂
Jenni Lassen
Thank you for the super easy and quick pattern. I made one for my niece with an improvised scarf but I don't know how to upload the picture so you can see it. I used Loops & Threads Charisma Black Raspberry. Turned out really cute. Thanks again.
Tamara Kelly
😀 Yay! Thank you Jenni! If you'd like you can email me the photo or share it on the Moogly Facebook page!
Kathy
Love this hat and how fast it works up. I am confused with the stitch count after Rnd one of the brim. It says 24 for the medium. I keep getting the 28 as was the count for the last Rnd of the medium size hat. Am I missing decreases somewhere? Thanks so much.
Tamara Kelly
No, you were right, my stitch counts there were off. I have no idea how I did that, but it's fixed now. 🙂
fiddlyfingers
This is just gorgeous, so chunky and yummy 🙂
deborah
Hi.. under the brim row 2... this makes no sense to me. Usually when you do a fpdc or bpdc you wrap it around a stitch but the instructions don't say that. Thanks
Tamara Kelly
Hi Deborah! "Around the stitch" is implied with post stitches. 🙂
Tania C
So we are to go around the puff part stitch itself?
Tamara Kelly
You would want to keep it close to the top of the stitch, but yes! 🙂
Rebecca O'Brien
For the medium when I start the brim I get 28 puff stitch every time. Am I missing a decrease? Help!!
Tamara Kelly
28 is the correct number. 🙂
Dana
Do you have a video of this beanie and what is level of this pattern?
Tamara Kelly
Hi Dana! I don't have a video, at least not yet. It's probably beginner to intermediate. 🙂
miriya
Hi there I love your patterns having made so many for gifts and donations 🙂 Could this pattern be adjusted for use with redheart supersaver and a 6/6.5 hook? Super cute!!!!
Tamara Kelly
Thank you so much Miriya! I think it could, you would just need to add more increase rounds. Or, you could use the supersaver held doubled to act as super bulky! 🙂
Hillary
What a great hat! I love how creative you are. You wouldn't have a matching scarf pattern would you?
Tamara Kelly
Not yet! Thank you! 😀
Dana
This was so much fun! It was done in no time & fit my head very well (I have a hard time finding/making hats that fit my weird head). I loaded the pics on ravelry (danabug1964). 🙂
Tamara Kelly
😀 Thank you so much Dana! I'm so glad to hear it!
Kelly
Hi! Love this hat! Thanks for posting pattern! Following size small and you lost me at row 5. Starting with the sl st. It's different than the other rows, right?
Thanks o much
Kelly
Tamara Kelly
Thank you Kelly! It's the same as the others except now that you're working even and so only working the puff stitches into the spaces between the puff stitches of the previous rows. So you slip stitch into that next chain space to get you in position for the first puff of that round. Does that help?
Kelly
Yes, it makes perfect sense. Thank you 🙂
Melanie
Love this hat and I've been waiting to use my super bulky yrarn for something fun!
Quick question, I'm on the medium hat, row 4 and I'm getting confused with the round brackets within the square ones. I keep coming out to 50 stitches and not 56. Can you explain how I would do the 3 times/4 times repeat please?
Tamara Kelly
Hi Melanie! You start at the beginning of the bracket, then do the part within the parentheses 3 times, then go back to the beginning of the bracket and start again from there, doing the part within the parentheses 3 times again. All together you will follow the bracketed instructions (including the part in parentheses) 4 times total. So the part before the parenthesis will be done 4 times, and the part within the parentheses will be done 12 times. Does that help?
Melanie
Yes, thanks! I did end up figuring it out and its working up perfectly! I'm chalking up my confusion to a 7 month baby brain 😉
Liz
this is perfect up to the brim but when I do the brim it is too tight do you have any suggestions please
Tamara Kelly
Hi Liz! I'd try working the brim with a larger hook. 🙂
Liz
i will give it a try, i love this pattern thanks a million
Emily DRAUGHON
I am so confused with round 4 for the medium size????? Please Help i don't understand the [[ and the ))
Tamara Kelly
Hi Emily!
Rnd 4 reads: [puff st in st, ch 1, skip ch sp, (puff st in st, ch 1, puff st in ch sp, ch 1) 3 times] 4 times
This means you repeat the entire part in the brackets 4 times. Within each of those repeats, you repeat the part in parenthesis 3 times.
Emily DRAUGHON
thanks i figured it out.....
terra tinder
Okay so I am making this right now (medium) and I don't know what's going on but I have the right number of puff stitches for all rows before:
Round 4: Ch 2, [puff st in st, ch 1, skip ch sp, (puff st in st, ch 1, puff st in ch sp, ch 1) 3 times] 4 times; join with a sl st in the first puff st. (56 sts – 28 puffs/28 chs)
For some reason I only have 24 puff stitches, not 28....
HELP PLEASE, TAMARA!
terra tinder
How is it that on the small you repeat the brackets 8 times, on the medium only 4 times and the large is
16? I am so confused on this round 4 of medium. If you only repeat the brackets 4 times and within that the parenthesis 3 times then shouldn't that only give you 10 puff stitches?! I am really confused by this 🙁
terra tinder
nevermind, I'm dumb lol! I got it after an AH-HA moment haha!! Sorry! 😛
Tamara Kelly
😀 GLad you were able to get it all figured out!
Debra
I just got finished making this hat for my granddaughter the medium size I used bulky five but I Put two balls together to make one would that equal The super bulky six? I'm worried that it's not gonna to fit her she doesn't live here I have to mail it to her
Tamara Kelly
To make a super bulky you would add 2-3 strands of worsted. This one might be a bit big, but if you used the same hook size it could work - you'll want to measure the brim. With the hat laid flat, it should be about 10-12 inches wide, with some stretch.