
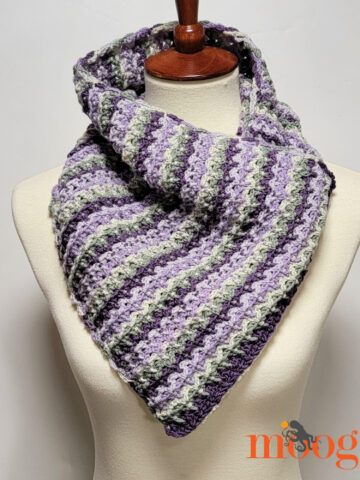
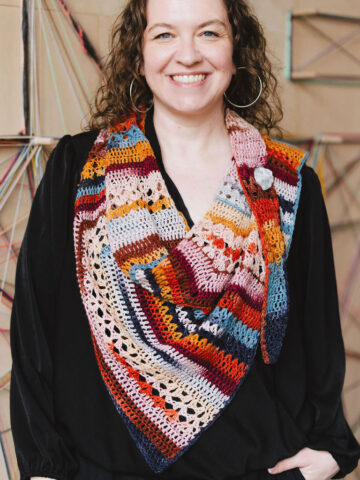
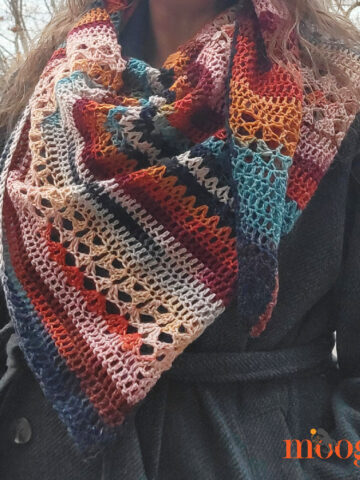
The Artfully Simple Infinity Scarf pattern is super easy, hides a multitude of sins, and comes with just one rule: no stress allowed! This finished scarf is between 50 and 60 inches long, and twists and turns on itself naturally - perfect for wearing doubled as a cowl, as well as long, tied, anything you can come up with! The little button tie embellishment is a separate optional piece, and instructions for that are included as well!
Disclaimer: This post includes affiliate links.
Prefer an ad-free PDF? You've got options!


Prefer the free blog version? Keep scrolling!
The Artfully Simple Infinity Scarf is a great one skein project that really shows off interesting and luxurious yarns. Perfect for thick and thin yarns, as well as yarns with long color changes, it can be made with any size hook and yarn - just start by chaining until you've got your desired length in a multiple of 7 sts plus 5 and go from there. Using this pattern, every cowl will be unique. In the right yarn it's a wearable work of art!

Artfully Simple Infinity Scarf
Add this pattern to your Ravelry Queue and Favorites
US - K, 6.5mm hook
US - I, 5.5mm hook (optional, for making tie on button only)
270 yds Red Heart Unforgettable (4-Medium; 100% Acrylic; 100g/3.5 oz, 247 meters/270 yards)
Colorway Shown: Tidal
This yarn is discontinued, but this pattern genuinely works with almost any yarn you have - it's great for those odd hanks you purchased without knowing what to make!
Optional: Button (1 ¼" or 32mm button shown)
Helpful Links and Tutorials:
Basics of the Artfully Simple Infinity Scarf
How to Crochet The Button Tie for the Artfully Simple Infinity Scarf
Klik hier voor de Nederlandse vertaling PDF, met dank aan http://terraysleven.blogspot.nl/
Artfully Simple Angled Scarf (for those who prefer a traditional scarf style)
How to keep it SIMPLE while making this scarf:
- If the starting chain is twisting up on you, try to straighten it out for the first stitch, but don't worry about getting out every twist - a couple twists are good! Keep going!
- If you finish the first round and find out you've started with an "off" number of chains, pretend as if they're there, stick with the pattern and just keep going!
- If you realize you skipped a stitch 2 rows ago, just keep going!
- If you run out of yarn before you get through all the rows? Well then stop, because you're out of yarn, silly. Just skip to the end of the pattern and finish off as directed! Though you might want to pull out a row to make the tie at the end.
Here's a Chart to help you visualize how it comes together:

Artfully Simple Infinity Scarf Instructions:
NOTE: This pattern is worked in a spiral, so there is no join at the end of the rounds.
To start: Using K hook, ch 215.
Round 1: Work a sc in the first ch made, making the loop to work in the round. Dc in the next ch. *Ch 5, sk 5 ch, dc in the next 2 ch. Repeat from * until you have reached the end of the loop and there are approximately 5 chains left unworked.
Round 2: Ch 5, sk the remaining unworked starting chains and the sc from Round 1. Dc in the first dc from Round 1, then dc again in the ch 5 sp. *Ch 5, sk next dc, dc in the next dc and the ch 5 sp. Repeat from * until end of round.
Rounds 3 - 20: Continue working [ch 5, sk next dc, dc in the next dc and the ch 5 sp] in a continuous spiral. The pattern will seem to slant to the left as you work, as seen below. Stop when you count 20 rows of mesh, or when you're almost out of yarn. To finish off, ch 5, sk next dc, sc in the next dc, and use seamless join in the next ch. Weave in ends.

Instructions for the Button Tie Embellishment (optional):

- Thread button on remaining yarn using a sewing or tapestry needle. Using I hook, ch for 18".
- Slip the button down close to the hook, and skipping over the button, sl st in the 2nd ch from the hook (trapping the button in the loop). Sl st back along ch for approximately 6" or until this sl st section is long enough to fit around cowl when doubled, with a little bit of tension.
- Ch 8 sts (for size button shown) or long enough to create a loop that fits tightly around the button. Sl st in the same ch as last sl st, sl st in next 2 ch.
- Ch to same length as remaining unworked ch, approximately 12". Break yarn and finish off ends.
- To wear, slip button behind cowl and pull it toward the front. Pass button through loop made in Step 3. Let ends fly and jet off to the spa! Or wherever you want to look fabulous.

UPDATE 1/27/13: A few people have expressed the need for more explicit instructions for the tie. If you're confused by the above step by step instructions, try this:
You start by threading the button on the yarn, and then then push it down the yarn a couple feet, away from the starting end, out of the way. Then you make your slip knot like you normally would, and chain for about 18 inches, pushing the button further down the yarn out of the way as needed. As soon as you’ve got your 18 inches, slide the button back toward your work, so that it’s snug up against the working loop and hook. Then, slip stitch in the 2nd ch from the hook, making sure that you yarn over using the yarn from the other side of the button – effectively trapping the button in that space. Then continue as directed.
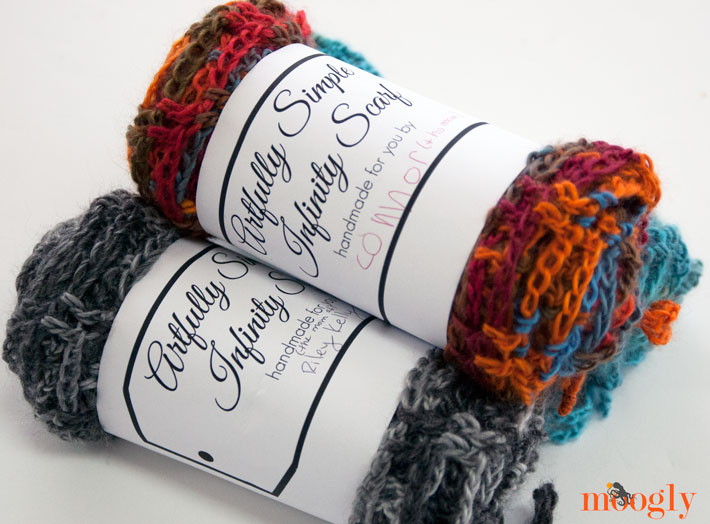
This scarf pattern is practically foolproof! What are you waiting for? With just one skein of yarn, you can have a sexy cowl and scarf to wear everywhere this season, and with the button embellishment pattern you can change up the look in seconds! Enjoy! And if you're gifting it, don't forget the free printable wrapper - CLICK HERE to get it now!
The Fine Print
Written pattern copyright Tamara Kelly 2012. Please do not reprint or repost this pattern, but please feel free to link to this page to share this pattern with others. You are welcome to sell items made from this pattern, but please link back to Moogly with credit for the design on the listing or tag.


Nancy says
This is so cool. I am going to make some gifts with this pattern.
sharon says
I love this pattern, I am I my 5th row..I can't untwist it. Is that how its suppose to be?
Tamara Kelly says
Hi Sharon! If it's twisted, it will stay that way, yes. 🙂
Spectre says
I just wanted you to know that I made this pattern over a decade ago, gifted the scarf to my mum, and she still wears it today! She mentioned the scarf recently and I was inspired to try to find this pattern again, so I can make one for myself. Now I have my next project lined up!
Tamara Kelly says
Amazing! Thank you so much, Spectre!
Mary Lou Broderick says
I have made multiples of this scarf. It is my favorite thing
Tamara Kelly says
Thank you so much, Mary Lou! ♥
michele maks says
Great yarn! Great pattern!
Lorie says
Love this one!
Question- how do you stay on track when counting to 210? I can't even keep 88 stitches counted! Do you use a stitch marker??
Kendy says
bobby pins, lots of bobby pins.
Joyce Pearson says
I get a piece of paper and make a mark for every 10 stitches, but you can use any amount of stitches, then have the marks add up to the number of stitches that you are needing. I keep that paper with my pattern and yarn for future use.
Renee says
Even easier, simply chain in multiples of 7. That eliminates counting and marking! I've made several of these beautiful scarves as gifts (and one for myself), and haven't counted even one of them. When the chain seems long enough, I check the length by putting a temporary slip stitch to join the ends, and put the circle over my head. Leave it long enough to twist and wrap around. If the scarf seems too short, unjoin the chain and add more chains in multiples of 7. (7, 14, 21, etc). The length can vary!
I prefer my scarf with one twist worked into the pattern. To achieve this, simply straighten each chain from the hook to the end, making sure each chain isn't twisted. Then rotate the end of the chain one time. Insert hook and work the pattern.
The math: 210 chains divided by 7 chains per group equals 30 dc pairs when the pattern is worked.
Also, one skein of Bernat Mosaic yarn makes a beautiful and soft scarf. I added one additional row on each side of the finished scarf using Fun Fur. Terribly cute!
fan says
Thanks for your post. When you say give the chain one rotation, do you mean one complete rotation (360 degrees), or one half rotation, like a Mobius? In other words, do you fully rotate it so the front is connected to the front, or just turn it once so the back is connected to the front (like most infinity scarves are done)? I hope that makes sense--thanks.
Candi says
I count - loudly - so no one interrupts me 🤣
moogly says
Lorie, I put in a stitch marker every 50 stitches or so! 🙂
Jeannie says
I'm new to crochet...what's a stich marker?
moogly says
Jeannie, a stitch marker is anything from a specialized little clip sold at craft stores to a paperclip, to a piece of scrap yarn - basically, whatever is handy that you can mark a particular stitch with and then remove later.
Jeannie says
Thank you! 🙂
Lorie says
I've used a bobby pin in a pinch! but they do have the tendency to slip out. safety pins work great!
Erin @A Knot Above says
I use a paperclip and bend it out slightly, I put the longer end through the stich and on the shorter end I bend it outwards from the work and slip a knitting needle stich counter on the end to keep count of my stiches/rows. Works great especially if you have to put your work down and can't remember where you were in your count. Never been a fan of stich markers this is way easier to move up rows 🙂
Nancy L says
I use a contrasting piece of yarn, when you are no longer in need of the marker, just slip it out.
MiMi says
I use lever back earrings!
Andrea says
Hi Moogly or any others out there who may know, is there a trick to reduce the look of fray with this yarn? Yours looks great but mine has a lot of little hairs coming from the yarn.
Thank you
Tamara Kelly says
Hm, thank I'm not sure of. Red Heart might be better to ask on that one!
Lorie says
great idea! I am going to start doing that!
Carolyn says
I have some really pretty mohair yarn that I have been waiting to use for a special project. I think this is perfect and can't wait to see what it turns out like. Thanks for sharing this pattern!
http://www.RhinestoneCloset.com/home.html 🙂
Athena Grace says
This is a great idea. I love it, I already started on one 🙂
sue burke says
Just made this in an evening with a multi color yarn!! Only one problem, I twisted the yarn and the end project had one to many twists in it. Check out if its twisted after your 2nd row.. Unfortunately (ha ha) I will keep this for myself and remake it for my friend!! It is a fun easy scarf!!! LOVE IT!!
moogly says
Ah but sue, with this scarf twists are good! Of course, if you prefer it without twists, that' ok too. I'm so glad you like it! 😀
Stephanie says
Beautiful scarf answer well written pattern. I am going to get the yarn now!!
Sara - My Merry Messy Life says
This is GORGEOUS Tamara! I have seen you posting it on Facebook and I'm sure it's very popular. Great pattern, design and yarn choice. Excellent job! Thanks for sharing at Hookin On Hump Day!
moogly says
Thanks so much Sara, thanks again for hosting!
Sara - My Merry Messy Life says
I'm featuring you this week! Thanks again for linking up! http://mymerrymessylife.com/2012/12/hookin-on-hump-day-25-link-party-for-the-fiber-arts.html
Pam says
Already made two and they r just beautiful. In to a third on in festive sparkly yarn. Can't wait for tomorrows pattern !!
moogly says
I'm so glad Pam! 😀
Lona says
Just finished the pattern in I Love This Yarn Stripes (Cranapple). So easy and shows off the colors changes of the yarn very nicely. I plan on making more of these. Perfect quick gifts, Thank you for sharing.
moogly says
You're welcome, Lona! I'm glad you liked it!
Brittany says
Do you turn it after every row? I havent starteed this pattern yet but when i do is it okay if i email you questions?
moogly says
Sure Brittany! My email is mooglystore@gmail.com.
You do not turn after each row of this pattern - it's worked in a continuous spiral, like a spiral staircase, with each new row just winding around on top of the previous one. You don't have to mark the first stitch of a row or anything like that, just keep crocheting around and around!
Brittany says
when i start this pattern it should be clear about what you are talking about right? lol
Brittany says
could you post a video of just doing the first few rows so i can visualize how to do this?
moogly says
Brittany, I've got it on my list for next time we film! In the meantime, think of it as a spring, with each layer on top of the previous layer as it goes up and around. In a "normal" pattern, each round is joined, typically with a slip stitch, and then x number of chains are worked to get to the height of the new row. In this pattern, rather than joining, the new round just starts right on top, creating not only a left to right movement, but a gentle upward (to the left) curve as you go.
Brittany says
Okay, I think I got it! One more question, how do i do the seamless join?
moogly says
Great to hear! The tutorial for the seamless join is on the moogly video tutorials page. 🙂
Kitty says
I've started this with some plain yarn to figure out if it will work with my recycled silk (because it's hard to count back stitches on old rows with that stuff it may not be possible) but it's pretty easy for a beginner. I did end up ripping out my second row with a heavy heart due to it twisting and me not catching it but now everything is working fine. I strongly advise checking for a twist unless that's what you want.
I can't wait to do this with other yarns and it's inspiring me to work with more spaced out crochet. I think the bernat mosaic yarns would be phenomenal with this.
Petra says
Thank you for sharing the pattern. I'm almost done with my first onr and I am loving it.
Chandi says
I love this! Am starting it now and just posted a pic on my blog, using CASHMERE, hand-dyed yarn. OH, yum. Delish. Love your post! Your personality really shines through and brightened my day. THANK YOU! Chandi
Renee says
I would really like to make this using three smaller balls of different colored yarn that I got for xmas. Is there a way you'd recommend changing colors using this pattern or how you'd do it? it seems like it will be difficult or not as secure when trying to weave ends in ... any help would be greatly appreciated!!
moogly says
Renee, it depends on the type of yarn, but for this pattern I think your best bet might be a Russian Join - here's a tutorial for the technique: http://blog.lionbrand.com/2012/06/19/how-to-russian-join-yarn-in-7-easy-steps/
Good luck and let me know if you have any other questions! 😀
Felicia says
Hey I was just wondering if you have any problem with the final product being sold on Etsy if this site is linked in the listing? Just curious because I have just started crocheting and I would like to eventually sell crocheted items in my shop, but trademarks/copyrights and all that can be confusing.
moogly says
Hi Felicia, thanks for asking! I give permission for anyone to sell finished products made from my Free patterns on Etsy, as long as they do include a link back to moogly with a note that that's where the free pattern came from. Good luck with your shop, and congrats on starting to crochet! 😀
Lorie says
Oh my gosh, you are the most giving and wonderful person! I <3 moogly!!!
Have a super happy new year!
moogly says
Thanks so much Lorie, you too! 😀
juna says
do u have video tutorial for this coz i cant get it here 🙁
moogly says
Sorry Juna, I don't have one yet - it's on the list though!
Lee Ann H says
This looks like a terrific scarf! Thanks very much for posting! :):)
______
Lee Ann H
Crochet...Gotta Love It! Blog
Crochet...Gotta Love It! Website (crochet names and rosary patterns)
Christina Carlton says
May I sell the one I make if I'm successful? I've got no problem linking it back to you or your page. Really hoping I've got enough yarn to do this.
moogly says
As long as there's a link back to the pattern on moogly, you may sell anything you make from my free patterns (as long as it's not the written pattern itself of course)! 😀 Thanks for asking Christina!
Bloominhyacinth says
Oh what a beauty, love this scarf so much. I made this and for some reason decided to lengthen by casting 280 chains to start. Of course its longer, and enables you to wear it various ways. Despite trying real hard to avoid getting a twist, of course it twisted which was a bummer. However, this does not in any way detract from the beauty of the scarf. The yarn I used was Bounty DK (sage green) with faint specks of red and yellow. I wonder if anyone can suggest how to avoid getting a twist in the scarf as I certainly intend to make more of these.
moogly says
Others might have suggestions for you, but I actually designed the scarf to incorporate one or more twists - it helps give it it's shape!
Joy says
I just started on my first scarf, I love it! It's so easy...
Only on my 3rd row and I made my 2nd twist already. I was about to start over, but I'm glad I read the comments and your responses. I'm keeping the twists and will probably be making even more before I am done.
Tamara Kelly says
🙂 I'm glad you're enjoying it Joy!
robbin melton says
I don't use acrylics, but I took a chance and got the yarn to make this. I'm quite pleased and will dive into my personal stash to make more of these!
juna says
plz notify me asap when u make one 🙂
Dana says
I just made the scarf over Christmas & I love it (I have about a jillion twists because I only half know what I'm doing, but I really like it that way). But I'm having trouble with the button tie. I don't think I understand where the button is situated when you start the chain because I'm chaining AWAY from the button & can't figure out how to "Slip the button down close to the hook, and skipping over the button, sl st in the 2nd ch from the hook..." Any way you can help me visualize it a little better?
Thanks for the pattern - even without the button I really love it & plan to make it in multiple colors for me to wear this winter 🙂
moogly says
Hi Dana, I'm so glad you like it! And you're right, I do think the twists add to this scarf rather than detract!
You're not the only person to have trouble with the tie, let me see if I can walk you through it:
You start by threading the button on the yarn, and then then push it down the yarn a couple feet, away from the starting end, out of the way. Then you make your slip knot like you normally would, and chain for about 18 inches, pushing the button further down the yarn out of the way as needed. As soon as you've got your 18 inches, slide the button back toward your work, so that it's snug up against the working loop and hook. Then, slip stitch in the 2nd ch from the hook, making sure that you yarn over using the yarn from the other side of the button - effectively trapping the button in that space. Then continue as directed.
Let me know if you have more questions! 😀 Thanks for reading!
Dana says
That helped a lot! I've now made two scarves with buttons & am working on the 3rd one 🙂
Thanks!
moogly says
Hooray! I'm so glad. 😀
DJ HIXSON says
MAKING THE LOOP TO WORK IN THE ROUND??????????????????? WHAT DOES THAT MEAN???????????????????????THIS IS INSTRUCTION FOR ROUND 1
moogly says
Hi DJ! This just means to bring the first chain you made and the last chain you made together, to start crocheting in the first chain you made - this creates a big circle of chains, and you'll make the scarf working in a spiral over this circle.
DJ HIXSON says
that is usually called a slip stitch
moogly says
A slip stitch is how you usually join to work in the round, but this pattern is worked in a spiral, so you start with a sc instead.
Annie says
The Tutorial really helped make this clear. Thank you so much.
Nancy Wisseman says
Which video should I watch to learn how to work this in a spiral, so there is no join at the end of the rounds?
moogly says
Nancy, I don't have a video for this yet, but I think I'm going to have to make one! Although this scarf is a tube rather than a flat circle, maybe this video will help you visualize it better: https://www.mooglyblog.com/circles-rounds-vs-spirals/
Anna says
This is so my kind of pattern no stress just go with the flow I love it!
moogly says
Exactly Anna! 😀
Andi says
Could this be done as a mobius, putting an intentional twist in it?
moogly says
Absolutely Andi! Some of us manage to twist it without even trying lol!
Arlene Brands says
Is there any way I can print this pattern ot without wasting all my ink on printing all the comments? Thanks!
moogly says
Sure thing Arlene! Look for the green Print Friendly button at the bottom of the pattern. This will print just the pattern without any ads or comments. You can also choose to omit the photos with a check box at the top. 🙂
Regina says
Vielen Dank für dieses wunderbare Muster,es ist einfach nachzuhäkeln und sieht toll aus .Danke und liebe Grüße
moogly says
Danke!
Jennifer says
How does this scarf work out with a different size hook? How much will it change the look of the scarf? If my hook is smaller, do I need to chain more at the beginning?
moogly says
Jennifer it all depends on the combo of yarn and hook - but this is a great pattern to play with! If you use a smaller hook, you will want to chain more to start - the smaller the hook, the more chains you'll want to start with!
Kay says
I love the looks of this pattern--can't wait to get started on it thank you so much for posting it for us!!!!
Jennifer says
I finally made the scarf up -- I used an "I" hook and bernat satin in pink. Very nice and super soft. This is a very petty question: but when finishing, your pattern says "ch 5, sk next dc and sc in next sc;" do you mean sc in next dc, then finish with seamless join?
moogly says
Whoops, right you are Jennifer! Thanks, I'll edit it right away! 🙂
Jennifer says
I have so far made several soap savers, 3 bobble hats, one brain waves hat (you linked to), several scrubby "sponges", the scarf, and I've started another men's hat. All of this instead of finishing my son's afghan Christmas present. I so love your site. Would you like photos? (not to brag, really, but sometimes as a browser, it is helpful to see items in different colors, etc.)
moogly says
That's so awesome Jennifer! 😀 I love to see photos! Are you on the moogly facebook page? That's usually the easiest way to share pics. 🙂
Destiny Brazille says
this is so easy. I was having trouble with another pattern but yours has opened my eyes. I will be working more of these!
Terry says
Thank you for this wonderful pattern! I have made 2 of these so far, using Lion Brand Homespun, and while one skein doesn't come up to 20 meshes (really about 1/2 that or a little more) because of the bulkiness of that yarn it still looks GREAT! I have 2 more to make so I can give them to the women in my prayer group. But I know there will be more in my future because I want one for myself and my daughter in law wants one. Great job on a fun pattern!
moogly says
Thanks so much Terry! I'm so glad you like it! 😀
Jennifer says
I absolutely LOVE this scarf! Have made several gifts for friends and everyone can't stop raving. Thanks for sharing your creativity!
Div says
Hello! I absolutely love this scarf and I just went out to get some new yarn for it today but I have one question for you... Does ch 5, sk 5 ch mean chain 5, skip 5 chains or chain 5, skin 5 chains? That's the oooonly thing confusing me and keeping me from starting lol
moogly says
Hi Div! sk = skip. 🙂
Div says
I'm such a dufas I meant to ask does it mean skip 5 chains or skip the 5th chain lol
moogly says
😀 Skip the entire next chain section. Skip 5 chains.
Pam says
Great scarf, love it!!!
My question is, when I start row 2, should i be looking at the right or wrong side of the piece? I have one twist..... thanks!
moogly says
The RS will spin around a bit with the twist, but you don't "turn" or flip the fabric over, so you should always be working from the same side of the piece.
Leila says
I love this pattern. I think I did something wrong when doing round 2. About half way in, I realized I had somehow changed from the top of the chain to the bottom of the chain. Is this what you mean by twists? Thanks for your help. Would this pattern work with a ribbon type yarn?
moogly says
That is indeed how those crazy twists happen! The twists are actually a good thing with this pattern - it helps create the texture and movement. 😀 This pattern has been made with all sorts of yarn now, including ribbon, and they all work great! And thank you!
Michelle I. says
I have the same issue. I end up at the bottom chain instead of the top chain...How do I get back to the top chain is my question? Because if I keep doing the pattern on the bottom chain then it's going to slant in the opposite direction 🙁
Tamara Kelly says
I'm not sure what to tell you other than to twist the chain on purpose?
Michelle I. says
Since I ended up somehow on the bottom row and the double crochets were leaning towards the top right (instead of the top left), I kept working on it that way, so I did chain 5, dc in the chain space and then dc in the FIRST dc.
Sarah says
This is a beautiful pattern and I'll be making one today with some LBY Homespun to see how it turns out! I do have a question for you... Your note at the bottom says that the pattern itself may not be reproduced, but it does not mention the sale of finished products. If I link back to your blog for the pattern rights, am I permitted to sell this?
moogly says
Thank you Sarah! You are free to sell any finished products made from this pattern, but I do indeed ask that you link back to the moogly URL with credit for the pattern, either on the listing if online or on the tag if it's in person sales (craft fairs, stores, etc). Thank you and good luck with your sales!
sandra says
My sister-in-law loves infinity scarves, but I am still learning how to read patterns. I have started many to eventually find out that I don't understand the instructions. I have read all the comments and am imbarassed to say I still do not understand the spiral idea for round 2. Is there other web tutorials you would reccomend until you are able to post yours? Is there a way to be contacted when yours is posted?
moogly says
sandra, I'm afraid I haven't been able to find anything that I'm afraid won't be even more confusing. However, we are filming tonight (should be anyway, barring incident!), and I'll do my best to make sure the ASIS tutorial is posted Wednesday! You can subscribe to the RSS feed for the blog, or if you're on Facebook come "like" the Moogly page, or follow moogly on twitter - I'll be announcing it in all those locations! 🙂
sandra says
thank you.
Eden says
Awesome pattern, super easy and looks great! Very versatile!!
Thank you
Nancy Wisseman says
I'm in the process of making one out of Homespun yarn and I was wondering what the approx. width your is. I figure that would be a better way for me to judge if I'm done. I'm using a couple of colors of yarn (left overs) so I can't use the "use up the skein" idea. So far I really love your pattern. Thanks
moogly says
Nancy, I believe about 18 inches, but you should definitely try it on and see what you think before you finish off. 🙂 And you're very welcome!
Nancy Wisseman says
I ended up making it only 5 inches wide. I was working with small balls of leftover yarn and that is what I ended up with with the colors I chose. I tagged you on my pictures and gave you credit. Next time I'll plan it out better and make it wider, although I do like them narrower than 18", so maybe I'll see what 8-10" looks like with the bulky yarn.
moogly says
😀 Thanks Nancy! Every one I've seen has been so different! I love seeing all the variety with the different yarns.
brittany says
How would you weave in the ends on tthis scarf?
moogly says
Hi brittany! Think I responded to you via email, but just in case you're a different brittany, you just weave the ends back along the chain to the nearest double crochets, and go up and down the stitches a few times, weaving through the yarn end itself if possible. Basically, the same thing you'd do when weaving in any project. If the yarn you're using is particularly slippery or you feel like it just isn't secure, then a few stitches with matching thread should do it.
Lori Josifek says
I definitely want to make the Artfully Simple Infinity Scarf, but am wondering if it will work with some Starbella yarn that I've been saving for a special project. Have you ever tried it with that type of yarn?
moogly says
I know it's been made with ribbon yarn, but I don't know about the Starbella. I don't see why not though!
Manuela says
Hi,
thank you so much for this pattern. I saw it, and felt in love 🙂
But first of all I had to translate it......The only problem I have/had is the length... but I'm sure I will find the right length for me.
Greetings from Vienna
Manuela
barb says
hi, I LOVE this, the pattern is so easy, but... this will be the third time i am taking it apart back to the first round. all of a sudden my pattern is going from the right to left. what am i doing wrong? btw I am left handed so my climbing up is to the right.
moogly says
barb, I wish I knew! Are you saying the slanting is going in the other direction, or you've started crocheting backwards?? I'm afraid I don't understand what's happening on your end.
HEATHER says
So very pretty! I'm making this !!!
Liz C. says
Hi. I'm working on the asis which i absolutely love, but i have a question. I'm a beginner and i twisted my starting chain, which i know u said not to worry about, so i kept going, but now its a mobius. Its actually pretty cool looking. It kinda looks like a chevron print so far. I was just wondering if u think this is a bad idea or not? Thanks so much!
moogly says
Liz, if you like it, go with it! I think it's a great idea! 😀 When it's all bunched up for wearing I think it'll look great.
Liz C. says
Thank u! I'm close to finished and i love it! I've already picked out yarn for another one.
barb says
how many chains would you suggest for super bulky yarn? i made 200 and that was too long
moogly says
barb, whatever gets you to 60 inches and is divisible by 5! 🙂
Michele says
I made two of these this weekend and LOVE them! Thank you so much for the pattern.
Pat Hilliard says
Can someone tell me if one skein of yarn is enough? Thanks.
moogly says
Pat it depends on what yarn you are using! The pattern calls for 280 yds worsted weight yarn (Red Heart Boutique Unforgettable in Tidal shown), and that's the content of one skein of this yarn.
Pat Hilliard says
Thanks, I am using the same yarn pictured?
moogly says
Then it'll just take the one skein. 🙂
Mindi says
I made four of these this weekend. I had part of a skein of Red Heart Incredible (Parrot) left from another scarf, so I made a narrow scarf from it. Then I used Bernat Super Saver in Lotus, Violet Twighlight, and Flamenco, which is my favorite. I'm sad that Red Heart Incredible is discontinued because I really like it.
The Bernat yarn is 100% acrylic, but it feels as if it contains rayon. It's really cool.
I was so excited when I went to JoAnn today to get buttons and saw that the button you used is there! I really wanted that button. There were only two, so I got two other cool buttons.
The pattern is awesome, and I love your comments--"If you run out of yarn before you get through all the rows? Well then stop, because you’re out of yarn, silly." Hilarious!! I'm sure I'll be making more for gifts.
moogly says
😀 Thanks! I'm so glad you like it!
Sherrie says
I don't really crochet. Is it possible to do this pattern by knitting? I think it's so pretty!
moogly says
Thank you Sherrie! I have no idea how one would knit this. But it's a great beginner crocheter pattern! Only a couple of stitches to learn. 😉
Evelyn says
I just began crocheting! I would LOVE to wear something like this for my cruise in June. If I made this with a thin yarn could I wear this in the warm months? It looks like a beautiful piece of art rather than a scarf-like piece. Do you have any suggestions as to how many chains to begin with using a thin yarn (there are SO many exciting things to figure out about crocheting that any helps would be GREATLY appreciated!!)
moogly says
I think that would be fantastic Evelyn! To use a thinner yarn, just pick a hook one size larger than that suggested on the label, and chain until it's between 50 and 60 inches long. Then follow the directions as written from there! You might not want to add as many rows, to keep it lightweight, but play with it and try it on as you go and I'm sure you'll be able to figure out when to stop. 🙂 Enjoy your cruise!
Lorie says
I just finished this scarf in shades of hot pink and purple......love it, love it!!!! I just happened to have the perfect button for it in my button box. Thx for the pattern!!!
lovewrens says
This is, by far, the easiest and most beautiful scarf I've ever made. Thank you so much for the pattern!
carole says
I just wish the whole pattern had printed, about the last three or four words got cut off. Can't wait to get started.
Connie says
Love the scarf. Just started the first one but I can't seem to find a cute button like the one you have. Where did you find it?
Tamara Kelly says
Thanks Connie! I got it at JoAnn Fabrics.
Connie says
Thank you. I looked their already and didn't see anything so I'll go back and look again. Could you tell me the name brand?
Tamara Kelly says
I wasn't able to find it on their website, but I did find it here: http://gobstock.com/blumenthal-button-cut-outs-blue-bird-1pc-3-pack.html?gclid=CL6w3cL4hrYCFUqoPAodMAMAQg
It's sold out at that site, but there's a picture to help you find it in person! 🙂
Connie says
Thank you.
Connie
Marie says
Made one using Prism,but i had to chain 410 to get my circle to 50 inches and 6 rows,got the Unforgetable and had to chain 350 to get my circle to 45 inches.... what am I doing wrong
Tamara Kelly says
Hi Marie! Sounds like we just have different gauges - nothing "wrong" about that, just the differences between people. 🙂 If you like how it looks, go with it, but if your chains are bigger than you like then you might want to try a smaller hook.
Marie says
So the finished scarf is 50 inches long or is the chain 50 inches long before you make the circle or after the circle.
Tamara Kelly says
The chain is 50 inches long before you make the circle.
Marie says
Thank you so much,don't know why I was making this so hard...tooooo much thinking.
.
Jinx says
I am a crochet instructor at a (chain) craft store. I was wondering if it would be alright with you for me to use this pattern at my demo next Wednesday? I would ***NOT*** be teaching anyone. The demos are just to show the craft and highlight certain yarns/techniques. (Basically I just sit there and get paid to crochet for a few hours and talk to people, haha, so I'm really just looking for an ultra-simple but still eye-catching design to be working on, and this fits the bill wonderfully!) Again, I would ***NOT*** be teaching this or giving away the pattern AT ALL! However, if you'd like, I could print up some cards with your website/link to this and give them to any customer who asks specifically about the pattern? Would that be alright with you? 🙂
Tamara Kelly says
Jinx that would be fantastic! I love it! 😀
Jinx says
Awesome, thank you so much! 🙂
Carol Heinbuch says
Where can I get this yarn. My michaels doesn't carry it?
Tamara Kelly says
Hi Carol! I got it at JoAnn Fabrics, though it's been selling out like crazy! I did find a few colorways in stock on walmart.com and robertscrafts.com.
mrsblocko says
I made 2 of these scarves and wrote about them here. The first one was done in some random worsted yarn and it didnt hang the way i wanted it too, then I got some of the yarn you used originally and I love it. Thank you so much for sharing the pattern!
Tamara Kelly says
You're very welcome! I'm so glad you gave it another try! 😀
Elizabeth says
I am not a scarf person, but I thought this looked like fun. I had some self-striping red heart super saver I needed to use, and I thought it would be good for this. I am just trying to figure out how you got 60 inches. I am 8 rounds in, I crochet loosely (always), and my original strip was no where close to 60 inches, and neither will the width. How did you do it?
Tamara Kelly says
The width/row height shouldn't be 60 inches (closer to 10-20), but the circumference should be between 50 and 60 inches. Everyone has a different gauge, and different yarns work up very differently!
Deb says
Really pretty! Thanks!
Viki says
This is the second pattern I've seen by you with a couple more at the bottom of the directions -- you are such a talented and creative crocheter (such a word?) . . . I am in LOVE with your designs. You ROCK ! ! !
Tamara Kelly says
😀 Thanks so much Viki!!
KelleaMarie says
Just wanted to say thanks for this awesome pattern, i learnt to crochet 3 days ago and was still able to make this in just over 3 hours or so. It was nice to find a pattern that wasnt going to make me feel like i was choking as some neckwarmers and cowls do, am definately making mum one for Mothers day 🙂 thanks very much
Tamara Kelly says
Oh that's awesome to read KelleaMarie! Thank you so much for saying so. 😀
martha avans says
I'm working on this using some fingering yarn and an "e" hook. loving how it's coming along.
Candice says
Hi there!
Love love love your infinity scarf & just made it as part of a swap for a lovely lady. Have blogged mine here http://candition.blogspot.com.au/ with a link back to your tutorial. Thanks so much for providing it free.
Candice
Tamara Kelly says
Looks great Candice! 😀
Angie says
Oh gosh! This is beautiful!! I'm not much of a crocheter...knitting is my cuppa tea....so thank you for providing a video tutorial!! I absolutely love this and can't wait to make my own 🙂
Valery says
Hello...I have a question...don't know if it's a dumb question but .....how does it end...should both sides must be joined to be an endless scarf or just leave it like a normal scarf?
Thanks!
Tamara Kelly says
Hi Valery! It's an infinity scarf, so it's worked in a big circle - you connect it in ring the first round and then build the circle up from there.
KrisR says
Thank you so much for the pattern. Just finished my tie - after watching the video - and it is absolutely beautiful. I made it out of Noro Silk Garden and I love it. Will certainly be making a few more of these for gifts. It was the perfect quick and easy project to work on while struggling with my first knitted sweater/jumper.
Tamara Kelly says
You're very welcome KrisR! Noro is a fantastic yarn choice, I bet it's beautiful!
paola says
I love this pattern!! its easy and the results its a very glamour scarf. Thanks!!!
Elizabeth M says
Love this! I just made one with what was left of a ball of yarn - not as wide, but still lovely! Thank you for sharing!
Maria says
Great idea! Thank you for sharing! Greetings from Greece 🙂
Tamara Kelly says
Greece! <3 You're very welcome!
Maria says
🙂
Misty says
I know it says to do your chain to 50 inches. I have done that. But then when I have my finished product, it doesn't look like it is as long as yours. It's tight on the neck when it is wrapped.
After you have yours finished. What is the length you have then? 25"?
Tamara Kelly says
Hi Misty!
The finished scarf is 50-60 inches long, so the initial chain should be about twice that.I'm so sorry, I misspoke! Please see my other comment!
Misty says
Thanks! I must have a really really tight crochet! My 210 is no where near that. I am using the same yarn as you as well.
Tamara Kelly says
Ok, I got out the measuring tape, and I misspoke (it was a day of insanity yesterday, I'm so sorry!). It should be between 50 and 60 inches before you join into a circle. However, that doesn't mean it's the right length for you - everyone is different! So basically I would say to chain until it is a bit lower than your waist when it's joined in a circle. I'm sorry for the confusion!
Misty says
I did another one and it came out beautifully! Thanks so much!
Tamara Kelly says
😀 Glad to hear it!
Ashleigh says
First time crocheting anything and after watching the videos I didn't not find it difficult at all! I have three or or four twists in it though (I have no idea how, there weren't any that I could see at the beginning!) which I think is a couple too many as it turns into a tube. But I still like it overall and it was a great project to start with. Thanks.
Tamara Kelly says
Those twists are sneaky! But I bet it still looks great! Welcome to crochet! 😀
Nadia says
i finished this great project, but where did you get that georgous button from ?? am searching like crazy for a nice one !
thanks!
Tamara Kelly says
😀 Thanks Nadia! I got this one at JoAnn Fabrics. 🙂
Candyann says
I also was wondering about the button. I will have to go to Joann's and see what I can find. I have been looking all over for stunning buttons, and places like WalMart, Michael's or even Hobby Lobby have not had anything that tickled my fancy. I made one of these for my 7 year old son's teacher as a Christmas gift this year.
Michelle Light says
I just made one of these for fall. Thanks so much for the pattern. I shared your link on my blog, along with a picture of my finished product. I am working on another multicolored one right now. http://micraftcreations.blogspot.com/
Tamara Kelly says
It's lovely Michelle! 😀
Shell says
Bought the yarn in a couple of colors and itching to start!! Christmas has just become very easy. I really appreciate people giving all of these beautiful patters and knowledge to others.
Thanks!!!
Tamara Kelly says
😀 You're very welcome!
Rachel says
Thank you so much for this pattern! I am a beginner crocheter and your instructions were so easy to follow, just started this pattern this morning and is taking shape beautifully!
Tamara Kelly says
😀 Glad to hear it Rachel! You're very welcome!
Janet Vandenabeele says
I made this scarf last week, using the same yarn (different color) and hook. But when I got to 15 rows, I was nearly out of yarn. I doubt I would have gotten through another round and had enough for the tie. (which I haven't made yet, still looking for the perfect button). Did I maybe crochet too loosely? It doesn't matter, the scarf looks AMAZING. People are stopping me and asking me where I bought it!!
Tamara Kelly says
Everyone has their own gauge - and if you like the way it ends up then it's all good! 😀 Glad you enjoyed it!
Arlette says
Can i use 4ply yarn for this? Would i have to increase the stitches or size?
Tamara Kelly says
You can use absolutely any yarn you like, you just need to chain long enough to get the length desired. 🙂
Angela says
I just finished this and I think I had to many twists in the starting chain when I joined. It looks ok but I think it would be better if I could have straightened it out more. Its all one big tube so it hides the color and pattern. On a positive note I did find the Red Heart Unforgettable yarn. I used dragonfly it's very pretty.
Tamara Kelly says
One tip for that is to use stitch markers or even tape to hold the chain just so until you can get the first couple of stitches in. Hope you're able to enjoy it anyway!
Cheryl says
LOVE this pattern! Just used some Berroco Vintage yarn in fennel green with this pattern for a couple of Christmas gifts for some dear friends. Haven't done the tie yet, but thinking to put a crocheted folded petal flower as the button or perhaps put the button in the middle of the flower and just let the button loop play on top of the flower petals. Am quite pleased with how the scarf turned out.
Thanks for sharing. Think I'm going to have to find time to make one of these for myself!
Tamara Kelly says
😀 Thank you Cheryl!
Gerry says
Great pattern, simple once you watch the video. THANK YOU!
Sil Johnson says
Just finished my first Artfully Simple Infinity Scarf.....and I LOVE it! This pattern worked easily and was forgiving if I made a mistake along the way. It looks beautiful and modern and I just wanted to thank you for sharing it. I will be making more of these....for myself and as gifts!
Martha B. says
Made this in some odd yarn I had in the house and it's really pretty! Not as lovely as the colors you used. Had to rip out my first attempt because I didn't read the pattern and my chain was too short. I looked at it and thought how easy, but I've crocheted for over 30 years. Would like to know your finished measurements. Wish they were in the pattern for approximates. I sued my favorite size H hook and a 4 ply yarn. I stopped at 15 or 16 rounds, but I have a short neck. Thanks for posting the pattern!
Tamara Kelly says
Hi Martha! I do mention in the post that the length was between 50 and 60 inches, and I didn't give a width because the pattern was designed to depend on the yarn used. My finished width was around a foot - the problem is that the mesh is SO stretchy it's hard to give a hard and fast measurement.
Allison says
Would the scarf still lay the same way if I used red heart super saver or maybe something softer? the Walmarts near me do not have Unforgettable they mostly have super saver medium worsted yarn.
Tamara Kelly says
I think this one has been made in just about every yarn under then sun - including RHSS! 🙂 And every one is a little different but the pattern looks in each.
Julie says
I love this pattern so much that I featured it on my blog as pattern of the week! http://www.gleefulthings.com/blog/?p=6785
I ordered some yarn to make it with, anxiously waiting for it to arrive! 🙂
Tamara Kelly says
😀 Thanks so much Julie!
Robyn says
I haven't crocheted in ages, but this pattern makes me want to pull out the hooks again. This pattern is gorgeous!
Tamara Kelly says
😀 Thank you so much Robyn! It's easy too!
mary says
Love this pattern. I made it for my daughter in law for Christmas using Red Heart Boutique Magical yarn. She loved it. Now I'm making one for myself.
Tamara Kelly says
😀 So glad you enjoy it Mary!
JAz says
I'm a self taught thread crafter (minus knitting). I love how simple this pattern is, and how easy it is to do on the go. I started last night while at pool (billiards) league, but wasn't happy with how many twists I had from the chain. When I'm working the chain, it naturally twists on me. Any tips on how to keep the chain from naturally twisting at the very beginning?
Tamara Kelly says
It will twist, it's true, and I don't think there is a way to stop it twisting before you join, but to straighten it for the join you can try adding stitch markers to the chain all in the same part of the stitch, so you can see how it should lay before you join. Another option is to actually work the first round as a row - turn and work into the starting chain, the join after the first row and use the tail at the beginning to close up the foundation chain. It'll be easier to keep the first row flat than just chains. 🙂 I hope that helps! I'm so glad you like it!
Misty says
So, do 2 Foundation double crochets, then do the chains, and repeat? That sounds wonderful if I can do it that way!!!! I have made SEVERAL of these scarves and I have to do it where I have the chain joined and then wrap it around my treadmill handles so I can keep it from twisting for the first 3 rounds. I look ridiculous, but it works. Sounds like if the 2 Foundation DC and then chains would work, I may try that next!
Tamara Kelly says
I wouldn't do foundation dc - just a long chain and then TURN and do regular dc into the chain. Then join after that first row.
fariba says
Thank you for beautiful scarf .so very great ..........;)
Elaine says
I LOVE this pattern! Simple yet amazing results. I had some Lion Brand Tweed Sripes n Caribbean that I had been saving for a special project. THIS WAS IT!! What a stunning scarf. I was pretty sure how to make the button tie but watched the video anyway. Your explanation was excellent. Thank you SO much!
Kari says
Hello! I love the color of this yarn, what is the name and colorway name? I have looked but can't seem to find it..also where o where did you get that beeeutiful button you used for the tie, I am making this scarf for my mother in law and that is JUST her style! Thank you!
Tamara Kelly says
Hi Kari! It's Red Heart Boutique Unforgettable in Tidal, and I got the button at my local JoAnn Fabrics. 🙂 Thank you!
Kari says
Oh Yay I have a Joann fabrics store here in Idaho! Hope I can find that same button! Thank you for your reply!
Kari says
I am having one heck of a time finding this button! I went to my Joanns and nothing! Any other info you can give me as to the brand of the button? Any info would be helpful, thank you!
Tamara Kelly says
Here's a site that sells them online: http://www.createforless.com/Blumenthal-Buttons-Cut-Outs-1-1/4-in.-Blue-Bird-1pc/pid189263.aspx 🙂
Tralalalisa says
This was a great scrap yarn pattern. I had enough of a skien to do 14 rounds, & it looks awesome! I messed up a few places, & I did what you said-just kept right on going, can't even tell that there was a mistake! I put photos up on my ravelry account and a link to your pattern on the project. Did I do all of that right??
Tamara Kelly says
That's great! 😀 Thanks so much Tralalalisa!
Janine says
Love this pattern I made this for my mum for her birthday last month she loves it and wears it all the time xx
Tamara Kelly says
😀 So glad to hear it Janine!
Cathleen Reese says
I love this scarf, the pattern makes any color beautiful but I do love the variegated and it's too
cool as a headband! Thank you so much for sharing this pattern for free with us!! I cannot
wait to make it!! Cat
Ashley says
Soooo I got about 10 rows in and realized my scarf is completely twisted up and won't lay right. I'm sooooo mad that I didn't notice it earlier! Gonna have to frog it! Ribbit! Ribbit!
lynn lee says
I cannot download the Artfully Simple Infinity Scarf. Is there another way to get the pattern? I love it! Thanks,Lynn
Tamara Kelly says
Hi Lynn, and thank you! Try the green Print Friendly button at the bottom of the post. 🙂
Jade says
I have a skein of beautiful chunky blue wool that I have been wanting a pattern for ages and this is perfect. So excited.
Really love your blog. Such great patterns.
Tamara Kelly says
😀 Thank you so much Jade!
eliteswindler7829.blog.com says
Je vois directement que vous maîtrisez très bien ce que vous avancez
Tamara Kelly says
Merci!
HarriEt says
Thanks for the beautiful pattern. I finished it and have some questions as I am new to crochet. My twists can be fixed in the next one, but my pattern is not even. I don't think it had anything to do with the number I started with. Maybe I need to pull or adjust the dcs so they align or it comes with much more practice that the stitches are uniform. I do not see the rows aligning exactly as are evident on yours which is perfect. Mine are for the most part offset. Any suggestions? Thanks again. Harriet
Tamara Kelly says
Hi Harriet! Thank you! I'm a little confused though. The dc stitches should be offset, in a spiral - not right on top of each other.
HArriet says
I am looking at your picture of the pattern flat on a surface. My rows do not align like that. No worries. It really looks good aside from the few extra twists and the button came out great too. Many thanks.
Tamara Kelly says
Hm, I'm not sure what's happening then! But if you like the finished scarf then that's what counts!
Blanche says
This is awesome! I'm trying to make the chain and keep losing count even between markers. What happens if you do not use a multiple of 7 and just chain until you like the length? Will it still work? Thanks!!!
Tamara Kelly says
Hi Blanche! It'll work! You might need to fudge a little at the end of the first round, but you shouldn't be able to tell in the finished scarf, so I'd just go with it!
Christina Carlton says
How wide are these scarfs? Right now I've got about 9 rounds.
Tamara Kelly says
That's going to depend on the yarn and gauge - each one is unique!
Carol says
Love this pattern! Thank you! I've been linking it all over the place. Sorry if this has been mentioned before, but it would be helpful to know how much yarn you need at the end for the buttonhole piece. I have been caught short of yarn on two of them because I've made three of these great scarves and just now starting the button tie. My favorite part of this is the rule: no stress!
Tamara Kelly says
Hi Carol, and thank you! I think the button tie uses less than 2 yards of yarn - you really don't need much at all, I've never come up short. Hope that helps!
Paula Meier says
Another way is to make the tie first, and then just crochet your scarf until you run out of yarn.
Thank you for this great pattern. Someone in my knitting group directed me to it, as I do crochet a little. Your directions were great for a new crocheted. I have made several of these for Christmas gifts this year, and will continue to make more, because the pattern works well with any yarn I have tried.
Tamara Kelly says
Thank you so much Paula! Yes, I just wrote it up the same way I designed it (it was a very organic, spontaneous design!) but of course you can do the tie first! 🙂 I'm so glad you like it!
JAGERVAIS says
Just came across this pattern (it's GORGEOUS!!!) and I'm in need for a last minute gift, is this a make-it-in-one-night kind of project? I have a ball of Bernat Mosaic that would be great!
How many hours (on average) does it take to complete?
Thanks!
Tamara Kelly says
That's going to be different for everybody, but I'd say it's a one night project for most... depending on the length of your night!
angi says
This is my absolute favorite scarf pattern. I have made about 20 scarves from this pattern in different colors and weights, and I have yet to find a yarn that it won't work with! Love it!
Tamara Kelly says
😀 Thank you so much angi! I'm so glad you've enjoyed it!
Michele says
I was just wondering where you got your button you used. I would like to get some like them for my scarves. Thanks.
Tamara Kelly says
Hi Michelle! I got mine at my local JoAnn Fabrics, and I believe I've linked to an online source in a previous comment. 🙂
fairyhedgehog says
This is a wonderful pattern and I'm really enjoying making it. Thank you so much for making it available for free - that's really generous.
Tamara Kelly says
😀 Thank you, I'm so glad you're enjoying it!
Janet says
Hi! I just finished making the scarf and it's beautiful, thank you for sharing! One question, I got the yarn exactly as describe ( tidal ) and I can't help but wonder if it's actually closer to Dragonfly from the collection? The end result looks more pastel and the blues and green colors aren't as strong as the picture describe. I thought it might be the lightning but the contrast is too much for that. Please advise, thank you!
Tamara Kelly says
I believe that the Unforgettable has a stronger dye lot effect than many other Red Heart yarns. I made this a few years ago now, so I wouldn't be surprised if they colorway is a little different now! I'm so glad you like the scarf! 😀
Roberta cole says
I am in the middle of making this pattern using the unforgettable yarn. I have come across 2 issues, 1) the yarn is really fuzzy not nice like your picture. Is there something I missed? 2) Where do you find such pretty buttons?
Tamara Kelly says
I'm sorry you're having trouble with the yarn Roberta! Maybe you got a funky skein? I get all my buttons at my local JoAnn Fabrics store. 🙂
Roberta cole says
It might be a wonky skein. I was reading mixed reviews of it on ravelry. Hmmmm dang we don't have Joann's here (I'm in Canada) I may have to get someone to ship me one!
Elizabeth Heller says
I just finished this and I love it! No stress is right... I messed up a few things and just kept going, and I swear nobody will ever know. Thank you so much for sharing it! I had trouble with the button instructions... the yarn I was using was just too fat to fit through the buttons holes! So, I just chained a few inches, skipped enough chains to slip over the button, and sc back down the chain, then I sewed the button on the opposite end from the loop with a regular needle and thread. It came out fine!
Tamara Kelly says
Great solution! I'm so glad you like it Elizabeth! 😀 Thank you!
Lola says
Just made this using Lion Brand Unique yarn in Grapevine. SO beautiful. Thanks for the easy to follow instructions. 🙂
Tamara Kelly says
😀 Thank you Lola!
Joani says
I absolutely love this pattern. It is so simple, but so beautiful. I've already made three to give as gifts. I plan on making one for myself as well.
Tamara Kelly says
😀 I'm so glad to hear it Joani!
Rachel says
Beautiful scarf! But at 215 ch, it is waaaay too long for my super petite frame. Is there a method behind this, such as chaining in multiples of x + y for instance? I scanned the comments but couldn't find the answer I was looking for. Thanks for your time!
Tamara Kelly says
Hi Rachel! It's typically worn doubled, so that halves the length, but really you can start with any multiple of 7 plus 5. 🙂
Deb says
Made this for a Christmas present in a soft grey (faux silk style). It turned out beautifully! I ended up with a twist in it, but decided it was thus a "moebius scarf". Perfect. It's already wrapped for Christmas but I'm hoping to get a pic when she wears it. 🙂
Tamara Kelly says
😀 I'm so glad you enjoyed it Deb!
Kelly says
I finished this pattern last night and am thrilled with how well it turned out! I've been a beginner crocheter for about 20 years and always look for a simple pattern to make during my vacations. I posted a pic of it on my FB page and have been receiving lots of likes and positive comments. Thank you for the thorough detailed instructions!
Tamara Kelly says
😀 Thank you so much Kelly! I'm so glad you like it!
Jo Ann says
A good way to be sure the chain does not twist I place markers at
random places on chain and make sure the markers are at bottom of chain as I join. It helps to leave markers on chain to help keep you on track.
Shannon Egan says
I've worked at Joann Fabrics since October. Yesterday a customer at the register was wearing a gorgeous gray cowl, so I asked her if she made it. Of course she did, and it was this pattern. I talk with many customers, and MooglyBlog & Tamara Kelly come up often in conversation. This pattern is beautiful in a solid gray chunky yarn. You're a household name!!
Tamara Kelly says
Oh wow! Thank you so much Shannon! 😀 What a thrill!!
mary young says
I just finished the above scarf. I could not put it down! Like a good book. JoAnn's did not have the yarn pictured so I bought a RedHart Zebra in black white and gray. The first two rows were a challenge but I managed. I do not have a lot of twists which is okay. I struggled with the button tie and watched the video more times than I care to admit.
Did you know you can pause it and get captions? I think I am going to do the tie over in a silver yarn for contrast as the zebra is very busy. This scarf is brilliant!
Tamara Kelly says
😀 I'm so glad you enjoyed it Mary!! Thank you!
Gail Goodwin says
I made this GREAT cowl today. I used a bulky weight yarn and a 9.00mm hook. I still only used one skein and it came out great! I used Isaac Mizrahi's black yarn with purple and blue sparkly thread with loops throughout. This pattern hides a MULTITUDE of sins when you make it in black! I made it for a friend who is moving from the apartments where I live and I hope she likes it. My husband thought it was great. Instead of a button, I used a good size piece of purple agate on a silver tone finding. I have to say it really looks nice. I am really proud of it and you should be too! Great pattern an quick as a bunny to do. Thanks again!
Tamara Kelly says
😀 Thank you so much Gail! Yours sounds amazing - what a lucky friend!
Emma says
I noticed when buying the yarn that there were some review saying the yarn breaks apart in the middle of the skein. Did this happen to you? Thanks.
Tamara Kelly says
Oh dear! No, I can't say it ever has.
Emma says
Sorry for all the questions, but how many twists in the chain is ideal? Thanks again
Tamara Kelly says
Ideally none, but a couple don't hurt. 🙂
Jo Ann says
Made two of these. Very easy.
Tamara Kelly says
🙂 Thank you!
Regina says
Wanted you to know, as a crochet enthusiast, I really love your work!! You're one of the persons that I recommend people check out for techniques!
In the last two years I've began to crochet to give away and to sell.
Though many of the publications I get out of the library were published in 2009 to the present, crochet still seems to be a fun topic, hot commodity and today, not to mention that its very relaxing, It doesn't have the negative connotation that it had, say 15 years ago.
I hope that there's still a few years left of people being excited about it. Here's to all that enjoy the craft to give away as well as who produce it to sell as a source of income.
Tamara Kelly says
Thank you so very much Regina! Yes, fingers crossed! 😀
prabha says
just finished the artfully simple infinity scraf. Thanks a ton for the pattern. Here's the link to a photo - https://www.facebook.com/CForCrochet/photos/a.790012077786282.1073741831.243287825792046/790012141119609/?type=3&theater
Tamara Kelly says
😀 I'm so glad you enjoyed it!
Marissa says
I used a finer yarn, so this scarf came out super light and lacy. I love it! The pattern and my experience with this project are featured on my blog here:
http://marissareisbc.blogspot.com/2015/05/an-infinity-scarf-just-in-time-for.html
Thanks!!
Tamara Kelly says
Very pretty! 😀
Marsha says
Hello,
Did you block this infinity scarf? If so, what technique did you use?
Thank you.
Tamara Kelly says
For this one I just get it damp and lay it out on a drying rack, spreading it out a bit.
Katie says
Hello,
I'm a librarian that teaches crochet classes at my library and was wondering if you would be okay with me teaching your scarf to my class, (full credit and your url would be given out)
Tamara Kelly says
Hi Katie! As long as the students all come to the site to print out their own copy, that would be fine. 🙂 If you have more questions, please email me at tamarakelly@mooglyblog.com!
Cindy says
Hello.. I'm making this scarf. I've used a size k needle as prescribed and I've cast on 215 stitches. I'm using the red heart 4 ply boutique yarn and my scarf is not very long. I certainly can't wrap my scarf in the ways you've pictured above. I don't even think I could put a button as I'll choke myself. Why with the exact instructions you gave is my scarf so short? Please note I'm 5 2 and size 6 wonan (I'm not a giant person or anything).
Tamara Kelly says
Hi Cindy! It's a matter of gauge. It sounds like you crochet a lot tighter than I do. So I'd recommend following the more general instructions to create a scarf to fit you. 🙂
Donna says
the pattern instructions say to change 215 to start. however, it also says it should be in increments of 7. is the 215 a typo?
Also for rows 3 and up the picture shows 2 DC, but the instructions say just one. I am mis understanding something? thanks.
Tamara Kelly says
Hi Donna! The instructions say "a multiple of 7 sts plus 5" - 215 is 30 x 7, plus 5. The instructions for Rows 3+ say "dc in the next dc and the ch 5 sp" - that's 2 dc sts, one in the next dc, and one in the ch-5 sp.
Tessa says
Such a beautiful scarf. I've made a few of these using the same exact yarn but every time I can't seem to get to 20 rows and still have enough yarn left for the tie. I wonder what I'm doing wrong? I end up with 19 rows.
Thanks for the free pattern!
Tamara Kelly says
Hi Tessa! It might be gauge, or the style of hook, or your skeins had a little less yardage... it's hard to say! 19 rows is still good though! 🙂
Lisa says
I could have sworn that I kept the chain from twisting, yet, there is a twist. I am kind of down about this, as I was so looking forward to this. Is this normal. I had it completely finished and the ends woven in, before I noticed it. 🙁 All I have left, is to make the button tie.
Marilyn Wicinski says
Hi and thanks so much for the pattern, I love it! I'm in the process of making it now and my yarn just doesn't look like your yarn in the photos. I love the color in your photos but the yarn I have looks like a faded out version and it's looking "puffy & fuzzy" instead of like the photos. I bought Red Heart Boutique Unforgettable in Tidal. Have they changed the yarn since the photos?
Tamara Kelly says
Thank you! They may have changed manufacturers. It was off the market for a little while and then came back.
Marilyn says
Ok thanks, I have switched to a smaller J hook and that helps. I guess I crochet kind of loosely. The yarn still looks fuzzy though compared to the photos. Also it's not a fun yarn to take stitches out. Love the pattern, it's quick & easy, and what a great idea with the label, love that too!
D.W. says
Turned out mauvelous Moogly! I still need to find an appropriate style button that is lightweight for the button tie.
Tamara Kelly says
😀 Thank you DW!
Julie wagner says
Hi Tamara,
Happy holidays!!! I am thinking about making this scarf with a sock yarn with a 3.5-4.0 hook, do you think that would work?? Also, how many chains would you do?
Thanks so much for all of your help and hard work,
Julie
Tamara Kelly says
I think it would look beautiful! I would just chain until I have the desired length, and not worry about the exact number of stitches - that's the fun of this pattern. 🙂
Tracey says
I love this beautiful pattern! It is one of my very favorite scarf/cowl patterns. The cowls I have made from this pattern have been very popular items on my Etsy shop - SpiritOfTheBear. Thanks for sharing this pattern and for allowing people to sell finished items from it. 🙂
Tamara Kelly says
I'm so glad to hear it, thank you Tracey!
mary young says
Can't tell you how many infinity scarfs I have crocheted........ What I do is count and put one of those plastic marker pins
every ten stitches and figure out many I need so I am done when I am out of pins. I single crochet the first row and then
very carefully line it up so it isn't twisted. So far no problems. Then when I am done I do another row to balance off the
first row. The scarf I just finished is like an ecru string type yarn with gold sequins. Lovely.
Tamara Kelly says
That's the best way I've found to keep them from twisting too. 🙂 Thank you Mary!
mary m young says
Thank you. Great minds think alike. lol. Mary
Emanuela says
Hi, Tamara. I finally began my ASIS, just in Tidal. Beautiful! I only ask if you think that a size of 60 cm is large enough. I worked 215 chain, but it seems to me that yours is a little bigger. I know that in this pattern freedom rules, but I ask anyway... Many thanks!
Emanuela
Tamara Kelly says
Thank you so much! 60cm would be a little short for me, but I'm a big lady! 🙂 It all depends on how you like to wear them.
Emanuela says
Many thanks, Tamara. Do you know what I think? I'll donate this one (and make another one a little larger for myself!!! ;o)
Emanuela
Tamara Kelly says
😀 Sounds like a good plan!
SHELLIE says
Can someone please tell me what stitch this is called? I'm trying to make a hair/head tube with this stitch for long hair.
Tamara Kelly says
It's an original stitch pattern I designed myself. 🙂
Audrey says
Hi There!
Am I the only one who is having trouble with Red Heart Unforgettable yarn? The chains turn into circles and I can't even count them. I made several attempts with different colors of Unforgettable to no avail. Made another one in Mary Maxim Mellowspun to make sure I wasn't crazy and it turned out great. I do, however, much prefer the look of Unforgettable.
What am I doing wrong????
Tamara Kelly says
That yarn is a bit trickier to work with, due to the roving style. I would recommend placing a stitch marker every 20 chains or so, so that you can count them out as you go and don't have to count them all at once.
Audrey says
It's not the first row where I'm having a problem. It's the 2nd row where I can't differentiate the chains.
Tamara Kelly says
Ah, I'm sorry, I misunderstood! In Rnd 2 you don't need to see the chains - just go into the 2nd dc and the ch sp. 🙂
Audrey says
Oh my goodness, I'm so sorry, it's row 1. I saw on your tutorial that you were going into both loops on the foundation chain....and for the life of me, I can't seem to do that with Unforgettable. They are just wiry little loops with a life of their own!
Tamara Kelly says
Luckily this pattern hides almost any sins! Just go into one loop if it's easier - it doesn't even necessarily matter which one, as the whole scarf twists and turns when it's worn. 🙂
Audrey says
Thank you Tamara. Sorry for the late reply as my email service has been down since Monday. Have made a few now. A couple in the double loops and a couple in singles. You're right, doesn't seem to make a difference one way or another.
Great pattern for gifts. Making about a dozen for my Bible study ladies and mail lady etc. Still like it best in Unforgettable. Dang!! : )
Audrey
mere says
I've had this in my "to be crocheted sometime" list for a long time now, along with the ASAS, and just this weekend someone on my Christmas list hinted she'd like a scarf (from someone, and not necessarily crocheted/handmade, just in general). So now I have a reason to move ASIS to the top of my list. Also a friend who knits more than crochets said she'd made this and it was both fun and fast.
I doubt many will scroll through all the comments to get to mine, but given the flexible nature of this pattern, if you make the button tie FIRST, then you can literally crochet the scarf until you've just enough yarn to finish off. Working in the spiral, no one can tell if the beginning and ending line up, and it'll look great either way.
Sheri says
I have made this scarf 2 times! It is beautiful every time!
Thank you for sharing this pattern!
Tamara Kelly says
😀 Thank you so much Sheri!
Susan says
Just saw this the other day and Love it! Went into my bucket of extra yarn to make a practice scarf before I make it for someone else. I can't wait to see how it turns out for me. just started row 2.
Tamara Kelly says
😀 Thank you so much Susan!
Becci says
Ive accidentally ordered DK wool to complete this (getting confused with US terms) - will it work with the same size hook, or is the pattern adjustable to be in a different type?
Oops... 🙁
mere says
I just finished making one in a DK yarn. I used, I believe, my trusty H/5.0mm hook, because it gave the drape I wanted. And I made my starting chain the length I wanted the finished scarf to be. Everything worked out fine.
Becci says
Aww.. Thanks - that makes me feel better!! I'd treated myself to a swanky new hook in a 6.5mm tho, so might have to buy the matching 5mm!!
Appreciate the reply - what an awesome community here 🙂
Tamara Kelly says
Thank you Mere! 🙂 I agree!
Sue says
How should this be blocked? Love the pattern, having lots of fun with it, thanks.
Tamara Kelly says
Thank you! I don't always block this pattern, but when I do I get it damp, press out the excess water with a cloth, and then drape it gently over a drying rack. spreading the stitches out with my fingers. 🙂
em says
HI Tamara, Thanks for the lovely free pattern.
It says you used 280yards of RH unforgettable, Does that mean you used a full ball and then a little extra?
Tamara Kelly says
I used exactly one ball (I think they may have changed the listed yardage at some point, as this was several years ago). 🙂 Thank you so much!
althea says
You had me at a multitude of sins and no stress! Iam doing this thank you for the free patterns!!
Tamara Kelly says
🙂 Thank you! I hope you enjoy the pattern!
Tammy says
Just found and completed this scarf. Love it and so forgiving on any mis-stitch. Thank you so much!
Tamara Kelly says
😀 I'm so glad you enjoyed it! Thank you!
Julie says
Hi, Tamara,
I have a question. Are you familiar with Premier Moonstone yarn at all? I am so in love with this pattern that I made over 10 of them for gifts. I was looking at the Moonstone and thought the interplay of colors with this pattern would be awesome. Do you have an opinion?
Thanks for all you share!
Tamara Kelly says
I'm sorry, I'm not familiar with that yarn. But I'm so glad you like the pattern! 😀
Candy says
I made this as a xmas gift for a good friend. You thought I gave her the world. It was so appreciated. I loved making it. And having a label topped it off. Thanks again Tamara... You are the best !!!
Tamara Kelly says
♥ Thank you so much Candy! I'm so glad to hear it!
Julie says
I absolutely LOVE this pattern and I couldn't even guess how many I've made! Thank you, Tamara!
Tamara Kelly says
Thank you so much, Julie!
Julie says
You're welcome! It's so much fun to make. One of the next ones I want to try is the Artfully Simple Angled Scarf and see if that one is as much fun.
Lori says
I couldn't either, Julie! I am probably on my 12th at least and in many different colors and each one works up beautifully. Thank you, Tamara, for such an awesome pattern and for your generosity in sharing it!
--Lori
Tamara Kelly says
♥ Thank you so very much Lori!
ayesha says
Just made this for the first time for a friend's birthday gift and it turned out great! I used a thinner cotton blend yarn and did only 15 rows since I was going for a lighter scarf (not much cold weather where I live). I love how versatile this pattern is!
Tamara Kelly says
I'm so glad to hear it Ayesha, thank you!
Jean king says
I love, love, love this pattern. I’ve made numerous gifts for friends and they all love them.
Sometimes I’ ll let it twist over but if I want it to stay straight, I’ll do the beginning chain and the first row and then I’ll put a small pillow in my lap and put the chain the pillow to do my work. It also helps for me to put stitch markers along my “bottom row” to help keep it oriented.
Tamara Kelly says
Thank you so much, Jean, I'm so glad to hear it!
Garden Chef says
Finally, I got my version of your pattern up on my site although I have posted photos of it in Ig and Fb in the past. Linking back to you with thanks!
I so love my scarf! I would like to make another one of a different color next time.
Thanks for sharing your pattern, Tamara!
https://gardenchefsneedleandpen.blogspot.com/2019/11/autumn-scarf.html
Tamara Kelly says
It's lovely, thank you so much! ♥
Garden Chef says
❤️❤️❤️
Thank you!
Leatrice says
Hi love love love this scarf. Made as a gift , noticed you mentioned wet blocking...... is it absolutely necessary???
Tamara Kelly says
No, not at all - totally optional! ♥ Thank you!
Hanah says
How much yarn is needed for this project?
Tamara Kelly says
This pattern is designed to be a one skein pattern with most yarns. 🙂 It is shown with one skein of Red Heart Unforgettable, yardage listed above.
Hannah says
also, will it shrink if put in the wash?
Tamara Kelly says
It depends on the yarn used! 🙂
Cathy Smay Robbins says
I love seeing this pattern again! I am a crochet designer who doesn’t usually follow a pattern, but this is one I made years ago… I love it even more now! Thank you for highlighting it in this week’s newsletter.
Tamara Kelly says
♥ Thank you so much, Cathy!
Victoria Kimball says
I've made "chain only" cowls and scarves before, but struggled with them getting tangled. I tried tying them after the fact, but THIS pattern is brilliant.
I definitely want to try it out with some weird yarn I have as well as maybe some boucle yarn
P.S. I love your tips on this one!
Tamara Kelly says
Thank you so much, Victoria! ♥
Kimberly says
This is one of my most favorite patterns of all time. I have made several of these. They always come out looking stunning and make great gifts.