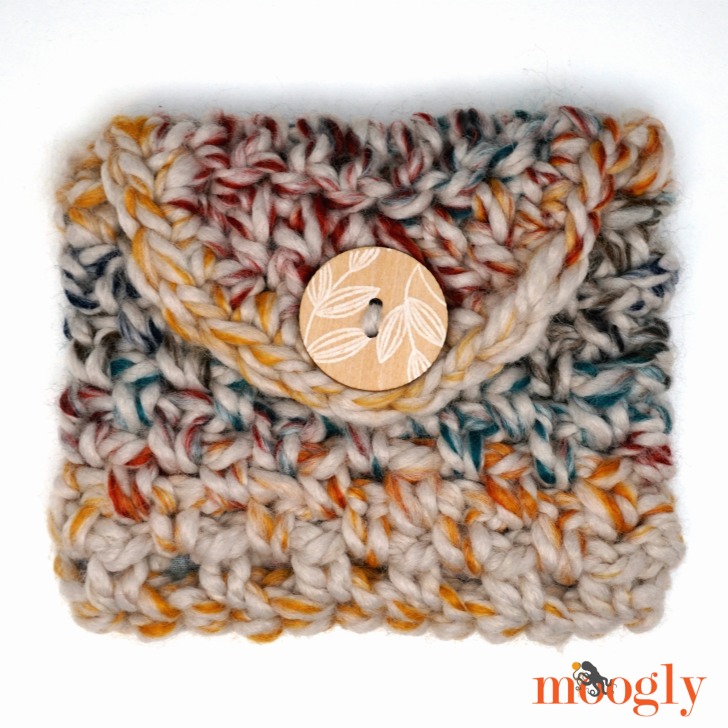
I recently wrote a post about how to create a no-sew fabric lining using the Cricut Maker. But I needed something to line, and I'd also noticed a need for a few more small pouches/pockets/and organizers in my office, and when I travel. So I whipped this up super fast (and lined it in just minutes) - the Speedy Button Pouch!
 Disclaimer: This post includes affiliate links; yarn provided by Lion Brand; hook provided by Furls.

With Super Bulky Lion Brand Wool-Ease Thick & Quick and big hook, I don't think I've ever created a faster pattern. But it sure does come in handy!
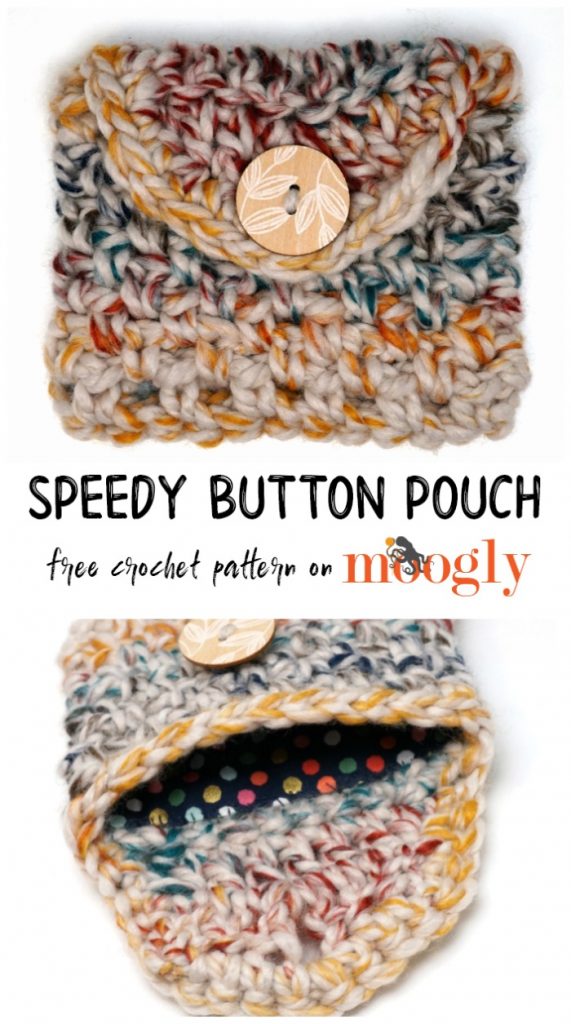
Speedy Button Pouch
Add this pattern to your Ravelry Queue and Favorites
US - M/N, 9mm - Furls Crochet Hook
Lion Brand Wool-Ease Thick & Quick (Super Bulky/6/UK: 14-16 ply; 87-106 yds/80-97 m; 5-6 oz)
Colorway: Hudson Bay (less than one ball used)
Button - 1 ⅝"
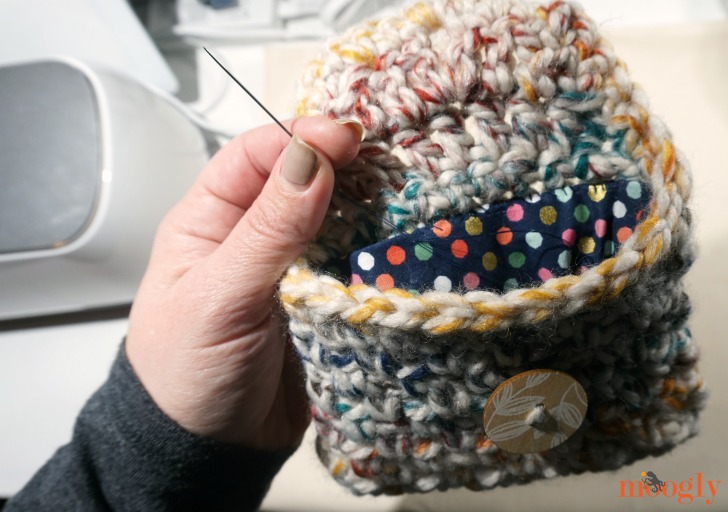
Optional: Cricut Maker and Fabric for lining (click for tutorial)
Gauge: 9 sts x 10 rows = 4" / 10cm in moss stitch pattern
Finished Size: 6" wide x 5" tall, closed
Helpful Links & Tutorials:
NOTE:
Please note the transition from Row 1 to Round 2 - in Round 2, crochet all the way around the first row - across the top as usual - and then across the foundation chain, joining to the first stitch of Round 2. You will continue to work in the round until Row 11, which begins the flap.
This pattern is worked in turned rounds, or joined rows, in Rounds 2-10. After joining with a sl st, turn to work from the other side as if working in rows.
INSTRUCTIONS:
Row 1: Ch 13, sc in the 2nd ch from the hook, sc in each rem ch across; turn. (12 sc)
Round 2: Ch 1, sc in the first st, ch 1, skip the next st, *sc in the next st, ch 1, sk 1; rep from * across, then turn and sc in the side of the row and continue across the bottom of the foundation chain in pattern, join to the first st of the round with a sl st and turn. (13 sc, 13 ch)
Round 3 - 10: Ch 1, *sc in the next ch sp, ch 1, skip the next st; rep from * around, join and turn. (13 sc, 13 ch)
(begin flap)
Row 11: Ch 1, sc2tog in first ch sp and sc, sc in next 9 ch sps and sc sts, sc2tog in next sc and ch sp; turn. (11 sts)
Row 12: Ch 1, sc2tog, sc in the next 7 sts, sc2tog; turn. (9 sts)
Row 13: Ch 2 and dc in next st (counts as dc2tog), dc in the next 5 sts, dc2tog; turn. (7 sts)
Row 14: Ch 2 and dc in next st, dc in the next st, (dc, ch 2, dc) in the next st, dc in the next st, dc2tog, do NOT turn. (6 sts, 2 ch)
Edging: Ch 1, sc evenly around opening of pouch working 2 sc in the ch-2 sp; join and break yarn.
Line if desired - see this tutorial.
What will you put in your Speedy Button Pouch? Mine is currently holding all phone cords and chargers for my next trip! It's also a great size for kids, purses, business cards, makeup, small gifts, you name it!
I hope this pattern helps you get a little more organized in the new year - I've got lots to do on that score myself! If you make the Speedy Button Pouch, be sure to tag me on social media @mooglyblog or use #mooglyblog so I can see what you've made!
The Fine Print
Written pattern copyright Tamara Kelly 2018, all rights reserved. Please do not reprint or repost this pattern, but please do link to this page to share this pattern with others. If you wish to make items for sale from this pattern or translate it to another language, please visit the About page for details. Thank you to Lion Brand Yarn for providing the yarn for this pattern.


Patti t. says
That's an awesome little pouch. Looks like it could be pretty handy for lots of things. Thanks for sharing your pattern. Love your blog.
Sue says
Very sweet chunky pouch! Love it.
Tamara Kelly says
Thank you so much! 😀
Gayle says
Hi: I love all of your patterns and usually don't have any trouble following them. However, on this one I'm not sure I'm doing the transition from row 1 to round 2. The way I'm doing it I am having 2 rows and the bottom open. Do I then go back and sew them up when I'm finished? Sorry to be so thick on this!
Tamara Kelly says
Hi Gayle! That's not quite right - did you read the Note right above the instructions? 🙂
Gayle says
Thanks for the reply. Yes I did read the notes but still couldn't figure it out! However, I did do a cell phone case in the meantime and from that description I could see what you had meant and was able to get this one right. I was not going around in the continual "round" as you described. It was my not figuring it out not yours. I so love your tutorials and patterns. Thank you.
Shaylin Orta says
In reply to another response here I'll be honest I couldn't figure it out either. And I kinda banged my head against the wall a little because I thought I was doing something wrong and just being dumb. So I started watching some videos on joined rows and The best way to do the bottom of a bag like this and nearly every video that I watched had you getting to the end of the row and then doing 3 single crochets into the end in order to turn and then go back in the other direction. so, where it says 'across, then turn and sc in the side of the row and continue across the bottom of the foundation chain in pattern' That's the part of having a really hard time understanding. I'm assuming where it says SC into the side of the row you mean to SC once? Because it doesn't give a number of times and I think that's the part that was tripping me up. I'm really hoping that this is a mistake in the pattern and not in me 'cause I feel pretty dumb. Thank you!
Tamara Kelly says
Hi Shaylin! Did you read the notes above the instructions? It's just like working in rows, except you join to the first stitch with a slip stitch first. I recommend using a stitch marker in the first and last stitch of each round to help you keep your place instead of working into the slip stitch. It sounds like you are having trouble with Round 2, so I'll break it down a bit more in plain language. 🙂
We have 12 single crochets that we made in Row 1. We turn at the end to work back across the top of the row first.
In Rnd 2, we chain 1 for the turning chain, and then sc in the first st, ch 1, and skip the next st. This leaves 10 sts. We sc in the next st, ch 1, and skip 1 5 times, to use up those 10 sts. Then we sc in the side of the row - the side of the last stitch you just worked into the top of. Then, keep turning your work clockwise to stitch into the bottom of those 12 sts. Across these 12 sts, the pattern is ch 1, skip 1, sc in the next st. This brings us to the other end, where we ch 1 to skip the end of the row and join with a sl st to the firs sc.
I hope that helps! 🙂
Lillian says
I love this cute pattern and can't wait to try it!
Tamara Kelly says
Thank you so much, Lillian! ♥
Monica Franzo says
How many stitches would I use if using 4 ply yarn, and what size hook?
Tamara Kelly says
Hi Monica! I would recommend using whatever hook gives you the fabric you like. I don't have any numbers for making it bigger, that would be a pretty major redesign, but you could make a tiny basket!
Lala says
Hi Tamara! I love all your patterns and haven't had any issues before, but I am truly struggling to understand the row 1-2 transition. I have read and reread the instructions, looked for videos, and done everything I can to understand, but I'm at a loss and can't figure it out.
Are there videos or other patterns/instructions out there that you could provide to help give clarity to what I should be doing with this part of the pattern. I really am stumped beyond belief and really want to finish this project.
Tamara Kelly says
Hi Lala! I think this might help: https://www.mooglyblog.com/bag-bottoms-crochet-tutorial/