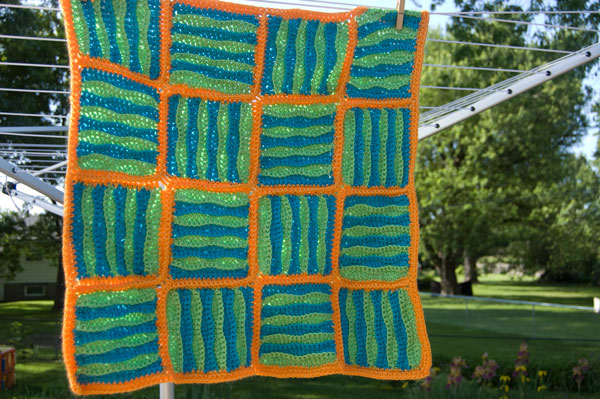
Introducing the Wavy Baby Blanket! It's almost summer here, but the mornings and nights are still cool, and soon the air conditioners in shops will start icing us down. Meaning we need a baby blanket just right for summer!
The Wavy Baby Blanket is a block pattern I came up with this week, plus a specific joining pattern. The finished blanket as written is about 22" square, just right for a light layer over a car seat or infant's lap.

But it can be as big as you like - just add more blocks! Each block is a little over 5 inches square, and a border and the joins add a little more width. And color makes all the difference too - make it your own!

Wavy Baby Blanket
Add this pattern to your Ravelry Queue and Favorites
This blanket is presented with 16 blocks, but make as many as you like for a custom blanket of your own. Since it's a blanket, don't worry too much about gauge or yarn weight, just use the hook and yarn that gives you a fabric you like.
- US – I, 5.50mm hook
- Caron Simply Soft (Worsted) in your choice of 3 colors
Shown here in Limelight (A), Blue Mint (B) and Mango (C) - Yardage needed for each block: A - 12 yds, B - 12 yds, C - 8 yds
- Additional yardage for joining and the border will depend on the blanket size chosen.
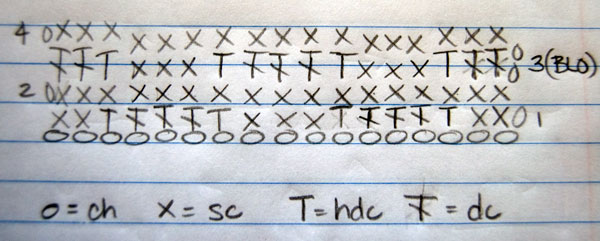
INSTRUCTIONS For Each Block:
With Color A, ch 18.
Row 1: Sc in the 2nd st from hook. *Sc in next st, hdc in next st, [dc in next st] 3 times, hdc in next st, [sc in next st] twice. Repeat from * once. (17 sts)
Row 2: Ch1 and turn. Sc in each st to end. (17 sc)
Row 3: Join Color B, ch 2 and turn. Work this row in blo, except for the very last st of the row. Dc in the 1st st. *Dc in next st, hdc in next st, [sc in next st] 3 times, hdc in next st, [dc in next st] twice. Repeat from * once. (17 sts)
Row 4: Ch1 and turn. Sc in each st to end. (17 sts)
Row 5: Join Color A, ch 1 and turn. Work this row in blo, except for the very last st of the row. Sc in the 1st st. *Sc in next st, hdc in next st, [dc in next st] 3 times, hdc in next st, [sc in next st] twice. Repeat from * once. (17 sts)
Row 6: Ch1 and turn. Sc in each st to end. (17 sts)
Rows 7 - 14: Repeat Rows 3 - 6 twice.
Rows 15 - 16: Repeat Rows 3 - 4. Break yarn and weave in ends.
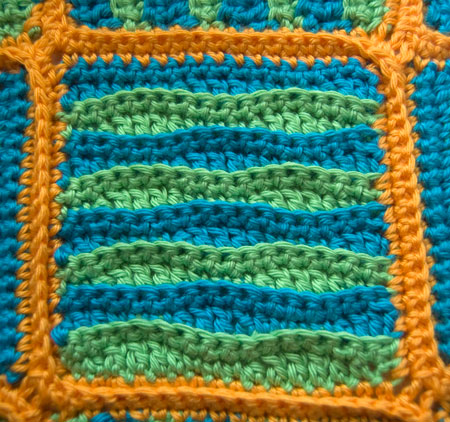
Edging: Join Color C with sl st. Ch1 and sc around the block, working 17 sc evenly in each side and ch 3 in each corner. Break yarn and join. Weave in ends.
Joining the Blocks Together:
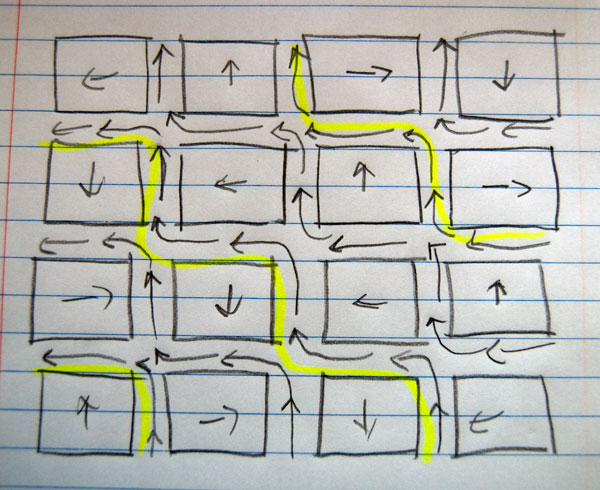
The hand-drawn diagram above details how I put this blanket together. The arrows inside the squares indicate which direction the blocks were facing - for instance, an up arrow means that the block lays in the same direction it was worked, from the bottom up.
The next block to the right is turned 90 degrees clockwise, and the next is 90 degrees clockwise again, etc etc.
The actual joining is done with sc, from the right side. The arrows between the boxes show the direction I traveled.
This creates another set of "waves" moving through the fabric. Starting with the square in the bottom left, the next block to the right is joined (with sc, holding the wrong sides together, going through the edging sts in ea block).
The third block is then added to the top of the first block, moving around the top right corner of that first block. I've highlighted every other join row, so you can see how the waves are created.
To add more blocks for a bigger blanket, just start in the lower-left corner as indicated and keep working in this undulating pattern. At the end of each joining row, having reached the top left of that section, break the yarn and start again at the next join row, working from left to right and bottom to top.
Once all the blocks are joined together, join the yarn again with a sl st, ch1 and work a row of hdc (or the edging of your choice) all around the blanket. Break yarn and weave in all remaining ends.
In Closing
This version of the Wavy Baby Blanket is in super bright (some might say loud, heh) colors - bright and summery. But I also think it'd be gorgeous in softer colors. Picture the squares in a soft grey and pink or blue, with the joins and border in a darker grey.
Or use up all those tiny balls of leftover yarn and make each square unique! This blanket would make a great stash buster, with only 12 yards needed of each color for each square.
What colors do you think would work best for this design? Something subtle, or a crazy quilt of many colors? How big will you make your blanket?
The Fine Print
Be sure to Like the moogly Facebook page for the latest updates and have some fun with us! Written pattern copyright Tamara Kelly 2012. Please do not reprint this pattern, but feel free to link to this page to share this pattern with others.




Denise
Oh!! I like! Perhaps this shall be another of the FOUR baby gifts I now have to make. Thank you so much Tamara!!
Rachel (Ravelry ID Rachel1989)
This is a really fun pattern! I like that wave pattern, and the fact you have the blocks themselves so small really appeals to me. I am looking for things to make for charity, and ideas for a block swap I am in on Facebook, so this pattern, at least the blocks themselves, might just be getting a few goes around. Thank you! 🙂
moogly
Thank you Rachel, I'm glad you like it! 😀
jodie
love this 🙂 already done row 1 :]
love how quick the squares are to make :]
moogly
I'm glad you like it jodie! Thanks for saying so!
Hope
Hello,
I love this pattern. I think it is absolutely adorable.
I'm planning on making this for my niece, who is no longer a baby, so i must make it to fit a twin size bed.
For right now, im just practicing making squares out of scraps so that i know how to do it when i start the blanket, Because i am quite the beginner at crocheting. and i have a couple questions. Bear with me if they are dumb questions, but they are questions all the same.
first, for row 2, after you turn and sc across the whole row, am i supposed to grab the both the top AND bottom loop of the previous stitch? or just one of the two? I grabbed both and i dont think it looks quite right.
and second, After i worked row 3, in the BLO fashion, i can see the loops of the second color around the posts of the first color in the waves. And i know it doesnt look the same as yours. Am i doing something wrong?
Im sorry to waste your time, or the time of anyone who has used this pattern who may be able to help, but i am really excited about this blanket for my niece and any and all help would be greatly appreciated!
Thanks so much!
moogly
Hi Hope! Never be afraid to ask a question! 😀 If you've got questions, there's a good chance someone else is wondering too!
Row 2 is worked in both loops of the stitches of Row 1, both front and back, the entire way across. It's not until Row 3 that any sts are worked in the BLO.
It sounds like maybe you're using post stitches instead of crocheting in the back loop? It's hard to say without seeing it.
Try watching this video on BLO: https://www.mooglyblog.com/front-loop-only-flo-and-back-loop-only-blo/
Let me know if you need more help! I'm happy to answer any questions I can!
Hope
Oh my goodness. Apparently I need to learn how to read.
It says BLO in the pattern. for some reason i saw BPO and googled what that meant. i had no idea. and thats what i went with.
Wow. Now i feel even sillier than i did before.
I'll give it another whirl and see what happens after i re-read it. then read it again. Jeez.
And i thought i was doing so good. Lol.
Thank you so much.
Hope
I even typed BLO when i asked you the question. I think I've had too much sugar from my christmas cookies and not enough sleep. lol
moogly
😀 Too much sugar and not enough sleep describes us both I think! You're very welcome!
tanya
thank you tons im new to crocheting and i was able to catch on how the pattern worked with the blue prints and hope i have luck to figure out the edging and joining my son will hopefully get years with thank you again tanya
tanya
squares coming out long is it normal?
Tamara Kelly
They should be pretty well square, but with differences in gauge they might be rectangular - adding another row (or 2) to square it up should work!
Margaret Kelly
Hello. thank you so much for these wonderful patterns. I made the leaping stripes blanket and it turned out great. I am a novice and have a question regarding this. I made 16 squares without the border. Very fun to crochet! However, now that I am trying to put the border on, I find that sometimes a top or bottom has 1 extra or less stitch. I figure I can make it up by keeping the count even. I want to know if the 3 in corner count as in addition to 17, or if 1 would be 17 and then 1 would be adding two. At the end, what should be the total stitch count around a square? Thanks, I never tried anyting that was in sections before!
Tamara Kelly
Hi Margaret! There should be 17 on each side, plus an extra in the corner (the first of the 3 in the corner will be one of the 17 for the side you're finishing, and the last of the 3 will be the first of the 17 for the side you're starting. A little bit of fudging here and there when joining squares is normal and expected! 🙂
Soosie
Thank you for such great instructions! Love this blanket. I'd like to try it again with a category 5 yarn, or 2 stands together of the Simply Soft. What are your thoughts/suggestions? I'm not skilled at making yarn substitutions... I've had some disasters. 🙂
Tamara Kelly
Blankets are a great project for yarn substitutions! 🙂 Just make sure to use a hook size that gives you nice fabric with your chosen yarn. Thank you so much! 😀
Haley
Do you block the squares at all? Mine are turning out with a big swoosh on one edge..
Tamara Kelly
I did not for this one, but you absolutely could!