
Inspiration is a funny thing. The Rainbow Pocket Market Bag was brewed up in my brain as a crazy combination of Earth Day, the Beatles' Yellow Submarine, my constant struggle with getting organized, and the desire for a little color in a cloudy rainy week! And the result is a free crochet market bag pattern that's useful all year long!
Prefer an ad-free PDF? You've got options!


Prefer the free blog version? Keep scrolling!
A Unique Bag for Every Day!
To make this fun reusable bag I used a couple of specific crochet techniques, and I've included links to them in the bullet points of the pattern. I also borrowed the mesh pattern from the Artfully Simple Infinity Scarf - though worked in rounds, not spirals. I've also learned from all of you that both short and long handles are popular - and included directions for two different types of handles!

The twist with the Rainbow Pocket Market Bag is the double layer at the bottom, which lets the whole bag fold up into a handy size to throw in your tote or car! So let's get to that crochet pattern!

Rainbow Pocket Market Bag
Add this pattern to your Ravelry Queue
US - I, 5.5 mm hook
US - F, 3.75 mm hook (optional, for making button)
200 yards Bernat Handicrafter or Lily Sugar'n Cream (4-Worsted, 100% cotton)
120 yards Color A, 10-40 yds each of Colors B-G
Button (optional, if you choose not to make your own)
Helpful Links and Tutorials:
Sateenkaarilaukku.pdf - (Finnish) courtesy of Laura Rankonen - thank you Laura!
Rainbow Pocket Market Bag Instructions
Color A Circle Instructions:
Rnd 1: Starting with a Magic circle, ch 2, work 12 dc into the circle. Join to the first dc with a sl st. (12 sts)
Rnd 2: Ch 2, 2 dc in each st around. Join to the first dc with a sl st. (24 sts)
Rnd 3: Ch 2, dc in the first st, 2 dc in the next st. *Dc in the next st, 2 dc in the next st. Repeat from * to end. Join to the first dc with a sl st. (36 sts)
Rnd 4: Ch 2, dc in the first 2 sts, 2 dc in the next st. *Dc in the next 2 sts, 2 dc in the next st. Repeat from * to end. Join to the first dc with a sl st. (48 sts)
Rnd 5: Ch 2, dc in the first 3 sts, 2 dc in the next st. *Dc in the next 3 sts, 2 dc in the next st. Repeat from * to end. Join to the first dc with a sl st. (60 sts)
Rnd 6: Ch 2, dc in the first 4 sts, 2 dc in the next st. *Dc in the next 4 sts, 2 dc in the next st. Repeat from * to end.This circle should be approximately 7 ½" across. Break yarn and use the Seamless join to join to the 2nd dc of the round. Weave in ends. (72 sts)
Colors B - G Circle Instructions:
Rnd 1: With Color B, start with a Magic circle, ch 2, work 12 dc into the circle. Break yarn and use Seamless join to join to the 2nd dc of the round. Weave in ends. (12 sts)
Rnd 2: With Color C, use the Standing dc to join to any st. Dc in the same st, then work 2 dc in each remaining st around. Break yarn and use Seamless join to join to the 2nd dc of the round. Weave in ends. (24 sts)
Rnd 3: With Color D, use the Standing dc to join to any st, then work 2 dc in the next st. *Dc in the next st, 2 dc in the next st. Repeat from * to end. Break yarn and use Seamless join to join to the 2nd dc of the round. Weave in ends. (36 sts)
Rnd 4: With Color E, use the Standing dc to join to any st. Dc in the next st, then work 2 dc in the next st. *Dc in the next 2 sts, 2 dc in the next st. Repeat from * to end. Break yarn and use Seamless join to join to the 2nd dc of the round. Weave in ends. (48 sts)
Rnd 5: With Color F, use the Standing dc to join to any st. Dc in the next 2 sts, then work 2 dc in the next st. *Dc in the next 3 sts, 2 dc in the next st. Repeat from * to end. Break yarn and use Seamless join to join to the 2nd dc of the round. Weave in ends. (60 sts)
Rnd 6: With Color G, use the Standing dc to join to any st. Dc in the next 3 sts, then work 2 dc in the next st. *Dc in the next 4 sts, 2 dc in the next st. Repeat from * to end. Break yarn and use Seamless join to join to the 2nd dc of the round. Weave in ends. This circle should be the same size as the Color A circle, though very slight differences are okay. (72 sts)
Assemble the Pocket Bottom of the Bag:
Place the two circles Right Side together, with the Color A circle on the bottom, as shown below.

Insert hook through a st of both circles, and using Color A yarn, sc through both layers for 56 sts.
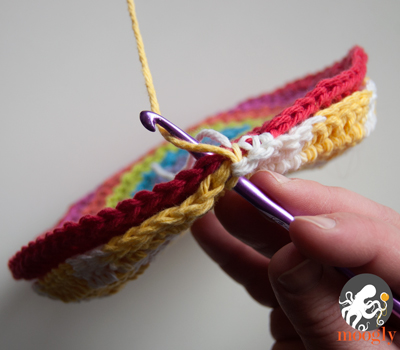
Then, sc through the remaining 16 sts of Color A's circle ONLY. Join to the first sc with a sl st. (72 sts)

Make the Mesh Sides of the Bag:
Rnd 1: Ch 3, and dc in the next st. Ch 5, skip 4 sts. *Dc in the next 2 sts. Ch 5, skip 4 sts. Repeat from * to end. Join with a sl st to the top of the first dc (skipping the ch 3).

Rnds 2 - 15: Ch 3, dc in the next ch sp. Ch 5, skip the rest of the ch sp and the next dc. *Dc in the next dc, dc in the next ch sp. Ch 5, skip the rest of the ch sp and the next dc. Repeat from * to end. Join with a sl st to the top of the first dc (skipping the ch 3).

Rnd 16: Ch 1, work 2 sc in first st. Work 4 sc in each ch sp and 1 sc in the top of each dc st around (skipping the ch 3). Break yarn and Seamless join to the 2nd sc of the round. (72 sts)
Make the Handles:
(I used only 5 colors for the handles, so use the 5 you like best - or add another round!)
Rnd 17: With Color B, join to any st of Round 16 and sc in each st around. Break yarn and Seamless join to the 2nd sc of the round. Weave in ends. (72 sts)
Rnd 18: With Color C, join to any st of Round 17 and sc in each st around. Break yarn and Seamless join to the 2nd sc of the round. Weave in ends. (72 sts)
Rnd 19: With Color D, join to any st of Round 18 and sc in the first 12 sts. For Short Handles, ch 14; for Long Handles, ch 50 (or longer if desired). Skip the next 12 sts, sc in the next 24 sts, ch same amount for second handle (14 or 50), skip the next 12 sts, sc in the last 12 sts. Break yarn and Seamless join to the 2nd sc of the round. Weave in ends.
Rnd 20: With Color E, join to any sc st of Round 19. Sc in each sc, and sc in the BLO of each ch around. Break yarn and Seamless join to the 2nd sc of the round. Weave in ends. (76 or 148 sts)
Rnd 21: With Color G, join to any st of Round 20 and sc in each st around. Break yarn and Seamless join to the 2nd sc of the round. Weave in ends. (76 or 148 sts)
Make the Button and Loop:
To make your own button:
Use the F hook and any color of yarn.
Rnd 1: Starting with a Magic circle, work 6 sc into the circle. Join with a sl st.
Rnd 2: Ch 1, and work 2 sc in each st around. (12 sc) Break yarn and use Seamless join to finish off. Embellish with Surface Crochet or embroidery sts if desired. Sew to multicolored circle at opening, as shown.

To make the loop:
With Color A, ch 15 or long enough to get loop around the button of your choice. Sew both ends to the Color A circle opposite the button, as shown.
 The Fine Print
Now you can take a little rainbow everywhere - and never be without a bag when you need one! Reusable bags are definitely the way to go, and I never head to the store without them! I hope you've enjoyed the pattern for the Rainbow Pocket Market Bag - I look forward to seeing your photos on Facebook and Ravelry!
Written pattern copyright Tamara Kelly 2013. Please do not reprint or repost this pattern, but please do link to this page to share this pattern with others. If you wish to make bags for sale from this pattern, please visit the About page for details.


Penny says
That is just adorable! And very handy. Thank you for sharing the pattern!
Tamara Kelly says
Thank you Penny, I'm glad you like it! 😀
Martha Lopez says
Beautiful colors very handy, love it !! good job
Learnto Crochet says
Could this be any cute!
Learnto Crochet says
Could this be any cuter!
Liz Hasler says
Love, love, love this! Thanks for sharing! You're awesome
rebby says
Queued and ready to start! Fabulous, thank you for sharing!
Pam G says
I love it! The colors are awesome and I'm a big fan of things that fold up small, great for traveling.
Heather says
You are the most amazing crochet crafty person! You inspire me everyday!! Thank you!:)
Ashley Archer says
I love this bag! This would make a great beach bag as well. You could put a pair of sandals, a towel, sunglasses, and sunscreen inside and it would fit perfect. Thanks for sharing.
Susan H says
I am half way thru my bag and my brain is already planning the next. Going to attach a clip to the finished project, so someone could clip it to their belt loop/or purse. When my MIL went in to care I inherited a lot of yarn... including lots of bits of cotton as she used to knit dishrags.. this will be the perfect way to use them up.. Thanks <3
Tamara Kelly says
Great idea Susan! Glad you like it!
Kelsey Couslton says
Is there a PDF? That you could post?
Tamara Kelly says
Kelsey, try the Print Friendly button all the way at the bottom of the pattern!
Alwin says
Hi I loved the wonderful things you make the colours are so cheerful. I am thinking of making the soap pouch holder for my grand daughters christening. It will be an exciting project as the pattern comes from you it will be made Cyprus (europe) and the be taken to England where my grand daughter lives.. Thank you and I will put a note in each bag where the pattern came from. I will be making around 60 bags... Regards Alwin
Tamara Kelly says
Congratulations on the new grand daughter! And that IS exciting! 😀 Thanks so much for telling me about it!
Susan M J says
I love the Bags, Im a self taught crochet senior. Nise Patterns Thanks for Sharing
Susan M J says
I Thankslove this Bag and its not hard like I thought I stared it in ecru will add red, yellow or/and green
Anke from Germany says
At first: sorry for my Bad english!
I love this, but something went wrong with my first try. It's hard to understand what kind of yarn you used for german people... Can you explain me? In Germany we don't have the name "worsted weight". My bag was really small and it seams like the mesh Side was to small for the bottom... Will try it again! Thank you for sharing this beautifull Pattern! Will Be a great gift!
Tamara Kelly says
From About.com: "The phrase "worsted weight yarn" refers to medium-weight yarn which is heavier than dk yarn / double knitting yarn, sport weight yarn, baby weight yarn, fingering weight yarn or crochet thread; it is lighter than chunky yarn or bulky yarn."
The kind of yarn I used is what is also known here as kitchen cotton. Most worsted weight yarns are 10 ply. I hope this helps!
Mary says
Love this! So clever, pretty and useful! (That actually describes all your patterns -- I just adore your work!)
Tamara Kelly says
Thanks so much Mary!
Linda Solaiman says
I can't believe this I just saw it today on fb, I have posted an almost identical pattern on my blog yesterday! great minds! 🙂
judy bee says
I love this idea, my bag is always folded up in my purse, but this is tres cool. You could add a short strap and have it be a fashion accent or statement on your handbag or in my case tote bag. And anything that combines Earth Day and Yellow Submarine...well is something for me. Can't wait to try this, thanks for sharing.
Tamara Kelly says
You're very welcome! Great idea on the strap!
Jennifer says
Is there any chance for an instructional video for this bag? It would help me greatly to see the process.
Tamara Kelly says
Hi Jennifer! The sts are pretty simple, what part is tripping you up? The mesh is actually the same stitch pattern seen in the Artfully Simple Infinity Scarf, and there's a video for that. 🙂
Eve Sison says
Oh, I so love this, Tamara! Wish I could make one these days!
Tamara Kelly says
😀 Thank you Eve!
Tina says
Thank you so much for your patterns! I love every one that I have tried. This one has got to be one of my favorites, and I can't wait for Saturday Market to start up again next month! I just started with this pattern 3 days ago, and I just started my third one!
Tamara Kelly says
Wow! Thank you so much Tina! 😀 I'm so glad you enjoy it!
Bridgette says
It's probably just me, but I can't see how it works with the button. Is it just for looks or is it required to be on the bag? I don't see how a button works on the button of this bag.
Tamara Kelly says
The button is just to close the pouch when it's all folded up. It's certainly optional if you want to leave it off!
Carrie Anderson says
I'm just a bit confused about the mesh part chains 2-15. As I get to the end of one round am I making 2 DC's then skipping the chain three and then chaining another 3 to begin another round?
Tamara Kelly says
At the end of the round, you make the 2 dc sts, ch 5, and join to the first dc, skipping over the ch 3 that started the round. Then to start the next round you ch 3 again. Does that help?
Ree says
Please stop making fabulous stuff to add to my "to crochet" list!!!
Tamara Kelly says
Mwahahahahahah! 😉
Jessica says
Love love love this pattern! Just finished my first one and I'm out to buy more cotton in colors to have one for everyday of the week and to give to family.
Tamara Kelly says
😀 So glad to hear it Jessica!
Joan Dunn says
I love this pattern and have the bottom two circles made. Now I am wondering: is the purpose of the buttoned bottom to put the entire bag in for storage? I don't see how this works,. Do you turn the bag inside out? I was also wondering why you put the two circles Right side together.
Tamara Kelly says
Hi Joan! Yes, the circles will turn right side out and "pull" the bag into the space between them, for storage. The circles are right side together so that when the bag is in the pouch they are the ones that show.
Madelaine T. Hetrick says
Thank you so much for this lovely pattern. My mother in law made me one like this in the 70's and someone stole it from me! I have been looking for a similar one and always going to work one up but other projects came first. I rarely knit or crochet for myself. Again many thanks and keep up the great work.
Madelaine (Knitnjunky).
Tamara Kelly says
😀 Thank you so much Madelaine!
Andrea says
was bedeutet Dc und Ch2,2 bei der regenbogentasche
Andrea says
und wo bekommt man die wolle dafür
Andrea says
wollte schreiben die wolle
kathjane says
Thank you so much for this! All my friends are getting these for birthday presents this year! It's perfect!
Tamara Kelly says
😀 Thank you!
Cindy says
You are a freaking genius!!! I'm going to make a bunch of these. Thanks so much for the free pattern.
Tamara Kelly says
😀 Thank you so much Cindy!
Grace Willsher says
I needed a quick birthday present and this did the trick. Such a clever design! Thanks for sharing.
Tamara Kelly says
😀 Thank you Grace, I'm glad you liked it!
Liz says
Oh no! I was having a great time, and now I'm stuck. On round 16 instead of 72 stitches I have 61. I began with 12 ch 5 spaces at the bottom. I'm really lost. Can you help?
Liz says
Apologies.....working too late tonight and misread directions. Back on track now with this delightful project
Tamara Kelly says
😀 So glad to hear it! Thank you Liz!
Amy says
I love this bag so much. I'm planning to make one that look like a watermelon! I just had one question: For double crochet circles I've used patterns that count the chain 3 at the beginning of each round as the first DC. In this pattern for the solid color circle does the chain 2 at the beginning of each round just get hidden between the first and last DC of each round ? I hope that makes sense.
Thanks!!
Tamara Kelly says
Thank you Amy! The ch-3 vs ch-2 thing is just a matter of personal preference. I like to use the ch-2 and yes, just hide it between the first and last sts of each round. It avoids the gaps than can happen with a ch-3. 🙂
Debbie Nininger says
I noticed that if we make these to sell we are supposed to see the About page. I'm not sure where that is. What is the rule on that sort of thing? And what if we make changes?
Tamara Kelly says
Hi Debbie! Here's the About page: https://www.mooglyblog.com/about-moogly/ 🙂
Debbie Nininger says
Thank you, that was helpful. I make shopping bags and like the way you designed this one t make it compact. I am going to try my bag with your pouch.
Tamara Kelly says
Thank you so much! ♥
Eleni Filiou says
Thank you very much!!! It s amazing! I wush you all the best!
Greetings from Athens Greece
Eleni Filiou
Tamara Kelly says
I'm so glad you like it, thank you, Eleni! ♥
Amanda Gratrix says
Hi Jennifer would this work with dk cotton as I don't have any worsted weight cotton.
Tamara Kelly says
Hi Amanda! I think it would be great, just drop down the hooks size a bit! 🙂