Red Heart Pomp-a-doodle is just too fun - and it makes a super easy DIY pom-pom rug! But crocheted (and knitted) rugs can be so slippery on hard surface floors. The Super Easy Non-Slip Pom Pom Rug has the perfect DIY crochet rug trick to solve this problem!

Disclaimer: This post includes affiliate links. Materials provided by Red Heart Yarn and Brittany Needles.
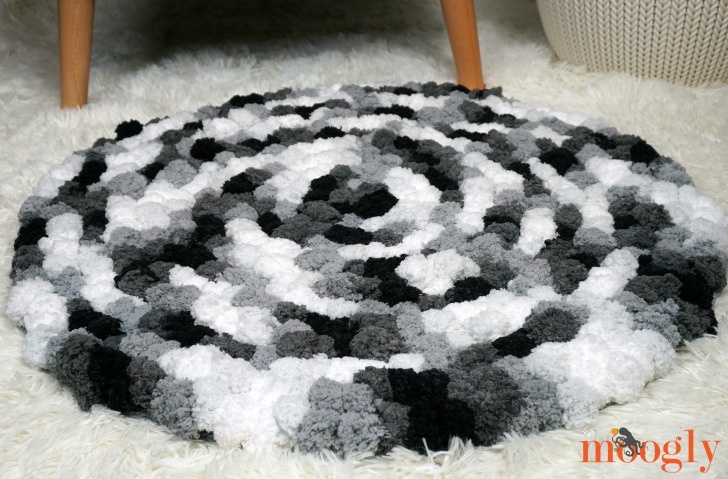
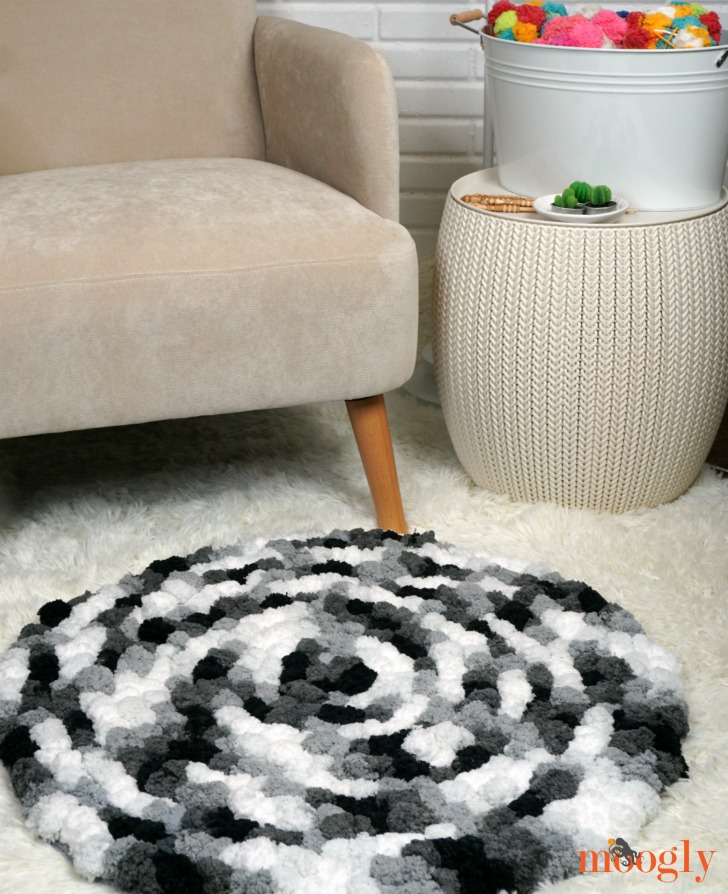
The Super Easy Non-Slip Pom Pom Rug can actually be made any shape, but I thought a round, circle rug would be a great shape to highlight the versatility of this crochet pattern - that is, in fairness, more of a crochet plan!
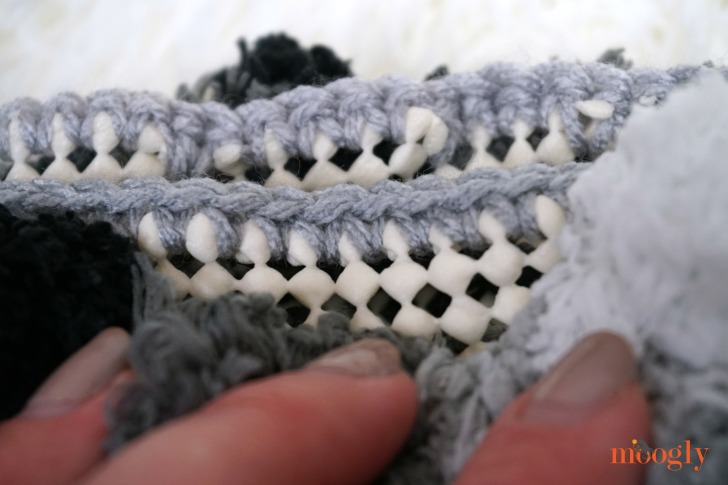
The key is starting with a purchased rug pad - you can pick these up at just about any big box store (I got mine at Bed Bath and Beyond, but have linked an easy Amazon option below). Most of these non-slip rug pads I've seen have the same basic look - a squishy field of foam with lots of holes that are perfect for a G/6 hook!
So... why not crochet right into those holes? Red Heart Pomp-a-doodle was the perfect yarn for this experiment - I worked the stitches from the "wrong side" of the rug, keeping the poms on the right side.
It took a bit of experimenting to get the spacing right, but then it came together in less than a day, making the Super Easy Non-Slip Pom Pom Rug possibly the fastest free crochet rug pattern ever!
I used 5 balls of Red Heart Pomp-a-doodle to make a 27" rug, so that's how I've written it up below. But you can honestly use this technique to make a rug in any size - and any shape! It all starts by purchasing the rug pad of the right size... read on to see!
Super Easy Non-Slip Pom Pom Rug
Add this pattern to your Ravelry Queue and Favorites
US - G, 4.0mm hook - Brittany Needles
70 yds Red Heart Pomp-a-doodle (100% polyester; "7" Jumbo; 14 yds/13 m; 3.5 oz/100g)
Colorway: Thunder (5 balls)

10 yds Red Heart Super Saver Ombre ("4" Medium/Worsted/UK: 10-12 ply; 482 yds/440 m; 10 oz/283 g)
Colorway: Anthracite (less than 1 skein)

Non-Slip Rug Pad (3' x 5' size used, purchase one larger than the size rug desired)
Gauge is not important for this pattern
Size shown: 27" circle
Helpful Links & Tutorials:
Super Easy Non-Slip Pom Pom Rug Tutorial
NOTE: This pattern is more of a technique than a standard written pattern. Only two stitches are used - slip stitches and single crochet. Please read through the entire pattern before you begin.
INSTRUCTIONS:
Prep your Rug Pad: If needed, cut your rug pad to your desired finished shape and size. Mark the center of your pad with a pen or marker.
Join the Pomp-a-doodle to the Rug Pad:
Insert hook into the hole closest to the marked center of your rug pad. Yarn over with the string section between the pom at the end and the next pom. Pull that loop through to the back of the rug, so that the first pom is held close to the pad fabric.
Insert hook in next pad hole and yarn over with the same section of string, pull that loop through to the back of the fabric and through the other loop on the hook. The yarn is attached!
Insert hook in pad hole about ½ inch from last hole used, yarn over with the next section of string, pull through pad and through other loop on hook, pulling the second pom close to the fabric.
Insert hook in next pad hole and yarn over with the same section of string, pull that loop through to the back of the fabric and through the other loop on the hook.
Continue in a Spiral:
Continue working like this, making 2 slip stitches for each string section, while curving around the pad in a gentle spiral, as shown below.

You may need to adjust the number of holes skipped as you go. There is a lot of room for "fudging" here, so there are no hard and fast rules, and you may find there is a particular method of counting/skipping holes in the pad that works well for you.

As you continue the spiral, try to keep the "rounds" about an inch apart, and make sure the poms are always pulled down against the rug pad fabric.
Adding a New Ball of Yarn:
When you need to add a new ball, pull up the second loop of the string *before* the last pom. Insert the hook in the next rug pad hole and pull up the string loop between the first two poms of the new ball of yarn. Pull this loop through the other loop on the hook (from the last ball) and then continue crocheting.

If there is a string on the end (without a pom), you can use a yarn needle to sew that string through to the back of the rug and weave it under the other stitches to secure.
Finishing the Pomp-a-doodle Portion:
When your rug has reached your desired size (or you've run out of yarn), you can cut off the very last pom (if needed) and use that section of string to pull through the final stitch and weave in the final end.

Weaving in the string through both the slip stitches you've been making *and* the non-slip rug pad holes will make it secure, but you can add a dab of fabric glue or hot glue to secure further if desired.

Adding a Nice Edge:
Turn to work from the Right Side (pom side) of the rug. Trim excess rug pad if desired, leaving at least a ½ inch from the cut edge. With Red Heart Super Saver, work a round of single crochet around the outside edge of the rug pad, trimming off any little squares that want to poke through. Join and finish off.
Blocking (Optional):
I found that the very edge of the rug wanted to curl under just a bit. So I sprayed just the Super Saver edge with water and laid the rug flat to dry, and that was all that was needed.
Simple as can be! Making a DIY Pom Pom Rug with Red Heart Pomp-a-doodle almost feels like cheating - but I love the result, and I love that with this trick it's non-slip right off the hook!

If you make the Super Easy Non-Slip Pom Pom Rug I’d love to see a photo. So if you share it on social media, be sure to tag me @mooglyblog or #mooglyblog – and happy crocheting!

Written pattern copyright Tamara Kelly 2018, all rights reserved. Please do not reprint or repost this pattern, but please do link to this page to share this pattern with others. To print or download, use the Print Friendly button below, or go to PrintFriendly.com, or right-click to copy and paste it into a word processing document if those options do not work for you (please note that Print Friendly is a free outside website that the button links to, and you can click here for a tutorial on how to use it, but I cannot provide additional technical support for this service). If you wish to make items for sale from this pattern or translate it to another language, please visit the About page for details. Thank you to Red Heart Yarn and Brittany Needles for providing the materials for this pattern.


Patricia Seaton says
This is brilliant! And it looks so quick to make. Thank you for a great pattern.
Tamara Kelly says
Thank you so much! 😀
Myra Wade says
Tamara, i understand why you made a round to show off the design of the yarn, but suppose i want to make a 3 x 5 rug. Would you start on the side and go up and down, leaving about an inch between rows?
Tamara Kelly says
Absolutely! That's the thing with this one - you can honestly go in any direction you like, to fit whatever mat size or shape you like. (Makes it tricky to write up, so I needed to just pick a shape to share and go with it! And then encourage all of you to have fun with it! 😀 ) I'd still keep the "lines" about an inch apart as you go - that seems to be a good width for the poms to fill in. 🙂
Jacqueline S Strand says
So cool! I love making rugs with crochet and this is a new exciting way. Thank you
Tamara Kelly says
😀 I'm so glad you like it, thanks Jacqueline!
Sylvia says
This is something that would be great for my daughter's dorm room next fall.
Tamara Kelly says
😀 That would be so fun!
Jennifer says
I have made a couple of these rugs so far for gifts. They were loved by the recipients. My question is how would you recommend cleaning the rug. Just spot cleaning? Thanks for the pattern!
Tamara Kelly says
The yarn is machine washable, but ironically, the rug pad usually isn't! For best results, I'd recommend a handwash - not least of all to make sure your ends don't come undone.
Jennifer says
Thank you for the suggestion. 😊
Digislr says
I love this but i need it to be machine-washable (party pooper pets). Is there a way to do this with a different fabric underneath that is machine-washable?
Tamara Kelly says
You might be able to find a washable pad! Otherwise, I'm not sure.
Janet Yamashita says
Your tutorials are wonderful!
Tamara Kelly says
Thank you so much! 🙂
Lorraine says
Hi, I’m sorry but I don’t quite understand this pattern and I’ve been crocheting for a long time. Is it possible to make a video of this. Thanks, Lorraine
Tamara Kelly says
Yes, there is a video tutorial linked above, the first one under "Helpful Links and Tutorials." 🙂
Nancy says
Hello, I’m with Lorraine. Please make a video. Thank you.
Tamara Kelly says
There is a video tutorial above, linked in the pattern. 🙂
PatriciaMalgioglio says
How can I do this without the pad below. Can you please explain .I would greatly appreciate the instructions. Thank You PatriciaMalgioglio @icloud .com
Tamara Kelly says
Hi Patricia! This pattern is specifically designed to work into the rug, but I suppose you could just crochet into the yarn itself in a bit spiral! 🙂