s
Ponchos are all the rage once again - they are the perfect autumn layer, like a cozy light blanket you can throw on over anything! The Perfect Fall Poncho features a simple cable-look pattern so it works up fast, an easy to wear shape and neutral color (in cozy Lion Brand Fishermen's Wool), and is one size fits just about all adults!
Disclaimer: This post includes affiliate links.
Prefer an ad-free PDF? You've got options!


Prefer the free blog version? Keep scrolling!
Perfect Poncho Proportions
Ponchos are a fantastic first adult garment to make. They are simple in their construction, and easy to adjust for a custom fit - if it's a little too small, make the seams a little shorter... if it's a little too big, make the seams a little longer! Easy as can be!
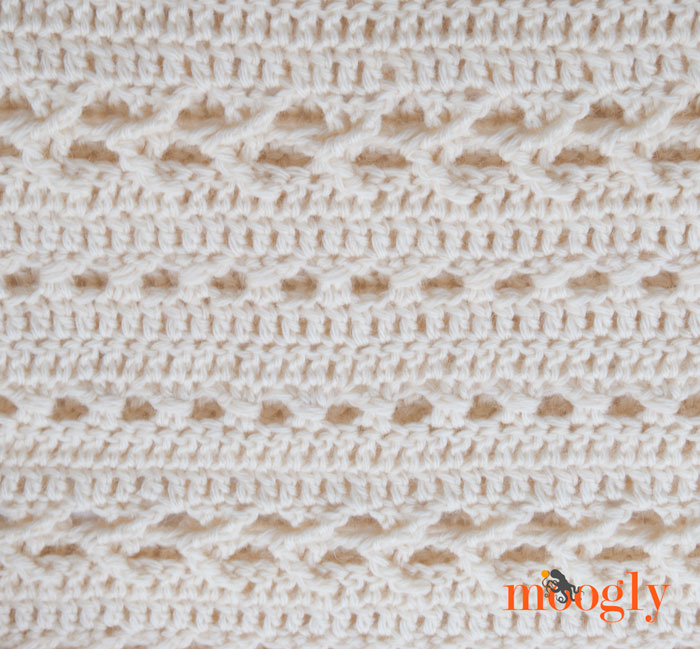
Perfect Fall Poncho
Add this pattern to your Ravelry Queue and Favorites
US - J, 6.0 mm hook - Furls Fiberarts
1700 yds (4 skeins) Lion Brand Fishermen's Wool (Aran/yarn symbol "4"/UK:10 ply; 465 yds/425 meters; 8.01 ounces; Colorway: Natural)
Stitch Markers - Clover Lock Ring Markers or Clover Wonder Clips
Gauge: 13 sts x 8 rows = 4" in dc
Finished Size: 50" wide x 26" high (after blocking) - fits most adults
Helpful Links and Tutorials
Chainless Starting Double Crochet
Special Stitches:
fpdtr (front post double treble) - yo 3 times, insert hook from front to back around post of indicated stitch, yo and pull up a loop, *yo and pull through 2 loops; repeat from * until 1 loop remains on hook.
bpdtr (back post double treble) - yo 3 times, insert hook from back to front around post of indicated stitch, yo and pull up a loop, *yo and pull through 2 loops; repeat from * until 1 loop remains on hook.
NOTES:
- This pattern is written with a ch-2 start to every row; this is the turning ch and does not count as a st. However, you can choose to use the Chainless Starting Double Crochet instead of the ch 2 and first dc of each row for a cleaner look.
- Odd numbered rows are the Right Side (RS), even numbered rows are the Wrong Side (WS)
Perfect Fall Poncho Instructions
Make 2 (they should each measure approximately 47" x 23" before blocking):
Row 1: Ch 174, skip the 2 chs closest to the hook, dc in each remaining ch to the end; turn. (172 sts)
Row 2: Ch 2, dc in each st across; turn. (172 sts)
Row 3: Ch 2, dc in the 1st 2 sts, ch 1, skip the next st, dc in the next 2 sts, working in front of last 2 sts made, fpdtr around skipped dc stitch, *ch 1, skip the next 2 sts, dc in the next 2 sts, working in front of last 2 sts made, fpdtr around skipped dc stitch; rep from * until 3 sts remain, skip the next st, dc in the last 2 sts, turn. (172 sts inc chs)
Row 4: Ch 2, dc in the 1st 2 sts, *ch 1, skip the next fpdtr st, dc in the next 2 sts, working behind last 2 sts made, bpdtr around skipped fpdtr st; rep from * until 2 sts remain, dc in last 2 sts, turn. (172 sts inc chs)
Row 5: Ch 2, dc in each st and ch sp across; turn. (172 sts)
Row 6: Ch 2, dc in each st across; turn.
Row 7: Ch 2, dc in the 1st 2 sts, *skip the next st, dc in the next 2 sts, dc around the posts of the previous 2 sts; rep from * until 2 sts remain, dc in the last 2 sts, turn.
Rows 8 - 9: Ch 2, dc in each st across; turn.
Row 10: Ch 2, dc in the 1st 2 sts, *skip the next st, dc in the next 2 sts, dc around the posts of the previous 2 sts; rep from * until 2 sts remain, dc in the last 2 sts, turn. (172 sts)
Row 11 and 12: Ch 2, dc in each st across; turn.
Rows 13 - 42: Repeat Rows 3 - 12.
Rows 43 - 46: Repeat Rows 3 - 6, break yarn and finish off.
Assembly:
Place 2 pieces so that RS are facing out and Row 1 of one piece is matched with Row 46 of second piece; use stitch markers to secure them together. Sew 17.5 inches from outside edge on both sides (64 sts), leaving center 12" (44 sts) unworked for neck hole. Before finishing off, try on and make neck hole smaller/larger as needed.
Final Edging: Sc evenly all around outside edge of poncho.
And with that, you have your Perfect Fall Poncho! If you're petite, you might need to close up the neck opening a little more, but this fit my size Medium 13 year old, my 3X self, and my somewhere in between sister - all with very different body shapes! I hope you enjoy it!
The Fine Print
Written pattern copyright Tamara Kelly 2015, all rights reserved. Please do not reprint or repost this pattern, but please do link to this page to share this pattern with others. If you wish to make items for sale from this pattern, or translate it to another language, please visit the About page for details. Thank you to Lion Brand Yarn for providing the yarn for this pattern!


MARGUERITE says
I hope you do a you tube video on how to make the Perfect Fall Poncho. It's so pretty and I can fallow along with your you tube videos just fine. When it comes to reading a crochet pattern I just can't follow them.
Tamara Kelly says
Thank you Marguerite! I'll put it on my list! 🙂
JUstina says
Hi Tamara, I just started your poncho but my issue is when I chain 174 of DK yarn and J hook the length is over 60” and the dimensions in your written pattern indicates 47”x23” before blocking. Can you please give some guidance? Thank you!!
Tamara Kelly says
Hi Justina! It sounds like you are using a different yarn. I'd recommend making a gauge swatch and changing your hook size as needed to get gauge. 🙂
Mary Russo says
That’s exactly what happened to me.
Jackie Bell says
Hi,
I had the same problem. I reduced the chain to 116 and it came out beautiful. I'm short so next time I'll only do 4 sets rather than 5
JoAnn says
Guess who's starting this tonight? ME!!!! Thank you
Tamara Kelly says
😀 Thank you JoAnn!
Jean J. says
Wish you had included a photo of this poncho.
Tamara Kelly says
I'm not sure what you mean Jean, there is a photo of it being worn, and a closeup of the stitch pattern.
Cindy says
Thank you for this beautiful pattern.
I've got a question about row 3.
Does the fpdtr has to be stitched around the last skipped dc or both or the first?
I think it has to be the second/the last.
Greetings from Germany
Tamara Kelly says
It's around the st that you skipped before the 2 dc sts. 🙂
Blythe Lee says
I've tried doing the FPDTR around each of the skipped DCs and around both. I think it looks best done around the left DC, the one closest to the DCs you just made.
Tamara Kelly says
Yes, this is the way it should be.
Blythe says
Could you please post some photos of the beginnings and endings or rows? I've worked through R 8 but my stitch count is off and I can't figure out where I went wrong (I think it started in R 5). Thanks.
Tamara Kelly says
Are you counting the ch-1s?
RANDEE says
I'm also loosing stitches, starting round 3, had to add them back in in row 6. Not counting chain 2's on the ends.
Tamara Kelly says
I'm sorry, without being there it's so hard to say. In the stitch count be sure you are counting the ch 1 and the post stitches. Also be sure you work into them on the following row!
Blythe lee says
I've had to fudge the pattern a little to keep stitch count. On rows 7 & 10, I could only get things to work right if I skipped one of the skipped sts (in other words, after the last group of DCs I do not skip a st before the final 2 DCs.
Tamara Kelly says
If it works, it works! 🙂 I'll have a video up later this week that might help too.
LaGretta says
Did you post the video?
Tamara Kelly says
Yes, it's linked above in the notes before the pattern. 🙂
sharon lindsley says
I also have questions about row 3 - I cut and pasted it to an email I sent you so you could see what we are reading and could possibly clarify this.. thanks so much
Tamara Kelly says
I replied via email! 🙂
K Miller says
I'm interested in making this pattern, but not keen on the wool idea. Do you have a suggestion for a suitable substitute?
Tamara Kelly says
Lion Brand Vanna's Choice is the same weight and 100% acrylic. 🙂
sharon lindsley says
I'm using Lion Brand Heartland and it seem to be working just fine.
sharon lindsley says
I'm using Lion brand heartland and it's working just fine.
Tamara Kelly says
Oh yes, that's another great one for this pattern! 🙂
Pam says
THANK YOU for the video!! It made the instructions perfectly clear. Can't wait to start it!
Tamara Kelly says
Oh good! Thank you Pam! 😀
tess says
I love this poncho... but I am looking for one to make for a man... got anything for that?
Tamara Kelly says
I don't personally, but there are a few on Ravelry that I think you might like:
http://www.ravelry.com/patterns/library/mans-striped-poncho-crochet
http://www.ravelry.com/patterns/library/mitered-mans-unisex-poncho---crochet
http://www.ravelry.com/patterns/library/oversized-poncho-crochet
tess says
thank you so much!!!! I found one Lion Brand http://www.lionbrand.com/patterns/chs-mansPoncho.html it's unisex, and might work for both of us 🙂
Mary says
Could the pattern instruction have a typo, I am following it on Moogly. When I finish row 3, the stitch count is 174 it calls for 172 stitches.I have redone the row several times and it still comes out to more stitches than the pattern calls for.
Tamara Kelly says
It should be 12. Have you watched the video tutorial at https://www.mooglyblog.com/perfect-fall-poncho-tutorial/ ?
Christine says
So very grateful for this pattern. It's so chique and sophisticated, while its easy to make. I'm a wheelchair user and ponchos are a my solution for staying warm and stil looking a bit glam. With a coat in a wheelchair I always feel like the Michelin man:-) one thing I would live if I was able to make a slit/opening on each side to put my arm through to operate my chair. That way I wouldn't have to lifestyle the whole poncho to do that. Any tips on how to achieve that would be more then welcome. It could a base pattern that I could fall back on every time.
If I would put my arm through the opening I could show off my elbow long gloves!!! 🙂
Tamara Kelly says
Hi Christine, thank you! I'm not sure where you'd put the slit - with the poncho as worn, you stick your arms out the sides. you could reduce the width by 14, 244, or 36 sts to make it a little narrower.
And you could put slits in somewhere by working the rows where you want the slits to be in parts - work the section before the first slit for that many rows, then the section between (the midle), then the other side, then finally work all the way across for the next row. You will have to add some plain stitches for the sides of the sections, so it would take a little experimentation. 🙂
Vicky says
I too am having issues with stitch numbers. I'm using the chainless dc (which is genius by the way) and wonder if this affects the number of stitches you should have as they are all counted? I dunno...
Vicky says
I chain 174, skip 2 and carry on doing dc's but when I count for the second row I have 173 stitches. It's twisting my melon.
Tamara Kelly says
The ch-2 doesn't count as a stitch. 🙂
Tamara Kelly says
If you use the chainless dc, then you don't ch 2, and you use the chainless dc in place of the first dc. 🙂
Sonya says
As the first two rows after the starting chain are all DC, could I could an FDC to start??? This is super cute!! I'm thinking for a bigger person (I'm a 3X), I could use a size up hook and a size 5 yarn and still get away with it. 😉
Tamara Kelly says
You could absolutely start with a fdc row. 🙂 I'm a 3x myself and it still fits fine as is.
Christy says
If I use fdc, should I still use a multiple of 12 + 4? Or less fdc + a turning chain? Thank you!
Tamara Kelly says
Hi Christy! If you are using Foundation Stitches, you want to have a mult of 12, plus 2 🙂
Rebecca says
I've completed both sides to my poncho. Do you recommend blocking before stitching them together?
Thanks!
Tamara Kelly says
Great question! I would recommend blocking before sewing IF you have limited space. It can be quite large all laid flat! However, if you have the space for it, sewing and adding the edging before blocking is better. 🙂
Rose says
Do you think that this pattern would work with a light-weight yarn, for a very different look? Since you've stated the multiples for the pattern, we should be able to adjust the number of stitches to create the size we want, I'm thinking.
Your patterns are all so creative and lovely! Thank you for offering these "gifts" to us, so that we can be creative!
Tamara Kelly says
Thank you so much Rose! Yes, I think you should be able to customize it pretty easily! 😀
Christine says
Hello. I am quite new to crochet and i absolutely love this poncho pattern. please could you tell me how many 100g balls of yarn i need, I have had a look at what you used, but because it was skeins i am confused. Many thanks
Tamara Kelly says
Hello Christine!
It's impossible for me to tell you how many balls you need without the name of the yarn you are using, as yardage will vary within that weight.
Christine says
Hello Tamara, the yarn i have chosen is called creative cotton aran, which is in 50g balls ( 85m ). The lady in the wool shop worked it out and said I would need approx 18 - 20 balls. I have already started the poncho and i must say i am very pleased with how it is looking. Thank you for your reply and for a lovely pattern. Christine
Tamara Kelly says
I'm so glad to hear it, thank you Christine!
Mackenzie says
I have a question about row four. When it says,*ch 1, skip the next fpdtr st, dc in the next 2 sts, working behind last 2 sts made, bpdtr around skipped fpdtr st; rep from * I chain 1 and then I get lost on which stitch is the fpdtr stitch . There is a stitch that is connected to the fpdtr in the front, but there is a stitch before that, so I would be skipping two stitches. Is this correct? Sorry this is confusing.
\
Tamara Kelly says
Hi Mackenzie! Did you watch the video tutorial linked above? I think it will answer your question. 🙂
Diane Dicke says
Can we start this with a Foundation dc?
Tamara Kelly says
Yes, if you prefer you can substitute 172 FDC for the first row! 🙂
Diane Dicke says
Thank you! 🙂
Robin Griffin says
Hi Tamara! I just finished making this poncho and I love how it turned out, but it was way too wide and heavy on me and I am a 3x gal myself, although I am vertically challenged, ie. short, lol! I don't like wool so I used Red Heart super saver and wonder if that was why it was so heavy. I wound up giving it to a co-worker who is my size but much taller and it looks gorgeous on her. Would I decrease the first row chains to make it a little narrower and if so, do I just chain a even number?
Tamara Kelly says
Hi Robin!
Thank you! RHSS is a heavier yarn for sure, at 52 yds per ounce, compared to LB Fishermen's Wool at 58 yds per ounce. But it's also acrylic vs wool - acrylic doesn't "breathe" like wool, making it seem heavier and hotter.
Of course, the height issue might be a lot of it too! 🙂 It is crocheted with a multiple of 12 sts, plus 4 more. The 2 sts on the ends of each row are dc sts – this is the “plus 4.” So you can subtract 12, 24, or 36 from the starting chain to shorten the width. Each set of 12 stitches represents just under 4" of width, so if you took off 36 chains, it would be about 38-39" wide.
Cyndi says
You have some beautiful patterns - I'm going to try a few. Could I maybe suggest that you include the yarn 'weight' (number and descriptor ie 4/medium, etc) that you use? I know you include the brand, but they're not always available to everyone in their area, and the weight would make it easier to find something comparable.... weight makes a huge difference in the final product, and using something heavier or finer than what is listed could affect how your project turns out. I have been able to figure most of them out with a lot of googling....
Tamara Kelly says
Hi Cyndi! Thank you! You can also click on the name of the yarn for more information. I am always adding more info to my patterns as time goes on, I'll update this one as well. It already had Aran/10 ply, so now I'll add the number. 🙂
HOLLY HILL says
I'm currently making this for a friend. I have to say that I am glad you added a video tutorial as when I got to row 7 I was having difficulty figuring out how to work around the posts. Thank you so much for that! It is looking beautiful and I can't wait to finish it.
Tamara Kelly says
😀 I'm so glad to hear it! Thank you Holly!
Kathy says
How Canberra one print this pattern without all of the comments printing also
Tamara Kelly says
The green "Print Friendly" button at the bottom creates a printable version that you can customize by clicking to remove the parts you don't want to print. 🙂
Sina Guthrie says
I love this gorgeous pattern! I have a couple of Caron Cakes that I believe will make a stunning finish for this. I'll post when I get it done.
btw, I love your patterns, they are so well written and easy to read!
The ups and down are some of my favorites! Also my first attempt at fingerless gloves.
Tamara Kelly says
Thank you so much! 😀
Margaret says
Beautiful pattern. But, using the #4 worsted weight yarn and J-hook as instructed produced a panel 60" long -- too long and heavy to wear. I ended up making it a blanket. I am working it up again using #3 light weight yarn and a G-hook. The measurements and weight are now perfect for wearing.
Tamara Kelly says
I'm glad you found the combo that works best for you! 🙂 I hope you enjoy the pattern.
Stacey says
How can this pattern be edited for a 6 yr old girl?
Tamara Kelly says
Hi Stacey! You would need to work shorter rows and fewer of them - the video tutorial (linked above) breaks the pattern down quite a bit, and includes the stitch multiple, so you can customize the size. 🙂
Amanda Edgeworth says
Hi Tamara! I have followed your lovely creations since the beginning! Your patterns are amazing! I love how this poncho works up is there a way to make a v neck instead.Thanks for all your hard work and wonderful patterns.
debbie gould says
im sorry but i am a little confused with the amount of yarn needed for this...i have purchased a beautiful yarn different to what you used...calyled barcelona dulce..200 g skeins...328 yards...300 m....bulky weight 5.....how many will i need to complete this
Tamara Kelly says
I don't know anything more about that yarn, but the pattern calls for 1700 yds of worsted. With a bulky, you may want to change the stitch count and hook size, which will change the amount of yarn needed.
Tatya says
Please tell me why row 46 should be attached to row 1 and not row 1&1 together because I'm trying to do this in two colours. Thank you very much
Tamara Kelly says
I did it to continue the stitch pattern but there's no reason I can think of not to join the row 1s together, other than the lack of stretch in the foundation chain.
Colleen says
Hi I’m from Australia and we don’t have Lion brand here. Can you please suggest something similar that is available here. Thanks Colleen
Tamara Kelly says
I'm sorry, I'm not familiar with what yarns are available in Australia.
Karen says
The pattern says rs out when hooking them together to sew. Why? How am I sewing them together that it won't look ugly on the outside? What kind of stitch, whip, mattress or what? I'm stuck here. Please help. The poncho is beautiful. Would like to finish it soon.
Thanks
Karen says
Please tell me how to sew together. My ponchos are usually one piece. This is going to be beautiful when completed but I'm stuck. Thanks
Tamara Kelly says
Hi Karen! I recommend the mattress stitch, which should be invisible when sewn from the right side, particularly when using the same color yarn: https://www.mooglyblog.com/mattress-stitch-seaming/
Karen says
Thanks for getting back to me right away. And for also including the video for the mattress stitçh. I'm almost done, but my cat said not today.,