![]()
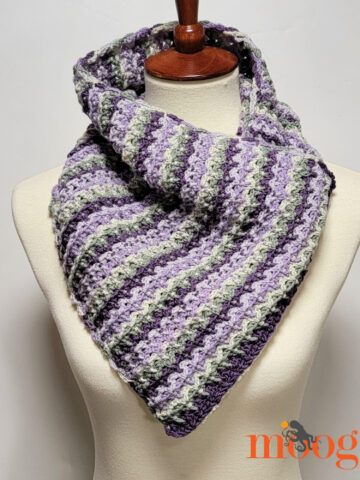
I am so crazy excited to share this scarf pattern with you! It's a stitch pattern that I have absolutely fallen in love with, and dubbed Neptune's Arrow. I hope you all like it too, because I can't wait to use it in more patterns! But let's get things started with the debut pattern - Neptune's Arrow Scarf!
Disclaimer: This post includes affiliate links.
Prefer an ad-free PDF? You've got options!


Prefer the free blog version? Keep scrolling!
Mountains... or Fish?
Why Neptune's Arrow? Well, because I can't decide what it reminds me of more - a school of fish swimming around, or arrows pointing in all directions. So... Neptune's Arrow it is. Some friends have also said how much it looks like snow capped mountains! I love that, and I love this stitch. And this scarf is the perfect pattern to try it out with.
![]()
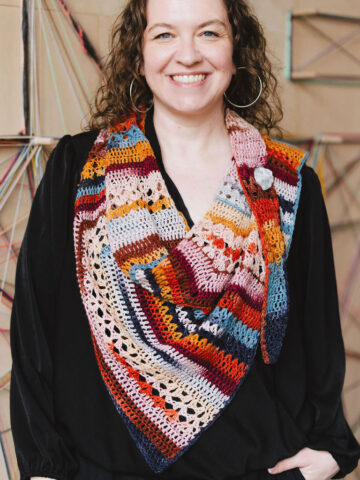
Neptune's Arrow Scarf is incredibly luxurious in Lion Brand Crepe Twist, and it's perfectly unisex as well. I love the sophisticated look of this scarf, as well as it's versatility. While I left it with two ends, as a traditional scarf, you could easily whip stitch the ends together to create a modern infinity scarf - and I've included instructions for that as well!
![]()
Neptune's Arrow Scarf
Add this pattern to your Ravelry Queue and Favorites
US - H, 5.0 mm hook - Furls
560 yds Lion Brand Crepe Twist (Worsted/4; 112 yds/102 m; 50 g/1.76 oz)
Color A: Espresso (3 skeins)
Color B: White (2 skeins)
Finished Size: 8" wide x 72" long (or length desired)
Helpful Links and Tutorials
Video tutorial for this stitch pattern
Special Stitches:
- Cluster - dc2tog in the same stitch - (yo, insert hook in indicated stitch, pull up a loop, yo and pull through 2 loops) twice, yo and pull through all 3 loops.
- V st - (dc, ch 1, dc) in the same stitch
- Small V st - 2 dc in the same stitch
NOTE: This pattern is worked in two colors, but instead of cutting the yarn between rows, or carrying it along the sides, you have two active loops going, one of which is worked at a time. Use a stitch marker to secure the loop you are not working with to keep it from pulling out on you! You also will only turn after Color A rows, which is noted in the pattern itself.
Neptune's Arrow Scarf Instructions
Row 1: With Color A, ch 44, sc in 2nd ch from hook, *ch 3, cluster in same st as previous st, ch 3, skip 5 chs, sc in next st; repeat from * to end, remove hook from working loop (place marker in loop), TURN.
Row 2: With Color B, join to last st of Row 1, ch 3, dc in 1st st, *ch 1, skip ch-3 loop, sc in cluster, ch 1, skip ch-3 loop, V st in sc st; repeat from * to end, finishing last repeat with Small V st, remove hook from working loop (place marker in loop), DO NOT TURN.
Row 3: Insert hook in the active loop of Color A (remove stitch marker), ch 4, sc in top of ch-3 of previous row, *ch 3, cluster in same st as previous st, ch 3, sc in ch-1 sp of next V st; repeat from * to end, finishing last repeat with sc in the last dc st of previous row, remove hook from working loop (place marker in loop), TURN.
Row 4: Insert hook in the active loop of Color B (remove stitch marker), ch 4, dc in 1st st (the sc at the end of the previous row), *ch 1, skip ch-3 loop, sc in cluster, ch 1, skip ch-3 loop, V st in sc st; repeat from * to end, finishing last repeat with Small V st, remove hook from working loop (place marker in loop), DO NOT TURN.
FOR A TRADITIONAL SCARF (shown):
Row 5 - 207 (or to length desired): Repeat Rows 3 - 4, ending with a Color A row, turn. Break Color B, but do NOT break Color A.
Row 208: Ch 2, dc in 1st st, *ch 2, sc in next cluster, ch 2, dc in next sc; repeat from * to end, turn.
Edging: Working all around the edges and ends of the scarf, sc evenly around.
FOR AN INFINITY SCARF (not shown):
Row 5 - 206 (or to desired length): Repeat Rows 3 - 4, ending with a Color B row, break Color B leaving a 18" tail. Use this tail to whip stitch the ends of the scarf together, adding a mobius twist if desired.
Edging: With Color A, ch 1, sc around edge of infinity scarf. Break and rejoin to other side and sc evenly around this edge.
![]()
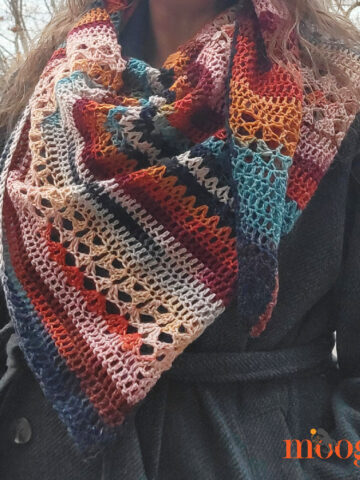
I love how easy this pattern is once you've got the two row repeat memorized! And the finished scarf is just so chic. I think the traditional style would also look great with some fringe! I can't wait to see how you all make it your own!
The Fine Print
Written pattern copyright Tamara Kelly 2015. Please do not reprint or repost this pattern, but please do link to this page to share this pattern with others. If you wish to make items for sale from this pattern, please visit the About page for details. Thank you to Lion Brand Yarn for providing the yarn for this pattern!


MARIA says
This one is visually stunning.
Tamara Kelly says
Thank you so much Maria! 😀
carolee says
Yet another truly stunning pattern!
I love this!!! Thanks so much for sharing!
Tamara Kelly says
Thank you so much Carolee!
Linda D. says
Love it! I'am thinking another Christmas present as a infinity scarf! Thank you.
Tamara Kelly says
Thank you Linda! 😀
Tracy says
So beautiful! I can't wait to try this. I love that you have the color work, without all the work 🙂 I hadn't seen this yarn, either, so it's great to learn about that as well. Thank you!
Tamara Kelly says
Thank you so much Tracy! 😀
Giselle says
Please do a video. I am a visual learner. Thank you for considering request. The scarf is stunning and I would love to make one.
Tamara Kelly says
I'm planning on a video next month! 🙂
Dalia Castro says
Please...I need a video!!!!!love this pattern
Tamara Kelly says
🙂 It's the first video on the agenda for April!
Deborah Ziegler says
I fell in love with the design when I saw it on my phone! I was thinking Zebra! Love it and thank you!
ChrIsti says
i can't wait to try this! Looks like there might be a typo though, under "for a traditional scarf"--it says "Break color B but DO NOT break color B" 🙂
Tamara Kelly says
Oops, thanks Christi!
crystal wall says
Beautiful NEW pattern. I love it. I see why ur so excited! Gorgeous! As always I follow and share.
~Crystal
Tamara Kelly says
Thank you so much Crystal!
Ariella says
Is this real life?! Haha, this is rad and challenging. I seriously can't believe how much you give us. Thank you!
Tamara Kelly says
😀 Thanks so much!
Hannah says
In the directions for a traditional scarf, under the row 5-207 section, it says to break color B, but do NOT break color B. I just wanted to let you know there's a typo there so when people get to that point in the pattern, they will know which color to actually finish off and which to keep going with. 🙂
Tamara Kelly says
Thank you Hannah! 😀
Hannah says
What is the repeat on the pattern, to make a different size? I'd love to make an afghan with this stitch pattern! 🙂
Tamara Kelly says
I'll be releasing blanket patterns with this stitch later this year! 🙂
Ellie says
Hey, Tamara! Thanks for the pattern! What is the stitch multiple for this pattern? Interested in making a baby blanket with it. 🙂 Thanks!
Tamara Kelly says
I'll be releasing blanket patterns with this stitch later this year. 🙂
Tina Hays says
Beautiful pattern but can you please explain how you continue if you don't turn at the end of the row? I'm not a beginner but I've never seen this in a pattern before. Thanks so much. Oh and I love your tutorials. They are incredibly helpful.
Tamara Kelly says
Hi Tina! You are switching back and forth between two yarns, both with active loops. So you work the first yarn, then without turning work the second, then turn the whole thing over and start again. Does that help? You can see this sort of thing in action in the Moroccan Tile Stitch tutorial! 🙂 Thank you so much!
Tina Hays says
Ah! Yes I totally get it it now. The one color is marked and waiting at the "beginning" and then once the rows have been worked with both colors, then you turn the project, correct? I sat here going 'oh, oh, OH" when I read your response. I guess if I had actually been working the pattern, it would have made perfect sense but I always like to read through a pattern before starting. I will watch the video as well as you give excellent directions. Thanks so much!
Tamara Kelly says
Yes! I'm so glad! 😀
SHelley says
Hi Tamara...I absolutely love your Neptune's Arrow Scarf. Do you have time to do a video on that pattern? I would greatly appreciate it. Can this scarf be turned into an afghan? Love all your crochét videos and patterns..
Tamara Kelly says
Both are on the schedule for next month! 😀
Erin says
Hi Tamara. Love your pattern. I have a couple of questions about Row 2. . Is the Sc in the cluster around the chain 3 loop of the cluster? Is the sc what would be the start of the cluster. When it says to skip chain 3 loop, is that part of the cluster or the other chain 3? Thanks so much
Tamara Kelly says
Thank you! 🙂 The Sc in the cluster is under the top two loops of the cluster, like working into any other stitch. The cluster is a dc2tog all worked into one stitch, it does not include a sc or any ch-3 loops. Skip the ch-3 loop means whichever of them you would encounter next.
Mare says
I found your blog a couple of months ago and I love it! I finished a baby blanket with your leaping stripes pattern and I am now doing it up in twin size. I look forward to your video on this design. It is stunning. You are very talented! Thank you for generously sharing your tips , patterns and guides!
Tamara Kelly says
😀 Thank you so much Mare!
Sabrina says
I can see this done down the length of a scarf in dk. green and it'd look like pine trees too! I love this!
Tamara Kelly says
😀 Yes! Thank you Sabrina!
Stephanie Bowen says
Is there a way for me to make this scarf more narrow? My 5 year old loves it and as is I think it will be too wide for him.
Tamara Kelly says
Hi Stephanie! This pattern uses a multiple of 6 +1, +1, so just subtract 6, 12, or 18 chains from the starting chain. 🙂
Susie says
The scarf is beautiful! Thank you for sharing the pattern. Um, did you notice step one has only 1 astrisk, not 2?
Tamara Kelly says
Ah, you're the first to say anything! I've added it. 🙂 Thank you!