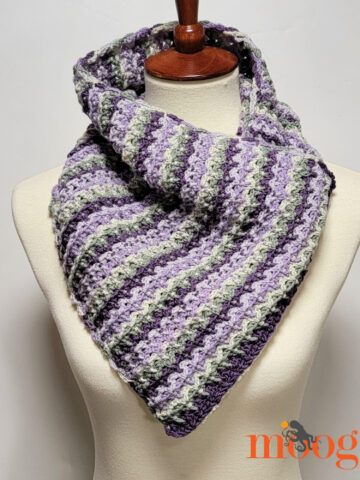
The Neapolitan Twist Cowl features two gorgeous yarns held together for a super warm and luxurious neckwarmer. Soft to the touch but stiff enough to stand up to the coldest winds, it's a free crochet cowl pattern on Moogly!
 Disclaimer: This post includes affiliate links; materials provided by Yarnspirations and Furls.

Neapolitan with a Twist
Inspired by the classic ice cream treat, the Neapolitan Twist Cowl can, of course, by made in any colors you choose. From pretty pastels to classic neutrals, this pattern will look gorgeous in any colorway!

And then there's the twist! This sort of twisted look is right on trend for headbands - so how about using it in a new way? I love the movement this simple seaming technique gives the cowl - but if it's not for you, you can just seam the ends straight for a more classic look.
Two Great Yarns Better Together
To get this great look, I held two yarns together. Red Heart Hygge Fur gives the Neapolitan Twist Cowl is soft fuzzy look and feel - but it can be difficult to work with.
Red Heart Roll With It Tweed makes it easy - and adds such great dimension and depth! Holding the yarns together, it's infinitely easier to see your stitches. Plus it adds a lot of warmth to the piece!
The Cloudy Day colorway is perfect for the colors of Hygge Fur I used, but you can mix it up and create new combos for your own special project!

Neapolitan Twist Cowl
Add this pattern to your Ravelry Queue and Favorites
US-L/M, 8.0mm - Furls
180 yds Red Heart Roll With It Tweed ("4"/Worsted/UK: 10-12 ply; 100% acrylic; 150 g/5.29 oz; 285 meters/311 yards)
Color A: Cloudy Day (1 cake)
225 yds Red Heart Hygge Fur ("5"/Bulky/UK: 12-14 ply; 100% nylon; 200 g/7 oz; 238 meters/260 yards)
Color B: Cotton Tail (white -1 skein, 75 yds)
Color C: Sienna (pink - 1 skein, 75 yds)
Color D: Smokey (brown - 1 skein, 75 yds)

Gauge: 9 sts x 11 rows = 4"/10cm in sc
Finished Size: 26" around x 10" wide (30" long before assembly)
Helpful Links & Tutorials
Neapolitan Twist Cowl Tutorial
Notes
Yarn is held doubled throughout - Color A is paired with B, then C, then D.
For a longer cowl, just add more rows to each section. There is no row or stitch multiple required for this pattern except for size.
Instructions
Row 1: With A and B, ch 24, skip the ch closest to the hook, sc in each rem ch; turn. (23 sts)
Row 2 - 28: Ch 1, sc across; turn. Finish last st of Row 28 with A and C.
Row 29 - 56: With A and C, ch 1, sc across; turn. Finish last st of Row 56 with A and D.
Row 57 - 84: With A and D, ch 1, sc across; turn. After Row 84, break both yarns, leaving a 20" tail of Color A.
Assembly:
Step 1: Lay the cowl flat, and fold both ends in toward the middle.

Step 2: Fold both ends in half as shown below.

Step 3: Sandwich the ends together as shown below.

Step 4: Sew through all 4 layers using the long tail of Color A and a yarn needle.
Step 5: Weave in all ends, flip cowl so that seam is on the inside.
Looking for more cowls? I love designing them, so there are lots to choose from here on Moogly! You can browse them all on the Moogly Free Patterns Page or Ravelry!

If this pattern inspires you to make your own project, and you post a photo on social media, be sure to tag me @mooglyblog or #mooglyblog so I can check it out too!
THE FINE PRINT
Follow Moogly on Facebook, Twitter, Pinterest, Instagram, and Tumblr! Thank you to Yarnspirations for providing the materials shown in this post. Written pattern copyright Tamara Kelly 2020, all rights reserved. Please do not reprint or repost this pattern, but please do link to this page to share this pattern with others.
To print or download, use the Print Friendly button below, or go to PrintFriendly.com, or right-click to copy and paste it into a word processing document if those options do not work for you (please note that Print Friendly is a free outside website that the button links to, and you can click here for a tutorial on how to use it, but I cannot provide additional technical support for this service).
If you wish to make items for sale from this pattern or translate it to another language, please visit the About page for details.


Brianna says
This is something I just have to learn how to do!!
Pamela says
Thank you, thank you, thank you for your pictures of how to join the ends of the cowl. In all the pictorials I have seen before for this technique I could not make heads or tails of how the ends were joined to make that twist. Your pictures made it very clear at last!
Krista says
I love that yarn! I have seen this style in a headband but not a cowl yet and it looks beautiful!
Tamara Kelly says
Thank you so much! ♥