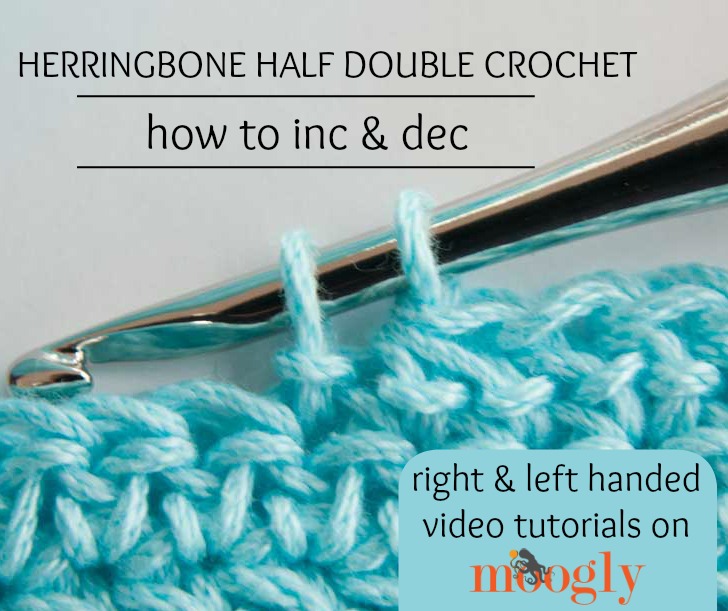
I made a video for the Herringbone Half Double Crochet a while ago - it's an interesting stitch that's sort of like a slip stitch with a single crochet stacked on top! It's fun to make and it led to a reader question - how do you increase and decrease with this stitch? So... here's how to increase and decrease with Herringbone HDC!
 Disclaimer: This post includes affiliate links.
Herringbone HDC Increases and Decreases - Right Handed
Herringbone HDC Increases and Decreases - Left Handed
As Seen in This Video (click for more info)
Written Instructions:
Increasing with Herringbone Half Double Crochet: Work 2 Herringbone HDC sts in the same stitch.
Decreasing with Herringbone Half Double Crochet: Yo, insert hook in indicated stitch, yo and pull up a loop through the stitch and the first loop on the hook, as for a slip stitch (2 loops remain on hook), yo and pull through both loops on hook.
And that's all there is to it! This stitch has great subtle texture, changing the look of the standard hdc a bit, but still creating a great solid fabric! I hope you enjoyed learning more about this stitch! Thanks for watching!

Get Moogly on your favorite social media sites: Facebook, Twitter, G+, Pinterest, Instagram and Tumblr, and sign up for the free Newsletter so you don’t miss a thing!

JANE RIMMER says
Please check the written instructions for your decrease. I think those are the instructions for a regular herringbone half-double.
Kathy says
Hi Tamara,
I can't find this answer anywhere maybe you can help. I am really getting into crocheting and want to understand and use gauge so projects will be the right size. Here is the question ...when counting stitches of a pattern for gauge and the pattern is sc. Chain. Sc. Do you count the chain as a stitch. It may be a stupid question but I really want to do it right. I think yes because in the next row a stitch would be put into the chain but.....
Thanks,
Kathy
Tamara Kelly says
Hi Kathy, I can try! 🙂 The problem is... it depends on the designer! Some will include the chains in the count, some won't. Sometimes it's obvious, you hold your ruler up and it *has* to be one way or the other, or it would be way way off. This is why gauge is most often given in 4" rather than 1" - it can make variations more apparent. From the example you give, I would think it was included, but if your gauge is really close one way and really off the other, that's the best clue. I wish it were more clear cut!
Kathy says
Thank you for the quick reply. I will do as you suggest and see how off it would be by including and excluding the counting of the chains.
Liz says
What a beautiful stitch! I've always wanted to learn how to do a herringbone stitch. That's so simple! And now I can increase and decrease too! I'm sure I can find a few useful applications for that!
Tamara Kelly says
😀 I'm so glad you enjoyed it, thank you!
Joanne says
Hi! I like the look of this stitch. Would it be thick enough, do you think, for cotton potholders? If not, do you have any favorite stitch for that purpose? I find potholders are good for keeping my hands busy in the waiting room at the doctor's office, etc.
Tamara Kelly says
Hi Joanne! With a small enough hook in proportion with the yarn, it could! I really like this stitch for extra safe thickness though: http://missabigailshopechest.blogspot.com/search/label/crocheted%20hot%20pad
Alice says
Your videos are well spoken. I an so hard of hearing, this truly makes a huge difference. Speaking slowly and clearly is perfect. Thanks. I hope to find all your videos of different stitches.
Alice
Tamara Kelly says
Thank you so much Alice! We are constantly trying to get better! 🙂
Karen says
Your instruction were very plain and simple thank you But to turn around and to go back on the other side. I don’t understand. Can you please explain how To do that please Thankyou
Tamara Kelly says
Hi Karen! Thank you! I'm not sure what you mean. To crochet the next row, you just turn and work however the pattern indicates, treating these stitches the same way you would any other stitch.