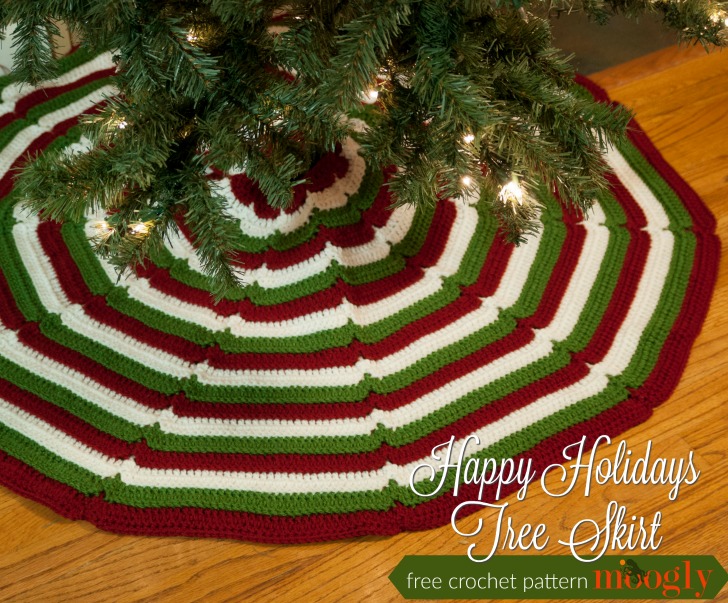
Introducing the Happy Holidays Tree Skirt!
One project I plan to do each year, is crochet a new tree skirt for our Christmas tree. And until now, I've always failed - too many gifts to make, too much to do to get ready. But THIS year, I finally got it on the to do list and I'm so very happy I did, and I can't wait to share it with all of you!
Disclaimer: This post includes affiliate links.
Prefer an ad-free PDF? Click here!


Prefer the free blog version? Keep scrolling!
Make It A Set
The Happy Holidays Tree Skirt can be made in a weekend if you're in a bit of a rush, but it's a great pattern to relax by the fire with too! The repeat is super easy to memorize, and carrying the yarn along the side means there are just a few ends to weave in when you're done.
And there's now a matching stocking too - the Happy Holidays Stocking!
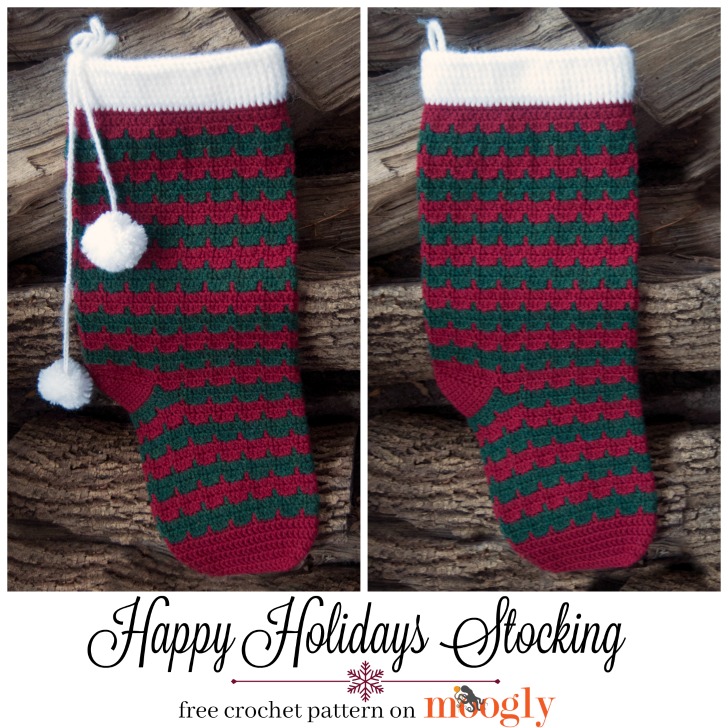
So be sure to grab that pattern too! But first...
Happy Holidays Tree Skirt
Add this pattern to your Ravelry Queue and Favorites
US - K. 6.5mm hook (Furls Fiberarts used)
1420 yds Lion Brand Vanna's Choice (Aran/yarn symbol “4”/UK: 10 ply; 145 yds; 3oz)
Color A: Cranberry - 560 yds (4 balls)
Color B: White - 450 yds (3 balls)
Color C: Kelly Green - 410 yds (3 balls)
Gauge: 12 sts x 7 rows = 4" in pattern
Finished Size: 50" diameter (customizable)
Helpful Links and Tutorials
Click here for the Happy Holidays stitch pattern tutorial
finishing a st with a new color
NOTES:
- Prefer a different size? Just repeat Rows 5 and 6 until you have the diameter desired!
- Carry the unused colors along the side to minimize ends to weave in, and then cover them with the edging.
- Each row increases by 12 sts.
INSTRUCTIONS:
Row 1: With Color A, ch 49, skip 2 chs closest to the hook, dc in each remaining ch; turn. (47 sts)
Row 2: Ch 2 (does not count as a st), dc in 1st st, 2 dc in next st, dc in next st, ch 2, sl st in next st, ch 2, *dc in next st, 2 dc in next st, dc in next st,** ch 2, sl st in next st, ch 2; repeat from * across, finishing last repeat at ** and last st with Color B, turn. (59 sts)
Row 3: Continuing with Color B, ch 2, working entire row in BLO, dc in 1st st, 2 dc in next st, dc in next 2 sts, ch 2, sl st in same st as last dc, dc in sl st, sl st in next st, ch 2, *dc in same st as last sl st, 2 dc in next st, dc in next 2 sts,** ch 2, sl st in same st as last dc, dc in sl st, sl st in next st, ch 2; repeat from * across, finishing last repeat at **, turn. (71 sts)
Row 4: Ch 2, dc in 1st st, 2 dc in next st, dc in each st to next ch-sp, ch 2, sl st in same st as last dc, dc in next st, sl st in next st, ch 2, *dc in same st as last sl st, 2 dc in next st, dc in each st to next ch-sp,** ch 2, sl st in same st as last dc, dc in next st, sl st in next st, ch 2; repeat from * across, finishing last repeat at ** and last st with Color C, turn. (83 sts)
Begin Repeat
Row 5: Continuing with Color C, ch 2, working entire row in BLO, dc in 1st st, 2 dc in next st, dc in each st to next ch-sp, ch 2, sl st in same st as last dc, dc in next st, sl st in next st, ch 2, *dc in same st as last sl st, 2 dc in next st, dc in each st to next ch-sp,** ch 2, sl st in same st as last dc, dc in next st, sl st in next st, ch 2; repeat from * across, finishing last repeat at **, turn. (95 sts)
Row 6: Ch 2, dc in 1st st, 2 dc in next st, dc in each st to next ch-sp, ch 2, sl st in same st as last dc, dc in next st, sl st in next st, ch 2, *dc in same st as last sl st, 2 dc in next st, dc in each st to next ch-sp,** ch 2, sl st in same st as last dc, dc in next st, sl st in next st, ch 2; repeat from * across, finishing last repeat at ** and last st with Color A, turn. (107 sts)
End Repeat
Row 7 - 38 (or to desired size): Repeat Rows 5 and 6, cycling through the colors every 2 rows, ending with two rows of Color A; break Color B and C, turn. (491 sts in Row 38)
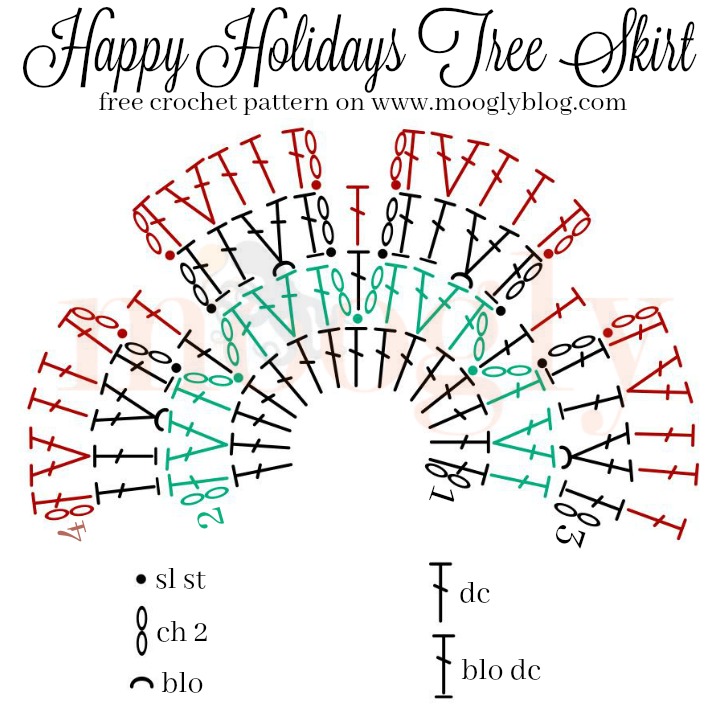
Edging and Ties: Continuing with Color A, ch 1, *sc in each st to next ch-sp, ch 2, 2 sc in the next st, ch 2; repeat from * to corner, 3 sc in the corner st, sc evenly along side, [sc, ch 31, skip ch closest to hook, sl st in each remaining ch, sc in same st as previous sc] in corner, sc in each st of the foundation chain, repeat from [ to ] at next corner, sc evenly along last side, 2 sc in the same st as the 1st st of the edging; join and break. Use the ties make at the top corners to secure the skirt around the tree trunk.
I hope you enjoy making and using the free Happy Holidays Tree Skirt crochet pattern for years to come! It's one of my holiday gifts to all of you - and I hope you all have a Happy Holiday season!
The Fine Print
Written pattern copyright Tamara Kelly 2016, all rights reserved. Please do not reprint or repost this pattern, but please do link to this page to share this pattern with others. If you wish to make items for sale from this pattern, or translate it to another language, please visit the About page for details. Thank you to Lion Brand Yarn for providing the yarn for this pattern!


Jade says
Finally my search is over! I have been wanting a tree skirt that is simple but festive without lots of panels to sew together. Thank you Tamara. You have solved my crochet woes yet again.
Tamara Kelly says
😀 I'm so glad you like it! Thank you Jade!
Ella Guillot says
I was just fixing to make one from the Crochet Crowd, and I whined up ripping it out. Then, I cam across your pattern, and this one will defiantly work, because it doesn't look so frustrating. Vey Easy! Thank you so much for your time.
Tamara Kelly says
😀 I hope you enjoy making it! There's a video tutorial if needed, too!
Terri Perez-Hernandez says
Please
I would love the link to the video
I can’t read patterns
Tamara Kelly says
HI Terri! The video is linked above, and at https://www.mooglyblog.com/happy-holidays-tutorial/ 🙂
Veronda Johns says
Where is the video, please. I am having difficulty with the 3rd row.
Tamara Kelly says
https://www.mooglyblog.com/happy-holidays-tutorial/
Darlene says
Nice! My tree skirt is probably at least 20 years old and still in great shape, but I am getting tired of it. Might just make a new one for this year!
Tamara Kelly says
Thank you! 😀
Jen L says
Is it possible to start with a foundation dc instead of a chain and dc in the chain?
Tamara Kelly says
Absolutely! 😀 Just FDC 47 for the first row.
Jacque Dooley says
Very pretty tree skirt. I am going to give it a try. I am a beginner at crochet. It doesn't look to hard. Than you for sharing the pattern. I really like it.
Tamara Kelly says
Thank you so much Jacque! 😀
Bonnie says
Tamara, you are the best!!
Tamara Kelly says
😀 Thank you so much Bonnie!
Patricia says
Oh Tamara! This is beautiful! Simple and elegant! I had unsubscribed from your blog because my hands no longer allow me to crochet as much as I used to. But, I sorely missed your inspiration and beautiful projects! I have resubscribed - if only to dream! Blessing to you!
Tamara Kelly says
Thank you so much Patricia! ♥ I hope your hands let you do as much as possible this year.
Itamar says
Hi!!!!
Thanks for this pattern. I'm trying to make it, but I have to be honest.... I'm lost on row 3... the first 2 ch count as a DC or not?..... I'm lost on the sl st part. Well, I'm new in this and I'm not understanding the sl st in same st as last dc.... and the rest Please, help me. ???
Tamara Kelly says
Hello Itamar! The ch-2 does not count as a stitch, and isn't worked into. I hope to have a video up for it next month, and will try to add a chart if I think it will clear things up. 🙂
Itamar says
Thanks!!!!
I'm trying this pattern for my tree skirt. I will try to make it for tomorrow. Thanks again.
Tamara Kelly says
I'm working on the chart now... I'll have it up as soon as I can!
Tamara Kelly says
And the chart is up! 😀 I hope it helps!
Itamar says
Thank you so so much!!!!
I'm gonna post a picture when I finish it. Have a blessing Thanksgiving Day and thank you a lot. My son is gonna love it. I know. Thanks!!!!
Tamara Kelly says
I'm so glad to hear it! Thank you!
Kristy F says
On row 3, as far as the ch2's from row 2, am I counting those as 1 stitch or 2 individual stitches?? In other words, do I crochet into the ch2 or each individual stitch...I'm confused ?
Tamara Kelly says
Hi Kristy! You do not crochet into the ch-2s at all in this pattern. I've added a chart - does that help?
Lisa M Stephenson says
Thank you very much for this tree skirt! I have had my little tabletop Christmas tree for 20 years and never had a skirt for it since the ones at the store are too large. This was the perfect project for me - your clear instructions have also given me confidence to try out more complex patterns; I can follow along with YouTube, but just written instructions intimidated me. But not anymore thanks to you! Merry Christmas 🙂
Tamara Kelly says
Oh good! Thank you so much Lisa! And Merry Christmas!
Diana says
Hi, Tamara. I'm excited to be making this tree skirt for my family members as gifts. Thanks so much for sharing! And the chart helped me out big time when I ran into a snag in Row 3, I was following the written instructions but was able to figure it out after looking at the chart. Yay!
Tamara Kelly says
Oh good, I'm so glad it helped!! It's simple... but hard to describe just in words lol. 😀
Rhonda says
Thank you for sharing this pattern. I just finished my tree skirt and I absolutely love it.
Tamara Kelly says
I'm so glad to hear it! Thank you Rhonda!!
Barbara beausoleil says
Hi I love this pattern and I am trying to make it. I am lost a bit on row 3 where it comes to the slip stich and then dc into the sl st. Do you have a video tutuorial on this.
Tamara Kelly says
Yes, I'm sorry I forgot to add a link to this pattern! Here you go: https://www.mooglyblog.com/happy-holidays-tutorial/ 🙂
Raeanna Guzman says
Thank you for allowing us to print your pattern!!! So helpful!(:
Tamara Kelly says
😀 I'm so glad to hear it, thank you Raeanna!
SK says
Can I use red heart super saver? I already have the yarn Id need so just wondering... thanks!
Tamara Kelly says
I think that would work great! 🙂
Lisa says
I needed a "mini" tree skirt for a small Christmas tree. This pattern fit the bill perfectly! I found the pattern easy to follow and could repeat the rows until I had the size I needed. It came out so well that I've been asked to make two more for friends. Thank you for sharing such beautiful patterns. Your work is inspiring.
Tamara Kelly says
Hi Lisa! I'm so glad to hear it, thank you so much! ♥ That made my day!
Kamilla says
On row 3 in the video you don't do 2dc in same stitch like the pattern and chart say.... why not?
Tamara Kelly says
The video is for the basic stitch pattern worked in rows, while this pattern is worked in the round, so increases are added. 🙂
Karyn says
Rows 4 and 5 aren't making sense with the repeat * to **.
*DC into last Sl St, 2DC and DC to next chain space** then repeat. How would you DC the next stitch into the last Sl St when there isn't one in the pattern repeat? It's a DC 2DC and a DC
Tamara Kelly says
Hi Karyn! I think I see where the mixup is.
When following that line of instruction, the full repeat is " *dc in same st as last sl st, 2 dc in next st, dc in each st to next ch-sp,** ch 2, sl st in same st as last dc, dc in next st, sl st in next st, ch 2"
After the ; you will see it says "repeat from * across, finishing last repeat at **"
This means that you start at the * and work to the ; around, except for the very last repeat, which will end at the **.
Does that make sense?
MIchele says
I am working on the edging. Do you have photos of the edging? Especially the sides.
Tamara Kelly says
I'm afraid the only photos I have are on the post. Is there a question I can answer?
cynthia wilson says
I made this last year. However, I embellished it with ties that were made of sparkly, fuzzy ribbon. That added some extra pizzazz and worked out for closing the tree skirt up nicely around bottom of tree. I wish I had taken a picture of it then. I have a picture of it taken before I added the sparkle but don't see where I can add it to this comment. Anyway, thanks so much for sharing your pattern. It made a lovely Christmas gift.
Tamara Kelly says
It sounds amazing Cynthia! I'd love to see a photo if you want to email it to me - tamarakelly@mooglyblog.com
Sheryl Hill says
Hello, I just found your blog and want to make the tree skirt. I read the pattern thoroughly two times and then watched the tutorial. The video shows instructions for a different tree skirt. The directions I read don’t match the tutorial, they are for the tree skirt pictured. The tutorial is for a pointed tree skirt. Rather confusing as I am a visual learner. Where are the directional no for the tree skirt that is being made in the tutorial? Thanks. I LOVE your blog.
Sheryl
Tamara Kelly says
Hi Sheryl! I can assure you they are the same - the video tutorial is for the generic stitch pattern moreso than this particular piece. Perhaps that's the confusion?
Abby says
I’d like to use a yarn that recommends an N15 crochet hook. Will this work okay with this pattern? Do I need to adjust the pattern in some way? Thanks!
Tamara Kelly says
Hi Abby! It should still work fine, it's just that the center hole will be a bit bigger. But you can overlap/tie it as needed. 🙂
Stephanie says
Hi Tamara! I absolutely love this pattern. I am almost done with my tree skirt and I have a couple questions with the edging and ties part. I'm still pretty new to crocheting and reading patterns. When it says "repeat from * to corner" what corner is that referring to? Just to make sure I'm reading this right, does it make 2 ties and which corners will they be on? Thank you for your help!
Tamara Kelly says
Hi Stephanie! Thank you! The corner is where you'll turn to work up the side of the rows. The two ties will be at either end of Row 1 and the tie instructions are between the [brackets]. Does that help?
Stephanie says
Yes, that makes sense. Thank you so much. I can't wait to use it this Christmas!!!
Amanda says
I just finished this tonight as a gift for my mom. We both think it's an amazing tree skirt - thank you so much for this pattern!
Tamara Kelly says
Thank you so much, Amanda! I'm so glad to hear it! ♥
Katie says
I made this tree skirt last year and it turned out beautifully. Now that Advent has started, it's time to put up the tree and pull this out again. I'm compiling a list of crochet Christmas decorations for my first blog post, and I'd like to add this to the list.
Tamara Kelly says
Thank you so much Katie, any links are appreciated! ♥
Katie says
I've posted my list today with this pattern at the top. Please check out my page to see my version of it. I'm sure you'll agree it's cute!
Tamara Kelly says
Thank you so much Katie, yours looks great!
Cindy says
I’m currently working on this pattern and am loving it! I was curious though how it might work with a chunkier yarn, any thoughts?
Tamara Kelly says
I think it would work great in a chunky! And you'll be done that much faster!
Kristy says
have you ever used a diff brand of yarn? i use a lot of #4 acrylic (super saver bernat/impeccable....). Just wondering if you knew how they'd compare in size or if theyd be pretty similar. Thanks!
Tamara Kelly says
I haven't for this pattern, but I think most 4 weight yarns should work just fine. 🙂
Betsy says
I would like to make some of the stripes wider, does the pattern allow me to do that? I haven't made any blankets that use this kind of design so I wanted to know before I start so I won't need to unravel and try another pattern.
Thanks,
Tamara Kelly says
Yes, you can just change colors whenever you like! 🙂
Margaret says
I really enjoyed making this tree skirt! Super easy pattern, your instructions were perfect . Thank you for sharing!!
Tamara Kelly says
Thank you so much! ♥
Ashley says
Thanks you for this beautiful pattern!! I have been looking for a simple easy tree skirt and this is it!! I can't wait to get started! Thank you!
Linda Shockley says
Just finished the tree skirt and it is so beautiful! Thank you for the pattern!
Tamara Kelly says
Thank you so much! ♥
Betty says
I’ve crocheted for 70 years and fell in love with this pattern! Purchased Vanna’s yarn, poor quality, will save for other projects. A high quality wool yarn would be best for this beautiful pattern.
Mona Arce says
Is it possible to make this pattern with a hole opening instead of the whole side open
Tamara Kelly says
Yes, just join at the end of the rnd and then turn! 🙂
Sharon says
I bought blanket yarn for this and it is way too bulky. Needs #5, not #6. Live and learn!
Tamara Kelly says
Oh gosh! I hope you find the perfect project for it! ♥
Sharon P says
I think i may have 🥴. Thank you so much for this pattern. 😊