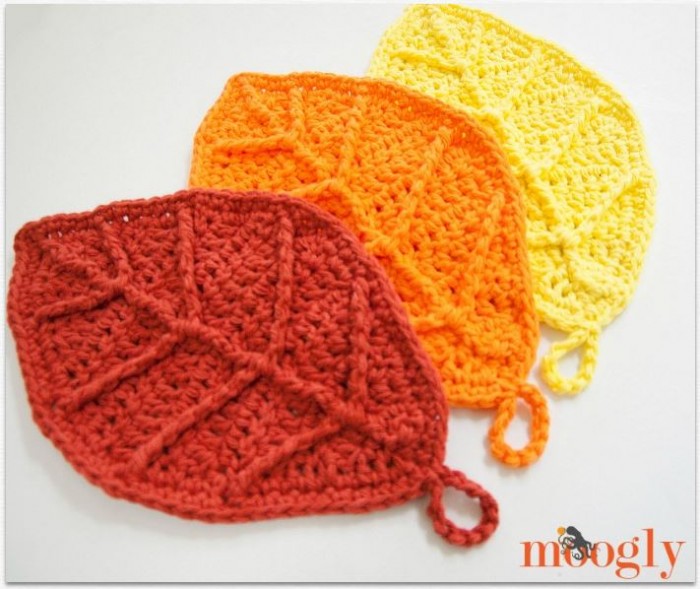
The Happy Autumn Leaves are many things! Dishcloths! Wall decor! Centerpieces! Table settings! Use the right yarn and they can be anything you wish. The one thing they always are? A fun free crochet pattern to celebrate the return of autumn!
Disclaimer: This post includes affiliate links.
Prefer an ad-free PDF? You've got options!


Prefer the free blog version? Keep scrolling!
Multipurpose Pieces
I made my Happy Autumn Leaves in cotton, thinking they'd be dishcloths... but after finishing one, I had to make two more, to use as decor! I love the way these look all grouped together, so very fall-ish.

If I had some feltable yarn on hand, I definitely would've tried it with this pattern - I think it'd be gorgeous! This is a fun pattern to play with in different yarns and weights - just match the yarn to the hook and see what effects and sizes you come up with!

Happy Autumn Leaves
Add this pattern to your Ravelry Queue and Favorites
US - H, 5.0 mm hook - Furls
40 yds Red Heart Scrubby Smoothie (4 - worsted weight yarn; 100% cotton)
This yarn is discontinued. Recommended substitute: Lily Sugar'n Cream
8 stitch markers - Clover Lock Ring Markers
Finished size: 9" long x 5.75" wide excluding loop
Click here for the video tutorial for Edging Round 1
Click on the linked stitches to go to their video tutorials!
Note that the instructions for Edging Round 1 are long, so I have broken them up a bit to try to make them easier to read. The long stitches (dtr, quadtr, quintr) have an "fp" in front of them - this indicates that they are to be worked as post stitches, going around the post of the stitch indicated rather than into the top of it.
Instructions
 Row 1: Ch 2 (does not count as a st), dc 5 in 2nd ch from hook; turn. (5 sts)
Row 2: Ch 2, 2 dc in the 1st st, dc in the next st, fpdc in the next st, dc in the next st, 2 dc in the last st; turn. (7 sts)
Row 3: Ch 2, 2 dc in the 1st st, dc in the next 2 sts, bpdc in the next st, dc in the next 2 sts, 2 dc in the last st; turn. (9 sts)
Row 4: Ch 2, 2 dc in the 1st st, dc in the next 3 sts, fpdc in the next st, dc in the next 3 sts, 2 dc in the last st; turn. (11 sts)
Row 5: Ch 2, 2 dc in the 1st st, dc in the next 4 sts, bpdc in the next st, dc in the next 4 sts, 2 dc in the last st; turn. (13 sts)
Row 6: Ch 2, 2 dc in the 1st st, dc in the next 5 sts, fpdc in the next st, dc in the next 5 sts, 2 dc in the last st; turn. (15 sts)
Row 7: Ch 2, 2 dc in the 1st st, dc in the next 6 sts, bpdc in the next st, dc in the next 6 sts, 2 dc in the last st; turn. (17 sts)
Row 8: Ch 2, dc in the 1st 8 sts, fpdc in the next st, dc in the last 8 sts; turn. (17 sts)
Row 9: Ch 2, dc2tog, dc in the next 6 sts, bpdc in the next st, dc in the next 6 sts, dc2tog; turn. (15 sts)
Row 10: Ch 2, dc2tog, dc in the next 5 sts, fpdc in the next st, dc in the next 5 sts, dc2tog; turn. (13 sts)
Row 11: Ch 2, dc2tog, dc in the next 4 sts, bpdc in the next st, dc in the next 4 sts, dc2tog; turn. (11 sts)
Row 12: Ch 2, dc2tog, dc in the next 3 sts, fpdc in the next st, dc in the next 3 sts, dc2tog; turn. (9 sts)
Row 13: Ch 2, dc2tog, dc in the next 2 sts, bpdc in the next st, dc in the next 2 sts, dc2tog; turn. (7 sts)
Row 14: Ch 2, dc2tog, dc in the next 1 sts, fpdc in the next st, dc in the next 1 sts, dc2tog; turn. (5 sts)
Row 15: Ch 2, dc2tog, bpdc in the next st, dc2tog; turn. (3 sts) Place markers on each end (both sides) of Rows 2, 5, 8, and 11.
Make the Border:
Edging Round 1: (see graphic below, and see the Edging Tutorial Video HERE)
Ch 1, sc in each st of previous row, sc evenly along side to 1st marker, fpQuadTr around the fpdc in the middle of Row 14;
sc evenly to 2nd marker, fpQuinTr around the fpdc in the middle of Row 11;
sc evenly to 3rd marker, fpQuadTr around the fpdc in the middle of Row 8;
sc evenly to 4th marker, fpDtr around the fpdc in the middle of Row 5;
sc evenly to the top of the leaf (the ch the first 5 sts were worked into), picot;
sc evenly to the 5th marker, fpDtr around the fpdc in the middle of Row 5;
sc evenly to 6th marker, fpQuadTr around the fpdc in the middle of Row 8;
sc evenly to 7th marker, fpQuinTr around the fpdc in the middle of Row 11;
sc evenly to 8th marker, fpQuadTr around the fpdc in the middle of Row 14;
sc even to end of round; join with a sl st in 1st sc of the round, do not turn.
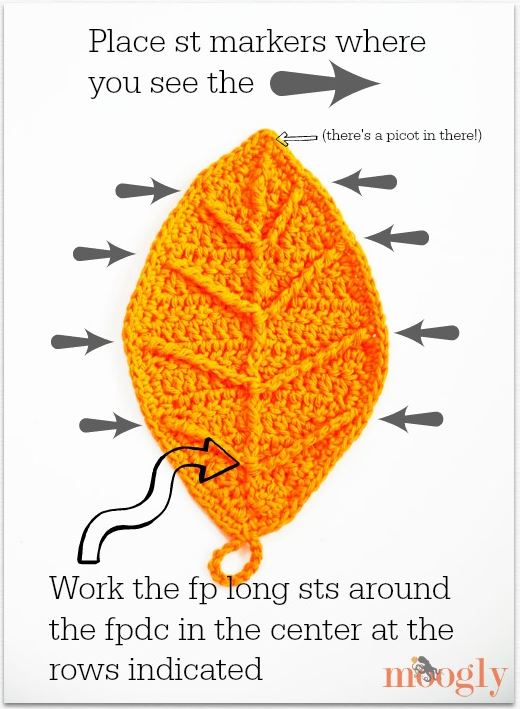
Edging Round 2: Ch 1, sc evenly along the side to the picot, work 3 sc in the picot, sc evenly along the other side; join with a sl st in 1st sc of the round, ch 12 for loop "stem"; break yarn and seamless join to same st. Weave in ends.

And that's that! I know that the first edging round is a bear, but the effect is totally worth it, and really it's only 8 long stitches and a picot, with a bunch of sc in between. If you're making it as a dishcloth or washcloth, you can use those long stitches to slip your fingers in while you use it! Or put some silverware in there for your Autumn table. Or just enjoy the fun 3D effect while they decorate your home! I hope you enjoy making the Happy Autumn Leaves free crochet pattern as much as I do!

Written pattern and graphics copyright Tamara Kelly 2014. Please do not reprint or repost this pattern, but please do link to this page to share this pattern with others. If you wish to make items for sale from this pattern, please visit the About page for details.


Meegan says
Adorable! I'm thinking autumn bunting...wreath deco...turkey feathers for toddler...
I think I have some wool yarn and will try to felt one or five.
Thank you!
Heather says
So sweet! Thank you for sharing!
Tamara Kelly says
Thank you so much Heather!
Johanna says
Oh my goodness, the possibilities are endless!! I could even see a scarf made out of these 🙂
Tamara Kelly says
😀 That would be amazing! Thank you Johanna!
Lynn says
How would you hook the leaves together for a scarf? That sounds really interesting.
Tamara Kelly says
I would sew them together, slightly overlapping, at different angles - but that's just one possibility! 🙂
Lunamon Design says
Thank you so much for this lovely pattern.
Have a nice week end
Tamara Kelly says
Thank you so much, you too!
Melly says
Just wondering if the post stitches on the back side shouldn't be BACKpost dcs instead of fpdc? Otherwise, it won't have a continuous center vein down the middle? I tried as the patter is written and it doesn't look right but doing fpdc on the front and bpdc on the reverse side looks correct?
Tamara Kelly says
Ack, right you are! I did it that way and then forgot to write it down! Thank you! I've corrected the pattern!
Lynn says
So the pattern as written is correct? My first attempt had a center vein that seemed jagged. Are the front and back post stitches written correctly on this current pattern?
Tamara Kelly says
Yes, the pattern is correct. Blocking may help even out your stitches!
Ashley says
I am so excited about these. Exactly what I was looking for last year and couldn't find. Thank you for all you do to give us all so many great free patterns.
Tamara Kelly says
😀 Thank you Ashley!
Usha Swaminathan says
Thank u so much forthe wonderful tutorial. I just got a new pattern for a CAL in my group.
Tamara Kelly says
😀 Thank you Usha!
LiNda Dashiell says
I love your patterns!!! They are by far some of the best ones I have seen! Thank you for making them free!!
Tamara Kelly says
😀 Thank you so much Linda! You're too kind!
Linda aka Crafty Gardener says
Thanks for a lovely pattern. The Autumn chill is here today so I'm organizing some crafting projects and this will certainly be one of the. These will be perfect in a garland or as table decorations.
Tamara Kelly says
😀 Thank you Linda!
Barbara Herbert says
Love these leaves. I had the pleasure of meeting you at the yarn bomb in Manchester, NH in July and have been perusing your site on and off even more than I used to. However, these leaves just forced me to write a comment, I am going to start making these right away. Thanx.
Tamara Kelly says
😀 Hello Barbara! Thank you so much! I'm so glad I was able to participate in that yarn bomb at least a little!
Barbara Herbert says
Actually, the only time I spent at the Yarn expo was while I was working on the yarn bomb. But later I was able to come over after 10 pm that evening and took a bunch of pictures of the walkway bombing and the check in desk bomb. If I manage to get the pix onto my laptop, I'll send them to you. Barbara
Tamara Kelly says
Thanks Barbara!
YVONNE M says
You are without a doubt colourfully creative Moogly and as a beginner
You are on my fab crochet list of crafty folk who inspire me to keep up
Being a hooky crafter. 🙂 ♥
Tamara Kelly says
<3 Thank you so much Yvonne! I appreciate you saying so!
Veronica Winter says
A bunch of these with a few crochet pine cones & berries- Brilliant for an Autumn Wreath.....
Tamara Kelly says
😀 Thank you!
Dezeray says
I love this pattern, it's the best leaf pattern I've seen. I need help though. I can't figure out Edging 1 for the life of me. I was hoping the pattern would be on Youtube as well because I'm a HUGE visual person. Please help me.
Tamara Kelly says
Hi Dezeray! The video tutorial for Edging Round 1 should be out later today! 😀
Dezeray says
Thank you soo much for the video. I'm making headway on my set of leaf coasters now 🙂
Tamara Kelly says
😀 So glad it helped!
Penny says
found these wonderfull leaves while waiting for the birth of my grandaughter last month. Gave me the inspiration to make a little tinkerbell like dress and they were perfect for it... Many thanks
Tamara Kelly says
🙂 Thank you Penny!
Penny says
I have had requests for the pattern i used for the dress. As i made it up as i went along i have just refered them back to your page on here. Its nice when you actually find something that says free and it actually is. Again many thanks
Tamara Kelly says
🙂 Thanks Penny!
Suzanne Broadhurst says
These work up so quickly - and beautifully - I'm making a set in a variety of colors for our Thanksgiving table to hold utensils. Thank you!
Tamara Kelly says
<3 I'm so glad you enjoy them Suzanne! Thank you!
Marcela says
Hola podrias subir un diagrama de la hoja?gracias
Tamara Kelly says
Hello Marcela! I'll add it to my to-do list. 🙂
marcela says
gracias, me resulta mas facil ya que la traduccion a español no entiendo bien.
Pam says
Hello:
I am interested in making this leaf. However, I don't see anywhere in the directions how many starting chains you need to make. HELP, please!
Tamara Kelly says
Hi Pam! Row 1 begins with Ch 2. 🙂
Jennifer says
Thank you so much! Made one it is blocking now and now off to make another.. these r super cute I'm making them as dishcloth 😁
Tamara Kelly says
🙂 I'm so glad you like it!