
Is there anything more magical, more all purpose, more... downright awesome... than BACON? The internet certainly doesn't think so, and who am I to argue with the internet? But a happy tummy full of bacon is just begging for a nap. I can't imagine what you'll dream about when you doze off with this pillow...
Disclaimer: This post may contain affiliate links.
Prefer an ad-free PDF? You've got options!


Prefer the free blog version? Keep scrolling!
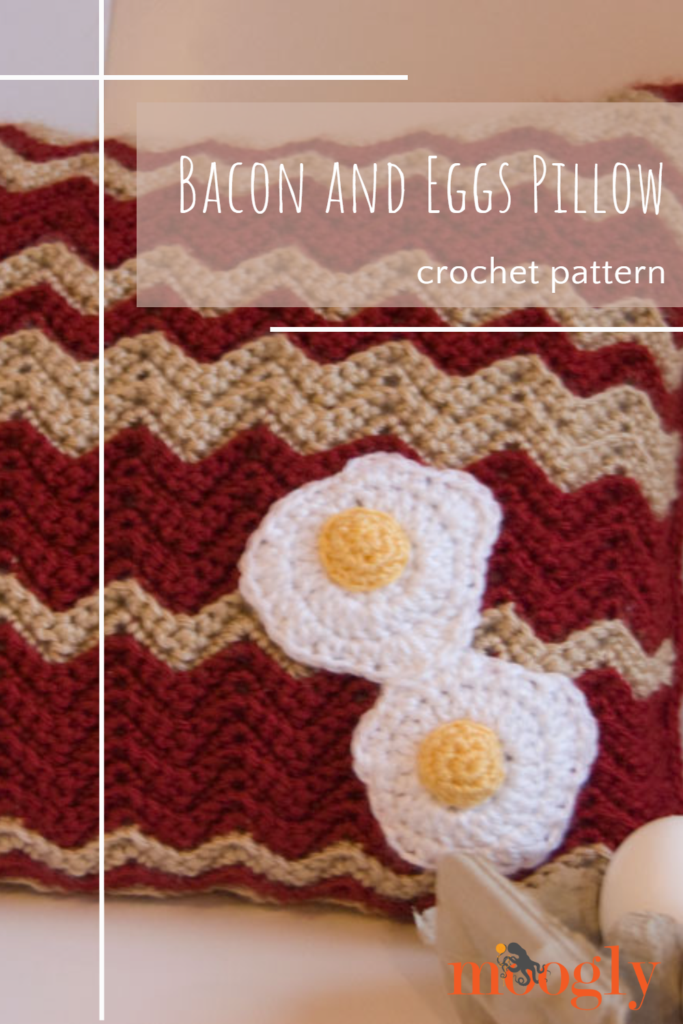
Bacon and Eggs Pillow
Add this pattern to your Ravelry Queue and Favorites
This pattern is designed to fit a 12" to 16" pillow form. To fit a 16" x 16" square pillow form, just keep going until it's long enough to wrap around the pillow. This is more of a stitch pattern with a recipe - be sure to read the notes carefully to make your own ooak pillow!
- Yarn:
- Caron Simply Soft Autumn Red, one skein
- Caron Simply Soft Bone, one skein
- Caron Simply Soft White, small amount
- Caron Simply Soft Sunshine, small amount
- Hook: US-H, 5.0mm
- Also needed: Pillow form, 12" x 16"
THE BACON:
The Ripple Pattern for the bacon is the same as found in this video tutorial, with two important changes: all stitches are sc, and there are only two sc worked between the increases and decreases. Basically, it's a multiple of 8 plus 1, plus 1 more for the starting chain. See below for a written pattern. Here is an abbreviated chart:

Starting in Row 2, all stitches are worked into the Back Loop Only (BLO), except for the 2 sc in the first and last stitches of ea row. Customize your bacon by switching between rows of "fat" and "meat" as desired. Start and end with red - this will hide the joining row best. The only rule is that you should always work an even number of rows of a color before switching - this will allow you to carry the colors up the side so there will be only a few ends to weave in. Plus it looks nicer, giving you a definite RS and WS.


Chain 82.
Row 1: Skip the first ch, and sc twice in the next st. *Sc in the next two ch. Work a sc2tog decrease over the next 3 ch, skipping the 2nd ch. Sc in the next 2 ch.^ Work 3sc in the next ch. Repeat from * until there 8 ch left. Work from * to ^ once more, leaving just the last ch unworked. Work 2 sc into the last ch.
Rows 2 - 84: Ch1 and turn. Sc twice into the first st. Working into the BLO, *Sc in the next two sts. Work a sc2tog decrease over the next 3 sts, skipping the center st. Sc in the next 2 sts.^ Work 3sc in the next st. Repeat from * until there 8 sts left. Work from * to ^ once more. Sc twice into the last st of the row.

Fold the RS of the fabric together. Ch1 and hold the ends so that the working loop is on your right, with the last row farthest from you and the starting chain end of the fabric closest to you. Pull your hook around to the side closest to you, and sc the ends together, going through both loops on the side facing you and the BLO of the row furthest from you. Weave in any ends, and turn the bacon right side out. Set aside and make the eggs.
THE EGGS: (make 2)
The Whites:
Starting with a magic circle, ch3 and dc 11, join with sl st to work in rnd.
Row 1: Ch3 and dc in same st. Work 2dc in ea st around. Join to top of ch3 with sl st. (24 dc)
Row 2: Ch1 and sc in first 3 sts. Hdc into next 2 sts. Work 3 dc into next st, then hdc in next st. Dc twice in next st, then dc in next st. Hdc in next 3 sts. 3dc into next st. 2dc into next st. Hdc into next 2 sts, then sc in next 3 sts. 4dc into next st, hdc into next st, and then sc in next 2 sts. 3hdc into last st of round, and then break yarn and use seamless join to finish off. Leave a long tail to sew onto the pillow.
The Yolks:
Starting with a magic circle, ch1 and sc 6, do NOT join with sl st - work amigurumi style, in a spiral, starting each row right in the top of the first st of the previous row without joining or chaining.
Row 1: Sc twice in ea st around. (12 sc)
Row 2: Sc evenly around. (12 sc) Finish off with seamless join, leaving a long tail to sew onto the whites.
Stuff with a bit of yellow yarn and sew to the whites, wherever desired.

Assembly:
Placing the eggs as desired, sew them to the RS of the pillow using the long white tails. Close one end of the pillow by sc evenly with red yarn. Stuff pillow into case and sc closed other end. Now dream of your next meal!
The Fine Print
Follow Moogly on Facebook, Twitter, Pinterest, TikTok, and Instagram! Written pattern copyright Tamara Kelly 2012, all rights reserved. Please do not reprint or repost this pattern, but please do link to this page to share this pattern with others.
If you wish to make items for sale from this pattern or translate it to another language, please visit the About page for details.


Paraskevi says
Mmmm, I think I got hungry!
Jamie says
Want... WANT... Love... want...
moogly says
😀 It will be going up for auction soon, I'll post the details as soon as I have them!
Chris says
I LOVE this! I'm thinking about making one to auction off to help raise funds for my friend's 16-year-old daughter who is currently undergoing chemo.
Thinking about also making one in ocean colors with fishy/sea life appliques as an under-the-sea pillow 😀
moogly says
Chris, I love that you're thinking of using it for an auction. <3 And that ocean theme is a fantastic idea!
Karen says
I can get the ripple pattern, but it just doesnt line up! Can you please write out the directions more clearly. I want to make this, its soooo cute!
moogly says
Karen, have you looked at the chart? It may help you visualize the stitches and how they line up. I've also updated the pattern with more explicit instructions. I hope that helps!
Karen says
Thanks so much! Ya, I watched the video and looked at the pattern for hours, but it never worked out. I hope this helps! I'll let you know if I succeed.
Karen says
Yes, ive got it! Because you said a multiple of 8, i was putting 8sc between the sctog and 3's and it just wasnt adding up! Thanks!
Kirsten says
So cool! I have a friend who is madly in love with her boyfriend, who LOVES bacon! I am totally going to make this for her to give to him! 🙂 You're patterns are AMAZING!!
moogly says
Thanks so much Kirsten! 😀
Christeen says
This pattern is almost (if not totally) identical to Twinkie Chan's Bacon and Eggs scarf pattern. Even the Caron Simply Soft colors are the same. Should she have been given some credit for the pattern? I know I'm going to make this, it's a great idea. I just want to make sure credit is given to Twinkie Chan if this was inspired by her pattern.
moogly says
I was indeed inspired by her scarf, among other things, as I've said on Ravelry. I don't know if the ripple pattern or other stuff is the same or not, I wasn't looking at her pattern when I did this one.
Corinne says
I am having a hard time visualizing this pattern. I know how to do the chevron stitch.....I am am picturing a rectangle with rippled edges. Can you walk me through the rectangle with the rippled edges to how you make it into a clean rectangle or square with straight edges on all sides? Thanks
moogly says
Corinne, the ripples are at the top and bottom, while the sides are straight. When you sew it all together, the ripples at the top and bottom match up, and the sides are straight already! 🙂
Corinne says
Thank you so much! Now I 'see'/get it! Will be starting this project just as soon as I get out to the yarn store.
Heather says
What is the gauge? I used the caron yarn and an H hook and my chain/1st row is 24 inches. Is this right? shouldn't it be closer to 12 for a 12 in pillow form? I understand there maybe a need for extra room but doubled? I see the fold is on the horizontal. Could I either get a gauge or dimensions before the fold?
Tamara Kelly says
Sounds like we have very different gauges indeed! I don't have the pillow anymore- it went off to a charity auction. But your finished dimensions should certainly be closer to 12" by 16". Be sure though that you work a few rows before judging the width - the chevron pattern takes up a lot of width. I'd recommend starting with a smaller hook for sure.
Sheila Hoffman says
I will give it a try and let you know how it goes.
Linda says
Love the bacon and egg pillow but it just is not coming out right. Very confused on the decrease stitches. Do you do the decrease 3 times (making six stitches into 3) with skipping one stitch after first decrease? This is what I did and something is not right? Am I doing so,etching wrong? Diagram did not help me at all.
Tamara Kelly says
Ok, so you do the decrease 3 times, turning 9 sts into 3 sts - skip the st in the center of each decrease. Does that help?
Heather says
OK - I am working this for a 16 wide pillow. My initial chain was 15 1/2 inches, now on row 10, it has grown to 17 inches wide....is that normal?? I swear I'm counting correctly, but the rows are widening and I'm needing it to fit the 16 inch pillow form...suggestions?? Thanks!
Tamara Kelly says
It does sound like you're adding stitches. Or maybe your tension has relaxed?
Heather says
Well at least I'm not going crazy - it is NOT supposed to "grow" like that right? I'll start again fresh and see how it goes - thanks!
Crystal says
Help! I'm on the 2nd row and something isn't right. The decrease is coming together above the increase on the first row making it scrunch together. I've taken it out, counted it out, tried adding a sc and tried moving the first 2 sc. Can't figure out what I'm doing wrong or how to fix it.
Tamara Kelly says
It's hard to say without being there, I'm afraid. Did you follow the chart?
Jill says
This pillow is really cute! Think I'll make one for each of my boys. Thank you
patricia says
Hello, I kindly ask for your permission to use your pattern (for my own use, not for selling or re-selling, not for a pillow case but for a scarf. The two eggs will be put in the beginning and the end of the scarf. It's multiplication of 8 plus 1 chain, right? Thank you so much.
Tamara Kelly says
That would be fine, I hope you enjoy it! 🙂