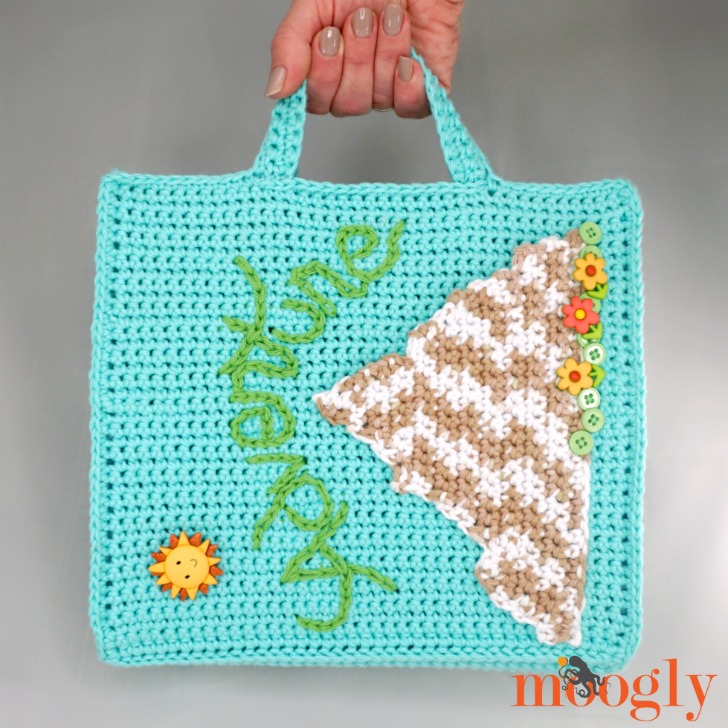
The Adventure Travel Case is a fun pattern to make for kids - or for kids to make for themselves! (Or maybe you want one too?!) Customize one for your favorite adventurer with this free crochet pattern!
 Disclaimer: This post includes affiliate links; materials provided by Red Heart Yarn, Clover USA, Furls Crochet and Polaroid.
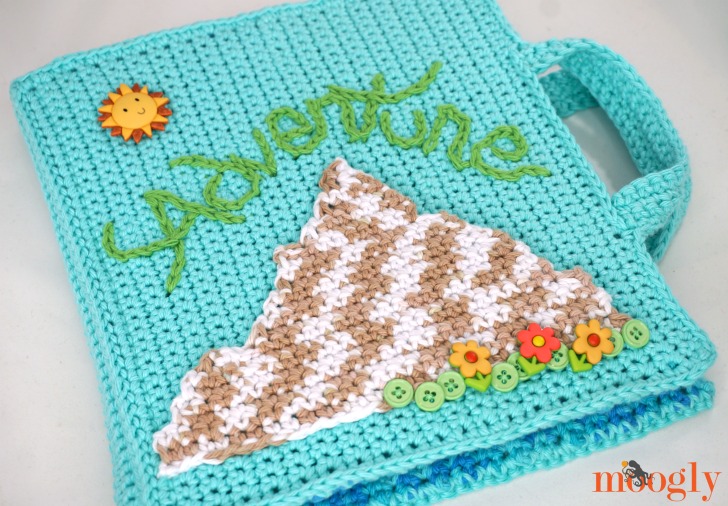
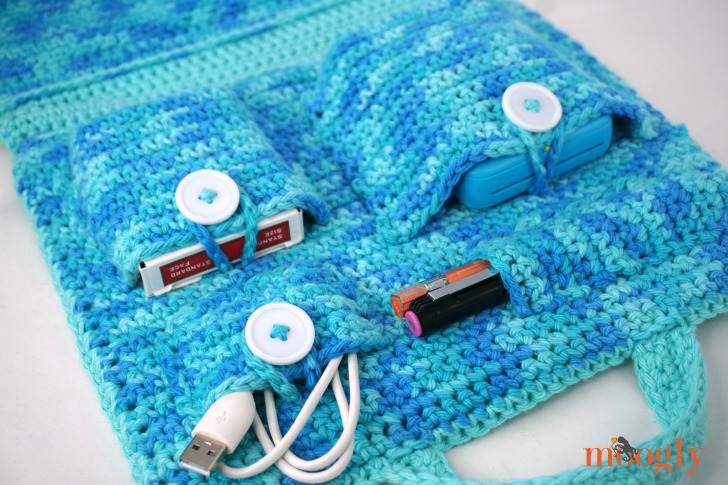
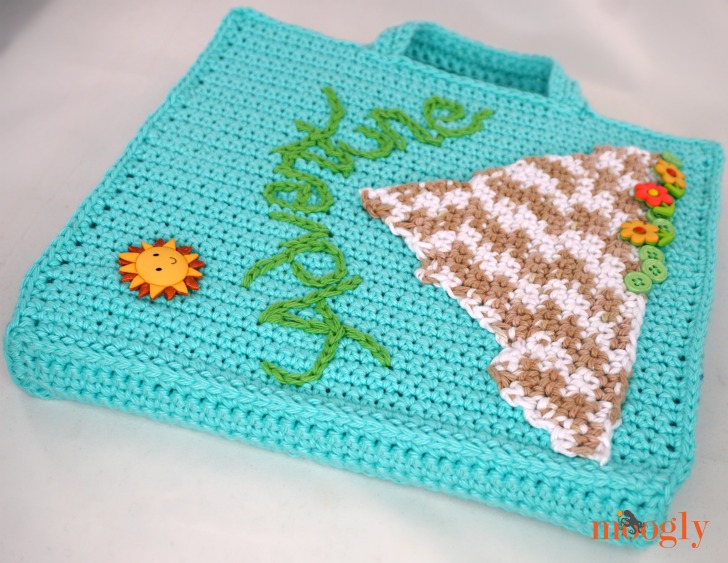
The Adventure Travel Case looks like a book with handles - and it opens up to reveal a bunch of handy pockets you can fill with everything needed for their next special trip!
This pattern is made with only beginner level stitches - so don't let it intimidate you! Red Heart Scrubby Smoothie makes it just as fun to touch as it is to carry.
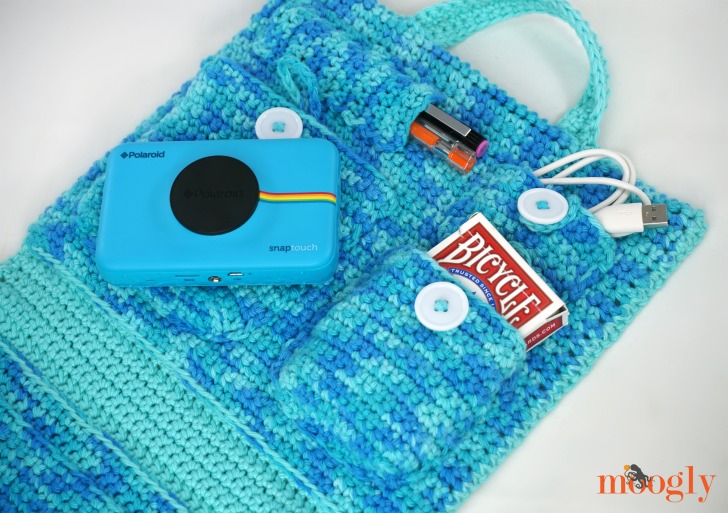
The Adventure Travel Case crochet pattern includes 5 different pockets to mix and match for the perfect custom case for your little explorer.

I was inspired by summer vacation - so I filled the pockets with all fun things: a deck of cards, a notebook and colorful pens, a tablet, and the Polaroid Snap, which is also adventure ready! It fits perfectly in the Large Pocket - and I even used it to take some of the photos seen below!
Add your own buttons and special touches to the front and you'll have something special indeed! You could even add another secret pocket...
Adventure Travel Case
Add this pattern to your Ravelry Queue and Favorites
US-H, 5.0mm hook - Furls Crochet
575 yds Red Heart Scrubby Smoothie (100% Cotton; “4”/Medium/Worsted/UK: 10-12 ply)
Color A: Aqua (2 balls)
Color B: Tide (3 balls)
Color C: Lime (1 ball)
Darice Clear Plastic Canvas – cut 2 pcs, each 8.75″ wide and 10.5″ long
Buttons - 1" buttons shown, number depends on custom options (6 shown)
Decorative items (optional)
Gauge: 15 sts x 17 rows = 4"/10cm in sc
Size:
Closed: 9.5" wide excluding handles x 11" tall x 1.5" deep
Open: 20.5" wide excluding handles x 11" tall
Helpful Links and Tutorials:
Adventure Travel Case Assembly Tutorial
Notes:
Make all pieces and set them aside until assembly.
Blocking prior to assembly is advised, and dimensions are given for the Outer Cover and Inner Panels.
Leave long 18" tails on your pockets and handles to sew them on with during assembly.
INSTRUCTIONS:
Outer Cover Instructions - Use Color A, make 1
Row 1: Ch 41, skip the ch closest to the hook, sc in each rem ch across; turn. (40 sts)
Row 2 - 40: Ch 1, sc in each st across; turn.
Row 41: Ch 1, fpsc in each st across; turn.
Row 42 - 46: Rep Row 2.
Row 47: Rep Row 41.
Row 48 - 87: Rep Row 2. Break yarn.
Block this piece to 20.5" x 11".
Handles - Use Color A, make 2
Row 1: Ch 24, skip the ch closest to the hook, sc in each rem ch across; turn. (23 sts)
Row 2 - 3: Ch 1, sc in each st across; turn. Break yarn.
Inner Panel Instructions - Use Color B, make 2
Row 1: Ch 41, skip the ch closest to the hook, sc in each rem ch across; turn. (40 sts)
Row 2 - 39: Ch 1, sc in each st across; turn. Break yarn.
Block these pieces to 9.25" x 11".
Notebook Pocket Instructions - Use Color B, make 0-2
This is the large pocket that takes up one whole side of the case - make up to 2 for your custom case (1 shown, holding the notebook and tablet).
Row 1: Ch 37, skip the ch closest to the hook, sc in each rem ch across; turn. (36 sts)
Row 2 - 32: Ch 1, sc in each st across; turn.
Edging: Ch 1, sc evenly down the sides of the rows, sc across foundation chain, sc up the final side of the rows; break yarn.
Large Pocket Instructions - Use Color B, make 0-2
This is the largest of the pockets on the multi-pocket side of the case - make up to 2 for your custom case (1 shown, holding the Polaroid Snap).
Row 1: Ch 23, skip the ch closest to the hook, sc in each rem ch across; turn. (22 sts)
Row 2 - 19: Ch 1, sc in each st across; turn. (22 sts)
Row 20: Sl st in first 4 sts, sc in next 14 sts, sl st in next 2 sts (rem sts left unworked); turn. (20 sts)
Row 21: Skip the first 2 sl sts, sc in next 14 sc, skip next sl st, sl st in next 2 sl sts; turn. (16 sts)
Row 22: Skip the first 2 sl sts, sc in next 14 sc, sl st in last 2 sts of Row 19; turn. (16 sts)
Row 23: Skip the first 2 sl sts, sc in next 14 sc, sl st in last st of Row 20; break yarn.
Medium Pocket Instructions - Use Color B, make 0-8
This is the second largest of the pockets on the multi-pocket side of the case - make up to 8 for your custom case (1 shown, holding a deck of cards).
Row 1: Ch 18, skip the ch closest to the hook, sc in each rem ch across; turn. (17 sts)
Row 2 - 15: Ch 1, sc in each st across; turn. (17 sts)
Row 16: Sl st in first 3 sts, sc in next 11 sts, sl st in next 2 sts (rem st left unworked); turn. (16 sts)
Row 17: Skip the first 2 sl sts, sc in next 11 sc, skip next st, sl st in next 2 sts; turn. (13 sts)
Row 18: Skip the first 2 sl sts, sc in next 11 sc, sl st in last unworked st of Row 15; break yarn. (12 sts)
Small Pocket Instructions - Use Color B, make 0-12
This is the smallest of the pockets with a button on the multi-pocket side of the case - make up to 12 for your custom case (1 shown, holding the USB cable).
Row 1: Ch 13, skip the ch closest to the hook, sc in each rem ch across; turn. (12 sts)
Row 2 - 9: Ch 1, sc in each st across; turn. (12 sts)
Row 10: Sl st in first 2 sts, sc in next 8 sts, sl st in next 2 sts; turn. (12 sts)
Row 11: Skip the first 2 sl sts, sc in next 8 sc, skip next st, sl st in last st; break yarn. (9 sts)
Pen Pocket Instructions - Use Color B, make 0-12
This is the long slim pocket shown on the multi-pocket side of the case - make up to 12 for your custom case (1 shown, holding 2 pens).
Row 1: Ch 8, skip the ch closest to the hook, sc in each rem ch across; turn. (7 sts)
Row 2 - 18: Ch 1, sc in each st across; turn. (7 sts)
Row 19: Skip the first st, sc in the next 5 sts, sl st in last st; break yarn.
Assembly Instructions
Click here for the video tutorial!
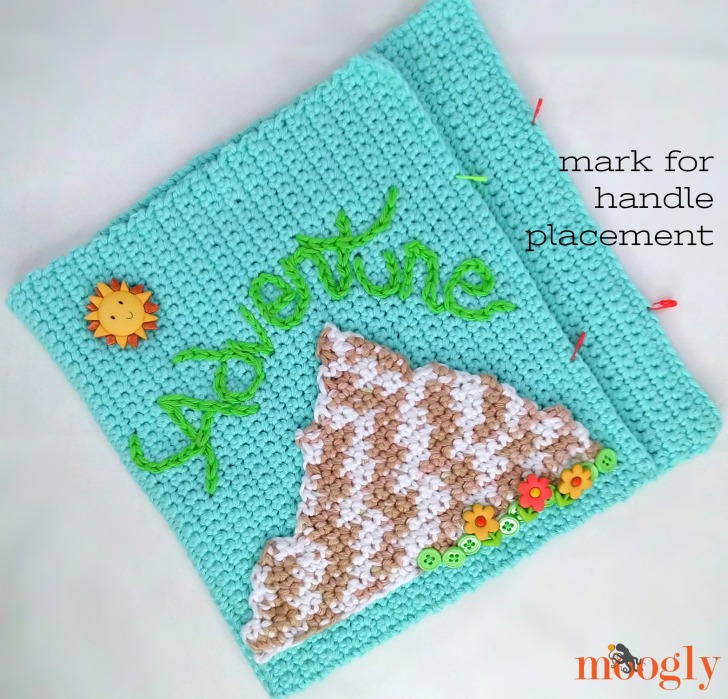
Step 1: Trace the pocket placement desired onto the plastic canvas pieces with a permanent marker.
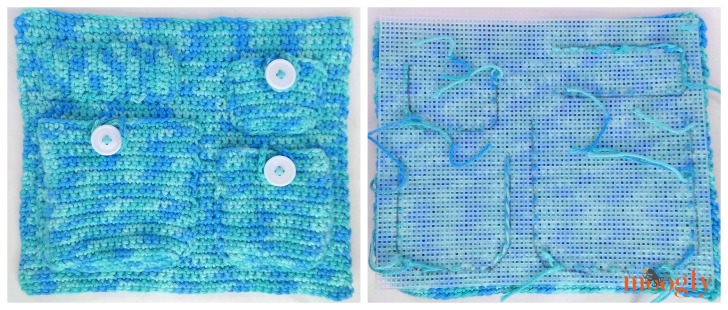
Step 2: Sew the pockets to the Inner Panels *and* the plastic canvas, sandwiching the Inner Panels between the pockets and plastic canvas. Use the traced lines as a guide.
Step 3: Add buttons to pockets as desired. Add button loops above pockets with buttons - a chain of 10 to 15 works well, but custom fit these to your own pockets and buttons.
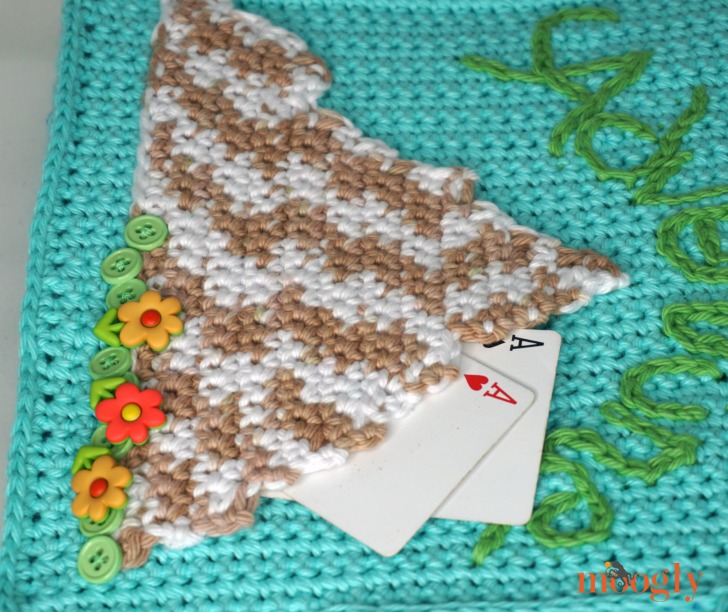
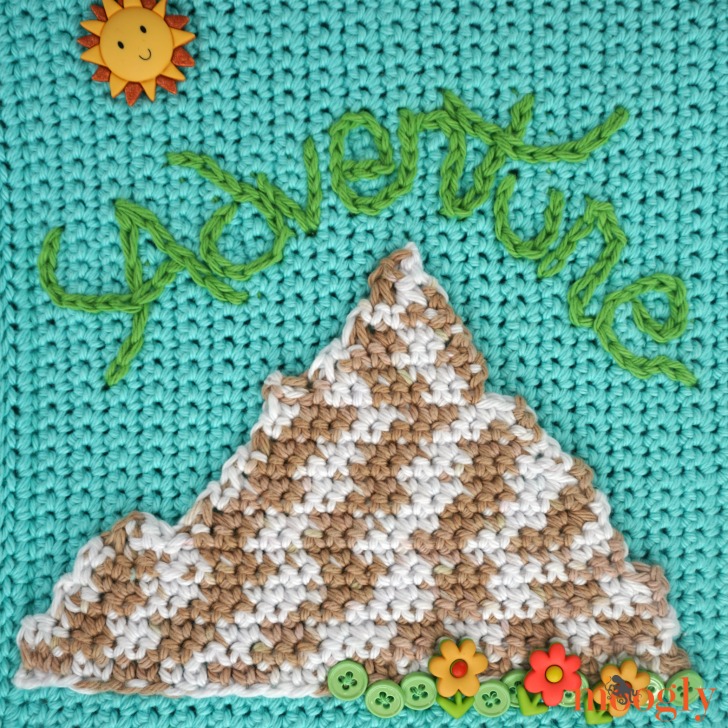
Step 4: Decorate Outer Cover as desired. I used the free crochet Mountain Applique pattern and decorative buttons. I also added the word "Adventure" using Color C and the surface crochet technique. You may also want to explore the Moogly Crochet Alphabet for ideas!
Step 5: Weave one tail of each handle through the center row of the handle to make it stronger and have a tail at each end of the handle. Use these tails to sew the handles to the Outer Cover 12 sts in from each corner.
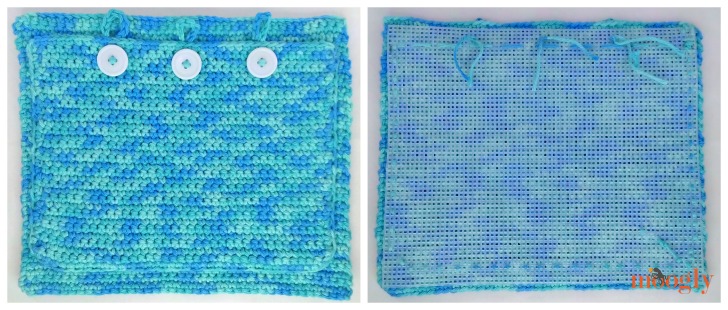
Step 6: Use stitch markers to attach the Inner Panels to the Outer Cover. Make sure that the plastic canvas is hidden between the crochet pieces and all yarn ends are tucked in. Line up the outer edges of the Inner Panels with the outer edges of the Outer Cover, leaving the "spine" of the book (the fpsc rows and the rows between them) free.
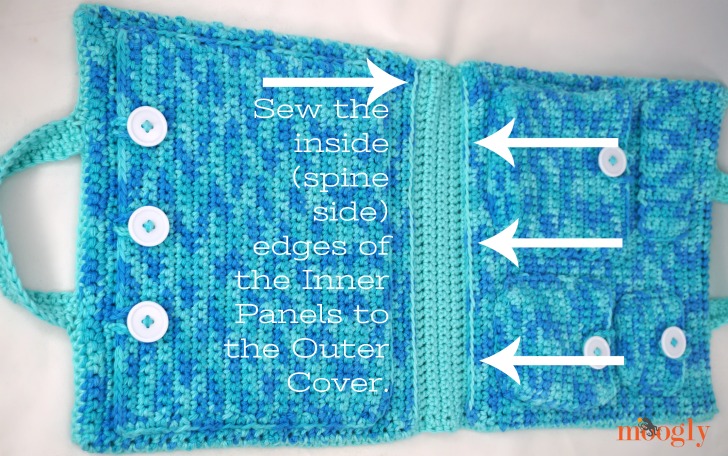
Step 7. Sew the inside (spine side) edges of the Inner Panels to the Outer Cover.
Step 8: Join to any edge of the Outer Cover with Color A and sc all the way around, working through Inner Panels to join when present, and working up over the handles as well; join and break yarn.
Step 9: Sl st/surface crochet through the sts at the base of first handle on the Outer Cover, working through the Inner Panel behind the handle; then, sc through the stitches between the ends of the handle, working through both the Outer Cover and Inner Panel; then, sl st/surface crochet through the sts at the base of the other end of the handle, working through Inner Panel here as well. Break yarn and weave in ends. Repeat on the other handle.
Ready to go on that expedition now? The Adventure Travel Case will *hopefully* have your travel companion carrying at least a few of their own supplies!
If you make an Adventure Travel Case I’d love to see it! So if you share it on social media, be sure to tag me @mooglyblog or #mooglyblog – and happy crocheting!

Written pattern copyright Tamara Kelly 2018, all rights reserved. Please do not reprint or repost this pattern, but please do link to this page to share this pattern with others. To print or download, use the Print Friendly button below, or go to PrintFriendly.com, or right-click to copy and paste it into a word processing document if those options do not work for you (please note that Print Friendly is a free outside website that the button links to, and you can click here for a tutorial on how to use it, but I cannot provide additional technical support for this service). If you wish to make items for sale from this pattern or translate it to another language, please visit the About page for details. Thank you to Red Heart Yarn, Clover USA, Polaroid, and Furls Crochet for providing the materials for this pattern.


Albertine says
Wat a cool, fun, clever and more cool thing to make! I would, and probably will, make it for myself 😉 I know it will be sturdier and smoother with the plastic canvas, but does it really need it?
Everyone can make it any way they like. This is awesome!
Albertine says
What*
Tamara Kelly says
Thank you so much! 😀 I suppose it would work without the plastic, but it will certainly be a lot floppier. You could also use stiff cardboard or other recycled materials if you aren't worried about wetness! 🙂 (With kids, I figured better safe than sorry - always prepare for spills lol!)
Albertine says
Thank you. I will give it a try without the plastic to see how floppy it will be. It's on the to do list. Maybe even first in line...
Rie says
This is stinkin' adorable!!!!!
Tamara Kelly says
Thank you so much! 😀
MichelE says
I have to be honest I have been stalking your blog waiting to see this finished and it is BRILLIANT! Such a great project and genius!
Tamara Kelly says
😀 Thanks so much! It was a big project to design for how simple it is!
Tracy king says
Awesome! My only dilemma is what category to pin it in ha ha. I put it in Crochet Stocking Stuffers for now but that just doesn’t seem right. Might have to start a new category just for this :). Love it a lot.
Tamara Kelly says
😀 It was tough for me to figure out that part too! Thank you so much!
Sonja verwijs says
I'm confused by the instructions for the handles. Here they are:
Handles – Use Color A, make 2
Row 1: Ch 24, skip the ch closest to the hook, sc in each rem ch across; turn. (23 sts)
Row 2 – 3: Ch 1, sc in each st across; turn. (17 sts) Break yarn.
Shouldn't rows 2 - 3 have 23 sts instead of 17? How does the stitch count become 17 when you sc in each st across?
Tamara Kelly says
I'm so sorry - that is a a typo - I will get it fixed right now. Thank you for letting me know!
Dorothy Stalnaker says
Just wondering if this needed to be washied how does the plastic canvas hold up? Would 'Low" heat be O.K.?
Tamara Kelly says
I would recommend air drying just to be sure - I've never tried drying it!