'Tis the season for getting organized... okay, so around here, that's every season! And one of my favorite things to make for that is crochet baskets. The Bouncing Basket is my latest, and like every new pattern, my current favorite!

Disclaimer: This post includes affiliate links.

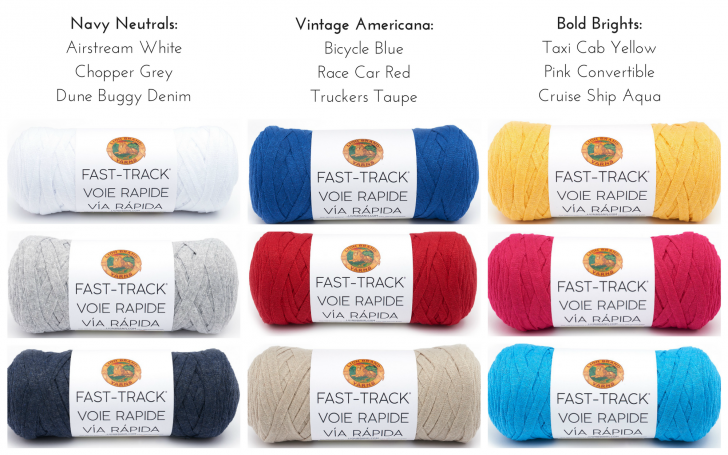
Need a Yarn Sub?
The Bouncing Basket features a stitch pattern that is fun to make as well as timeless - at home in almost any home decor! Made with Lion Brand's new Fast-Track (see the link below!), it's a quick project with big impact! It's also perfect for on the go - with generous and strong handles, you'll find yourself using it in every room of the home and out and about! Can't find Fast-Track? Try substituting Hometown USA or Heartland Thick & Quick for more great looks!
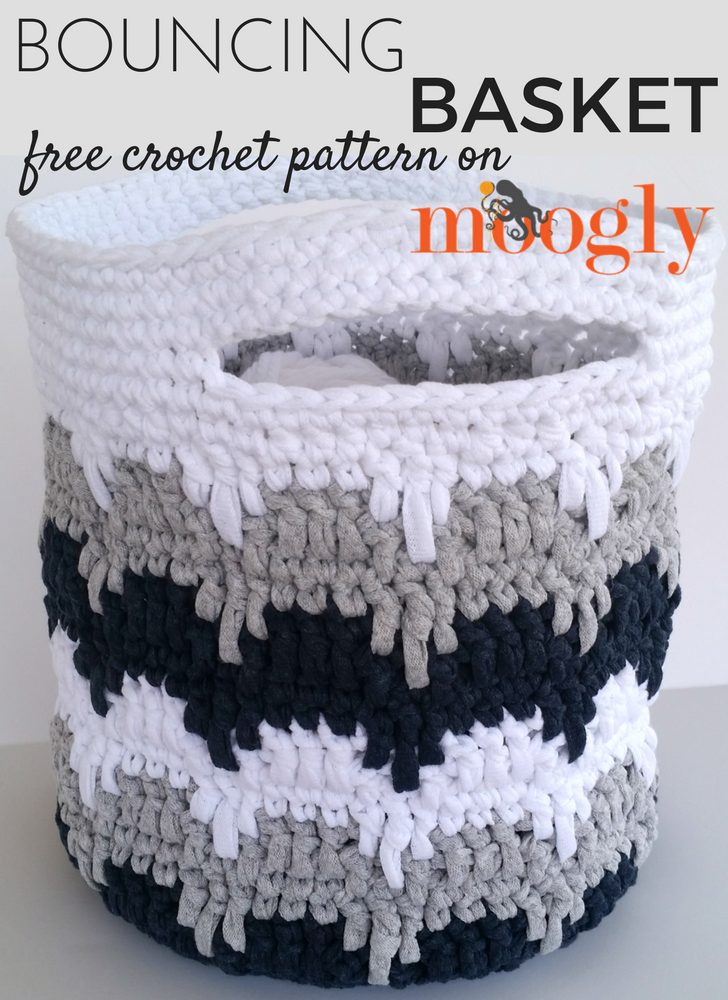
Bouncing Basket
Add this pattern to your Ravelry Queue and Favorites
- US - N, 9.0mm hook - Furls Crochet
- 300 yds Lion Brand Fast-Track (Super Bulky/"6"/UK 14-16 ply; 149 yds/136 m; 8.01 oz)
Color A: Dune Buggy Denim - 1 skein/120 yds
Color B: Chopper Grey - 1 skein/80 yds
Color C: Airstream White - 1 skein/100 yds - Stitch Markers - Clover Lock Ring Markers
- Gauge: Round 1-5 of pattern = 4"/10cm diameter
- Size: 9" diameter, 12" tall
- Crochet Abbreviations
- Helpful Tutorials: Magic circle; keeping a magic circle closed; BLO (back loop only); joining with sc; adding handles; seamless finishing
BOUNCING BASKET INSTRUCTIONS:
Make the Bottom:
Round 1: With Color A, make a magic circle, work 6 sc in the ring; join. (6 sts)
Round 2: Ch 1, 2 sc in each st around; join. (12 sts)
Round 3: Ch 1, sc in the 1st st, 2 sc in the next st, *sc in the next st, 2 sc in the next st; repeat from * around, join. (18 sts)
Round 4: Ch 1, sc in the 1st 2 sts, 2 sc in the next st, *sc in the next 2 sts, 2 sc in the next st; repeat from * around, join. (24 sts)
Round 5: Ch 1, sc in the 1st 3 sts, 2 sc in the next st, *sc in the next 3 sts, 2 sc in the next st; repeat from * around, join. (30 sts - check gauge here for exact sizing)
Round 6: Ch 1, sc in the 1st 2 sts, 2 sc in the next st, *sc in the next 4 sts, 2 sc in the next st; repeat from * around until 2 sts remain, sc in the last 2 sts, join. (36 sts)
Round 7: Ch 1, 2 sc in the 1st st, sc in the next 5 sts, *2 sc in the next st, sc in the next 5 sts; repeat from * around, join. (42 sts)
Round 8: Ch 1, sc in the 1st 6 sts, 2 sc in the next st, *sc in the next 6 sts, 2 sc in the next st; repeat from * around, join. (48 sts)
Round 9: Ch 1, sc in the 1st 7 sts, 2 sc in the next st, *sc in the next 7sts, 2 sc in the next st; repeat from * around, join. (54 sts)
Round 10: Ch 1, sc in the 1st 8 sts, 2 sc in the next st, *sc in the next 8 sts, 2 sc in the next st; repeat from * around, join. (60 sts)
Round 11: Ch 1, 2 sc in the 1st st, sc in the next 9 sts, *2 sc in the next st, sc in the next 9 sts; repeat from * around, join. (66 sts)
Round 12: Ch 1, sc in the 1st 10 sts, 2 sc in the next st, *sc in the next 10 sts, 2 sc in the next st; repeat from * around, join. (72 sts - this is the end of the increases)
Make the Sides:
Round 13: Ch 1, sc in BLO of each st around; join. (72 sts)
Round 14: Ch 1, sc in the 1st 3 sts, ch 1, skip the next st, sc in the next st, ch 1, skip the next st, *sc in the next 3 sts, ch 1, skip the next st, sc in the next st, ch 1, skip the next st; repeat from * around, join. (48 sc, 24 ch)
Round 15: Ch 4, skip the 1st 3 sts, dc in the skipped st from the round before the previous round enclosing the ch-1 in the st, ch 1, skip the next st, dc in the next skipped st from the round before the previous round enclosing the ch-1 in the st, *ch 3, skip the next 3 sts, dc in the skipped sc from the round before the previous round enclosing the ch-1 in the st, ch 1, skip the next st, dc in the next skipped sc from the round before the previous round enclosing the ch-1 in the st; repeat from * around, join to the ch-4 sp. (24 dc, 48 ch)
Round 16: Ch 1, dc in the 1st 3 skipped sts from the round before the previous round enclosing the ch-4 in the st, ch 3, skip the next 3 sts (this includes the dc, ch 1, dc), *dc in the next 3 skipped sts from the round before the previous round enclosing the ch-3 in the st, ch 3, skip the next 3 sts (this includes the next dc, ch 1, dc); repeat from * around, join and break Color A. (36 dc, 36 ch)
Round 17: With Color B, join with sc to 1st dc of previous round, sc in next 2 sts, dc in skipped st from the round before the previous round enclosing the ch-3 in the st, tr in skipped st from round below enclosing the ch-3 and ch-1 in the st, dc in skipped st from the round before the previous round enclosing the ch-3 in the st, *sc in next 3 sts, dc in skipped st from the round before the previous round enclosing the ch-3 in the st, tr in skipped st from round below enclosing the ch-3 and ch-1 in the st, dc in skipped st from the round before the previous round enclosing the ch-3 in the st; repeat from * around, join. (72 sts)
Rounds 18 - 20: Repeat Rounds 14-16; break Color B.
Round 21: With Color C, repeat Round 17.
Rounds 22 - 24: Repeat Rounds 14-16; break Color C.
Rounds 25 - 28: With Color A, repeat Rounds 21-24; break Color A.
Rnds 29 - 32: With Color B, repeat Rounds 21-24; break Color B.
Round 33: With Color C, repeat Round 17.
Round 34: Ch 1, hdc in the 1st 2 sts, sc in the next 3 sts, *hdc in the next 3 sts, sc in the next 3 sts; repeat from * around, join. (72 sts)
Round 35: Ch 1, sc in each st around; join. (72 sts) Place markers in sts #11, 23, 47, and 59.
Make the Handles:
Round 36: Ch 1, sc in each st to 1st marker, ch 15, skip next 13 sts (1st marker to 2nd marker), sc in next 23 sts, ch 15, skip next 13 sts (3rd marker to 4th marker), sc in remaining 13 sts; join. (46 sc, 30 ch)
Round 37: Ch 1, sc in each st and ch around; join. (76 sts)
Round 38 and 39: Ch 1, sc in each st around; break yarn and join with seamless finish. (76 sts)
And that's the Bouncing Basket! I gave it that name because the stitch pattern reminds me of the path of a bouncing ball - plus, it bounces back from whatever you put in it! Keep it up straight to use the handles and for more storage, or fold the handles over for easy tabletop organization - the Bouncing Basket is there for whatever you need! I hope you enjoy making this free crochet basket pattern!
The Fine Print
Written pattern copyright Tamara Kelly 2017, all rights reserved. Please do not reprint or repost this pattern, but please do link to this page to share this pattern with others. To print or download, use the Print Friendly button below. If you wish to make items for sale from this pattern or translate it to another language, please visit the About page for details. Thank you to Lion Brand Yarn for providing the yarn for this pattern!


Rita Miller
Lovely pattern! I made mine smaller and shorter. using worsted weight yarn and a G/4mm hook. But I think your Round 16 has an extra "ch3" after the first "(this includes the dc, ch 1, dc)." Also, Round 16 starts with "enclosing the ch-3 in the st" but Round 15 starts with a ch4, not a ch3.
Tamara Kelly
That Row 16 has been my nemesis! I'll take a look at that section again, thank you Rita.
Deb Weisblatt
Any updates to row 16? It's a bit confusing. At the *, do you dc in each of the 3 skipped stitches or the 1st stitch of the 3 skipped stitches? Thanks!
Tamara Kelly
Hi Deb! No updates, but I'll do my best to walk you through it as needed! At the * you dc once in each of the next 3 skipped sts.
Pat
I'm having trouble with 16 as well. Any suggestions?
Tamara Kelly
Can you tell me more about what the trouble is?
Sue plank
I enjoyed making the basket but my question is how do you keep them up straight? Or do they just stay up when they are full. Can u starch something like this
Tamara Kelly
Filling the basket does make it stand up better, as does folding over the top edge. 🙂 I haven't tried starching it, but I'd try a spray starch on the inside of the basket it I were to give it a try.
Gail steckel
I made a similar crochet basket to hold yarn and had the same problem - the sides collapsed. I finally just unraveled it and used the yarn for something else. I was very disappointed.
Tamara Kelly
I'm sorry to hear you had trouble Gail! A good solution is to go down a hook size or two to get a tighter fabric with more stiffness.
Rosemarie C.
I saw the basket pattern and i just had to make one. I made one for my son to use to move his toys from one room to another. It was so easy and took me two days to complete. Thank you so much for sharing this awesome pattern! Can't wait to make another one.
Tamara Kelly
😀 I'm so glad you like it! Thank you Rosemarie!
jami r
Pattern isn't right at row 8. It doesn't go from 42 to 48 stitches doing 6 then 2. Taken it out numerous times. Help
Tamara Kelly
Hi Jami!
There are 42 sts in Rnd 7, which can also be expressed as 6 x 7. There are 6 repeats of the pattern in that row, which is made up of 7 sts - 5 sts worked even, with 2 sts in the next st.
There are 48 sts in Rnd 8, which is an increase of 6, as there are 6 increases (2 sc in the same st) in this round. Again, there are 6 repeats of the pattern in this row (indeed, in every row of the bottom of the basket), and this time they are made up of 8 sts - 6 sts worked even, with 2 sts in the next st. 6 x 8 is 48. 🙂 I hope that helps!
Liz
Hi, love the basket (as I do all your patterns, made several bags so far) - I haven't worked much with sc, most of the patterns I choose seem to be dc so I've a couple of questions re joining....
For a seamless join in dc I usually do the chainless starting dc instead of the CH3 and join with a slip st to the top of that stitch at the end which works great 🙂
I'm wondering where you find best to join here - I've assumed the join is a slip stitch into the top of the first sc & not into the CH1 ?
Then I've tried working the first sc into the same space as the CH1 or into the next stitch along (which slants the seam sideways) - both seem to leave quite a visible seam line. Do you have any tips?
Tamara Kelly
Hi Liz!
You would sl st into the top of the first sc, not into the ch-1 tch. There are a couple of things you can try - sl st to the blo of the first st, and work the first st into both loops; pull the sl st very tight; start the pattern round with stitch #2, and then make stitch #1 at the end, covering (working over) the tch.
The stitch pattern on this one keeps a pretty straight line though, I have to say - and a relatively invisible seam! 🙂
Liz
Thanks Tamara, sl st to the blo worked great 😊
Tamara Kelly
So glad to hear it! 🙂
Lee
Hi Tamara. I'm working my way through the increase rounds and was wondering why the location of the increases shifts every few rounds (ie round 6, 7, 8, 11, 12). Is it to reduce the pointiness of the increase locations that would happen if they were kept in the same places and make the overall shape more circular than hexagonal? I'd like to make the basket wider than 9" so I'm trying to see if there's a pattern to the shifting to maintain it with more increase rounds.
A couple of followup questions on making the basket wider as well: would I be able to follow rounds 14-34 as written to make the sides even with the altered stitch count of a wider base? I only skimmed through the instructions for those rounds and it seems like they work as long as the stitch count is a multiple of 6? It looks like I'd have to alter the placement of handles for rounds 35/36 but they also seem to work with multiples of 6. Could you confirm this?
I really like the look of this basket by the way. 🙂 I finally ordered some fast track yarn because it looks so nice (I also need somewhere to put my WIPs that isn't a chair people need to sit on, but your basket design was what motivated me to actually do something about it >..<).
Tamara Kelly
Hello Lee! Yes, it's to keep the bottom more circular. 🙂 And yes, any multiple of 6 should work for the sides, though you will need to adjust the handles. Thank you so much!
Katie
HI, I was a beginner crocheter when I saw your pattern and decided to make it. It's taken me several months of trying and stopping and unraveling and giving up and trying again, reading books and watching tutorials. Of course in my naiveté I bought some random yarn to make it with, so I think that made it more difficult. Now I would call myself intermediate level and I decided to tackle it again. I made it and it worked out wonderfully. Except I seem to have made the right side on the inside and the wrong side on the outside. I'll keep it though :). Thanks for the pattern. I really enjoy your blog as well as your FB and Pinterest pages.
Tamara Kelly
Oh my goodness, I'm so glad to hear how your skills have progressed! A lot of people do actually crochet their in-the-round projects inside out - and then flip them when they're done! Thank you so much, Katie! 🙂
Amanda
Do you double your yarn on this basket?
Tamara Kelly
No, it's a very thick yarn! 🙂 If you are substituting another yarn, you may want to do so.