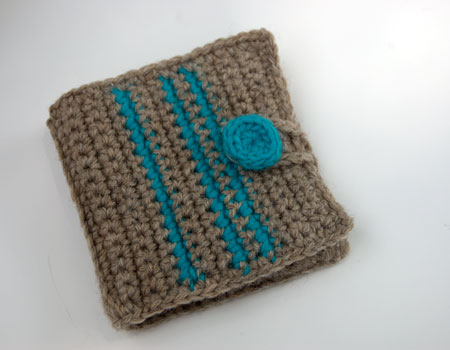
Once in a while, not often enough, I get to make stuff for my own kids. And this one was a request from my 6 year old middle child - a new wallet, just for him. He's a little camera shy, so you'll have to believe me when I say that this design made him very very happy.
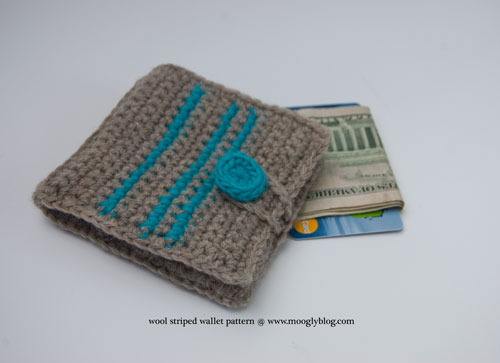 The Wool Striped Wallet isn't just for kids though - it's great for anyone who loves a little custom organization. The crochet stitches are simple but the result is eye-catching and you can add as many pockets as you like to make it suit your own needs.
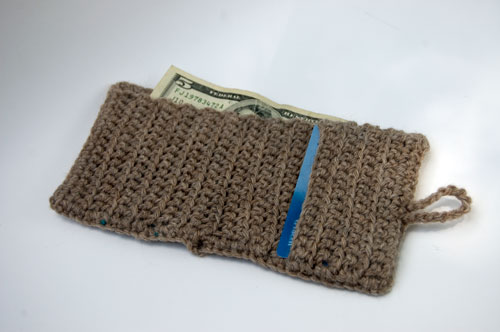 Wool Striped Wallet
Add this pattern to your Ravelry Queue
This wallet is made in three pieces that are then crocheted together, and I strongly recommend blocking all three pieces both before and after assembly for best results. You shouldn't have to pin the pieces, just get them good and wet and then shape them on a towel to dry. Don't rub too much - we don't want them to felt, just to lay flat and even.
- US - G, 4.00mm hook
- Main color: Wool or wool blend worsted weight yarn, a bit less than 100 yards (Knit Picks Wool of the Andes in Mink Heather shown)
- Stripe color: Wool or wool blend worsted weight yarn, approximately 3 yards (Stitch Nation by Debbie Stoller Full o' Sheep in Aquamarine shown)
- 1" Button, or make your own using the Simple Crochet Button pattern (shown).
OUTER PIECE:
With Main color, ch 17.
Row 1: Skip the first ch and sc to end. Ch 1 and turn. (16 sc)
Row 2 - 19: Sc across. Ch1 and turn. (16 sc in each row)
Row 20: Working in BLO, sc across. "Crease" made. Ch1 and turn.(16 sc)
Row 21 - 25: Sc across. Use the Stripe color to finish the last sc as in switching colors for stripes, then ch 1 and turn.
Row 26: Sc across with the Stripe color, crocheting over the Main color so that it is carried along to the end of the row. Use the Main color to finish the last sc, then ch1 and turn. Break Stripe color yarn. (16 sc)
Row 27 - 29: Sc across. At the end of Row 29, use the Stripe color to finish the last sc, then ch 1 and turn. (16 sc in each row)
Row 30: Sc across with the Stripe color, crocheting over the Main color so that it is carried along to the end of the row. Use the Main color to finish the last sc, then ch1 and turn. Break Stripe color yarn. (16 sc)
Row 31: Sc across. Use the Stripe color to finish the last sc, then ch 1 and turn. (16 sc)
Row 32: Sc across with the Stripe color, crocheting over the Main color so that it is carried along to the end of the row. Use the Main color to finish the last sc, then ch1 and turn. Break Stripe color yarn. (16 sc)
Row 33 - 37: Sc across. Ch1 and turn. (16 sc in each row)
Row 38: Sc across. Break yarn and weave in all ends. Add the button to the RS of the outer piece, at the end with the stripes, a few rows in.
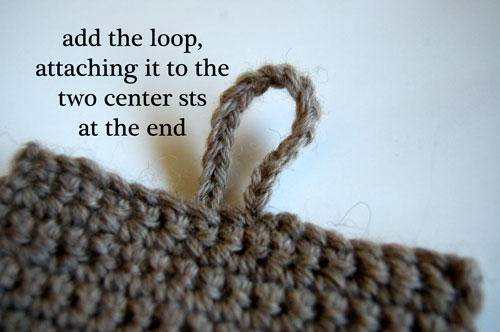
From the RS of the Outer Piece, on the end *without* stripes, join Main color yarn with a slip stitch in the 8th stitch from the right. Ch 17 (or long enough to go around your button if you are using a larger button), then sl st to the next st to the left (9th from the right). Break yarn and weave in ends.
With Main color, ch 16.
Row 1: Skip 1 ch and sc across. Ch1 and turn. (15 sc)
Row 2 - 25: Working in FLO, sc across. Ch1 and turn. (15 sc)
Row 26: Working in FLO, sc across. Break yarn and weave in ends.
 POCKET:
(These instructions call for one pocket, but you can add more if you like!)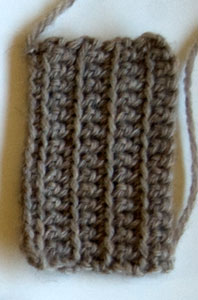
With Main color, ch 16, leaving a 12" tail for later sewing.
Row 1: Skip 1 ch and sc across. Ch1 and turn. (15 sc)
Row 2 - 7: Working in FLO, sc across. Ch1 and turn. (15 sc)
Row 8: Working in FLO, sc across. Break yarn and weave in last end, but leave long end.
ASSEMBLY:
Gently block all the pieces! Blocking here is important to get all the pieces to lay as flat and thin as possible.
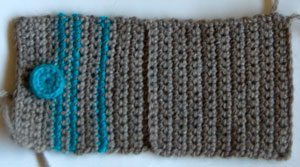
Whip stitch the side edge of the pocket to the top right edge of the inner piece, using the long tail, so that the pocket sits sideways and will be left open toward the center of the wallet. See the picture below:
 Next, lay the RS outer piece on top of the WS inner piece (with attached pocket), with the loop end of the outer piece on your right, and the pocket at the very bottom on your left.
Join the yarn with a slip stitch to the bottom left corner, and sc through all three layers, working across the bottom of the wallet. This joins the opposite edge of the pocket and the bottoms of the inner and outer pieces.
Keep working to join the inner and outer pieces after the pocket, until you are about 2 rows from the center Crease of the outer piece. At this point, drop the inner piece and sc through just the outer piece, until you are 2 rows past the Crease on the other side. Then, pick up the inner piece again and continue working right in the next inner row and the next outer row, going through both the inner and outer pieces with each stitch. The corners should line up and a small gap should be seen between the inner and outer layers at the Crease - this allows for a slimmer profile and better fold. See the picture below:
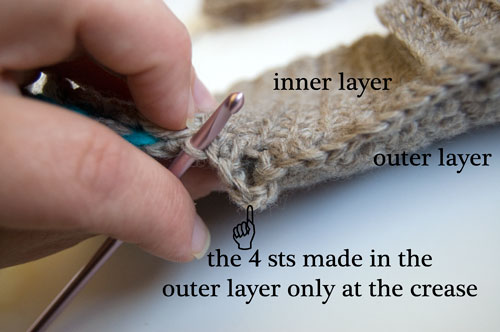 When you come to the corner, ch 2 and sc along the side of the wallet. Work in the stitches where the loops are attached, keeping the hook on top and pulling the working yarn behind the loops. This sandwiches the loop and gives a good looking finished edge.
Approaching the top of the wallet, the inner piece should be one row narrower than the outer, so work the last sc in the side through just the outer piece. Ch2 to get around the corner again, and then sc across the top of just the outer piece. To avoid a wrinkled edge, you may want to skip working a sc in every 4th or 5th row - play with your spacing here to get as flat an edge as possible.
At the end of the top of the wallet, ch2 and start to sc the final edge together. The first st will be just through the outer piece, but the remaining stitches will be worked through all 3 layers again - the inner, outer, and the bottom of the pocket. At the end of the side, ch 2 and break yarn. Use the seamless finishing to join to the first stitch.
Block the entire wallet once more, working gently to avoid felting. Pull any wobbly edges even and let dry.
Done! Hope you enjoy this pattern as much as my little guy does - let me know what you think in the comments!
 Be sure to Like the moogly Facebook page for the latest updates and have some fun with us! And if you like what you see but don’t craft, I take custom orders and commissions. Written pattern copyright mooglyblog 2012. Please do not reprint this pattern, but feel free to link to this page to share this pattern with others.


CuriousTiff
Thanks for sharing your wonderful tutorial!! I greatly appreciate you for sharing your hard work for free! I am working on the wallet as we speak and it has inspired me to make a similiar design fitted for a cell phone. Fantastic work!
Regarding the button, do you have a link to the "pattern" for a good fitting button? I'm going to use one that I found on Ravelry, it looks like it matches up pretty close to what you have, but I would love to have your advice on it. Here's the link to the button pattern I'm thinking of using: http://www.ravelry.com/patterns/library/simple-crochet-button The direct link to the button tutorial page is: http://mrsmicawber.blogspot.com/2011/08/simple-crochet-button.html
Thanks again!! 🙂
CuriousTiff
moogly
CuriousTiff, thanks so much for your comments! In fact, that simple crochet button from mrsmicawber is exactly the one I used - I link to it in the pattern specs! Great eye!
Cj
Thanks for the real nice pattern. I am going to be adding this to my list of Christmas Gifts to Make.
moogly
I'm glad you like it Cj! Thanks for commenting!
bardiena
Great idea.
Karli
Wow I really love this pattern!! Thank you so much for sharing your creativity with us! You're the best!! 🙂
zakira
Masha Allah !!!awesome project..i really liked it nd made one ,it has come out beautifully.
thanks again for sharing this..hav a good day
Tamara Kelly
😀 Thank you Zakira! You too!
Marrie
Tmara!..i am your fan!..loving and still watching your tutorialsss! 😉
LAUREN Rodriguez
Do you have a video tutorial? (:
Tamara Kelly
Not for this pattern, I'm afraid.
Zarnaz
Hello there! Your site is my inspiration for learning how to crochet! Thank you so much for your efforts!
I will be making this wallet as soon as I get the appropriate yarn, in the meantime I wanted to ask you whether you have a pattern for a cute little coin purse? One in which I can put all my spare change and just pop it in my handbag... 🙂
Thank you again!
Tamara Kelly
Hi Zarnaz, and thank you! I don't have a pattern like that yet - but I am actually in the planning stages for it! 😀 So stay tuned!
Zarnaz
I found a coin purse pattern online... but I think I'll wait for your pattern! 🙂
Zarnaz
Hello again!
I just made the inner side of the wallet but it is much shorter than the outer layer... Is it supposed to be like this? Outer layer was made of 38 rows and inner layer with 26 rows, right?
Tamara Kelly
Yes, the inner should be shorter. If you prefer it higher of course, you can add to it! 🙂
ursula
hi! i also wonder why the length of the inner is only 26 rows while the outer length is 38 rows. the pocket is sewed right on top of the inner side, right? the height is fine with me, as the inner only minus 1 stitch from the outer. please help, i really like your wallet and about to make 2, one for me and one for my best friend.
Tamara Kelly
Because if they were the same length, then when folded there would be too much interior fabric. 🙂 The inside is smaller so it can fit inside the outer easily.
ursula
Hi, thx for your quick reply. I'm making the inner now, how many rows should i minus from the outer for the length? I minus 1 row for the height n still have no idea bout the length 🙁
Tamara Kelly
Since everyone's tension is different, it should be just a bit shorter - try holding them together and folding them before you cut the yarn so you can adjust as needed.
Lauren
How do I do this with only one color?
Tamara Kelly
Just use the same color for all of it. 🙂
Lauren
Ya know, that makes so much sense. I just figured there was a different technique if you wanted separate colors.
stephanie joy
Hi! 🙂 i really wish you included a picture of the inside of the wallet.. like other commenters i'm finding it is really confusing trying to understand how the inner and outer pieces are attached when the inner is supposed to be so much smaller in length. Does this mean that only 2 sides of the inner is attached (the bottom and one side)? since it isn't long enough to reach both ends? According to these instructions, "Next, lay the RS outer piece on top of the WS inner piece (with attached pocket), with the loop end of the outer piece on your right, and the pocket at the very bottom on your left," it seems (if i'm understanding correctly) the pocket will be on the button side of the wallet since the pocket is positioned on the "left" whereas the "loop end" is towards the right.. i'm practicing by holding together the unattached pieces right now.. and if i attach them the way i'm reading the instructions, then my finished wallet if closed and held like in your final picture (with the button side up and towards the right) the larger money pocket would be upside down and only attached at one side (the button side!) Is that correct? In the wallet in your last picture if you opened it up the way it is, would the larger money pocket open at the bottom?.. because it seems like it should open at the top.. i hope this makes sense! haha..i'd really like to finish this project i started here.. i love it so far! 🙂 ♥
Tamara Kelly
The inner is attached on three sides - it's smaller because otherwise when you close it, it will be too bulky. Feel free to rearrange the pieces to where you want them though! 🙂
stephanie joy
HI Tamara, i really appreciate you getting back to me.. So your inner piece is a whole 12 rows shorter which is about 1/3 of the length of the entire outer piece and yet it still managed to be attached on 3 whole sides minus 4 stitches at the crease!? Maybe i just need more practice at doing this! LOL.. i am still a newbie to crochet, and i've only done scarfs so far for the most part. Please forgive me! But in trying to figure this out again today i realized something.. in the instructions you have us lay down the outer piece with the loop on the right (which makes the button side on the left) and then you say to put the pocket side of the inner piece to the LEFT as well, which means the pocket would be on the button side, but i now see in the open picture of the open wallet near the top of the tutorial that clearly your pocket is on the LOOP side! i think this is why mine was opening upside down.. it seems that the pictures and assembly instructions do NOT match each other! i thought i'd point that out just in case anyone else has problems trying to assemble this thing, not to criticize you or be a pain in the arse.. 😀 i do love this style of wallet, and love how yours came out.. now if only i can get mine to work! Ha!
Soubarna
Hi Tamara, I have the same doubt. The inner piece is 12 rows shorter than the outer piece. If I exclude the 4 rows for the crease, then it is still 8 rows. Do you stretch the inner piece to join it with the outer so that it fits end to end? I have tried to explain my situation with the below diagram. The top row is the outer piece. The bottom row is the inner piece. The ^^^^ signifies the crease. Which configuration is the correct one? It would be very helpful, if can reply. Thanks for your pattern.
Option A:
----------------^^^^------------------
-----------------------------------
Option B:
----------------^^^^------------------
---------------------------------
Option C:
----------------^^^^------------------
- - - - - - - - - - - - - - - - - - - - - - - - (Stretched to fit the outer piece)
Regards,
Soubarna
Tamara Kelly
Hello Soubarna! Option C - the inner piece is smaller so that it fits inside when the wallet is folded.