It's a baby crazy time for our extended family, with one set of twins recently arrived and another on the way! So as you can imagine, I have baby things on the brain again. The set that were just born are a boy and a girl, so I wanted to make them a pair of blankets that were soft, cozy, and coordinate well together without being exactly the same. The result was the Sweetest Baby Blanket!
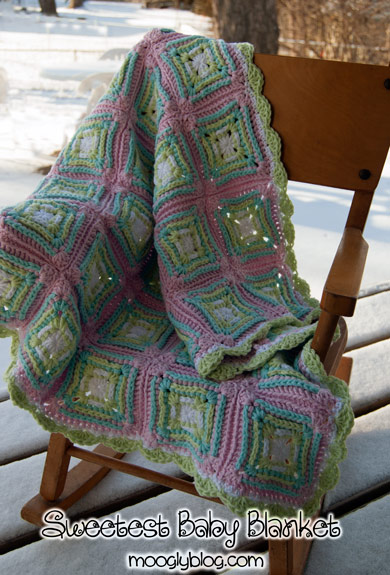

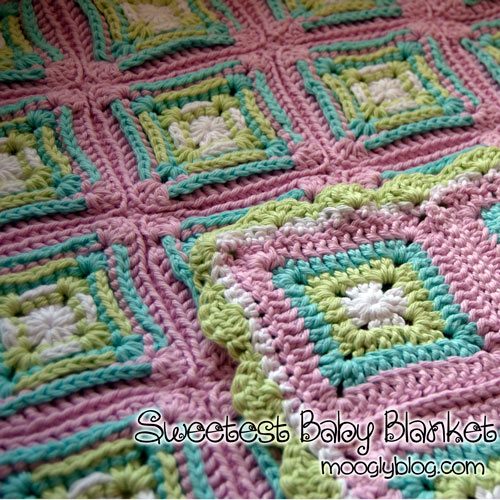
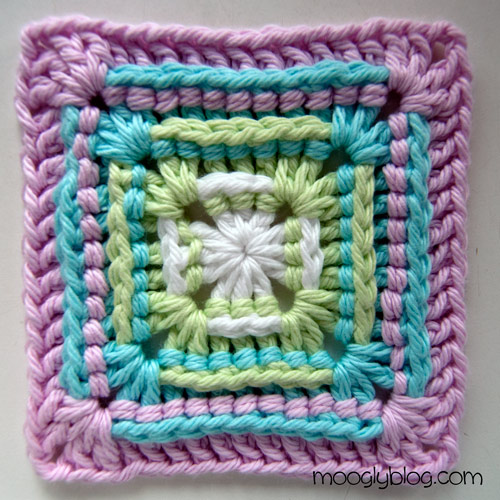
The Sweetest Baby Blanket is a simple but exciting twist on the granny square. Each square as written measures about 4.25", so for a small baby blanket I went with a 6 x 6 blanket. If you want to make a larger blanket, just add more squares!
Sweetest Baby Blanket
Add this pattern to your Ravelry Queue and Favorites
- US - I, 5.5mm hook
- Worsted weight yarn, in 4 colors (I Love This Cotton in White, Pistache, Aqua, Turquoise, and Pink shown)
- Yarn amounts for 36 squares: Color A - 100 yds; Color B: 180 yds; Color C: 250 yds; Color D: 350 yds, plus additional amount for seaming and border if desired.
- Video tutorials for all stitches and techniques used are available on the Tutorials Page.
Sweetest Baby Blanket Instructions
Round 1: (Using Color A) Make a magic circle. Ch 3 (counts as 1st dc), and working into the ring dc 2. *Ch 2, dc 3 into the ring. Repeat from * 3 times. Ch 2, break yarn and use seamless join to finish off, joining to the top of the ch 3. Weave in ends for this round.

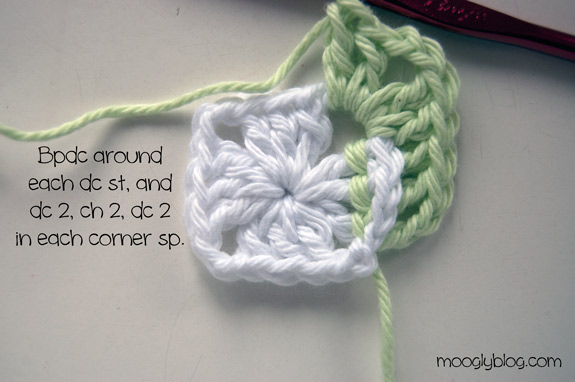
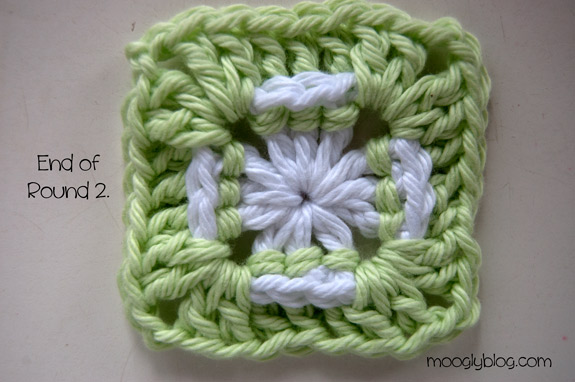
Round 2: (Using Color B) Insert the hook around the rightmost dc in any set of 3 from Round 1, as if to make a back post stitch (as seen above). Pick up yarn pulling it around post as if to make a back post stitch, and ch 3. Bpdc around next 2 sts. [Dc 2, ch 2, dc 2] in ch sp. *Bpdc around next 3 sts, then [dc 2, ch 2, dc 2] in ch sp. Repeat from * 3 times. Break yarn and seamless join to top of ch 3. Weave in ends for this round.
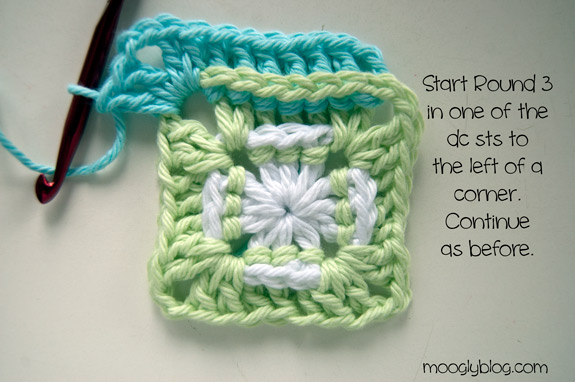
Round 3: (Using Color C) Insert the hook around the rightmost dc in any set of 7 from Round 2, as if to make a back post stitch. Pick up yarn pulling it around post as if to make a back post stitch, and ch 3. Bpdc around next 6 sts. [Dc 2, ch 2, dc 2] in ch sp. *Bpdc around next 7 sts, then [dc 2, ch 2, dc 2] in ch sp. Repeat from * 3 times. Break yarn and seamless join to top of ch 3. Weave in ends for this round.

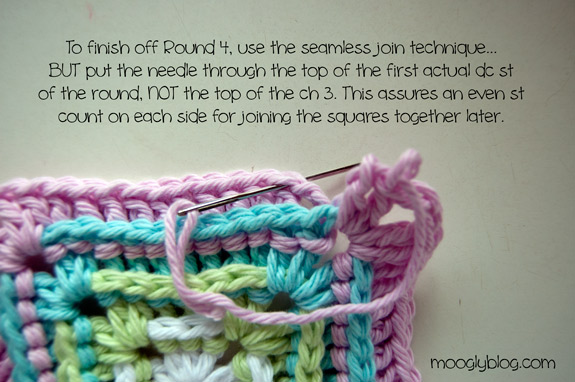
Round 4: (Using Color D) Insert the hook around the rightmost dc in any set of 11 from Round 3, as if to make a back post stitch. Pick up yarn pulling it around post as if to make a back post stitch, and ch 3. Bpdc around next 10 sts. [Dc 2, ch 2, dc 2] in ch sp. *Bpdc around next 11 sts, then [dc 2, ch 2, dc 2] in ch sp. Repeat from * 3 times. Break yarn and seamless join to top of dc - NOT the ch 3, as seen below. This ensures an even "V" count on each side of the square, important for most joining methods. Weave in ends for this round.
Finishing:
To attach the squares to each other, I held the RS of two squares together, and using Color D, sl st through the outside loops of both, so that the sl sts show up on the WS of the blanket. You can see a nice tutorial of this technique on Attic24. Of course, feel free to use whatever joining method you prefer! For an edging, I did a row of sc and a row of simple dc 5 shells. There are hundreds of edgings available, so use the one you like best!
I hope you enjoy this pattern as much as I have! It looks just as good in brights as in pastels, and is perfect for both boys and girls. Change it up by making each square different or using a different joining method - it's up to you to make it your own!
The Fine Print
Written pattern copyright Tamara Kelly 2013. Please do not reprint, or repost this pattern, but please feel free to link to this page to share this pattern with others. You may sell items made from this pattern, but please include a link to www.mooglyblog.com on the online listing or sale tag if selling at a craft fair, storefront, or other in person sales.


Jean Lamb says
Thank you for this .... it's so fresh and beautiful ... harbinger of spring!
Karie {Girl Going Country} says
This pattern is ADORABLE! I love the striped effect of using the back post stitch. And thank you for the detailed pictures! I can't wait to give this a try!
Linda says
It's beautiful and thank you for the tutorial it is now on my to do list 🙂
Lisa Herrera says
I don't like granny squares. To much work sewing them together. I like one continuous pattern. They are beautiful though. If I had the patience.
moogly says
Thank you! Luckily with the baby size I was able to put it all together and edge it in one evening! 🙂
DONNA says
YOU CAN MAKE A BIG GRANNY SQUARE LIKE THAT , IT WOULD BE VERY PRETTY. 🙂
Tamara Kelly says
Indeed! I agree! 🙂
LaDonna says
That is what I am thinking of doing! 🙂 Love the look, but don't want to connect the pieces! Thank you for sharing another great pattern!
Gina says
Here's a link to my Ravelry page for the Sweetest Baby Blanket with one large granny:
http://ravel.me/matchboxcrazy/tok13
Tamara Kelly says
Very cool Gina! 😀
Tamara Kelly says
😀 Thank you!
Jean leRoux says
Lovely colours, lovely stitch. Thanks for sharing the pattern.
Tambra says
Beautiful! Thank you for sharing & demonstrating this lovely Baby Blanket!
Sara - My Merry Messy Life says
Oh wow, what an awesome pattern and tutorial, Tamara! I LOVE the colors you chose too! Thanks for sharing at Hookin On Hump Day!
moogly says
Thanks Sara! 😀
Kathy Lashley says
Beautiful colors! I love your work! You are very talented!
moogly says
Thank you so much Kathy!
Barbara Webb says
This is the first time on your blog. I love this blanket. I have been looking for a pattern to use some of my extra balls. This will be perfect. I am going to make it out of a baby yarn thickness. Thanks again, great work! W/B signing up for newsletter.
moogly says
Thank you Barbara, I'm so glad! 😀
cyndy says
I have been looking at your patterns and I have to say they are the best. All the different things all look good.
I will be back.
Thank you for all the enjoyment I got from looking at it.
moogly says
Thanks so much cyndy!
mary-ann nichols says
I just luv it. How did you do the ruffle on top?
moogly says
Thanks mary-ann! For an edging, I did a row of sc and a row of simple dc 5 shells.
Carol says
I am making this blanket but I find that my squares are not laying flat. The sides seem to squeeze in. I tried using a bigger hook. I tried having the hole in the center be a little more open. I tried doing 2 rows of plain double crochet around the square. I still can't get them to lay flat. What am I doing wrong. I'd like to make this blanket, but I don't want to get all of the squares done and have the lines not be straight . especially the outer edge.
moogly says
Carol, the sides of the squares to tend to pull in a bit, but blocking each square before joining them should straighten them out! The method of blocking just depends on what yarn you are using.
Carol says
Thank you, that makes me feel better. Now I can continue on with it.
Coy says
I cannot get the pattern to download. Can you email it to me as attachment. I'm not very good on the computer. I do better with my crochet hooks!
moogly says
Hi Coy! There isn't really a download option for my patterns, but if you use the green Print Friendly button at the bottom of the pattern you can get a printable copy! 🙂
Heather Boyce says
Is it possible to make cushion covers with the blackberry salad design.
Many thanks
moogly says
Absolutely Heather! Just make them the size to fit your pillow! A few people have done so, and you can see pictures here: http://www.ravelry.com/patterns/library/blackberry-salad-striped-baby-blanket/people
Mary Arnevik says
Hi - This is a lovely blanket! Would you please tell me the brand on yarn you used and the names of the colors? Thanks!
Tamara Kelly says
Hi Mary! This info is listed in the bullet points, along with the hook size.
Ericka says
Adorable!!!! I love crocheting with cotton - perfect!!!
Minerva says
I love this baby blanket, it is gorgeous. Thank you for sharing the pattern.
Tamara Kelly says
Thank you Minerva!
Karen Allen says
This is very pretty and different......it will definitely be going on my to-do list.
Brittany says
I am in love with the blanket! I think I need to make an adult version of this. I am obsessed with blankets. Thank you so much for the tutorial!
Beaj says
This is so cute and I sure will give it a try. Like the challenge of a different square..:)
Thank You.
Katherine says
I've been looking for a beautiful and unusual granny square, and I thank you for posting one.
Heidi Urness says
IM having trouble with this pattern my squares brake in the white what am i doing wrong can you please help me i really love this pattern.
Tamara Kelly says
I'm sorry you're having trouble Heidi! What do you mean by break?
Heidi Urness says
the white likes comes apart in the middle for some reason not sure why
Tamara Kelly says
If you're starting with the magic circle, you may want to leave a longer tail if it's pulling out. If it's just loosening up, try pulling the hole closed tightly and then weave in the end securely. I hope that helps!
Heidi Urness says
hi thanks I will give that a try
Heidi Urness says
hi i just wanted to let you know it is working for me now thank you so much.after my second try of making this....
Tamara Kelly says
😀 Yay! Glad to hear it Heidi!
Beaj says
Now this is just too cute. Thanks..:)
Tamara Kelly says
Thanks Beaj!
Brandie Woods says
I love this pattern dearly and would love to make it. I have one question I am using a variegated yarn and would like to make one continuous square. How can I do that without having to cut each row off? Any help would be appreciated.
Thanks
Tamara Kelly says
Hi Brandi! To finish Round 1 I would slip stitch to the top of the ch 3 that started the round, and then to start Round 2, yo and work a bpdc right around the top of the same st (the ch 3). Then work as directed and repeat at the end/beginning of each round. You'll want to pull the sts of that first bpdc up nice and high to make sure it's as tall as the other sts, but it should work.
Brandie Woods says
Ok thank you so much I will try that here in a bit. 🙂
Melanie says
I love this blanket! I'm going to make it for my niece who is due in December. She is having a boy. What colors did you use for the boy blanket?
Tamara Kelly says
Those were the White, Pistache, Aqua, Turquoise! 🙂 Congrats on the new niece!
Melanie says
Thanks for responding so quickly.
Serafina says
What an amazing tutorial ! Thank you sooooo much !!!
Serafina says
Silly me, meant to add : and what a gorgeous blanket! Again, thank you!
Tamara Kelly says
😀 Thanks so much!
Darlajune says
This is the most beautiful baby blanket I have ever seen!! Thank you so much Tamara. My new grandbaby will love it!
Tamara Kelly says
😀 I'm so glad you like Darlajune! Congratulations on the new grandbaby!!
Heidi urness says
Hi I'm still working on mine I've got 3 afghans started for Xmas presents ill let you know when I'm done:)
Tamara Kelly says
Wow! Good luck! 😀
Grace says
(Worsted weight yarn, in 4 colors (I Love This Cotton in White, Pistache, Aqua, Turquoise, and Pink shown)
Yarn amounts for 36 squares: Color A – 100 yds; Color B: 180 yds; Color C: 250 yds; Color D: 350 yds, plus additional amount for seaming and border if desired.)
Hi I was just checking yardage and I notice there are only 4 yarn amounts, but 5 colours in the picture. Which colour correlates to which letter, and how much yarn is needed for the 5th colour?
Thanks so much.
Grace
Tamara Kelly says
Hi Grace! I'm afraid there are only 4 colors in each square. The Turquoise was only used in the blues "boys" sample square while the Pink was only used in the finished blanket.
Grace says
So "colour D" is switched out with either pink or turquoise depending on gender and the same yardage is used. Ok, thanks for clearing that up for me 🙂
Tamara Kelly says
Yes! You put it better than I did! 😀
NonaN says
Who makes I love this cotton?
Tamara Kelly says
I Love This Cotton is sold by Hobby Lobby.
Kathy L says
I am making this baby blanket and am working on the magic circle. Should it be single or double crochet ? Thanks.
Tamara Kelly says
You work double crochets for the first round, right into the magic circle. 🙂
Kathy L says
I was talking about actually making the magic circle. The tutorial says after wrapping 2x around finger, you make a single crochet about 6 times unless you need to make double crochets. Not sure if it matters for this pattern. I got the part about double crocheting in the middle of the circle . Thanks..Kathy
Tamara Kelly says
For the magic circle tutorial I was just demonstrating working sts into it - they could be sc, dc trc, whatever the pattern calls for. In this case work the dc sts right into the circle, no sc sts required. 🙂
Kathy L says
Thanks!! 🙂 One last question!! I am making this for a boy and was wondering what you would suggest doing for the edging.
Tamara Kelly says
For boys I like Triangle Edging or a row of sc or dc followed by a row of crab stitch (reverse single crochet). There are tutorials for both here on moogly on the tutorials page!
Kayla says
Hi, in the image of the finished blanket the corner that is laying on top of the rest of the blanket looks flat while the ones under have raised looking parts. Is the flat the back side?
I also saw your advice for making it in one color yarn rather than switching, would that also have the raised effect though you aren't changing yarns each round?
Thanks, love the look of this!!
Tamara Kelly says
Hi Kayla! The flat is the back side. The raised effect comes from the post stitches, so it should work with just one color too. 🙂
Crystal says
Is it possible to complete this blanket as one big square instead of crocheting all the little squares?
Tamara Kelly says
Absolutely! 😀 Just add more rows in the pattern - after making the first few rows I think you'll see how easy it is. 🙂 And I think the end result would be fantastic!
Joyce Jados says
I just finished making this for our new granddaughter, giving it to her for Christmas. It is more beautiful than the pictures! Thank you for sharing this pattern!
Tamara Kelly says
😀 Glad you like it Joyce, Merry Christmas!
Ali says
Thank you for this pattern, I just finished it tonight. It looks so sweet and will be a lovely gift for my new nephew arriving at the end of the month!
Tamara Kelly says
😀 Glad you like it! And congrats on the new nephew!
Janet Ragusa says
Beautiful pattern. I'm new to crocheting and the nice clear photos make it easy for me to follow the pattern. I can't wait to make this blanket.
Tamara Kelly says
Thank you Janet! 😀
Jacie says
This is a beautiful blanket. I would love to make it for my year old great granddaughter, but the instructions are rather difficult to read with advertisements printed over them. Could you tell me how to print the pattern without the advertisements? Or maybe it would be easier to just email me the pattern . Thank your for your attention in this matter..... Jacie
Tamara Kelly says
Hi Jacie! Thank you! Use the green Print Friendly button at the bottom of the post and you'll get a copy to print without any ads. 🙂
Teresa says
I just LOVE your patterns. I have made several of your blanket's and give them as gift's.
THANK YOU for sharing.
Tamara Kelly says
😀 Thank you so much Teresa!
suzan says
As a fairly new crocheter I could use more help in making the border. I don't know exactly what "sc and shells" means. Thanks. I love this precious baby afghan and the dimensional effects it has. Making it for granddaughter arriving soon. Suzan in NC.
Tamara Kelly says
Hi Suzan! What I mean is that I worked a row of single crochet stitches all around the outside, and then went around again workintg *sc in the next st, skip 2 sts, dc 5 in the next st, skip 2 sts; repeating from * around. Does that help?
hollie says
I'm working on a baby blanket for a friend and was searching for a nice simple shell edging...I'm so glad I found this one. And I must say I never thought of doing the back post stitch. I'm fairly new at crocheting and have limited patience so I like the granny squares. 🙂 These ones are absolutely adorable and I'm going to try them on my next blanket.
Tamara Kelly says
😀 Thank you Hollie!
shoko says
what a pity that we dont have this beautiful yarn in iran 🙁
Trish says
I have a lot of small yarn balls. Would it look strange to make this in all different colors and textures of yarn if I keep the magic circle in each square white? Also, how do you weave your ends so they don't show? Mine always peek out. I have a new grandbaby coming this spring and thought this blanket would be perfect! Thanks for sharing!
Tamara Kelly says
I think that would look fantastic Trish! 🙂 I have a tutorial on how I weave in my ends here.
Gina says
Hi, Tamara! Thank you so much for this pattern! I had so much fun making it for my niece's 21st birthday. I ended up doing one large square with the shell border rather than doing the individual granny squares. It ended up being about 4 x 4 ft. I would love to show you a picture, but I don't know how in this forum. Thanks again!
Tamara Kelly says
Thanks so much Gina, I'm so glad you like it! You can share photos on the Moogly Facebook page, or email them to me using the contact info at the top of the website! 😀
Wdaug says
Hi,
Making the sweetest baby blanket...love it so much! I was wondering if you blocked all of your squares, if you joined as you go, and if when you joined the squares, did that resolve the "pulling in" of the sides of the squares? Thank you!
Tamara Kelly says
Joining them resolved a lot of it, but blocking helps too. Blocking before or after joining is up to you - if you're using an acrylic and plan on steam blocking, I'd wait until after joining. 🙂
Shell @ SilkyBlanky says
That looks so beautiful. Never tried using yarn or crocheting before since I do love sewing but I think I may give it a try for my new neice. 🙂
Traci says
Hi Tamara!
I am certain that, at one time, there was a picture of both of the Sweetest Baby Blankets that you made. One for the girl and one for the boy. Now all that's here is the girl blanket. I'm trying to remember what colors you used for the boy blanket. Did you just swap the pink for a blue? I'm wondering if the blue with a turquoise would go together?
Tamara Kelly says
Oh how odd, I thought so too! :/ I checked my notes and I substituted Turquoise for the Pink, I believe.
Anisa says
Hi. I really like your pattern. I am making it for a good friend of mine who is expecting a baby girl. Could you tell me how did you join the squares? And also the edges around the blanket please? Thanks
Tamara Kelly says
Thank you, Anisa! That info is in the section headed "Finishing." 🙂
Anisa says
Thank you. It helps 🙂
Arah says
Couldn’t you just keep going and add onto the square and make it big enough to be a blanket that way? Like a massive granny square
Tamara Kelly says
Yes, you could! 🙂