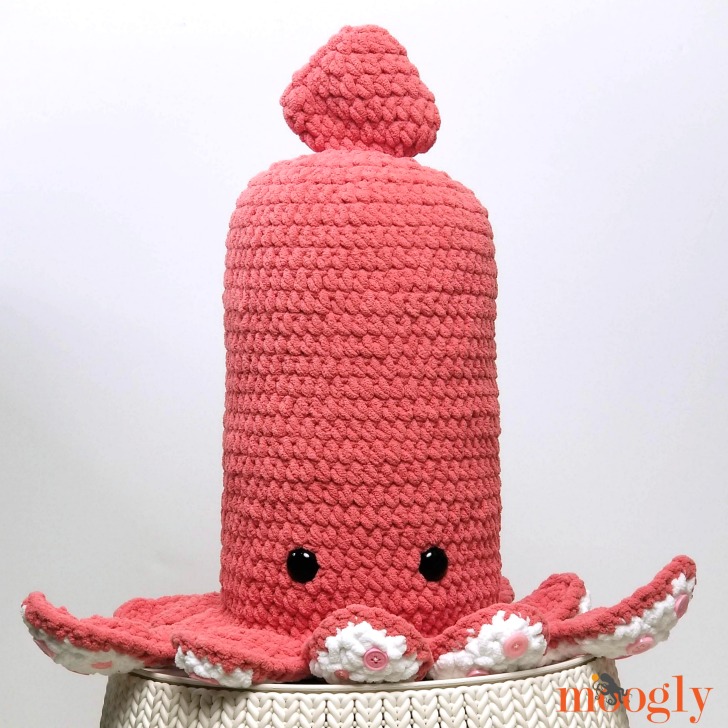
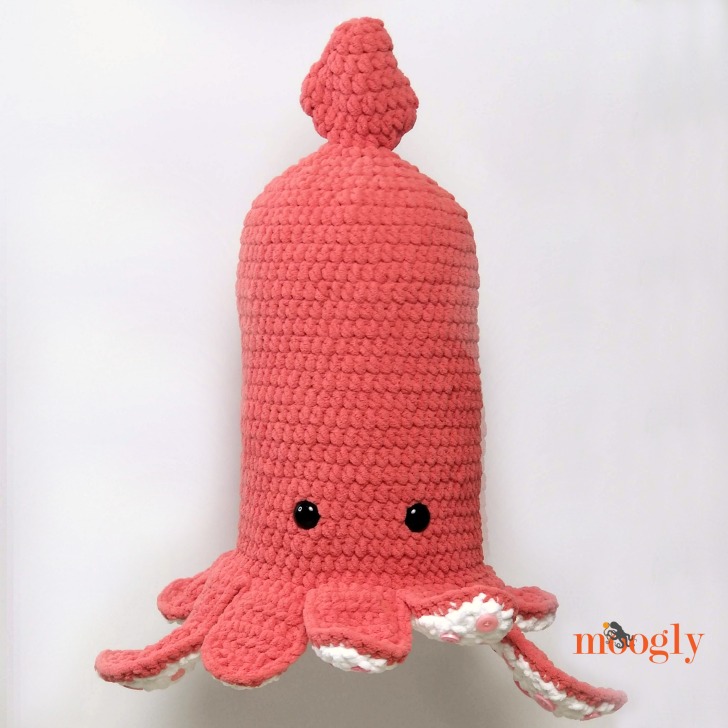
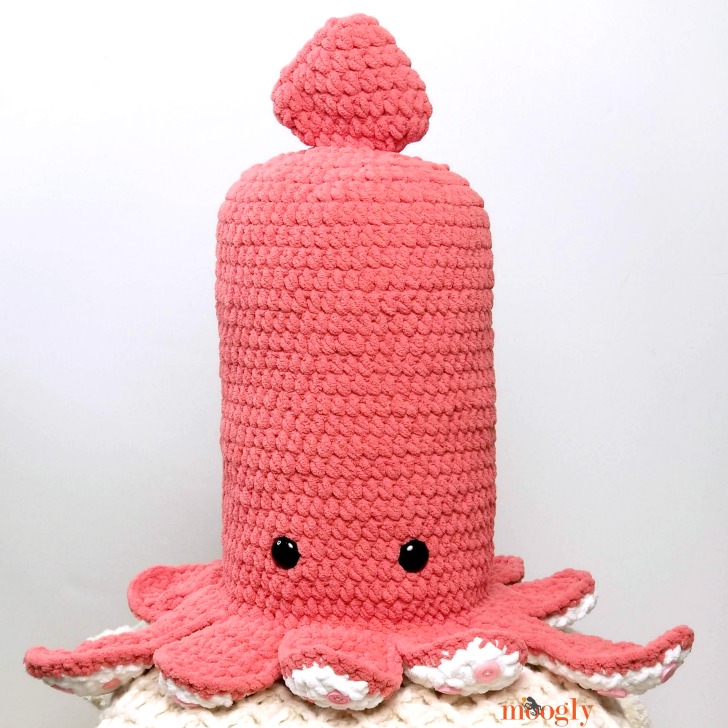
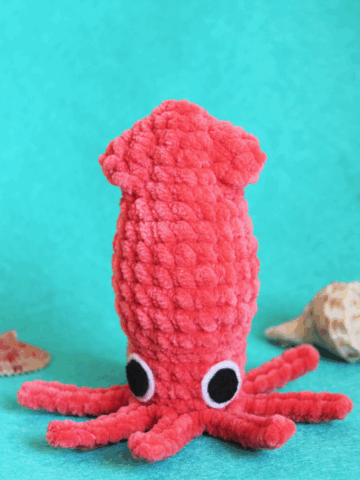
The Squid Squish is the latest cuddly crochet cutie on Moogly! This adorable amigurumi style sea creature joins his pals for fun and adventures - get the free crochet squid softie pattern below!
Disclaimer: This post includes affiliate links; materials provided by Yarnspirations and Furls.
Prefer an ad-free PDF?


Prefer the free blog version? Keep scrolling!
A Crochet Bolster Pillow
The Squid Squish is filled with a microbead bolster pillow. It's just the perfect size, and so very huggable! And once again I've used Bernat Blanket, so it's a quick project to make, taking just an evening or two. Of course, if you prefer, you can fill it with Fiberfill.
Add Your Own Details
I've used 24mm Safety Eyes on the Squid Squish, but you can use buttons or crocheted eyes if you prefer. And I've used a grab bag of buttons for the Tentacle and Arm Suckers - I love the random sizes and how they give the Squid a more whimsical look!
A Note on Toys for Kids
The Squid Squish itself is far too big for babies to choke on, but if you use buttons for the eyes and suckers, they may not be. This pattern has not been tested for safety for children under 3 years of age. If you are crocheting it for a baby or toddler, please embroider on the face rather than using buttons. If using it as a photo prop, be sure not to leave the toy with a baby unattended.

Squid Squish
Add this pattern to your Ravelry Queue and Favorites
US-L, 7.0 mm or 8.0 mm hook (whatever gets you gauge) - Furls
375 yds Bernat Blanket (6 - Super Bulky/UK: 14-16 ply; 100% polyester; 300g/10.5 oz; 201 m/220 yds)
Color A: Terracotta Rose (275 yds, 2 ball)
Color B: White (100 yds, 1 ball)
24mm Safety Eyes
7" x 12" Bolster Microbead Pillow (pink) - Amazon
Additional Buttons for Tentacles/Arms
Sewing Thread and Sewing Needle
Gauge: 9 sts and 7 rows = 4" in hdc
Size: Approximately 18 inches long not including tentacles/arms
HELPFUL LINKS AND TUTORIALS
Sc2tog - single crochet decrease
NOTES:
Rnds 1 - 33 of the body and Rnds 1 - 6 of the belly are worked in a spiral.
Do not ch 1 unless directed, and do not join any rnds with a sl st.
Move a stitch marker along the first st of each rnd as you work to keep track of your progress.
SQUID SQUISH INSTRUCTIONS:
Fin
Rnd 1: With Color A, make a magic circle, ch 1, sc in the ring, 9 hdc in the ring. (10 sts)
Rnd 2: *2 hdc in the next st, hdc in the next 4 sts; rep from * around. (12 sts)
Rnd 3: *2 hdc in the next 2 sts, hdc in the next 4 sts; rep from * around. (16 sts)
Rnd 4: Hdc in the next st, 2 hdc in each of the next 2 sts, hdc in the next 6 sts, 2 hdc in each of the next 2 sts, hdc in the last 5 sts. (20 sts)
Rnd 5: Hdc in the next 2 sts, 2 hdc in each of the next 2 sts, hdc in the next 8 sts, 2 hdc in each of the next 2 sts, hdc in the last 6 sts. (24 sts)
Rnd 6: Hdc in the next 2 sts, sc4tog, hdc in the next 8 sts, sc4tog, hdc in the last 6 sts. (18 sts)
Rnd 7: *Sc5tog, hdc in the next 4 sts; rep from * around. (10 sts)

Body
Rnd 8: 2 hdc in each st around. (20 hdc)
Rnd 9: *Hdc in the next st, 2 hdc in the next st; rep from * around. (30 hdc)
Rnd 10: *2 hdc in the next st, hdc in the next 2 sts; rep from * around. (40 hdc)
Rnd 11: *Hdc in the next 3 sts, 2 hdc in the next st; rep from * around. (50 hdc)
Rnd 12: *Hdc in the next st, 2 hdc in the next st, hdc in the next 3 sts; rep from * around. (60 hdc)
Rnd 13 - 33: Hdc in each st around. Do not break yarn.
Body Tentacles and Arms
NOTE: Work these in numerical order around Rnd 33 of the Body.
1st - First Tentacle:
Row 1: Hdc in the next 6 sts (rem sts left unworked); turn. (6 sts)
Row 2 - 4: Ch 1, hdc in each st across; turn.
Row 5: Ch 1, sc2tog, hdc in the next 2 sts, sc2tog; turn. (4 sts)
Row 6: Ch 1, sc2tog twice; break yarn. (2 sts)
2nd - 4th - More Tentacles:
Row 1: Join to next st of Row 33, ch 1, hdc in same st and next 5 sts; turn. (6 sts)
Row 2 - 6: Rep as for 1st Tentacle.
5th - First Arm:
Row 1: Join to next st of Row 33, ch 1, sc2tog, hdc in next 2 sts, sc2tog; turn. (4 sts)
Row 2 - 4: Ch 1, hdc in each st across; turn.
Row 5: Ch 2, (dc, hdc) in first st, hdc in next 2 sts, (hdc, dc) in last st; turn. (6 sts)
Row 6: Ch 2, (dc, hdc) in first st, hdc in next 4 sts, (hdc, dc) in last st; turn. (8 sts)
Row 7: Rep Row 2.
Row 8: Ch 1, sc2tog, hdc in the next 4 sts, sc2tog; turn. (6 sts)
Row 9: Ch 1, sc2tog, hdc in the next 2 sts, sc2tog; turn. (4 sts)
Row 10: Ch 1, sc2tog twice; turn. (2 sts)
Row 11: Ch 1, sc2tog; break yarn. (1 st)
6th - 8th - More Tentacles:
Rep as for 2nd - 4th Tentacles.
9th - Second Arm:
Rep as for 5th - First Arm.
10th - Last Tentacle:
Rep as for 2nd Tentacle.

Belly
Rnd 1: With Color B, make a magic circle, ch 1, sc in the ring, 9 hdc in the ring. (10 sts)
Rnd 2: 2 hdc in each st around. (20 hdc)
Rnd 3: *Hdc in the next st, 2 hdc in the next st; rep from * around. (30 hdc)
Rnd 4: *2 hdc in the next st, hdc in the next 2 sts; rep from * around. (40 hdc)
Rnd 5: *Hdc in the next 3 sts, 2 hdc in the next st; rep from * around. (50 hdc)
Rnd 6: *Hdc in the next st, 2 hdc in the next st, hdc in the next 3 sts; rep from * around. (60 hdc)
Belly Tentacles and Arms
Continuing with Color B, repeat as for the Body Tentacles and Arms.

Assembly
Add the Eyes and Suckers: Add the Safety Eyes or buttons to the Body, so that the 3 short tentacles between the arms are facing forward, between Rnds 29 and 30 (as shown below) or as desired. Add buttons to the Tentacles and Arms for suckers (as shown above).

Prep for Finishing: Insert the Pillow into the Body, then match up the Body Tentacles and Arms and Belly Tentacles and Arms.

Making sure the tentacles and arms are matched up, use stitch markers to secure the pieces together.

Final Seam: Using Color A, and from the top (body) side, sc through both layers (Body Tentacles and Arms and Belly Tentacles and Arms), working evenly around. Use Seamless Finishing to join, break yarn and weave in end.

Looking for more free crochet toy and softie patterns? Browse them all on the Moogly Free Patterns Page or Ravelry! In particular, be sure to check out the Octopus Squish, Narwhal Squish, and Benevolent Bumble Bee!

If the Squid Squish pattern inspires you to make your own project, and you post a photo on social media, be sure to tag me @mooglyblog or #mooglyblog so I can check it out too!
THE FINE PRINT
Follow Moogly on YouTube, Facebook, Twitter, Pinterest, Instagram, and TikTok! Thank you to Yarnspirations for providing the materials shown in this post. Written pattern copyright Tamara Kelly 2020, all rights reserved. Please do not reprint or repost this pattern, but please do link to this page to share this pattern with others.
If you wish to make items for sale from this pattern or translate it to another language, please visit the About page for details.


Michelle says
Made this for a friend of mine. She loves it