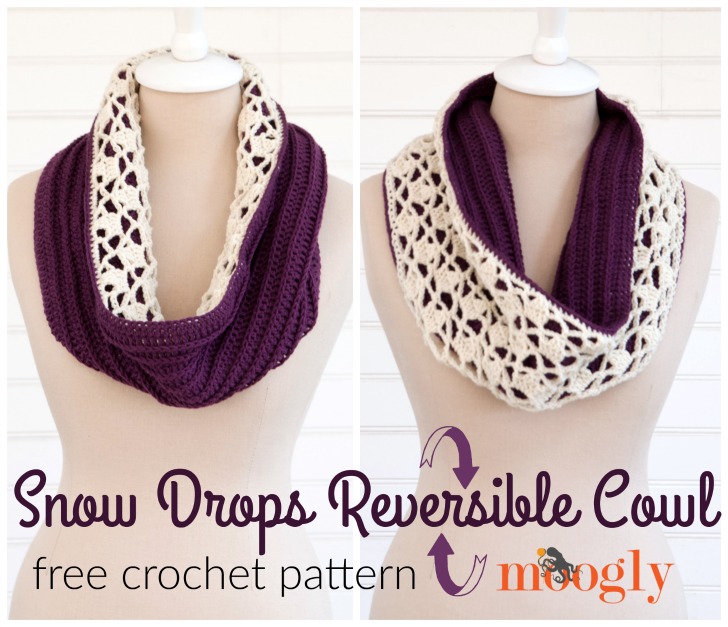
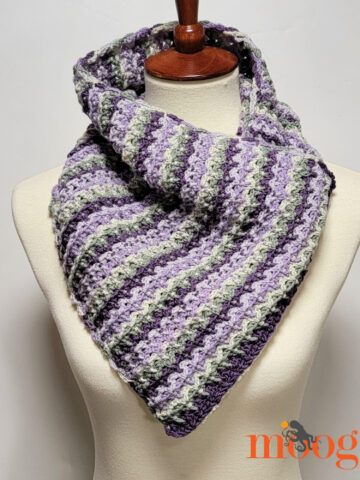
The Snow Drops Reversible Cowl is the perfect balance between modern lines and pretty crochet lace - because it features them both in one super wearable free crochet cowl pattern. Double the thickness means double the warmth - and twice the style! You can flip it over to match your outfit or your mood - or fold it to show off both sides at once.
Disclaimer: This post includes affiliate links.
Prefer an ad-free PDF? You've got options!


Prefer the free blog version? Keep scrolling!

Snow Drops Reversible Cowl
Add this pattern to your Ravelry Queue and Favorites
US-I, 5.5 mm hook - Furls
500 yds LB Collection Superwash Merino (DK/8ply weight yarn; 306 yds/280 m; 100 g/3.53 oz)
Color A - Ivory: 1 ball - 200 yds
Color B - Eggplant: 1 ball - 300 yds
Gauge: 16 sts x 12 rows = 4" in Part 2 st pattern (dc in 3rd loop row and hdc row alternating)
Finished Size: 7.5" wide x 17" wide laid flat (34" around)
To customize the size: Begin with any multiple of 10 sts.
Matching Snow Drops Hat (free crochet pattern)
NOTES:
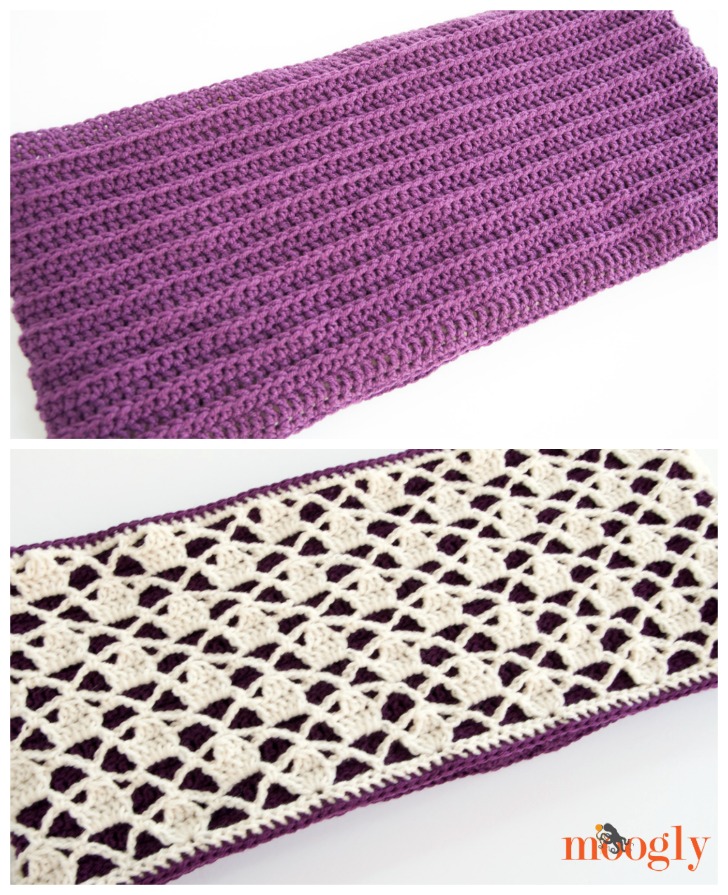
- This cowl is made in two parts that are then crocheted together. Each part uses just one color/ball of yarn.
- If you prefer not to use foundation stitches, you can start each piece as follows, then go to Round 2 of the pattern pieces:
Round 1: Ch 141, skip the first ch, sc in remaining chs; join to work in the round. (140 sc) - Helpful tutorials: FSC (foundation single crochet); working in the "3rd loop"
PART 1 INSTRUCTIONS (the lace side) - Color A:
Round 1: FSC 140, join to work in the round. (140 sts)
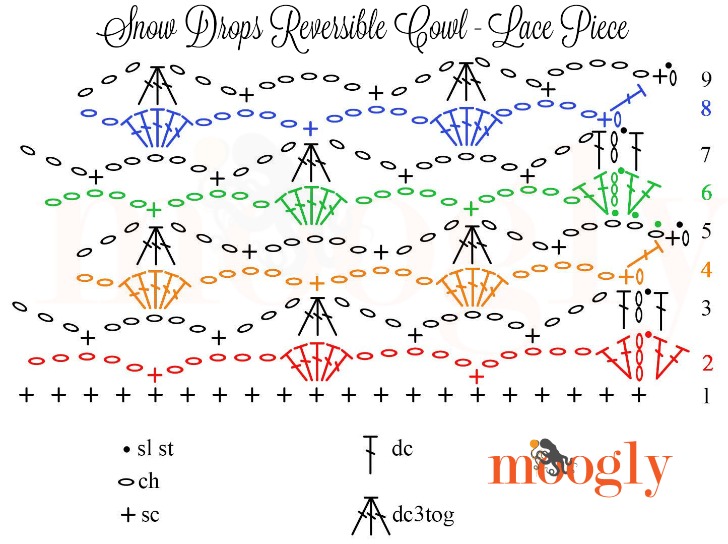
Round 2: Ch 3 (counts as 1st dc), 2 dc in 1st st, *ch 5, skip 4 sts, sc in next st, ch 5, skip 4 sts, ** 5 dc in next st; repeat from * around, finishing last repeat at **, then 2 dc in 1st st of previous round (same st as ch 3 and 2 dc); join to top of ch 3. (14 5-dc shells)
Round 3: Ch 2, skip 1st st, dc in next st, *ch 3, skip next st, sc in next ch-5 sp, ch 5, skip next st, sc in next ch-5 sp, ch 3, skip next st, ** dc3tog over next 3 sts; repeat from * around, finishing last repeat at **, dc in last st, join to 1st dc of round. (14 dc3tog sts)
Round 4: Ch 1, sc in 1st st, *ch 5, skip ch-3 sp, skip next st, 5 dc in next ch-5 sp, ** ch 5, skip next st, skip ch-3 sp, sc in next st; repeat from * around, finishing last repeat at **, ch 2, dc in 1st st of round. (14 5-dc shells)
Round 5: Ch 1, sc in 1st st, *ch 5, skip next st, sc in next ch-5 sp, ch 3, skip next st, dc3tog over next 3 sts, ch 3, skip next st, ** sc in next ch-5 sp; repeat from * finishing last repeat at **, join to 1st sc of round. (14 dc3tog sts)
Round 6: Sl st in next 3 chs, ch 3 (counts as 1st dc), 2 dc in same ch sp, *ch 5, skip next st, skip ch-3 sp, sc in next st, ch 5, skip ch-3 sp, skip next st, ** 5 dc in ch-5 sp; repeat from * finishing last repeat at **, then 2 dc in 1st ch-5 sp (working over the sl sts made at the beginning of this round); join to top of ch 3. (14 5-dc shells)
Round 7: Ch 2, skip 1st st, dc in next st, *ch 3, skip next st, sc in next ch-5 sp, ch 5, skip next st, sc in next ch-5 sp, ch 3, skip next st, ** dc3tog over next 3 sts; repeat from * around, finishing last repeat at **, dc in last st, join to 1st dc of round. (14 dc3tog sts)
Round 8: Ch 1, sc in 1st st, *ch 5, skip ch-3 sp, skip next st, 5 dc in next ch-5 sp, ** ch 5, skip next st, skip ch-3 sp, sc in next st; repeat from * around, finishing last repeat at **, ch 2, dc in 1st st of round. (14 5-dc shells)
Round 9: Ch 1, sc in 1st st, *ch 5, skip next st, sc in next ch-5 sp, ch 3, skip next st, dc3tog over next 3 sts, ch 3, skip next st, ** sc in next ch-5 sp; repeat from * finishing last repeat at **, join to 1st sc of round. (14 dc3tog sts)
Round 10 - 17: Repeat Round 6 - 9 twice.
Round 18: Ch 1, skip 1st st, *sc 5 in ch-5 sp, skip next st, sc 2 in ch-3 sp, sc in next st, sc 2 in ch-3 sp, skip next st; repeat from * around, join to 1st sc of round, break yarn and finish off. (140 sts)
PART 2 INSTRUCTIONS (the solid side) - Color B:
Round 1: FSC 140, join to work in the round. (140 sts)
Round 2: Ch 2 (does not count as a st), dc in each st around; join to 1st dc of round. (140 sts)
Round 3: Ch 1, hdc in each st around; join to 1st hdc of round. (14o sts)
Round 4: Ch 2 (does not count as a st), dc in 3rd loop of each st around; join to 1st dc of round. (140 sts)
Round 5 - 22: Repeat Rounds 3 - 4 nine times.
Round 23: Ch 1, sc in each st around; join to 1st sc of round. (140 sts) Do not break yarn, remove hook and place stitch marker in the active loop to keep it from pulling out during assembly.
ASSEMBLY INSTRUCTIONS - worked with Color B:
- Both pieces are worked in the round, so the right side is the one that was facing you as you crocheted. Turn Part 2 wrong side out, and place wrong sides together, with Part 2 on the inside of Part 1.
- Use stitch markers to attach top and bottom of both parts evenly.
- Replace hook in active loop of Part 2 and sc through both layers of top and bottom. (140 sts on each) Break yarn and weave in ends.
And now you have a reversible cowl! I love the way each side peeks out, however you wear it. And if you prefer long infinity scarves to cowls, just make the first round as long as you like, with any multiple of 10 sts. I hope you enjoy the Snow Drops Reversible Cowl!
The Fine Print
Written pattern copyright Tamara Kelly 2015, all rights reserved. Please do not reprint or repost this pattern, but please do link to this page to share this pattern with others. If you wish to make items for sale from this pattern, or translate it to another language, please visit the About page for details. Thank you to Lion Brand Yarn for providing the yarn for this pattern!


WheelyBad says
Stunning, thank you so much for sharing this with us 🙂
Tamara Kelly says
Thank you so much! 😀
Sharon says
This is beautiful I've never done anything like this before so I'm going to give it a try. Thank you for sharing.
Tamara Kelly says
Thank you Sharon!
Paige says
Love this! Saw on Facebook. Is there a printable version for easy printing?
Tamara Kelly says
Yes! The green Print Friendly button at the bottom of the post creates a clean print copy. 🙂
Rachel says
I I love this feature! Makes it so easy to print!
Tamara Kelly says
Thank you Rachel!
Deborah zotian says
Beautiful! Is it available on Ravelry as well?
Deborah zotian says
And if I look closely, I would have seen the link to Ravelry! I've added it to my library. This will definitely be a holiday gift to someone - maybe me!
Tamara Kelly says
😀 Thank you Deborah!
Robyn Lehman says
I think I just found this years Christmas gifts! How beautiful and looks like it works up pretty quickly!
Tamara Kelly says
It does indeed! Thank you Robyn!
Judy says
I must echo the "STUNNING" comment. I saw a cowl like this recently, but it was knitted, and I filed a photo of it away, thinking someday I would try to figure out how to duplicate it in crochet. But I don't need to tax my brain or crochet skills when Tamara Kelly is on the job. This is exactly what I was looking for. You are truly amazing--thank you so much for sharing the pattern and your amazing talent.
Tamara Kelly says
Thank you so much Judy! 😀 I really appreciate it!
Stevie Baucom says
I love this!! I might try to make it into an infinity scarf that can wrap and you can see both sides all the time 🙂
Tamara Kelly says
Thank you Stevie!
Joanne says
TK...This is awesome ... thank you so much for this pattern...You are so good to us lovers of crochet. <3
Joanne bailey says
Tammy,
This pattern is so beautiful. I appreciate how you share so much of your beautiful work.
Thank you so much.
Tamara Kelly says
Thank you so much Joanne!
Kitten With A Whiplash says
I'm not the biggest fan Cowls ever had, but this is truly exceptional. I loved Judy's comment ... since I cannot crochet any more, I saw this as an inspiration to design a knit version. But now I'll search around and see if I can save on my "taxes" too! Either way I'll still save this.
Tamara Kelly says
🙂 Thank you!
Erika White says
This is absolutely beautiful....... May all your Birthday wishes come true!!!!! Take the day and enjoy!!!!
Tamara Kelly says
😀 Thank you so much Erika!
Shawne says
Thank you Tamara for another lovely pattern! 🙂
Tamara Kelly says
Thank you so much Shawne!
tess says
HELP... some how, when I am working with a pattern like this and it says...
Round 1: FSC 140, join to work in the round. (140 sts)
Round 2: Ch 2 (does not count as a st), dc in each st around; join to 1st dc of round. (140 sts)
I always end up one short... what am I doing wrong?
Tamara Kelly says
My guess is that you are not putting the first st of the second round in the first st of the first round. Since the ch 2 doesn't count as a st, you want to work the first stitch right in the first st of the previous round.
Fuego Azul says
Beautiful!! I can't wait to make this! 🙂
Tamara Kelly says
Thank you! 😀
cindyzs/freespiritczs says
happy birthday Tamara! 🙂
Vicke says
This is absolutely beautiful. You are one of my favorite designers and thank you for the free patterns!
Happy Birthday!
Vicke
Tamara Kelly says
Thank you so much Vicke!
April koenig says
I've been trying to download this... but all I'm getting is the first page... and I the only one? I've tried numerous fixes with my computer and interwebs, but can't get it to change.... any suggestions? Anyone else have this problem?
Tamara Kelly says
Sometimes things glitch... CleanPrint.com is another option.
Gabi says
Thank you for the Beautiful pattern.
I think if you add a diagram It could be more understandable.
Tamara Kelly says
I'll see what I can do, thank you Gabi!
Patricia B says
This is beautiful! I think I'll even play around with the colors. Thank you for another great pattern.
Tamara Kelly says
Thank you Patricia!
Nicole says
I agree, this cowl would be a lovely gift! Spending a relaxing afternoon working on this pattern, while also watching a movie with my kids. Thank you.
Tamara Kelly says
Thank you Nicole!
Teresa johnson says
on the I don't know what is meant by the third loop on Part 2, Round4, "Round 4: Ch 2 (does not count as a st), dc in 3rd loop of each st around"
Could you explain this, please?
Thank you!
Teresa johnson says
found it! https://www.mooglyblog.com/third-loop-half-double-crochet/
Tamara Kelly says
Yes, it's also linked in the pattern a bit below the yarn and hook. 🙂
Rachel says
I have been looking for something to crochet that inspires me and I think this is that pattern! Thanks for sharing it with us. This will be the perfect Christmas gift for my mom!
Tamara Kelly says
Thank you! 😀
Chere says
Beautiful! Working on it now and I have a question, on round 6 when I slip stitch into the chain 3 it bunches up and looks funny. Am I doing this right or am I missing something? Thanks!!
Tamara Kelly says
Hi Chere! I don't know why it's bunching - slip stitching into the chain will make it a little bit thicker, but it shouldn't really bunch up. You might want to try making your sl sts a little bit looser.
Chere says
Hi thanks for taking the time to reply! I figured out what I was doing wrong. I totally thought you meant to sl st into the chain 3 space not into the next 3 chains lol goes to show I shouldn't try new patterns when sleepy! It's all finished now and turned out beautifully. Thank you again!! Have a lovely day!
Tamara Kelly says
Ah! Glad you got it figured out. 😀 Thank you!
Paige says
Currently working on this and loving it.
Questuion - on round 4 of the lase, there is no mention to join. Am I supposed to slip stitch to the chsin one?
Paige says
And round 8? There is not note how/where to join? Or am I missing it?
Tamara Kelly says
In Round 8, you don't sl st join, you work a dc in the 1st st of the round instead, so that just like Round 4, it *looks* like you've finished in the center of a ch-5. This puts you in the right place to start the next round.
Tamara Kelly says
Hi Paige! At the end of Round 4, instead of joining, you dc in the 1st st of the round. This is done to move the start of the next row to look like it's in the middle of a ch-5. 🙂
Kia sadler says
Beautiful pattern! But I have a question on the solid part. Round 4: Ch 2 (does not count as a st), dc in 3rd loop of each st around; join to 1st dc of round. (140 sts)
I don't understand what you mean by 3rd loop. Please help!
Thanks!
Kia
Kia sadler says
Ok I found your video on 3rd loop, so for this pattern is it the back 3rd loop or the front 3rd loop?
Thanks!
Kia
Tamara Kelly says
Hi Kia, thank you! This is the 3rd loop in the back of the hdc sts.
Tatiana says
Beautiful design and thank you for the pattern ,but I can't find the yarn anywhere. is it new, where can I buy it?
Tamara Kelly says
Hi Tatiana! It's available through the Lion Brand website, linked in the list of materials. 🙂
Tiffany says
I'm following the pattern as written, and the join stitches are coming out a huge mess. Can you offer any advice? I've frogged it at least three times, and still can't get it to look correct.
Tamara Kelly says
Hi Tiffany! I'm sorry you're having trouble. I'm not sure what you mean by huge mess. Are you referring to the sl st join at the end of most rounds? Or when you sc the two pieces together?
Maria J says
Help!!!
I'm doing this pattern as we speak and I'm stuck at the end of round 4. Where do I put the the last double crochet. I'm so lost and confused. I'm stuck at this part:
"around, finishing last repeat at **, ch 2, dc in 1st st of round. (14 5-dc shells)"
I don't know what that means?
Read more at https://www.mooglyblog.com/snow-drops-reversible-cowl/#a1KQGULkQJOwKOOx.99
Tamara Kelly says
Hi Maria! The first stitch of Round 4 was a sc in the first st. Instead of joining at the end of this round, work a dc in that first sc. This way you finish this round at what looks like the middle of a ch-5 - this is done to set up the next round. 🙂 Does that ehlp?
Paige says
That does help me as I had a question about this as well! Thanks.
Maria J says
After the last 5dc she'll do I ch 2 or 5 at the end of round 4
Tamara Kelly says
After the last 5 dc shell, you ch 2 and dc in the first sc of the round. 🙂
Maria J says
Also the beginning of round 5 confuses me as well
Maria J says
In the beginning of round 5 it says to ch 1 and do a sc in the 1st St. Is the first St as the dc.?
My next question is what does this mean :
"Ch 1, sc in 1st st, *ch 5, skip next st, sc in next ch-5 sp, ch 3, skip next st, dc3tog over next 3 sts, ch 3, skip next st, ** sc in next ch-5 sp;"
Because after I do the sc I have the chance 5 from the previous row and the 5 dc .
Tamara Kelly says
You can sc in the dc, or in the "ch sp" that the ch 2 and dc create.
After the first sc, you should come to a st and the next ch-5 sp of the previous round, before you get to the 5 dc. The dc3tog is in the center 3 sts of the 5 dc.
Diane says
Looks beautiful some lucky teacher is going to get one. Thanks for sharing.
Tamara Kelly says
Thank you! 😀
Cheyanne says
GORGEOUS!!!
Gabi says
WOW!
It's so easy for me now!
Thank you very much!!!!!!! for diagram.
Maria J says
Is there a diagram?? Diagrams are so much easier for me
Tamara Kelly says
I added one for the lace portion just the other day. 🙂 It's right there on the pattern page.
Tamara Kelly says
🙂 I'm so glad to hear it, thank you Gabi!
Debra W says
Hi Tamara,
How do you connect a FSC in the round without having a gap at the other side of the connecting stitch? Hopefully that makes sense.
Tamara Kelly says
Hello Debra! I have a tutorial on that - Click Here. 🙂
ZAHRA says
I LOVED THIS ONE SO MUCH.
I ACTUALLY LOVED ALMOST ALL YOUR PATTERNS
YOU ARE MY FAVOYRITE EVER
THANK YOU TAMRA
WARM EGYPTIAN GREETINGS 🙂
Tamara Kelly says
Thank you so much Zahra! 🙂
Hendrike says
Thank you for yet another beautiful pattern! Very good explanation so its easy to make.
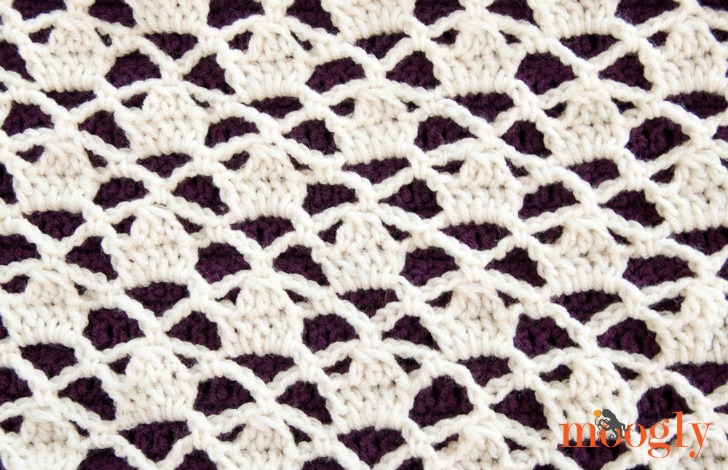
I love the lace part and it comes out so nicely against the dark solid side.
Greetings from a crocheter from Holland
Tamara Kelly says
Thank you so much Hendrike! I appreciate it!
Sam C. says
Hello there, I am commenting to tell you that I love this pattern so far. I just wanted to suggest that you make an alternate instruction for the third loop round. For left handers, the third loop will be on the side that is away from us, so working in the round on those rows will not work. What I suggest is adding a turn at the end of the row before the third loop row and a turn at the end of the third loop row( after joining to the first stitch of course). That way our faux knit will be on the same side each time and it will look like it is supposed to.
Tamara Kelly says
Hi Sam! Thank you! The 3rd loop used in this pattern is always on the side away from the crocheter, whether they are right handed or left handed. Or am I misunderstanding?
Patricia says
I really like this pattern; I wonder whether if it could be made into an infinity scarf that I could double around my neck. Do you know what the multiplier would be? Or maybe multiplier might not be the right word, but often patterns will have a formula for the initial number of chains - like they have to be a multiple of ? plus 3 chains. Thank you.
Tamara Kelly says
I think it would make a lovely scarf, and I did include the multiples in the pattern. It's listed under the yarn, hook and gauge info. 🙂
Heidi says
Is anyone else having trouble with the lace side being larger than the 2nd side? I ran out of yarn for the lace side so it was a couple rows shy of the size it should have been yet it still seems much larger than the 2nd side. I'm assembling it now but am afraid the lace is going to sag. I'm planning on making a couple of these for Christmas gifts. The pattern is well written and is working up nicely. I'm wondering if on future ones if I should make the lacey side with a size smaller hook maybe?
Tamara Kelly says
Hi Heidi! Individual variations in tension can definitely have that effect. I would make one side and then make the other side to match - however many rows that works out to be. It would probably be easier to adjust the solid side. 🙂
Teresa says
The lace side of mine did seem a little wider, however I figured it was due to being a different type of yarn and I tend to crochet looser as I go along, and I made that side after making the solid side. Once I completed the cowl, I washed it and it looks great.
Posted photos in Ravelry username Terranda.
Jacky says
Please can I get some help ???
Round 3: Ch 1, hdc in each st around; join to 1st hdc of round. (14o sts)
Round 4: Ch 2 (does not count as a st), dc in 3rd loop of each st around; join to 1st dc of round. (140 sts)
Round 5 – 22: Repeat Rounds 3 – 4 nine times.
Is Round 4 missing something? If I am DC in the 3rd loop of each st around am I skipping two stitches?? Then I am not doing 140 stitches right??? I am confused.
TIA
Tamara Kelly says
Hi Jacky! The 3rd loop of the hdc is a part of each hdc stitch. There is a link to the tutorial on how to do this at the beginning of the pattern. 🙂
Amy says
I'm having trouble joining the rows for the lace portion. Do I do the part after the two asterisks last or finish a row with the part before the two asterisks. So for example, in row 3, do I skip a stitch and the dc in the last stitch or do I dc3tog then dc? What is the "last stitch" exactly?
Tamara Kelly says
Hi Amy! I'll try to help, but please do reference the chart as well!
You make the repeat several times that goes beyond the ** asteriks, until the last repeat, which ends at the **. Then it depends what that line of instructions says next - sometimes there are more stitches, sometimes there are not. The last stitch refers to the last stitch left in the previous round.
In Round 3, at the end, you do not dc3tog, as that's after the **, you skip that and dc in last st.
Amy says
Ah, thank you! I'm a fairly new crocheter and never seen the diagrams so they are a little hard for me to follow but your clarification helped!
June says
Someone PLEASE tell me what the directions mean in reversible cowl under Part 2, round 4, where it says: "doc in 3rd loop of ea st"! What is 3rd loop? I've been crocheting for a number of years but have never heard this. I wish there was a video to show that! Can anyone describe how to find this loop?
June says
"Doc" above was typo- supposed tone DC (double crochet)
June says
Sorry I should have searched first. I found the YouTube video- very well done-clear and closeup video-Tks re 3rd loop.
Tamara Kelly says
I'm glad you found it, thanks June!
June says
Confused: lace side-rd3: ch2 skip *1st (*which looks like 4th dc in 5-cluster below), dc in next (which is the 5th in cluster below), ch 3 skip next st<-skip what next st? There's only a ch5 "next"...
After "finish last repeat" you say to DC in last st- what last st?--after sc in ch5 k
& ch3 what's left on previous row is the 5 dc cluster, which has a ch2 and *1dc in it from beginning of row. ..then you say to join to 1st doc of round- which I guess is * to left of ch2-- but I still can't find where that DC goes
Round4-if joined to the only dc, as st to rt is ch2 & say to CH1 & sc in 1st st- what 1st st? My next st in row below, which to me looks like a 1st st, is the sc, which has a ch3 before it. --- to make this clearer, what I see at beginning of rd (that I'm trying to figure out your words to end row & start next), is: ch3, a skipped st then 1 dc, ch3, sc, ch5,sc, ch3, and dc3tog...etc
Tamara Kelly says
Hi June! Did you check the chart? That should answer your questions.
June says
Replying to your last reply to me: yes I looked at chart but it's the exact description of ending and starting I cannot fit into pattern. I sent exact details why. NEVERMIND if you can't answer. This anyway.
Tamara Kelly says
I asked about the chart because the chart includes the beginning and ending of the rounds.
JMMMacKEY says
Thank you for this lovely pattern. I'm usually a knitter, but am excited to make this crochet pattern. Your thoughtful and helpful responses to the the questions is amazing. I'm truly grateful for your talent and generosity.
Tamara Kelly says
Thank you!
June says
I relooked over the pattern, since had trouble at end & beginning of some rows description, I then tried to compare pattern(diagram) to description and one area on pic I don't understand and appreciate it if you would tell me more--that being what and where does that slanted dc fit at beginning of rows 4 & 8? It looks like the row begins with a chain, (where did it join after 3chains?) then it shows sc and that slanted dc comes out of sc slanted to right--what's that mean please?
Tamara Kelly says
Hi June! Those round start with ch 1 and sc, and finish with a dc worked into that first sc. This sets you up for the next round. The dc takes the place of 3 chs, putting you in the middle of a ch-5, so you can work the first st of the next round in the middle of the "ch-5" sp. Does that help?
June says
Yes that helps- Tks Tamara!!
I also wondered how your lace lays so flat on purple! After stitch together you wash- since yarn says washable I guess put in washing machine will be ok? Then what? How to get flat as mine has bilges and bumps.
Tks ahead again for help and hope you have blessed Tksg too!
Tamara Kelly says
Hi June! I'm so glad! For washing small handmade items, I generally recommend hand washing. Then you can gently reshape and lay flat to dry, which is a mild form of blocking.
Janet says
Can you suggest any acrylic yarns for this pattern? My recipients are allergic to wool.
Tamara Kelly says
Lion Brand Babysoft, Jamie DK, or Vanna's Sequins would all be great DK weight substitutes, or since it isn't a fitted garment, you could bump up to Vanna's Choice! 🙂
Lea Ann says
Hi. Great pattern. When joining the two pieces together do you only join one side?
Tamara Kelly says
Thank you! I joined both sides. 🙂 But you could play with only joining one - might get some neat looks out of it!
Catie says
I am having trouble going from row 4 to 5. I have the right amount of 5dc clusters. I ended row 4 with a 5dc cluster-ch3-doc in last stich.
I then ch1 and sc in first stich. But the pattern has me skipping my last 5dc cluster.
I am a 15 yr crocheting veteran. But this does not make sense to me. Please help.
Tamara Kelly says
I'm sorry you're having trouble Catie, have you checked the chart?
Betsy says
I am so totally in love with this pattern. I'm a very very seasoned crocheter and am confused with what you mean by "3rd loop" in Round 4: Ch 2 (does not count as a st), dc in 3rd loop of each st around; join to 1st dc of round. (140 sts). Please clarify. Thank you for this gorgeous pattern!!!!!
Betsy says
Ok......I finally read thru all of the comments and also found the YouTube video! It was very helpful. I've actually done this technique before but don't remember it being called the 3rd loop. Oh well.
Tamara Kelly says
There aren't many official names in crochet, it can certainly make things confusing sometimes! 🙂
carowick says
Thank you for sharing. Beautiful!!!!
Corinne says
Could you create a graph of row 18 (lace side) ?
Tamara Kelly says
Graphs take a few hours to make, can I try to walk you through it instead? Looking at row 9 (which is the same as row 17), going right to left:
work 5 sc in the ch-5 sp,
skip the sc,
work 2 sc in the ch-3 sp,
sc in the top of the dc3tog,
work 2 sc in the ch-3 sp,
skip the sc,
start again from the first step.
Does that help?
Lisa says
I am having a problem with understanding some of the directions. EG - Row 6, sl in first 3 ch. I can't get my hook in those tiny chains at all, am I doing something wrong?
Tamara Kelly says
It sounds like your chains may be too tight! But you can just sl st around the entire chain if needed. 🙂
Lisa says
I was really hoping you'd say that 😀
I don't have enough experience yet to make on the fly alterations confidently, so I appreciate you taking the time! 🙂
Tamara Kelly says
My pleasure, glad I could help! 🙂
Clara says
Dear Tamara,
thank you so much for your beautiful pattern! It's great!!!!
I just finished my cowl (i did it longer to wrap it two times around my neck - super cozy 🙂 ) - and I'm in love. I think, I'm going to wear it the rest of the winter non-stop.
So, thanks a lot and best wishes from Germany
clara
Tamara Kelly says
Thank you so much Clara! Best wishes to you too!
Erin says
For the lace side, row 3, do you 2dc into the chain space or into the next st?
Erin says
Round 2 not 3 sorry!
Tamara Kelly says
2 dc in 1st st of previous round (same st as ch 3 and 2 dc) - this is the first stitch of Round 1 that you are working into, the same stitch you started working into in Round 2. 🙂
Angela says
Hi, thank you very much for sharing this pattern! I'm making the cowl right now and I'm very excited about it :).
Could I ask why, in the chart, the 5dc shells are drawn as 4-dc shells? Is this a charting convention I'm not aware of?
Tamara Kelly says
Thank you Angela! But I think if you look again, you'll see there are 5 dcs in the shells in the chart too. The exception is the shell that's made at the join, where a ch-3 counts as the center dc of that shell. 🙂
Kathy says
Such a beautiful scarf! But then again, all your patterns are.
Am I understanding correctly that the "bumpy" side of Part 2 goes to the inside and that it is the smoother side that faces out? Though I do like the look of the ridges a lot, I also noticed that the place where the rounds join appears much more prominently on the bumpy side and on the smooth side.
Tamara Kelly says
Thank you so much Kathy!
I put it together so that the bumpier side faces out, as I like the look, but you can flip it around if you like the other side best! 😀 It's up to you!
June says
Thank you so much for your beautiful pattern! I hope you don't mind that I posted about my experience making this amazing scarf on my blog! (http://wp.me/p6XPDk-dZ)
Tamara Kelly says
It's lovely June!! Thank you so much for the write-up!
Cynthia Philip says
I am allergic to wool. What would be the next best type of yarn to use?
Tamara Kelly says
Any yarn of the same weight should work! 🙂
Laura says
I figured out what the 3rd loop was, I haven't heard it referred to as this, but are we dc in the 3rd loop on the front or back of the hdc?
Tamara Kelly says
Hi Laura! In the back is the traditional placement, and the one used here. 🙂
Hannah says
Hi! I absolutely love this pattern and am going to try to make it for a friend-my question is, can I use a thinner yarn like cotton and have it work out? Or would it be better to just go with the bulkier yarn? Thanks
Tamara Kelly says
Hello Hannah!
This pattern calls for a DK weight yarn, but if you wanted to go even thinner, you could add 10-20 sts to the beginning chains. 🙂
Amy Robertson says
Just curious about the end/beginning of the pattern. Mine looks a bit wompy. I've looked at the diagram; maybe mine matches.
Can I post or email a photo?
Love the pattern! I'm making it for a friend.
Tamara Kelly says
Hi Amy! Unfortunately I don't have the capacity to host photos here in the comments, but you can use the Contact Me button in the menu bar up top to email me! 🙂
Dove says
Do you happen to have a matching hat?
Tamara Kelly says
Coming very very soon! 😀
LOUISE says
Yikes! I have seen so many people having problems with this that I am almost afraid to try it.
I am writing to ask a very simple question when compared to theirs. You have used a FSC at the beginning of the pattern and I was wondering why. Is it better to use this than the chain method, does it make a difference to how it looks overall and if I can't get the hang of it how do I start normally please???
I ask because I am a fairly new crocheter.
Yours in yarn
Louise
Tamara Kelly says
Hello Louise!
I used a FSC because it is so much stretchier! But if you don't want to use it, you can start use the alternate instructions included in the pattern notes above. 🙂
Sue says
I love this pattern so much, thank you!!. Is there a glove pattern to match, or could you suggest one? Iv looked around and couldnt see one but i may have missed it somewhere.
Tamara Kelly says
Only a hat at this time, I'm afraid. But thank you! 😀
Suw says
Ok thank you! My cowls nearly finished, beautiful pattern
Tamara Kelly says
😀 Thank you!
Laura says
Do you have a video tutorial for the lace side? I am having a hard time with the instructions.
Tamara Kelly says
Not at this time, I'm afraid. Just the chart.
Dawn says
Hi there! Love the blog and your video tutorials. I've recently finished the Fortune's Wrap and now working on the Snowdrop cowl. Just wondering for the cowl, when working row 4, are we to work into the 3rd loop on the front or on the back or does it matter so long as we're consistent every time we repeat the row?
Tamara Kelly says
Hello Dawn, and thank you so much! You'll want to use the 3rd loop that's in the back. 🙂
Sheila Petersen says
I want to make this. Is there a video you've done for it.
Tamara Kelly says
Hello Sheila! I have not, but I'm happy to help you with any questions! 🙂
JULIA says
Thank you so much. Currently making this as a Christmas gift for my mum... but I'm going to have to make myself on too! Beautiful, simple and quick xx
Tamara Kelly says
😀 Thank you - and Merry Christmas!
Joan Arnold says
Hi, Tamara! I'm trying this pattern out now, and just like a lot of the others that left replies, the end of the 4th round of Part 1 is confusing me. For clarification, from what I read from your replies to others, after the last ch5 repeat, it's ch2 then dc in sc from the beginning, then chain 1 to sc in ch2-dc space from previous round, or is it just sc, in the ch2-dc space from previous round, with a ch1 to join the end of round 5 to the beginning sc? Please help.
Thanks!
Tamara Kelly says
Hi Joan! To finish Round 4, after working 5 dc in the last ch-5 sp, you ch 2, then dc in the sc that started Round 4. There is no slip stitch join for this round - it is completed with that dc. To go to Round 5, just ch 1 (does not count as a st) and sc right back in that dc and then go from there. 🙂 Does that help?
Joanne says
Even after 5 years.....still outstanding. Thanks for sharing
Tamara Kelly says
Thank you so much, Joanne! ♥