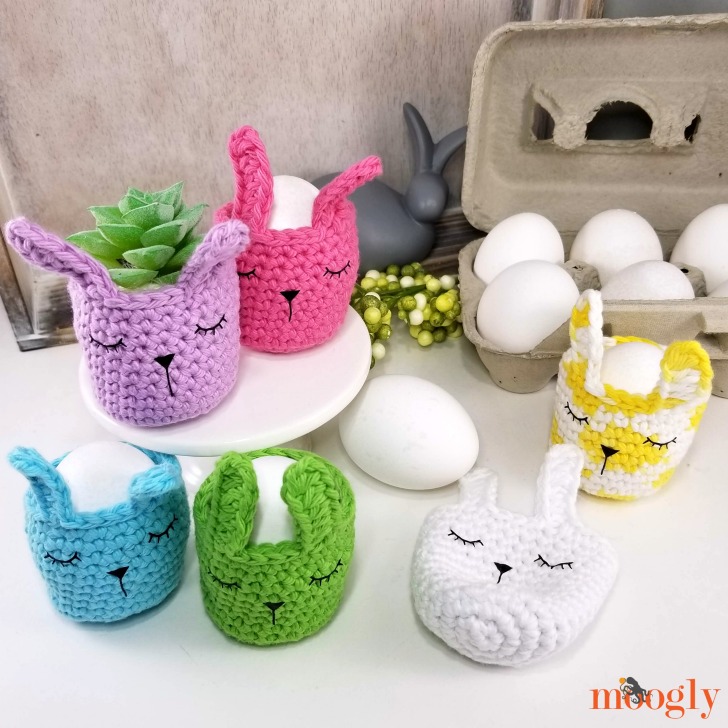
The Sleepy Bunny Egg Cozy combines two of my favorite crafts - crochet and Cricut! Make these adorable mini egg baskets as re-useable green Easter decor with the free pattern below!
Disclaimer: This post includes affiliate links; materials provided by Yarnspirations, Furls, and Cricut.
Prefer an ad-free PDF?


Prefer the free blog version? Keep scrolling!
No Dye Needed!
The Sleepy Bunny Egg Cozies are a great way to "decorate" your eggs without making a mess! You can do all sorts of color themes by child for egg hunts, or just pick your favorite colors!

Perfect Little Stashbusters
Egg cozies use less than 20 yards of yarn each! So I grabbed a bunch of my Red Heart Scrubby Smoothie stash and whipped these up - so cute and fun! Lily Sugar'n Cream is a great substitute too. I do recommend sticking with 100% cotton if you're doing the iron-on eye and nose though. If you use buttons or embroidery instead, you can use any fiber!

Sleepy Bunnies by the Dozen
I really enjoyed making these Sleepy Bunny Egg Cozies - and I hope you will too! They are just so cute and happy and bright, and will be a part of our Easter celebrations for years to come.

Sleepy Bunny Egg Cozy
Add this pattern to your Ravelry Queue and Favorites
US - G, 4.00mm hook - Furls
20 yds Red Heart Scrubby Smoothie (100% cotton; 4/Medium/UK 10-12 ply)
Colorways shown: Coral, Caribbean, Lime, Lavender, White, and Sunshine (20 yds per cozy)
This yarn has been discontinued. Recommended substitutions: Lily Sugar'n Cream, Bernat Handicrafter, Premier Cotton Sprout Worsted, WeCrochet Dishie
Stitch Markers - Clover
Cricut Maker - optional
Cricut Everyday Iron-on Vinyl - optional
Cricut BrightPad - optional
Cricut EasyPress Mini - optional
Gauge: 1.5" across after Rnd 4
Size: Fits one large egg; 2.5" tall x 3" wide laid flat
Helpful Links and Tutorials
Sleepy Bunny Egg Cozy Tutorial
Notes:
This pattern is worked in a spiral, do not join with a slip stitch at the end of each round, and only ch when indicated. Use a stitch marker to mark the first stitch of each rnd to help keep track.
If preferred, use small buttons or a bit of black yarn to create the face of the bunny.
Sleepy Bunny Egf Cozy Crochet Instructions
Rnd 1: Make a magic circle, ch 1, sc 6 in the ring. (6 sc)
Rnd 2: 2 sc in each st around. (12 sc)
Rnd 3: *Sc in the next st, 2 sc in the next st; rep from * around. (18 sc)
Rnd 4: *2 sc in the next st, sc in the next 2 sts; rep from * around. (24 sc)
Rnd 5 - 14: Sc in each st around. (24 sc)
Ears: *Ch 7, skip ch closest to the hook, hdc in next 6 chs,** sl st in next 5 sts of Rnd 14; rep from * to **, break yarn, seamless join to next st of Rnd 14.

Cricut Instructions
1. Find the File: In Cricut Design Space, open up a New Project, and search the Images for the Cricut Access file "Bunny Doll Face #M3AAF089" and open it up into your project. I tried to make a clickable project - this link may or may not work, but if we're lucky... click here. (If this link does work for you, skip to Step 3!)

2. Prep the Image: I wanted to move the nose up closer to the eyes, rather than how it is shown. To do this, you can use a simple shape (I just used the square) and the Slice tool!
Put the square over the nose, and select both the square and the face files on the right.

Click on Slice at the bottom right, and suddenly you should have a bunch more files!

Go ahead and turn off the other layers, until all that's left are the eyes and the nose.

Now you can move the nose closer to the eyes, change the size of the nose if desired (I made it smaller), and attach them so that they stay put.

Finally, duplicate the face as needed to make however many cozies as desired!

Be sure to highlight and attach them all so they don't move around when it's time to cut!

3. Cut, Weed, and Cut Again: Using your Cricut Maker or Explore Air 2, cut the vinyl - no need to mirror this cut!

Using the BrightPad, weed the vinyl so only the faces remain. Use scissors to cut each face into it's own square.

4. Iron-On the Faces: Using the EasyPress Mini, add a face beneath each pair of ears!


Happy Easter!
And that's how to make your own Sleepy Bunny Egg Cozy! I hope you've enjoyed this free Easter crochet pattern - I've got two more egg cozy patterns in store for you over the next week, and then there will be a video tutorial for all three!

If this pattern inspires you to make your own project, and you post a photo on social media, be sure to tag me @mooglyblog or #mooglyblog so I can check it out too!
THE FINE PRINT
Follow Moogly on Facebook, Twitter, Pinterest, Instagram, and TikTok! Thank you to Yarnspirations and Furls for providing the materials shown in this post. Written pattern copyright Tamara Kelly 2020, all rights reserved. Please do not reprint or repost this pattern, but please do link to this page to share this pattern with others.
If you wish to make items for sale from this pattern or translate it to another language, please visit the About page for details.


Jackie says
I want to “hop to it “ and make these adorable bunnies. So cut !
Tamara Kelly says
Thank you so much! ♥